TiVo CI_Install_0327_1.0 User manual
- Category
- Digital Video Recorders (DVR)
- Type
- User manual
This manual is also suitable for

2013
TIVO
®
WHOLE HOME INSTALLATION
© 2013 TiVo Inc. All rights reserved. TiVo, the TiVo logo, the Thumbs Up logo, and the Thumbs Down logo are trademarks or registered
trademarks of TiVo Inc. or its subsidiaries worldwide. iPhone and iPad are registered trademarks of Apple Inc. Android is a trademark
of Google Inc. CableCARD is a trademark of Cable Television Laboratories, Inc. Imagery from Tribune Media Services. All other
trademarks are the property of their respective owners. Custom.TiVo.com CI_Install_0327_1.0
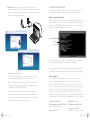
Need additional technical support? Email a specialist at [email protected].

One: What You Need
Hardware
A standard TiVo whole home setup requires at least one TiVo DVR, a video
source (cable or antenna, depending on the model), and a fast Internet
connection.
Connections:
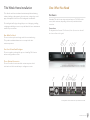
The diagram below illustrates TiVo Premiere (Series 4) connections that will
be referenced later in this guide.
Broadband/
Network Download
Power
Remote Activity
Record 1
Record 2
Video Format
Record 3*
Record 4*
External Storage
(eSATA)
Component
Composite
Digital Audio
(optional)
HDMI
Cable/MoCA
Ethernet (Gigabit)
USB
A/C Power
CableCARD
™
(multi-stream only)
01
*Recording indicators for tuners number 3 & 4 are only available on 4 tuner models.
TiVo Premiere 4 and TiVo Permiere XL4 share the same chassis and input/outputs.
The entry level TiVo Premiere includes an additional coax connector for an HD Antenna.
TiVo Whole Home Installation
TiVo offers the world's most advanced entertainment platform featuring
industry-leading recording capacity, the most tuners, cutting-edge control
apps, and unparalleled access to all the leading web entertainment.
This install guide will help you through the process of designing, installing,
configuring and adding accessories as you build a whole home entertainment
network for your customers.
One: What You Need
This section shows you how to design a whole home network using
TiVo products and what infrastructure is necessary for the best
customer experience.
Two: How To Install and Configure
This section guides you through the process of installing TiVo Premiere
and our most popular accessories.
Three: Optional Accessories
This section outlines how to extend the customer experience both
inside and out of the home with easy-to configure accessories.
CUSTOM.TIVO.COM

Whole Home Installation:
TiVo DVRs require one of the following networking
connections and a digital signal via a CableCARD
(or HD antenna).
Ethernet:
An RJ-45 Ethernet connection at all Whole Home-enabled product locations.
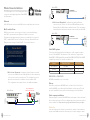
MoCA enabled Coax:
MoCA injects Internet connectivity into a home's coax network allowing
each DVR to operate without an Ethernet or Wireless connection.
Coax based networking require the feature to be enabled on the four tuner
DVR. To enable MoCA start at Tivo Central > Settings > Network & Phone >
Change network settings > Enable MoCA. See screen shot below.
1. Whole Home “Homerun” configuration (typical) requires a coaxial
connection at all Whole Home-enabled product locations and access
to the open port on the network router. This configuration is used
when the router/switch is in a different location than the DVR.
This configuration also requires the use of an additional adapter.
At the Router:
At the DVR:
2. Whole Home “Daisychain” configuration requires an Ethernet
connection at the location of a four-tuner DVR and Ethernet and/or
Coaxial at all other Whole Home-enabled locations. This configuration
is used when the router/switch is the same location as the four tuner DVR.
CableCARD options:
To decrypt cable channels with a third-party box, cable companies require
the use of a CableCARD. Two variations of this card exist, a Single-stream
CableCARD (S-CARD) and a Multi-stream CableCARD (M-CARD). CableCARD
compatibility varies by TiVo model; see chart below.
OBTAINING A CABLECARD:
M-CARDs are available in one of two ways:
Pick up:
Customers can pick up an M-CARD from a local cable office. Not all offices
stock CableCARDs, so installers should call ahead to verify inventory. The pick
up option is available from any cable provider that supports self-installation.
Cable company installation:
Customers may opt to have a CableCARD delivered as a part of their cable instal-
lation order in some regions. This often happens when someone has a new line of
service installed. Visit: http://www.fcc.gov/guides/cablecard-know-your-rights
TiVoPro Tip:
Some cable companies also allow the account holders to authorize a custom installer to
pick up a CableCARD on their behalf. Check with your local cable company for details.
4 TUNER DVR
WHOLE HOME ETHERNET
Model
TiVo Premiere
TiVo HD
Ethernet Ports Speed
10/100/1000
10/100
Model
TiVo Premiere
TiVo HD
Cable Card Type
M-CARD
2 S-CARD(s) or 1 M-CARD(s)
Cable Card Slots
1
2
TiVo Series 3 HD 2 M-CARD(s) or 2 S-CARD(s) 2
MoCA enabled Coax
4 TUNER DVR
WHOLE HOME COAX
At the DVR:
Connect included coax
cable from here to Modem
ROUTER
MoCA
NETWORK
ADAPTER
02 03
CUSTOM.TIVO.COMCUSTOM.TIVO.COM

Two: How To Install
Begin TiVo DVR installation by connecting the power cord, and connecting
the box to the Internet via a wired or wireless connection. Next, establish
the cable source (or HD antenna: only for TiVo Premiere 2-tuner DVRs) and
configure the device through the on-screen Guided Setup.
Networking Options
TiVo DVRs require an active network connection as a part of every standard
installation. TiVo DVRs have a number of networking options available to
accommodate various installation situations. Networking options vary based
on the size of the installation.
Ethernet:
This connection type is the fastest and most-reliable
connection available in homes.
04
Model
TiVo Premiere
TiVo HD
Ethernet Ports Speed
10/100/1000
10/100
Model
TiVo Premiere
TiVo HD
Cable Card Type
M-CARD
2 S-CARD(s) or 1 M-CARD(s)
Cable Card Slots
1
2
TiVo Series 3 HD 2 M-CARD(s) or 2 S-CARD(s) 2
Wireless:
Acceptable for rooms without access to a hard-wired connection.
TiVo manufactures a wireless N adapter for connecting to existing wireless
networks. This accessory offers two connection methods. Before beginning
installation, make sure the adapter is set to client mode. See diagram.
1. Wi-Fi Protected Setup (WPS): If the router supports this option,
connect the wireless adapter by pressing the WPS button and then
pressing the corresponding button on the wireless router. When the
device stops blinking, the connection is complete. Check the router’s
instruction guide to confirm the availability of this option.
Restore Factory Settings
Client
Bridge
Client
Bridge
05
Support for wireless a/b/g/n standards
CUSTOM.TIVO.COMCUSTOM.TIVO.COM

2. Manual setup: If the router doesn’t support WPS connections, a
laptop is needed to log into the web interface for the wireless adapter.
Before beginning this installation method, you will need the SSID and
passphrase for the wireless network.
Accessing the web interface:
•DisablethewirelessadapteronthePCbeingusedforsetup.
See individual manufacturer’s instructions, if needed.
•Connectthewirelessadaptercablestotheappropriateports.
•Openthecomputer’sbrowserandentertheadapter’sdefault
IP address (192.168.10.1) in the URL bar.
•Selectthenetworktojoinandenterthenetworkpassphrase.
•Oncetheconnectioniscompleted,removetheadapterfrom
the computer and install in the appropriate ports on the DVR.
•EnablethewirelessadapterPCusedforsetup.
06
ACTIVATING THE CABLECARD:
To activate an M-CARD correctly, the coaxial cable must be connected
to the back of the DVR before choosing to activate the CableCARD.
Cable-assisted installations:
Cable company installers need to access the CableCARD pairing screen
inside of the installer options screen when installing a TiVo DVR. The menu
displaying the CableCARD ID, Host ID, and Data ID is set to automatically
display on screen when a CableCARD is inserted.
If for any reason this screen does not appear, the guide below shows how
to navigate to the CableCARD menu to properly activate the CableCARD.
Self-installation:
Cable companies offer activation options for installations performed
without a cable-company installer present. The list below provides
activation information for common cable service providers. If you do not
see a self-installation phone number for the chosen cable service, please
check the cable provider information kit for help with self-installation.
Depending on the provider, the CableCARD ID and Host ID from the TiVo
DVR may be required. Follow the guide for navigating to the CableCARD
installer’s menu found in the cable-assisted installation section of this guide.
07
Setting & Messages > Settings > Remote, CableCARD, & Devices > CableCARD
Decoder > CableCARD options > CableCARD Menu > CableCARD
Comcast (877) 405-2298
Comcast Automated (800) 671-9094
www.comcast.com/activate
Cox (888) 556-1193
RCN (888) 891-7770
Time Warner (866) 606-5889
Verizon (888) 897-7499
www.verizon.com/fiostv/selfinstall
CableCARD ID
Host ID
Data ID
CUSTOM.TIVO.COMCUSTOM.TIVO.COM

Installing an antenna:
Connecting an Over-The-Air (OTA) antenna:
(2-turner Premiere only):
TiVoPro Tip:
When picking an antenna as a primary video source, the amplitude and design of an
antenna as well as the distance and direction of your OTA signals ultimately determines
channel selection. To determine the above information, visit antennaweb.org.
Installing a tuning adapter (optional):
A tuning adapter is a small set-top box that provides two-way capabilities,
so a TiVo DVR can transmit channel requests to the cable head-end.
(Does not support cable VOD.) In some areas, installing a tuning adapter
is required in order to receive broadcasting from a local cable company.
The tuning adapter must be compliant with the CableCARD(s) issued for a
customer’s account. Please see the diagram below for wiring configuration.
TiVoPro Tip:
The branding on the M-CARD will more than likely match the branding on the tuning
adapter, confirming their compatibility in most cases.
08
Complete Guided Setup:
Guided Setup will automatically run the first time you power up the TiVo
Premiere series box. The Guided Setup allows configuration of networking
and connectivity and automatically updates the operating system software
and program guide information. You can repeat Guided setup by going to:
TiVo Central (TiVo button) > Messages & Settings > Help > Restart or Reset
System > Repeat Guided Setup.
1. Begin Guided Setup: Review service terms, activate service (if necessary),
select your country and video output, and enter your ZIP or postal code.
NOTE: Boxes purchased from the TiVo.com store always come pre-activated.
If the box was purchased at a retail store or distributor, you can activate it
online at www.tivo.com/activate.
2. Choose TV programming source: Choose cable only if you are
using basic cable or CableCARDs. Choose cable & antenna if you are
using basic cable or CableCARDs and a digital antenna. Choose antenna
only if you are only using a digital antenna as your programming source.
IMPORTANT:Onlythe2-tunerPremieresupportsantenna.Youwillnot
see all these options on Premiere 4 and XL4.
3. When prompted, install the CableCARD. If you already have a Cable
CARD, install it, then call the cable provider to activate it, and then test the
channels. If you are waiting to pick up a CableCARD from the cable company
office, or you are not going to use CableCARDs, follow the prompts to continue
withoutCableCARDs.OnceyourecievetheCableCARD,insertitintheback
and follow the onscreen prompts.
4. Choose the network settings that will connect to the TiVo service.
5. Get setup information, choose a cable provider
(if using Cable or Cable & Antenna), and set up channels.
6. Get initial program information: TiVo service will connect to TiVo's servers
and download program information, including program titles, times, channels,
descriptions. This may also be the time when the TiVo box updates to the
latest software, which may take about 30 minutes.
7. W he n prompted, press the TiVo button to complete Guided Setup.
The box has one day of Guide data, but will soon make an additional connection
to the TiVo Service to get the full 14 days of Guide data. This completes the DVR
setup. Next, you can proceed to configure web entertainment services (Netflix,
Hulu Plus, Pandora, etc.) using on-screen menus and consider adding accessories
to further enhance the entertainment experience.
09
RF OUT RF IN USB POWER
CABLE
SPLITTER
CUSTOM.TIVO.COMCUSTOM.TIVO.COM

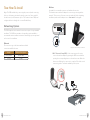
Three: Accessories
TiVo offers several accessories to extend and enhance the entertainment
experience both inside, and outside, the home. Each of these accessories are
easy to install and offer cutting-edge features and high value to the customer.
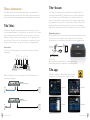
TiVo
®
Mini:
TiVo Mini is an IP-based solution and requires an active network connection
for every standard installation. TiVo Mini allows you to watch live TV or recorded
shows streamed from another TiVo DVR. It also lets you access content from
Hulu Plus, YouTube
™
, Pandora
®
, Spotify
®
and more. The TiVo Mini requires at
least one 4-tuner TiVo box to be on the network. Before installation, the device
must have been activated on the same account as the accompanying DVR.
Connections:
Select one of the following network connections based on the networking
configuration.
Make the following connections on the back of the TiVo Mini based on the
networking configuration.
10
TiVo
®
Stream:
TiVo StreamisastreamingaccessoryavailableforusewithiOS5.1devices*
or later and Premiere DVRs. TiVo Stream allows you to stream recorded shows
from a TiVo Premiere series DVR simultaneously to multiple mobile devices,
allows you to watch a show on a mobile device as it's being recorded and wire-
lessly transfer shows from your TiVo to a mobile device. Before installing, a TiVo
Stream must have been activated on the same account as the accompanying
DVRs. The TiVo Stream has its own TiVo Service Number on the bottom of the unit.
Networking options:
TiVo Stream can only be connected to a home network using an Ethernet cable.
This connection can be anywhere on the network, but TiVo recommends
placing the unit in close proximity to the wireless router (see diagram below).
TiVoPro Tip:
When using a MoCA enabled Whole Home network as an IP solution,
Stream can plug directly into the Ethernet port on a four-tuner DVR.
TiVo app:
AfreeappisavailableforiOS*andAndroiddevicesthat
provides second-screen interaction for Premiere DVRs.
11
Coax/MoCA
Component
A/V
HDMI
Ethernet
USB
12VDC
TIVO MINI
WHOLE HOME ETHERNET
TIVO MINI
WHOLE HOME COAX
TiVo
®
Premiere DVR
wired connection
(Ethernet or MoCA)
wireless
router
TiVo Stream mobile device
< Remote < Browse
< Search < Manage
CUSTOM.TIVO.COMCUSTOM.TIVO.COM
*iPad
®
, iPhone
®
and iPod touch
®

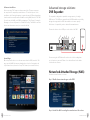
Software installation:
After connecting TiVo Stream to a home network, the TiVo app setup must
be completed on compatible portable devices. To finish this portion of the
installation, the following information is required: network SSID and passphrase
from the wireless network, and the Media Access Key (MAK) from the TiVo DVR.
You can locate the MAK on the DVR by navigating to TiVo Central > Settings &
Messages > Account & System Info > Media Access Key. The MAK is located on
the account information screen (see screenshot below).
Launch App:
OncetheportabledeviceisonthesamenetworkastheDVR,launchtheTiVo
app, enter the MAK if this was not already done, select the Setting tab in the
top left-hand corner, then select Setup TiVo Stream (see screenshot below).
12
Advanced storage solutions:
DVR Expander:
The expander is designed to expand the storage capacity of a single
DVR location. TiVo DVRs are compatible with eSATA hard drives specifically
designed to merge with the DVR onboard drive to increase capacity.
Verification of compatibility can be obtained from manufacturer.
Connect the device to the eSATA port on the back of the DVR.
Disconnecting the eSATA drive will result in a loss of all recording data
once it has been connected. Failure of one drive will result in the failure
of both drives in all cases.
Networked Attached Storage (NAS):
Provides a central location for content:
Step 1. Enable home network apps on the DVR.
Step 2. Install the NAS according the manufacturer's directions
13
EXTERNAL
STORAGE
CUSTOM.TIVO.COMCUSTOM.TIVO.COM

Home Automation and Control
Glossary
The TiVo Premiere box was engineered with the ability to easily integrate
with popular control systems via IP or IR with a transmitter. By default, the
feature that allows network devices to control the TiVo unit via IP is turned
off to ensure network security.
Compatible Control Systems:
Important Default Setting
TiVo DVRs can be controlled by networked devices, such as Crestron home
control systems. Beginning with version 9.4 of the TiVo software, this feature
isturnedOFFbydefaulttoensurehomenetworksecurity.Toenablethis
featureandturnitON,dothefollowing:
1. Go to TiVo Central > Messages & Settings > Settings >
Remote, CableCARD & Devices > Network Remote Control
2. Choose “Enabled”
3. Press “Select”
These partner companies have control modules readily available. If your
preferred control system does not have a module available, you can program
one using the “TCP Remote Protocol” as a guide. You should already be
familiar with the mechanics of opening and using TCP connections before
using the protocol.
14
CableCARD – is a specialized version of
a PCMCIA card designed specifically to
decode scrambled digital cable signals.
TiVo Premiere DVRs use a Multi-stream
CableCARD (M-Card) which is inserted
into a slot in the back of the DVR.
CableCARDS must be activated by
a cable provider.
Digital Tuning Adapter (DTA): A Tuning
Adapter is a small set top box that gives
your CableCARD-equipped TiVo box the
ability to request switched digital video
(SDV) channels. Like CableCARDs, Tuning
Adapters are part of the digital cable
system, so they must be issued by the cable
provider. Tuning Adapters are installed in
the cable line between the TiVo box and
the cable wall outlet. An additional USB
connection is used by the TiVo box to
send channel tuning requests to the Tuning
Adapter, which transmits the requests
back to the cable system.
Media Access Key (MAK) – is the numerical
passcode assigned to any content associ-
ated with the TiVo account. All devices
on the same account share the same MAK
to verify permission to access content.
You may be prompted to enter this
number when setting up additional TiVo
devices and accessories.
MoCA (Multimedia over Coax Alliance) –
Delivers a high-speed network connection
through existing coax cable. Some TiVo
products feature a built-in MoCA bridge
(XL4), others require an Ethernet-coax bridge.
Multi-Service-Operator (MSO) – refers
to large entities offering a multitude of
services including cable, internet, phone
and security. When used in reference to
TiVo products it implies a synonym for
cable company.
Network Attached Storage (NAS) –
is an detached storage solution with can
be accessed via a network or FTP site.
This storage is in turn shared with all
other devices authorized on the network.
In reference to TiVo, NAS can provide
additional storage for all networked units.
Over-the-top (OTT) – Content designated
by the provider as above and beyond
traditional linear channels provided by
the cable company.
Season Pass
®
recording – TiVo feature
that keeps track of a show that is part of
a series. Set one up, and the TiVo service
will make sure to record the show every
week, even if the day or time changes.
You can tell the TiVo box how many
episodes to keep and if it should
record reruns.
TiVo App – the free all-purpose mobile
applicationforiOS,Android,andKindle
HD enables TV guide data, remote DVR
management, and touch screen control
for compatible TiVo DVRs.
TiVo Service Number (TSN) – refers
to the unique identifier associated with
every box manufactured by TiVo Inc.
This number identifies aspects of the
box to TiVo Customer Service to help
assist in troubleshooting among other
activities.
Trickplay
™
Bar - shown as green linear
bar on the bottom of the screen, the
Trickplay Bar represents the continuous
video stream a TiVo DVR is processing
and allows for manipulation of video
content with operations for pause,
rewind, and resume.
Video on Demand (VOD) – refers to
services that grant access to content
uponrequest.TransactionalVODrefers
to services like Amazon Instant Video
andcableVODthatrequireusersto
pay for each individual piece of content.
Subscription-basedVOD,likeNetix
and Hulu Plus, offer a flat monthly fee
for unlimited access to a content library.
Whole Home Enabled –refers to
TiVo products with built-in MoCA
capability and the ability to integrate
into a home network via Ethernet or
coaxial cable in order to share content.
15
CUSTOM.TIVO.COMCUSTOM.TIVO.COM

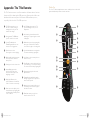
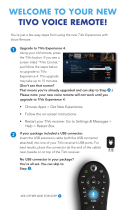
Appendix: The TiVo Remote:
The TiVo Premiere remote control has a number of alternate button functions
that are useful for enhancing the DVR experience. New users should become
familiar with the remote as part of the Premiere DVR installation process,
especially if this is their first TiVo DVR experience.
Live TV/Swap takes you to live TV.
If you’re watching live TV, use it to
swap tuners.
Info shows the channel banner while
watching live TV; press it again to make
it disappear.
Guide takes you to the program guide,
where you can find shows to watch or
record. Press it again to clear the guide.
Use the Arrow buttons to navigate the
TiVo menus and the program guide.
Use Select to choose menu options or
shows to record.
Play starts playing a show from the
My Shows list.
Press Record to start recording the show
you’re watching, or to set up a recording
for a show selected in the program guide.
Forward (fast-forward) fast-forwards
through a progam. Press it up to three
times for three speeds.
Advance moves forward in 30-second
increments; press and hold to jump to
the end of the show.
Enter/Last returns you to the last
channel tuned to in live TV.
1 The TiVo button takes you to
the TiVo
®
Central screen, the
starting point for all your TiVo
features and settings.
2 If programmed, TV PWR turns
your TV or A/V receiver on/off.
3 Use the Thumbs Up and
Thumbs Down buttons to rate
shows for TiVo Suggestions.
4 Pause freezes a show.
Press it again to resume playing.
5 Back (rewind) rewinds a program.
Press it up to three times for
three speeds.
7 Instant Replay repeats the
last 8 seconds of the show.
Press and hold to jump to the
beginning of a show.
6 Slow plays a show in slow motion.
8 Within the HD menus, the
A, B, C, D buttons sort and filter
views. Look for the onscreen tips.
9 Clear removes the display of the
channel banner or program guide
and deletes titles from My Shows
or the To Do List.
16
TiVoPro Tip:
The “Live TV” button swaps between tuners, enabling viewers to time shift
(pause/rewind) multiple channels at the same time.
1
2
3
4
5
6
7
8
9
17
CUSTOM.TIVO.COM CUSTOM.TIVO.COM
-
 1
1
-
 2
2
-
 3
3
-
 4
4
-
 5
5
-
 6
6
-
 7
7
-
 8
8
-
 9
9
-
 10
10


TiVo CI_Install_0327_1.0 User manual
- Category
- Digital Video Recorders (DVR)
- Type
- User manual
- This manual is also suitable for
Ask a question and I''ll find the answer in the document
Finding information in a document is now easier with AI
Related papers
-
TiVo SDOC-00104-000 Rev A1 User manual
-
TiVo Premiere XL4 Product information
-
-
TiVo BOLT Series Getting Started Manual
-
-
-
-
-
-
TiVo TCD849000VO User manual
Other documents
-
 Western Digital My DVR Expander Datasheet
-
ActionTec ECB2500c MoCA Network Adapter Installation guide
-
ActionTec ECB2500C Installation guide
-
 Atlantic broadband Tivo Quick start guide
-
 Altice suddenlink TiVo Stream Installation & Setup
-
ActionTec ECB6250 KIT User guide
-
-
Arris TIVO EDGE FOR CABLE Setup + Product Features
-
COX Cisco Tuning Adapter User guide
-


