--VII. Cloning cont’d
When the units are correctly lined up, the donor PixiePlus will automatically enter
cloning mode. Its Status LED will turn solid red and both units will chirp rapidly.
3. Hold the recipient steadily in front of the donor. If the connection is broken (the
recipient ceases to chirp), reposition the recipient unit to re-establish communica-
tion and the units will continue where they left off. If communication is broken for
more than 15 seconds, the recipient will time out of cloning mode and you will need
to begin again.
4. When the recipient has completed copying codes from the donor, it will beep 3
times and reset. After the PixiePlus has reset it will be fully operational with the
same codes and configuration settings programmed into the donor unit.
After cloning is complete, the donor unit will remain in cloning mode for 15 seconds
until it times out. It will then return to normal operation.
VIII. Complete Installation
To complete the installation, secure a Leviton
Decora™ wall plate (not included) over the face of
the PixiePlus. The outer screw holes on the PixiePlus
should be used to secure the wall plate.
VI. Configuring Special Features cont’d
2. Security Keylock
The Security Keylock locks the PixiePlus during disuse to prevent unauthorized
use. It disables the keys on the PixiePlus after POWER OFF is pressed, until a
Security Keycode is entered on the standard PixiePlus keypad. If the proper code
is not entered, the system cannot be turned on or used.
Use of the Security Keylock feature requires the DISCRETE POWER ON and
POWER OFF keypad module to be inserted. If your device remote has only a “tog-
gling power” key, you may still use this module if you program both POWER ON
and POWER OFF with the same (toggle) code.
How the Security Keylock works
When POWER OFF is pressed, the PixiePlus enters a “locked” state and all key-
pad buttons go dark.
When the system is locked, any button press other than POWER ON is understood
as a Security Keycode entry. A soft chirp is emitted, but the key does NOT illumi-
nate, and no control operation is performed. If the correct code sequence is
entered, the system unlocks, the interface illuminates, and normal operation is
restored, until the next time POWER OFF is pushed and the system locks again.
If the entered code is not correct, the system emits a long beep and remains
locked.
Security Keycodes may one to six button presses long. Codes can use any key on
the keypad other than POWER ON.
By default the Security Keylock feature is off, and the default Security Keycode is
OFF-OFF-OFF.
Configure the Security Keylock
1. Press and hold both POWER ON and POWER OFF while gently inserting a
paper clip into the PixiePlus programming aperture. The PixiePlus will enter
“Security Keylock configuration mode” and communicate the current Security
Keylock settings as follows:
• The Red Status LED indicates whether the Security Keylock feature is enabled
(LED is on) or disabled (LED is off).
• The PixiePlus will show the existing Security Keycode by illuminating each button
in the code in sequence, pausing briefly, then repeating the code.
2. To enable or disable the Security Keycode feature, press POWER ON to toggle
between enabled/disabled.
3. To change the Security Keycode, enter a new code by pressing a sequence of
up to six keys, using any keys in any combination, except POWER ON. After the
code is entered, the PixiePlus will immediately show the new Security Keycode.
V. Reprogram PixiePlus cont’d
If the button did not seem to learn correctly, press any other button on the
PixiePlus, then press the target button again to rearm it, and repeat the learning
procedure.
8. Repeat for each button: While still in learning mode, program and verify
each button.
9. Set a button to macro mode: If a button has been programmed with multiple
commands, the button may be configured to send all commands with a single but-
ton press. By default, buttons are configured to Round Robin mode.
After verification, and while still in learning mode, press and hold the button you
wish to set to macro mode for approximately five seconds. The PixiePlus will beep
three times to indicate that it has now been set to macro mode.
Each button must be independently set to macro mode.
If a button is reprogrammed the code will automatically default back to round robin
mode.
Press-and-hold repeat commands (such as volume ramping) are not available for
buttons set to macro mode. A Macro button can send one and only one instance of
each code with a single button press. There is a 300 millisecond delay between
each code in the series. Some devices may not be able to respond to multiple
commands sent at this frequency.
10. To control multiple units of the same device:
One PixiePlus may send identical codes to multiple units of the same device with-
out any additional configuration. For example, you may control two identical projec-
tors with a single PixiePlus by adding an additional IR emitter and wiring it from the
PixiePlus to a second projector. A single button press on the PixiePlus will send
identical codes to both devices, and the PixiePlus will control them in tandem.
11.To control multiple devices:
Different buttons on a single PixiePlus may be programmed with codes from differ-
ent remote controls.
Example: You wish to control power and source selection on a projector, and vol-
ume on an IR-controllable amplifier.
To do so, wire one IR emitter to the LCD monitor and the second IR emitter to the
amplifier. Program the PixiePlus power and source buttons with the codes from the
LCD monitor remote control. Program the PixiePlus volume buttons with the vol-
ume control codes from the amplifier remote control.
One PixiePlus may learn IR commands from remote controls from different
devices. Each button can be configured to send a single command (normal opera-
tion) or multiple commands (macro mode) with a single button press.
VI. Configuring Special Features cont’d
Use of the Inactivity Shutdown Timer requires the DISCRETE POWER
ON/POWER OFF keypad module.
Configuration of the Inactivity Shutdown Timer requires the VOLUME UP and VOL-
UME DOWN keypad module to be inserted. The volume module can be replaced
with a blank after the feature is configured.
What the Timer does
• The timer begins counting down immediately after the PixiePlus powers on a dis-
play device. Pressing any button except POWER OFF resets the timer and it
begins timing down again. Pressing POWER OFF stops the timer. There is no visi-
ble behavior when the timer is counting down, until two minutes before it expires.
• If the timer counts down to 120 seconds, the PixiePlus will begin beeping and
the POWER OFF button flashes to warn users that it is preparing to shut down.
• If the timer expires, the system shuts itself down exactly as if the user had
pressed the POWER OFF key. Any macro programmed for POWER OFF is exe-
cuted. If the Security Keylock feature is enabled, the PixiePlus will also lock.
Set the Inactivity Shutdown Timer
Press and hold both volume keys while gently inserting a paper clip in the pro-
graming aperture of the PixiePlus.
Be gentle with the paper clip to ensure that you do not damage switch
mechanism.
The PixiePlus will begin beeping to communicate the current Timer setting
(described in the table below).
To change the active setting: Press VOLUME UP or VOLUME DOWN to cycle to
the next setting. The PixiePlus will indicate the new setting with a pattern of beeps,
and update its Red LED blinking.
When you have reached the desired setting, remove the paper clip to return to nor-
mal operation.
Inactivity Shutdown Timer Settings
IX. Operation
Power
Power buttons control power on the projector or monitor. The PixiePlus is always
on, and its LED backlit buttons remain continually illuminated, unless the Security
Keylock is active. By default the PixiePlus is configured with the Epson discrete
codes for Power On and Power Off.
Source
Source button inserts control input selection on the projector or monitor. By default
the PixiePlus is configured with toggling source selection commands for use with
the 4-Button discrete module. The default Epson codes are Computer 1 and
Computer 2 (toggle) for the COMP button, and for Video 1 and Video 2 (toggle) for
the VIDEO button. The AUDIO button turns the Epson AP-60 audio system on and
off via IR, and the circle-with-line MUTE button toggles the projector mute on and
off.
Volume
If the PixiePlus is not used to control volume, a blank button insert may be used.
By default the PixiePlus is configured with RS-232 control codes for Volume Up
and Volume Down.
X. Troubleshooting
Programming Problems
Verify that the PixiePlus is in learning mode for programming. The Status LED con-
tinually blinks red when the PixiePlus is in learning mode.
The Status LED is solid red and the PixiePlus beeps loudly each time you try to
arm a key for learning.
The ambient light is too bright. Shield the PixiePlus from ambient light sources and
try to re-program.
If the buttons appear to program properly but do not control the device, verify each
code is correctly learned immediately after it has been programmed. The button will
blink rapidly to indicate it is in verification mode. Push the button and the IR emitter
will emit the corresponding code.
When the PixiePlus is emitting a code in verification mode, you should see the
Status LED flicker at a consistent strength and frequency. If the flickering seems
uneven, verify that you are holding the remote control in the correct sweet spot -
described in Section V, Part 3.
If the Status LED does not flicker rapidly when the remote control is emitting a
code, verify that the batteries in your remote control are fresh.
The PixiePlus beeps three times as soon as the paper clip is inserted into the pro-
gramming aperture.
The PixiePlus beeps three times when it is toggled between two-button and four-
button Source Selection modes. This is done by pressing and holding any button
while inserting the paper clip. Is one of the buttons being activated while the paper
clip is being inserted?
This can happen if a button is stuck. Check all buttons to make sure they are not
caught in a depressed position. If not, it is possible that the button contacts on the
PixiePlus circuit board are being shorted. Remove the bezel and check for solder
or bits of wire that could bridge the button contacts. Then reseat the buttons, re-
attach the bezel, and try entering programming mode again. If this does not correct
the problem, please contact SP Controls Technical Support.
Operation Problems
The PixiePlus does not power the projector/monitor on.
Is the PixiePlus display dark, and does it chirp when any button is pressed? If so,
the PixiePlus Security Keylock is active. See page 16 ff. for information on how to
configure and/or retrieve the Security Keylock code.
If the Security Keylock is not set, verify that the projector or monitor powers on nor-
mally with its own remote control or settop controls. If it does not, it may not be
plugged in or may require service.
X. Troubleshooting cont’d
The PixiePlus does not control the projector/monitor.
Confirm that the IR emitter bud is positioned directly over the receiver on the IR
window of the device you are controlling. Some devices are sensitive to accurate
placement.
Fluorescent lights can interfere with IR signals. Check if the projector is close to a
fluorescent light source. If so, try turning off the lights. If this restores control, cover
the IR emitter bud and display device IR receiver window with an IR-opaque shield,
such as gaffer's tape. Some opaque tapes do not block IR.
Some commands work but others do not.
Power and Source Selection commands are sent by RS-232 and Volume com-
mands are sent by IR. If some commands but others are not working, check the
wiring type that matches the codes that are not working.
Control is intermittent.
If you are using learning a device manufactured by Philips, Magnavox, or Koss,
consult the SP Controls PXE-DCM Philips Protocol Application Note for additional
programming instructions.
If you are still unable to control your device, please contact SP Controls Technical
Support for further assistance.
XI. Technical Specifications
The PixiePlus is UL listed and CE certified.
Package Type
Dimensions
Weight (PCB with bezel and 3
insert modules)
Power Supply
Output Type
Recommended Wire
Single-Gang Decora™ Mounting
4.130” (h) x 1.745” (w) x .90” (d)
2.5 oz
6VDC, 300mA
IR Emitter/RS-232 (preconfigured, reprogram-
ming RS-232 requires PXE-PGM-TOOL, sold
separately)
CAT5, CAT5e, or CAT6; male-female RS-232
straight serial
Warranty
SP Controls warrants all PixiePlus products and accessories against defects in
materials and workmanship for a period of five years from the date of purchase.
Although SP Controls thoroughly tested and reviewed this documentation, there is
no warranty, express or implied, with respect to quality, merchantability, or fitness
for a particular purpose. Therefore, the PixiePlus and accessories are provided "as-
is" and the purchaser assumes the entire risk as to quality and performance.
There are no obligations or liabilities on the part of the SP Controls Corporation for
consequential damages arising out of or in conjunction with the use or performance
of these products or other indirect damages with respect to loss of profit, revenue,
or cost of removal and/or replacement. Some states do not allow the exclusion or
limitation of incidental or consequential damages, so the above limitation or exclu-
sion may not apply to you. This warranty gives you specific legal rights, and you
may also have other rights that vary from state to state. SP Controls' maximum lia-
bility shall not exceed the price paid by the user.
All implied warranties, including warranties for merchantability and/or fitness, are
limited in duration to five (5) years from the date of purchase. Proof of purchase
must be provided with any claim.
FCC Compliance
This equipment generates radio frequency energy and if not installed in
accordance with the manufacturer's instructions may cause radio interference.
This equipment complies with part 15, Subpart J of the FCC rules for a Class A
computing device. This equipment also complies with the Class A limits for radio
noise emission from digital apparatus set out in the Radio Interference Regulation
of the Canadian Department of Communications. These above rules are designed
to provide reasonable protection against such interference when operating the
equipment in a commercial environment. If operation of this equipment in a resi-
dential area causes radio frequency interference, the user and not SP Controls,
Inc., will be responsible.
Copyright
Pixie™, PixiePlus™, and the SP Controls switch logo are trademarks of SP
Controls, Inc. Epson
®
is a registered trademark of Seiko Epson Corporation.
Decora™ is a registered trademark of Leviton Manufacturing Co. All other trade-
marks mentioned in this manual are the properties of their respective owners. No
part of this document may be reproduced or transmitted in any form or by any
means, electronic or mechanical, for any purpose, without express written permis-
sion of SP Controls, Inc.
© 2010 SP Controls, Inc. All rights reserved.
Changes or modifications made to this equipment not expressly approved by SP
Controls, Inc., could void the user's authority to operate the equipment.
SP Controls, Inc. assumes no responsibility for any errors that appear in this docu-
ment. Information in this document is subject to change without notice.
PixiePlus™
Projector Controller for Epson
®
Installation Guide
(Decora™ wall plate not included)
ELPSP10
13
23
22
2120
Patent US 7,334,067
VI. Configuring Special Features cont’d
If more than six keys are entered, the PixiePlus will beep and reset to the previous-
ly configured code.
4. After the new Security Keylock has been reconfigured, its new settings must be
confirmed. If you do not follow this sequence to store the new settings, any
changes you make will be discarded when you leave Security Keylock configura-
tion mode.
To confirm the new settings, press POWER ON and hold it down until the PixiePlus
beeps three times.
5. After the new code is set and confirmed, carefully remove the paper clip as
usual to return to normal operation.
If the Security Keycode is forgotten, you can retrieve it by putting the
PixiePlus back in Security Keycode configuration mode – it will then display
the currently-configured code.
3. PixiePlus Audio Feedback
By default, the PixiePlus clicks when a button is pressed. To mute, press and hold
any button while inserting a paper clip into the programming aperture. The
PixiePlus will beep quickly three times to indicate that AUDIO has been set to OFF.
VII. Cloning
Any PixiePlus may quickly and easily copy all the codes from any other PixiePlus.
The PixiePlus cannot clone a Pixie.
In cloning there is a donor unit and a recipient unit. The donor unit must already be
programmed with the appropriate codes (see Section V). The recipient will copy
the donor unit’s codes.
Both units must have the same button insert types, though they may be of different
colors.
Both units must be powered. The donor unit should be installed before beginning.
To power the recipient, you may wish to temporarily daisy-chain power
from the terminal block of the donor unit with a short length of cable.
VII. Cloning cont’d
Cloning Procedure
1. Set the recipient to cloning mode. If the PixiePlus has never been programmed,
you may set it to cloning mode by pressing and holding any button while applying
power. If a PixiePlus has previously been programmed, gently insert a paper clip
into the IR Learning aperture of the recipient unit. Press and hold any button on the
that unit and, while still holding the button, remove the paper clip. The PixiePlus
will rapidly chirp while in cloning mode.
It will time out of cloning mode in about 15 seconds, so have both devices on
hand. If the PixiePlus times out of cloning mode, repeat this procedure to return it
to cloning mode.
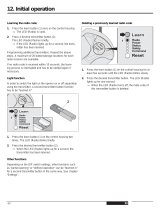
2. Position the two units face-to-face, with both units held upright, approximately
one inch apart. They should be directly across from each other with the bezels
lined up. This will position the IR receiver window of the cloning PixiePlus directly
across from the IR transmitter in the donor PixiePlus.
Be sure not to obstruct the IR receiver window or transmitter with your
hands.
V. Reprogram PixiePlus cont’d
Example: You wish to configure the PixiePlus to send a power command to a pro-
jector and a separate power command to an amplifier with single press of the
PixiePlus POWER ON button.
To do so, program the PixiePlus POWER ON button with two commands, Power
On from the projector remote, and Power On from the amplifier remote. Then con-
figure the PixiePlus POWER ON button to macro mode.
12. To restore the PixiePlus to its default preconfiguration: Set the device to
learning mode by inserting the paper clip. Then press and hold any two buttons
while the device is in learning mode. The whole keypad will blink, first slowly, then
quickly. Then the PixiePlus will beep four times, indicating that it has been restored
to its default configuration.
13. To exit learning mode: Gently remove the paper clip to exit learning mode. Be
sure not to hold any buttons while removing the paper clip, or the unit will be set to
cloning mode.
14. To test learned codes: Verify that the IR emitter bud has been placed directly
over the IR detector on the device the PixiePlus controls. Press the PixiePlus but-
ton that you wish to test. A red LED labeled “IR Activity” will blink when the code is
being sent, but the emitter bud does not illuminate.
15. Troubleshooting: If you cannot control the device, be sure that the emitter bud
is positioned correctly. If some buttons work but others do not, try re-programming
the buttons that do not work. Make sure you press the button on the remote for at
least one second during learning.
Fluorescent lights can interfere with IR signals. Check if the projector is close to a
fluorescent light source. If so, try turning off the lights. If this restores control, cover
the IR emitter bud and display device IR receiver window with an IR-opaque shield,
such as gaffer's tape.
See Section X. Troubleshooting beginning on page 21 for more tips.
VI. Configuring Special Features
1. Inactivity Shutdown Timer
The Inactivity Shutdown Timer will automatically shut the display device down if it is
not used for a configurable length of time.
Example: The PixiePlus Inactivity Shutdown Timer is set to three hours. If no but-
ton is pressed on the PixiePlus for three hours, the PixiePlus will begin to beep and
flash in warning 120 seconds before three hours has elapsed. If no button is
pressed, at three hours the PixiePlus will send all codes programmed to the
POWER OFF button.
14
19
18
17
16
PIXIEPLUS AUDIO
One long beep
One quick beep
Two quick beeps
Three quick beeps
Four quick beeps
Five quick beeps
Six quick beeps
Seven quick beeps
Eight quick beeps
PIXIEPLUS STATUS LED
LED dark
LED blinks once
LED blinks twice
LED blinks three times
LED blinks four times
LED blinks five times
LED blinks six times
LED blinks seven times
LED blinks eight times
TIMER SETTING
Timer DISABLED (default)
One-hour shutoff
Two-hour shutoff
Three-hour shutoff
Four-hour shutoff
Five-hour shutoff
Six-hour shutoff
Seven-hour shutoff
Eight-hour shutoff
approx. one inch apart