Samsung AVMDH052EA0XIA User manual
- Category
- Fireplaces
- Type
- User manual
Page is loading ...

Safety Precautions
◆ If the power supply cord of this air conditioner is damaged,
it must be replaced by the manufacturer or its authorized
service personnel only in order to avoid a safety hazard.
WARNING
◆Do not attempt to install this air conditioner by yourself.
◆This unit contains no user-serviceable parts. Always consult authorized
service personnel for repairs.
◆When moving, consult authorized service personnel for disconnection
and installation of the unit.
◆Do not become over-exposed to cold air by staying in the direct path of
the airflow of the air conditioner for extended periods of time.
◆Do not insert fingers or objects into the outlet port or intake grilles.
◆Do not start and stop air conditioner operation by disconnecting the
power supply cord and so on.
◆Take care not to damage the power supply cord.
◆In the event of a malfunction (burning smell, etc.), immediately stop
operation, turn off the electrical breaker, and consult authorized
service personnel.
DANGER
◆Provide occasional ventilation during use.
◆Do not direct air flow at fireplaces or heating apparatus.
◆Do not climb on, or place objects on, the air conditioner.
◆Do not hang objects from the indoor unit.
◆Do not set flower vases or water containers on top of air conditioners.
◆Do not expose the air conditioner directly to water.
◆Do not operate the air conditioner with wet hands.
◆Do not pull power supply cord.
◆Turn off power source when not using the unit for extended periods.
◆Check the condition of the installation stand for damage.
◆Do not place animals or plants in the direct path of the air flow.
◆Do not drink the water drained from the air conditioner.
◆Do not use in applications involving the storage of foods, plants or
animals, precision equipment, or art works.
◆Do not apply any heavy pressure to radiator fins.
◆Operate only with air filters installed.
◆Do not block or cover the intake grille and outlet port.
◆Ensure that any electronic equipment is at least one metre away from
either the indoor or outdoor units.
◆Avoid installing the air conditioner near a fireplace or other heating
apparatus.
◆When installing the indoor and outdoor unit, take precautions to prevent
access to infants.
◆Do not use inflammable gases near the air conditioner.
◆Max input power & current is measured according to IEO standard and
input power & current is measured according to ISO standard.
CAUTION
E-
2

Contents
◆
P
REPARING YOUR AIR CONDITIONER
■ Safety Precautions . . . . . . . . . . . . . . . . . . . . . . . . . . . . . . . . . . 2
■ View of the Unit . . . . . . . . . . . . . . . . . . . . . . . . . . . . . . . . . . . . . 4
■ Wireless Remote Controller-Buttons and Display . . . . . . . . . . . 6
■ The Receiver & Display Unit . . . . . . . . . . . . . . . . . . . . . . . . . . . 7
■ Wired Remote Controller-Buttons and Display . . . . . . . . . . . . . 8
■ Centralized Controller . . . . . . . . . . . . . . . . . . . . . . . . . . . . . . . . 9
■ Getting Start . . . . . . . . . . . . . . . . . . . . . . . . . . . . . . . . . . . . . . . 10
■ Inserting the Wireless Remote Controller Batteries . . . . . . . . . 11
UU
UU
SS
SS
II
II
NN
NN
GG
GG
WW
WW
II
II
RR
RR
EE
EE
LL
LL
EE
EE
SS
SS
SS
SS
RR
RR
EE
EE
MM
MM
OO
OO
TT
TT
EE
EE
CC
CC
OO
OO
NN
NN
TT
TT
RR
RR
OO
OO
LL
LL
LL
LL
EE
EE
RR
RR
◆
O
PERATING YOUR AIR CONDITIONER
■ Selecting the Automatic Operating Mode . . . . . . . . . . . . . . . . 13
■ Cooling Your Room . . . . . . . . . . . . . . . . . . . . . . . . . . . . . . . . . 14
■ Heating Your Room (Except Cooling Only Models) . . . . . . . . 15
■ Removing Excess Humidity . . . . . . . . . . . . . . . . . . . . . . . . . . 16
■ Airing Your Room . . . . . . . . . . . . . . . . . . . . . . . . . . . . . . . . . . 17
◆
P
ROGRAMMING YOUR AIR CONDITIONER
■ Setting the On Timer . . . . . . . . . . . . . . . . . . . . . . . . . . . . . . . . 18
■ Setting the Off Timer . . . . . . . . . . . . . . . . . . . . . . . . . . . . . . . . 19
UU
UU
SS
SS
II
II
NN
NN
GG
GG
WW
WW
II
II
RR
RR
EE
EE
DD
DD
RR
RR
EE
EE
MM
MM
OO
OO
TT
TT
EE
EE
CC
CC
OO
OO
NN
NN
TT
TT
RR
RR
OO
OO
LL
LL
LL
LL
EE
EE
RR
RR
◆
O
PERATING YOUR AIR CONDITIONER
■ Selecting the Automatic Operating Mode . . . . . . . . . . . . . . . . 21
■ Cooling Your Room . . . . . . . . . . . . . . . . . . . . . . . . . . . . . . . . . 22
■ Heating Your Room (Except Cooling Only Models) . . . . . . . . 23
■ Removing Excess Humidity . . . . . . . . . . . . . . . . . . . . . . . . . . 24
■ Airing Your Room . . . . . . . . . . . . . . . . . . . . . . . . . . . . . . . . . . 25
◆
P
ROGRAMMING YOUR AIR CONDITIONER
■ Setting the On Timer . . . . . . . . . . . . . . . . . . . . . . . . . . . . . . . . 26
■ Setting the Off Timer . . . . . . . . . . . . . . . . . . . . . . . . . . . . . . . . 27
UU
UU
SS
SS
II
II
NN
NN
GG
GG
CC
CC
EE
EE
NN
NN
TT
TT
RR
RR
AA
AA
LL
LL
II
II
ZZ
ZZ
EE
EE
DD
DD
CC
CC
OO
OO
NN
NN
TT
TT
RR
RR
OO
OO
LL
LL
LL
LL
EE
EE
RR
RR
■ Using the Centralized Controller . . . . . . . . . . . . . . . . . . . . . . . 28
◆
R
ECOMMENDATIONS FOR USE
■ Operating Recommendations . . . . . . . . . . . . . . . . . . . . . . . . . 29
■ Cleaning Your Air Conditioner . . . . . . . . . . . . . . . . . . . . . . . . 30
■ Temperature and Humidity Ranges . . . . . . . . . . . . . . . . . . . . 32
■ Solving Common Problems . . . . . . . . . . . . . . . . . . . . . . . . . . 33
◆
T
ECHNICAL SPECIFICATIONS
E-
3
ENGLISH

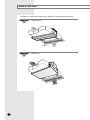
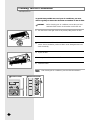
View of the Unit
The figures are shown in this instruction may differ from yours depending on the model.
E-
4
Air filter
Air
inlet
Air
outlet
Indoor Unit
✴✴
052/070/072
✴✴
Air
inlet
Air
outlet
Indoor Unit
✴✴
105/128
✴✴

E-
5
ENGLISH
Air outlet
Connection valve
TYPE A
Outdoor Unit
Air outlet
Connection valve
TYPE B
Outdoor Unit
Air outlet
Connection valve
TYPE C
Outdoor Unit
Air outlet
Connection valve
TYPE D
Outdoor Unit
Air outlet
Connection valve
TYPE E
Outdoor Unit
If the heat exchanger in the outdoor unit gets dusty, cooling efficiency may fall. So clean the heat exchanger with water
when it becomes dirty. However, be careful when you wash the surface of the heat exchanger because it is very sharp.
NN
NN
oo
oo
tt
tt
ee
ee

Wireless Remote Controller-Buttons and Display
E-
6
- After cleaning the air filter, press the filter reset button.
- Duct type air conditioner does not have function of adjusting air flow direction.
Therefore, the function is not operated even if you press the swing button.
- The heating mode( ) is not selected in cooling only models.
NN
NN
oo
oo
tt
tt
ee
ee
Operating mode
Mode selection button
Filter Reset button
Swing button (Not operated)
On Timer button
Off Timer button
On/Off & Timer
Set/Cancel button
Fan speed adjustment
button
Temperature adjustment
buttons
Temperature setting
Fan speed
Air flow direction
On Timer setting
Off Timer setting
Battery discharge indicator
The wireless remote controller is an optional accessory.

The Receiver & Display Unit
The Receiver & Display unit is an optional accessory and it is installed on the wall.
Filter sign indicator
Fan indicator
Timer indicator
Remote control sensor
- Heat Pump Models :
On/Off indicator(Green) &
Removing frost
indicator(Red)
- Cooling Only Models :
On/Off indicator
Concealed Type
Fan indicator
Filter sign indicator
On/Off indicator
Removing frost indicator
(Except Cooling Only Models)
Timer indicator
Remote control sensor
On/Off button
Standard Type
E-
7
ENGLISH

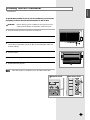
Wired Remote Controller-Buttons and Display
The wired remote controller is an optional accessory and it is installed on the wall.
- Test button is for your installation specialist. You must NOT press it.
- After cleaning the air filter, press the filter reset button. Then the wired remote
controller will display the FILTER SIGN indicator when the time to clean the air filter;
refer to page 30 or 31.
- Duct type air conditioner does not have function of adjusting air flow direction.
Therefore, the function is not operated even if you press the swing button.
- The heating mode( ) is not selected in cooling only models.
NN
NN
oo
oo
tt
tt
ee
ee
Communication error indicator
On Timer setting
Off Timer setting
Test indicator
On Timer button
Off Timer button
Test button
Filter Reset button
Mode selection button
Temperature adjustment
buttons
Centralized controller indicator
(In case of installing the Centralized controller)
Removing frost indicator
(Except Cooling Only Models)
Temperature setting
Fan speed
Air flow direction
Filter Sign indicator
On/Off & Timer
Set/Cancel button
Fan speed adjustment
button
Swing button
(Not operated)
On/Off indicator
Operating mode
E-
8

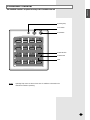
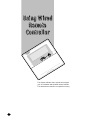
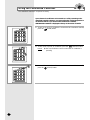
Centralized Controller
The centralized controller is an optional accessory and it is installed on the wall.The centralized controller is an optional accessory and it is installed on the wall.
E-
9
ENGLISH
Operating lamp
All On button
All Off button
On/Off indicators
On/Off buttons
Index
Operating lamp comes on when at least one air conditioner connected to the
centralized controller is operating.
NN
NN
oo
oo
tt
tt
ee
ee

Getting Start
You have just purchased a system type air conditioner and it has been
installed by your installation specialist.
Your Owner’s Instructions contain much valuable information on using your
air conditioner. Please take the time to read them as they will help you take full
advantage of the unit’s features.
The booklet is organized as follows.
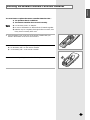
◆ The following figures are shown on pages from 4 to 9 :
- Indoor and outdoor units
- Wireless remote controller (buttons and display)
- The receiver & display unit
- Wired remote controller (buttons and display)
- Centralized controller
◆ In the main part of the document, you will find a series of step-by-step
procedures for each function available.
The illustrations in the step-by-step procedures use three different symbols:
PRESS PUSH HOLD DOWN
E-
10

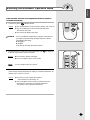
Inserting the Wireless Remote Controller Batteries
Push the battery cover on the rear of the remote controller with your
thumb in the direction of the arrow and remove it.
Insert the two batteries, taking care to respect the polarities :
◆ + on the battery with + on the remote controller.
◆ - on the battery with - on the remote controller.
1
2
Close the cover by sliding it back until it clicks into place.
3
◆ Use two AAA, LR03 1.5V batteries.
◆ Do not use old batteries or different kinds of batteries together.
◆ Batteries may be completely discharged after 12 months, even
if they have not actually been used.
You must insert or replace the remote controller batteries when :
◆ You purchase the air conditioner
◆ The remote controller does not work correctly
NN
NN
oo
oo
tt
tt
ee
ee
E-
11
ENGLISH

This chapter indicates how to operate and program
your air conditioner with the wireless remote controller.
The wireless remote controller is an optional accessary.
UU
UU
ss
ss
ii
ii
nn
nn
gg
gg
WW
WW
ii
ii
rr
rr
ee
ee
ll
ll
ee
ee
ss
ss
ss
ss
RR
RR
ee
ee
mm
mm
oo
oo
tt
tt
ee
ee
CC
CC
oo
oo
nn
nn
tt
tt
rr
rr
oo
oo
ll
ll
ll
ll
ee
ee
rr
rr
E-
12

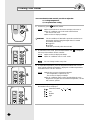
Selecting the Automatic Operation Mode
In the Automatic mode, the room temperature and the fan speed are
controlled automatically.
1
To select the AUTO mode, press the Mode button until is displayed
at the top of the wireless remote controller.
Result:
◆ The receiver & display unit beeps.
◆ The air conditioner runs in AUTO mode.
2
You can change modes at any time.
If necessary, press (ON/OFF) button.
Result:
◆ The On/Off indicator on the receiver & display unit comes on.
◆ The air conditioner runs in the mode selected when
the unit was last used.
◆ The receiver & display unit beeps.
The air conditioner is fitted with a protection mechanism to
prevent the unit from being damaged when it is started
immediately after being:
◆ Plugged in
◆ Stopped
lt will start up normally after three minutes.
IMPORTANT
NN
NN
oo
oo
tt
tt
ee
ee
To adjust the temperature, press the Temperature buttons one or more
times until the required temperature is displayed. Possible temperatures are
between 18
O
C and 30
O
C inclusive.
Result:
◆ Each time you press Temperature buttons:
- The temperature is adjusted by 1
O
C.
◆ The air conditioner starts cooling, provided that the room
temperature is higher than the selected temperature.
The quantity of air is adjusted automatically.
3
E-
13
ENGLISH

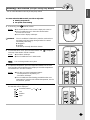
Cooling Your Room
To select the COOL mode, press the Mode button until is displayed
at the top of the wireless remote controller.
Result:
◆ The receiver & display unit beeps.
◆ The air conditioner runs in COOL mode.
2
You can change modes at any time.
To adjust the temperature, press the
Temperature
buttons one or more
times until the required temperature is displayed. Possible temperatures
are between 18
O
C and 30
O
C inclusive.
Result:
◆ Each time you press
Temperature
buttons:
- The temperature is adjusted by 1
O
C.
- The receiver & display unit beeps.
◆ The air conditioner starts cooling, provided that the room
◆ temperature is higher than the selected temperature ; the fan
◆ will, however, operate.
3
You must select the COOL mode if you wish to adjust the :
◆ Cooling temperature
◆ Fan speed when cooling
1
If necessary, press (ON/OFF) button.
Result:
◆
The On/Off indicator on the receiver & display unit comes on.
◆ The air conditioner runs in the mode selected when
the unit was last used.
◆ The receiver & display unit beeps.
The air conditioner is fitted with a protection mechanism to
prevent the unit from being damaged when it is started
immediately after being:
◆ Plugged in
◆ Stopped
lt will start up normally after three minutes.
IMPORTANT
Select the fan speed by pressing the Fan button one or more times until
the intended value is displayed :
4
NN
NN
oo
oo
tt
tt
ee
ee
E-
14
Automatic(rotated : ➔➔)
Low
Medium
High

Heating Your Room
(Except Cooling Only Models)
E-
15
ENGLISH
To select the HEAT mode, press the Mode button until is displayed
at the top of the wireless remote controller.
Result:
◆ The indoor unit beeps.
◆ The air conditioner runs in HEAT mode.
2
You can change modes at any time.
To adjust the temperature, press the
Temperature
buttons one or more
times until the required temperature is displayed. Possible temperatures
are between 16
O
C and 30
O
C inclusive.
Result:
◆ Each time you press
Temperature
buttons:
- The temperature is adjusted by 1
O
C.
- The indoor unit beeps.
◆ The air conditioner starts heating, provided that the room
temperature is lower than the selected temperature ; the fan
will, however, operate.
3
You must select the HEAT mode if you wish to adjust the :
◆ Heating temperature
◆ Fan speed when heating
1
If necessary, press (ON/OFF) button.
Result:
◆
The On/Off indicator on the receiver & display unit comes on.
◆ The air conditioner runs in the mode selected when
the unit was last used.
◆ The receiver & display unit beeps.
The air conditioner is fitted with a protection mechanism to
prevent the unit from being damaged when it is started
immediately after being:
◆ Plugged in
◆ Stopped
lt will start up normally after three minutes.
IMPORTANT
Select the fan speed by pressing the Fan button one or more times until
the intended value is displayed :
4
NN
NN
oo
oo
tt
tt
ee
ee
Automatic(rotated : ➔➔)
Low
Medium
High
You can select the HEAT mode only in heat pump models.

Removing Excess Humidity
E-
16
To select the DRY mode, press the Mode button until is displayed
at the top of the wireless remote controller.
Result:
◆ The receiver & display unit beeps.
◆ The air conditioner runs in DRY mode.
2
You can change modes at any time.
To adjust the temperature, press the Temperature buttons one or more
times until the required temperature is displayed. Possible temperatures
are between 18
O
C and 30
O
C inclusive.
Result:
◆ Each time you press Temperature buttons:
- The temperature is adjusted by 1
O
C.
- The receiver & display unit beeps.
◆ The air conditioner starts removing the excess humidity.
The quantity of air is adjusted automatically.
3
If the atmosphere in your room is very humid or damp, you can
remove excess humidity without lowering the room temperature too
much.
1
If necessary, press (ON/OFF) button.
Result:
◆ The On/Off indicator on the receiver & display unit comes on.
◆ The air conditioner runs in the mode selected when
◆ the unit was last used.
◆ The receiver & display unit beeps.
The air conditioner is fitted with a protection mechanism to
prevent the unit from being damaged when it is started
immediately after being:
◆ Plugged in
◆ Stopped
lt will start up normally after three minutes.
IMPORTANT
NN
NN
oo
oo
tt
tt
ee
ee
In the dry mode, the fan speed is controlled automatically.
NN
NN
oo
oo
tt
tt
ee
ee

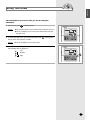
Airing Your Room
E-
17
ENGLISH
If the atmosphere in your room is stale, you can air it using the
FAN feature.
Select the fan speed by pressing the Fan button one or more times until
the intended value is displayed:
3
Low
Medium
High
To select the FAN mode, press the Mode button until is displayed at
the top of the wireless remote controller.
Result:
◆ The receiver & display unit beeps.
Result:
◆ The air conditioner runs in FAN mode.
2
You can change modes at any time.
NN
NN
oo
oo
tt
tt
ee
ee
If necessary, press (ON/OFF) button.
Result:
◆ The On/Off indicator on the receiver & display unit comes on.
◆ The air conditioner runs in the mode selected when
◆ the unit was last used.
◆ The receiver & display unit beeps.
1

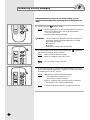
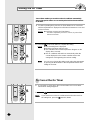
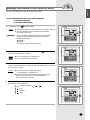
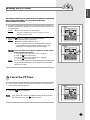
Setting the On Timer
The On Timer enables you to switch on the air conditioner automatically
after a given period of time. You can set the period of time from 30 minutes
to 24 hours.
To set the operating time, press the On Timer button one or more times
until the required time is displayed. Possible time is between 0.5 hour and
24 hour inclusive.
Result:
◆ Each time you press On Timer button:
- The time is adjusted by 0.5 hour to 5 hours, by 1 hour from
6 hours to 24 hours.
1
Press the (Set/Cancel) button to complete the setting.
Result:
◆ The remaining time is displayed.
◆ Blinking of the timer indicator stops.
◆ The selected mode and the temperature disappear on the
display after 5 seconds.
◆ The air conditioner will switch on automatically when the
counter displayed on the remote controller reaches the
setting time as disappearing the On timer setting.
2
You can see or change the setting mode and/or the temperature
by pressing the Mode button or the Temperature buttons after
setting the On timer.
NN
NN
oo
oo
tt
tt
ee
ee
E-
18
If you want to turn on the air conditioner before the timer reaches
the setting time, press the (ON/OFF) button.
NN
NN
oo
oo
tt
tt
ee
ee
To cancel the On Timer, press the On Timer button one or more times
until the timer setting disappears.
1
Press the (Set/Cancel) button.
2
To Cancel the On Timer

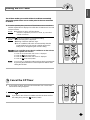
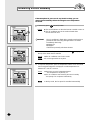
Setting the Off Timer
The Off Timer enables you to switch off the air conditioner automatically
after a given period of time. You can set the period of time from 30 minutes
to 24 hours.
To set the operating time, press the Off Timer button one or more times
until the required time is displayed. Possible time is between 0.5 hour and
24 hour inclusive.
Result:
◆ Each time you press Off Timer button:
- The time is adjusted by 0.5 hour to 5 hours, by 1 hour from
6 hours to 24 hours.
1
You can see or change the setting mode and/or the temperature
by pressing the Mode button or the Temperature buttons after
setting the Off timer.
NN
NN
oo
oo
tt
tt
ee
ee
Press the (Set/Cancel) button to complete the setting.
Result:
◆ The remaining time is displayed.
◆ Blinking of the timer indicator stops.
◆ The air conditioner will switch off automatically when the
counter displayed on the remote controller reaches the
setting time as disappearing the Off timer setting.
2
If you would like to turn the air conditioner on after 2 hours
and to operate it for 2 hours:
1. Press the On Timer button until ‘2.0 Hr’ is displayed.
2. Press the (Set/Cancel) button.
3. Press the Off Timer button until ‘4.0 Hr’ is displayed.
4. Press the (Set/Cancel) button.
EE
EE
xx
xx
aa
aa
mm
mm
pp
pp
ll
ll
ee
ee
E-
19
ENGLISH
To cancel the Off Timer, press the Off Timer button one or more times
until the timer setting disappears.
1
Press the (Set/Cancel) button.
2
If you want to turn off the air conditioner before the timer reaches
the setting time, press the (ON/OFF) button.
NN
NN
oo
oo
tt
tt
ee
ee
To Cancel the Off Timer

This chapter indicates how to operate and program
your air conditioner with the wired remote controller.
The wired remote controller is an optional accessory.
UU
UU
ss
ss
ii
ii
nn
nn
gg
gg
WW
WW
ii
ii
rr
rr
ee
ee
dd
dd
RR
RR
ee
ee
mm
mm
oo
oo
tt
tt
ee
ee
CC
CC
oo
oo
nn
nn
tt
tt
rr
rr
oo
oo
ll
ll
ll
ll
ee
ee
rr
rr
E-
20

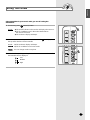
In the Automatic mode, the room temperature and the fan speed are
controlled automatically.
1
To select the AUTO mode, press the Mode button until is displayed
at the top of the wired remote controller.
Result:
: ◆ The air conditioner runs in AUTO mode.
2
You can change modes at any time.
If necessary, press (ON/OFF) button.
Result:
: ◆ The On/Off indicator on the wired remote controller comes on.
◆ The air conditioner runs in the mode selected when
◆ the unit was last used.
The air conditioner is fitted with a protection mechanism to
prevent the unit from being damaged when it is started
immediately after being:
◆ Plugged in
◆ Stopped
lt will start up normally after three minutes.
IMPORTANT
NN
NN
oo
oo
tt
tt
ee
ee
Selecting the Automatic Operating Mode
To adjust the temperature, press the Temperature buttons one or more times
until the required temperature is displayed. Possible temperatures are
between 18
O
C and 30
O
C inclusive.
Result:
◆ Each time you press Temperature buttons:
- The temperature is adjusted by 1
O
C.
◆ The air conditioner starts cooling, provided that the room
temperature is higher than the selected temperature.
The quantity of air is adjusted automatically.
3
E-
21
ENGLISH
Page is loading ...
Page is loading ...
Page is loading ...
Page is loading ...
Page is loading ...
Page is loading ...
Page is loading ...
Page is loading ...
Page is loading ...
Page is loading ...
Page is loading ...
Page is loading ...
Page is loading ...
Page is loading ...
Page is loading ...
-
 1
1
-
 2
2
-
 3
3
-
 4
4
-
 5
5
-
 6
6
-
 7
7
-
 8
8
-
 9
9
-
 10
10
-
 11
11
-
 12
12
-
 13
13
-
 14
14
-
 15
15
-
 16
16
-
 17
17
-
 18
18
-
 19
19
-
 20
20
-
 21
21
-
 22
22
-
 23
23
-
 24
24
-
 25
25
-
 26
26
-
 27
27
-
 28
28
-
 29
29
-
 30
30
-
 31
31
-
 32
32
-
 33
33
-
 34
34
-
 35
35
-
 36
36


Samsung AVMDH052EA0XIA User manual
- Category
- Fireplaces
- Type
- User manual
Ask a question and I''ll find the answer in the document
Finding information in a document is now easier with AI
Related papers
Other documents
-
Haier 2HUM18R03/R2(DB) User manual
-
-
Trane CFEA 12 CJM1 Owner's manual
-
-
-
-
York VRF Ducted High Static Indoor Unit User manual
-
-
York VRF EconoFresh Kit Indoor Unit User manual
-
York VRF 2 -Way Cassette Indoor Unit User manual