Air Hogs Air Hogs RC V-Wing Avenger User manual
- Category
- Toys & accessories
- Type
- User manual
This manual is also suitable for

®
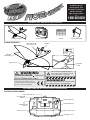
CONTENTS LIST AND PARTS IDENTIFICATION
BECOMING FAMILIAR WITH YOUR CONTROLLER/CHARGER
Controller/ChargerV-Wing Avenger™ Labels Spare Tail Rudder
V-WING AVENGER™
CHOKING HAZARD
WARNING:
Not for Children under 3 years.
Small parts.
“This product is in compliance with the
essential requirements and other relevant
provisions of Directive 1999/5/EC.”
Do not touch the flapping wings!
Do not play above someone’s head!
Adult supervision is required!
DANGER!
DO NOT PUNCTURE THE STYROFOAM!
THE BATTERY WILL BE DAMAGED.
CONTROLLER/CHARGER
Problems flying?
Do not return your
Air Hogs
®
to the store.
C
all the Air Hogs
®
flight training center
a
t
1- 800-622-8339
Ultra Light Crash
Resistant Foam
Durable
Mylar Wings
Rudder
Charging
socket
OFF ON
Light-up Eyes
CHG OFF ON A B C
LR
Steering Trimmer
Directional Control
Charging socket
Throttle Control
Power LED Indicator
CHG/OFF/ON
Selector
Charging LED
Indicator
Tri-Band Selector

HOW TO INSTALL YOUR BATTERIES
HOW TO CHARGE YOUR V-WING AVENGER™
BATTERY INSTALLATION – CONTROLLER/CHARGER
INDOOR SELECTION
Make sure the power switch is in the OFF
position.
1. Use a screwdriver to loosen the screw
(counter-clockwise)on the battery case. (pic.1)
2. Put 4 AA size batteries in the battery
compartment as per the polarity shown
i
nside. (pic.2)
3
. Tighten the screw clockwise.
pic.1 pic.2
BATTERY CHARGING
Turn the power OFF for both bird and controller/charger.
1. Carefully set bird into charging dock on controller/charger,
ensuring that plug is aligned and inserted correctly into
charge receptical on bird.
2. Set the CHG/OFF/ON selector to CHG position. (pic.3)
The green LED will light up. (pic.4)
3. The green LED will turn off when the battery is fully charged.
4. It may take up to 15-20 minutes to fully charge the battery
and a fully charged battery can give up to 5 minutes of flight
time. The charging times may vary as to the battery power.
The green LED will light up when the
bird is being charged.
Bird attached to charging dock on
controller/charger.
INDOORS
1. It is best to fly your V-Wing
Avenger™ indoors.
2. For optimal flights make sure all
fans, windows and air conditioners
are not creating a breeze.
3. Control distance is up to 16’.
4. Minimum flying space 16’ x 16’ x 10’.
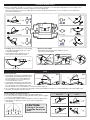
FLYING YOUR BIRD
1. Make sure the controller/charger is OFF before turning on the bird.
2. Turn ON the bird then turn ON the controller/charger.
3. Set the right lever to the neutral position, then push the throttle to MAXIMUM to rev up the bird and hand toss it straight
in front of you.
4. If bird continuously turns right, push the “L” trim button repeatedly until it straightens out. (pic.5)
If bird turns left, push the “R” trim button. (pic.6)
b) If the bird raises its nose very quickly, it may reduce speed and drop.
You should pull the left lever down (throttle down) to straighten out.
a) The correct flight pattern would be:
IMPORTANT:
BIRD MUST BE
TRIMMED CORRECTLY
BEFORE FLYING!
FLYING YOUR BIRD Cont’d
TIPS
5. When your bird flies steadily, you can start to control the directional flight of your bird. Move the right lever to left or right to turn.
You may need to pulse but not hold the right lever for easy adjustment.
This function depends on the rear rudder, please note that if the bird responds slowly to your command, you should throttle
up for better performance.
6. Landing: Steer your bird over a soft landing
area and throttle down. Never try to catch
your bird in mid-flight.
7. If your bird has minor damage, you can
fix it as shown, with labels provided.
8. Replacing the Rudder:
Remove the damaged or broken rudder as shown,
then insert the new rudder.
W
arning: Changes or modifications to this unit not expressly approved by the party responsible for compliance could void the user's authority to operate the equipment.
-
Keep hands, hair and loose clothing away from the wings when power switch is turned ON.
-
Turn off controller/charger and V-Wing Avenger™ when not in use.
-
Remove battery from controller/charger when not in use.
-
Parental guidance is recommended for the flight.
-
Keep your bird in your sight so that you can supervise it at all times.
-
New and alkaline batteries are recommended for use in controller/charger to obtain best and maximum performance.
-
You are advised to replace with new batteries as soon as the function becomes impaired.
-
Users should keep and retain this information for future reference.
-
Users should keep strict accordance with the instruction manual while operating the product.
-
Your controller/charger is tailor-made for the Li-Poly rechargeable battery used in bird. Do not use it to charge any battery other than that in the bird.
Safety Precautions:
Battery requirement for Controller/Charger:
Power Supply :
Rating : DC 6 V, 0.72 W
B
atteries : 4 x 1.5 V “AA”/LR6/AM3
Requires 4 x 1.5 V “AA” size batteries (not included)
Battery requirement for V-Wing Avenger™:
Power Supply :
Rating : DC 3.7 V, 1.85 W
Batteries : 1 x 3.7 V Li-Poly Rechargeable Battery Pack
Requires 1 x 3.7 V Li-Poly Rechargeable Battery Pack (included)
Your bird is equipped with a Li-Poly battery,
please also pay attention to the following cautions for safety use:
-
Do not dispose of the battery in fire.
- Do not use or leave the battery near a heat source such as fire or heater.
- Do not strike or throw the battery against a hard surface.
-
Do not immerse the battery in water, and keep the battery in a cool dry environment.
- When recharging, only use the battery charger specifically for that purpose.
- Do not over-discharge the battery.
-
Do not connect the battery to an electrical outlet.
- Do not directly solder the battery and pierce the battery with a nail or other sharp object.
- Do not transport or store the battery together with metal objects such as necklaces, hairpins etc.
-
Do not disassemble or alter the battery.
- Charge the battery every 6 months.
- Turn off your equipment power switch after use.
-
As for a used battery, please recycle after covering the battery terminals with insulation tape or inserting it to an individual poly-bag.
Battery Cautions:
-
Non-rechargeable batteries are not to be recharged
- Rechargeable batteries are to be removed from the toy before being charged (controller/charger only).
- Rechargeable batteries are only to be charged by an adult
-
Different types of batteries or new and used batteries are not to be mixed (controller/charger only).
- Only batteries of the same or equivalent type as recommended are to be used.
- Batteries are to be inserted with correct polarity.
-
Exhausted batteries are to be removed from the toy (controller/charger only).
- The supply terminals are not to be short-circuited.
Care and Maintenance:
-
Always remove batteries from the toy when it is not being used for a long period of time. (For controller/charger only)
-
Wipe the toy gently with a clean damp cloth.
- Keep the toy away from direct heat.
-
Do not submerge the toy into water that can damage the electronic assemblies.
Note:
- Parental guidance is recommended when installing or replacing batteries.
-
Under the environment with electrostatic discharge, the sample may malfunction and require user to reset the sample.
Special Note to Adults:
- Regularly examine for damage to the plug, enclosure and other parts. In the event of any damage,
the toy must not be used with the controller/charger until the damage has been repaired.
-
This toy is not intended for children under 3 years old.
- This toy must only be used with the recommended charger
- Do not try to charge other batteries with controller/charger.
pic.4pic.4
CHG OFF ON A B C
L
R
pic.3
Sudden or rapid
acceleration will
cause the bird
to raise its nose,
stall and crash.
pic.6
LR
pic.5
LR
CHG OFF ON A B C
LR
Ascending
Steering
Descending
Go Straight
Turn Right
Turn Left
Balancing the bird:
1. If your bird is still turning to the RIGHT after
trimming without pushing the direction lever,
put a clear label on the LEFT upper wing
(bottom side) about 2.75” from the tip to
correct the imbalance (pic.7).
2. If your bird is still turning to the LEFT after
trimming without pushing the direction lever,
put a clear label on the RIGHT upper wing
(bottom side) about 2.75” from the tip to correct the imbalance (pic.8).
3. You can add more than one label onto the wing to obtain proper balance. However, too many labels will increase the weight of the
wing thus affecting the flying performance.
pic.7
clear label
pic.8
clear label
Flying techniques for advanced users:
1. Cut the rudder and elevator along the cutting lines indicated.
2. You can use these to adjust the flight path before flying, but we suggest
you use the steering trimmer first.
3. You can bend the rudder to different angles to achieve a spiral cruise.
4. If the elevator is adjusted too much up or down, the bird will go
down quickly.
Cut the airfoil along these lines
CAUTION:
Cutting of the airfoil
should be done by an
adult.
Tune the elevator upwards
Tune the elevator downwards
Ascending
Descending
Adjustment Action
16’ 16’
10’

The green LED will light up when the
bird is being charged.
Bird attached to charging dock on
controller/charger.
INDOORS
1. It is best to fly your V-Wing
Avenger™ indoors.
2. For optimal flights make sure all
fans, windows and air conditioners
are not creating a breeze.
3. Control distance is up to 16’.
4. Minimum flying space 16’ x 16’ x 10’.
FLYING YOUR BIRD
1. Make sure the controller/charger is OFF before turning on the bird.
2. Turn ON the bird then turn ON the controller/charger.
3. Set the right lever to the neutral position, then push the throttle to MAXIMUM to rev up the bird and hand toss it straight
in front of you.
4. If bird continuously turns right, push the “L” trim button repeatedly until it straightens out. (pic.5)
If bird turns left, push the “R” trim button. (pic.6)
b) If the bird raises its nose very quickly, it may reduce speed and drop.
You should pull the left lever down (throttle down) to straighten out.
a) The correct flight pattern would be:
IMPORTANT:
BIRD MUST BE
TRIMMED CORRECTLY
BEFORE FLYING!
FLYING YOUR BIRD Cont’d
TIPS
5. When your bird flies steadily, you can start to control the directional flight of your bird. Move the right lever to left or right to turn.
You may need to pulse but not hold the right lever for easy adjustment.
This function depends on the rear rudder, please note that if the bird responds slowly to your command, you should throttle
up for better performance.
6. Landing: Steer your bird over a soft landing
area and throttle down. Never try to catch
your bird in mid-flight.
7. If your bird has minor damage, you can
fix it as shown, with labels provided.
8. Replacing the Rudder:
Remove the damaged or broken rudder as shown,
then insert the new rudder.
W
arning: Changes or modifications to this unit not expressly approved by the party responsible for compliance could void the user's authority to operate the equipment.
-
Keep hands, hair and loose clothing away from the wings when power switch is turned ON.
-
Turn off controller/charger and V-Wing Avenger™ when not in use.
-
Remove battery from controller/charger when not in use.
-
Parental guidance is recommended for the flight.
-
Keep your bird in your sight so that you can supervise it at all times.
-
New and alkaline batteries are recommended for use in controller/charger to obtain best and maximum performance.
-
You are advised to replace with new batteries as soon as the function becomes impaired.
-
Users should keep and retain this information for future reference.
-
Users should keep strict accordance with the instruction manual while operating the product.
-
Your controller/charger is tailor-made for the Li-Poly rechargeable battery used in bird. Do not use it to charge any battery other than that in the bird.
Safety Precautions:
Battery requirement for Controller/Charger:
Power Supply :
Rating : DC 6 V, 0.72 W
B
atteries : 4 x 1.5 V “AA”/LR6/AM3
Requires 4 x 1.5 V “AA” size batteries (not included)
Battery requirement for V-Wing Avenger™:
Power Supply :
R
ating : DC 3.7 V, 1.85 W
Batteries : 1 x 3.7 V Li-Poly Rechargeable Battery Pack
Requires 1 x 3.7 V Li-Poly Rechargeable Battery Pack (included)
Your bird is equipped with a Li-Poly battery,
please also pay attention to the following cautions for safety use:
-
Do not dispose of the battery in fire.
-
Do not use or leave the battery near a heat source such as fire or heater.
- Do not strike or throw the battery against a hard surface.
-
Do not immerse the battery in water, and keep the battery in a cool dry environment.
-
When recharging, only use the battery charger specifically for that purpose.
- Do not over-discharge the battery.
-
Do not connect the battery to an electrical outlet.
-
Do not directly solder the battery and pierce the battery with a nail or other sharp object.
- Do not transport or store the battery together with metal objects such as necklaces, hairpins etc.
-
Do not disassemble or alter the battery.
-
Charge the battery every 6 months.
- Turn off your equipment power switch after use.
-
As for a used battery, please recycle after covering the battery terminals with insulation tape or inserting it to an individual poly-bag.
Battery Cautions:
-
Non-rechargeable batteries are not to be recharged
-
Rechargeable batteries are to be removed from the toy before being charged (controller/charger only).
- Rechargeable batteries are only to be charged by an adult
-
Different types of batteries or new and used batteries are not to be mixed (controller/charger only).
-
Only batteries of the same or equivalent type as recommended are to be used.
- Batteries are to be inserted with correct polarity.
-
Exhausted batteries are to be removed from the toy (controller/charger only).
-
The supply terminals are not to be short-circuited.
C
are and Maintenance:
-
Always remove batteries from the toy when it is not being used for a long period of time. (For controller/charger only)
-
Wipe the toy gently with a clean damp cloth.
- Keep the toy away from direct heat.
-
Do not submerge the toy into water that can damage the electronic assemblies.
Note:
- Parental guidance is recommended when installing or replacing batteries.
- Under the environment with electrostatic discharge, the sample may malfunction and require user to reset the sample.
Special Note to Adults:
- Regularly examine for damage to the plug, enclosure and other parts. In the event of any damage,
the toy must not be used with the controller/charger until the damage has been repaired.
-
This toy is not intended for children under 3 years old.
- This toy must only be used with the recommended charger
-
Do not try to charge other batteries with controller/charger.
pic.4pic.3
Sudden or rapid
acceleration will
cause the bird
to raise its nose,
stall and crash.
pic.6
LR
pic.5
LR
CHG OFF ON A B C
LR
Ascending
Steering
Descending
Go Straight
Turn Right
Turn Left
Balancing the bird:
1. If your bird is still turning to the RIGHT after
trimming without pushing the direction lever,
put a clear label on the LEFT upper wing
(bottom side) about 2.75” from the tip to
correct the imbalance (pic.7).
2. If your bird is still turning to the LEFT after
trimming without pushing the direction lever,
put a clear label on the RIGHT upper wing
(bottom side) about 2.75” from the tip to correct the imbalance (pic.8).
3. You can add more than one label onto the wing to obtain proper balance. However, too many labels will increase the weight of the
wing thus affecting the flying performance.
.
1
25
”
2.
75”
pic.7
clear label
2
.
7
5”
.
1
2
5
pic.8
clear label
Flying techniques for advanced users:
1. Cut the rudder and elevator along the cutting lines indicated.
2. You can use these to adjust the flight path before flying, but we suggest
you use the steering trimmer first.
3. You can bend the rudder to different angles to achieve a spiral cruise.
4. If the elevator is adjusted too much up or down, the bird will go
down quickly.
Cut the airfoil along these lines
CAUTION:
Cutting of the airfoil
should be done by an
adult.
Tune the elevator upwards
Tune the elevator downwards
Ascending
Descending
Adjustment Action
Label
16’ 16’
10’

TROUBLESHOOTING
The wings won’t flap.
The bird turns around and drops after
taking off.
Can’t take off or drop down at flight.
Drop down at the climbing state or before
take off.
The bird does not react, or reacts poorly
to operation by controller/charger.
Loss of control.
Bird cannot be charged after connecting
with charging socket.
PROBLEM
- ON/OFF Switch is OFF.
- Weak Battery.
- Trimmer is not tuned properly.
- Rudder is not in neutral position.
- Weak power.
- Flying at the wrong elevator angle or
speed.
- Weak power.
- Bright lights may be affecting
performance.
- Out of the control range of distance.
- Weak power of controller/charger.
- Bird is not connected properly.
- CHG/OFF/ON button is not set.
CAUSE
- Set switch to ON.
- Re-charge the battery pack.
- Adjust the trimmer (see trimming section).
- Re-tune the rudder.
- Re-charge the battery pack.
- Play for more skills, such as tune the Throttle Trimmer for
precise power control or stroke (not hold) the left control lever
on controller/charger.
- Re-charge the battery pack.
- Play in a darker environment or dim the lights.
- The bird flies up to 16’ in open space.
- Replace all old batteries with new ones.
- Pull it out and connect again.
- Push the CHG/OFF/ON button to OFF and then CHG again.
SOLUTION
For further questions and problems, please visit our website www.airhogs.com.
Spin Master Ltd., 450 Front Street West, Toronto, ON M5V 1B6 Canada
Spin Master Inc., PMB #10053, 300 International Drive, Suite 100, Williamsville, NY 14221, USA
Spin Master Toys Far East Limited. Rm #1113, 11/F, Chinachem Golden Plaza, 77 Mody Rd.,
Tsimshatsui E., Kowloon, HK
Spin Master Toys UK Ltd., Meadowbank, Furlong Road, Bourne End, Bucks, SL8 5AJ,
United Kingdom
Spin Master France – 36 rue de Silly – 92100 Boulogne Billancourt – France
North American Consumer Information
Phone: 1-800-622-8339
www.spinmaster.com
TM and © Spin Master Ltd. Air Hogs ® is a registered
trademark of Spin Master Ltd. All rights reserved. Conforms
to product safety standards ASTM F963, EN71 regulatory
requirements. Products and colors may vary. Please retain
this information for future reference. Patent Pending.
MADE IN CHINA.
20011862 NEN REV 0
TM
The green LED will light up when the
bird is being charged.
Bird attached to charging dock on
controller/charger.
INDOORS
1. It is best to fly your V-Wing
Avenger™ indoors.
2. For optimal flights make sure all
fans, windows and air conditioners
are not creating a breeze.
3. Control distance is up to 16’.
4. Minimum flying space 16’ x 16’ x 10’.
FLYING YOUR BIRD
1. Make sure the controller/charger is OFF before turning on the bird.
2. Turn ON the bird then turn ON the controller/charger.
3. Set the right lever to the neutral position, then push the throttle to MAXIMUM to rev up the bird and hand toss it straight
in front of you.
4
. If bird continuously turns right, push the “L” trim button repeatedly until it straightens out. (pic.5)
If bird turns left, push the “R” trim button. (pic.6)
b) If the bird raises its nose very quickly, it may reduce speed and drop.
You should pull the left lever down (throttle down) to straighten out.
a) The correct flight pattern would be:
IMPORTANT:
BIRD MUST BE
TRIMMED CORRECTLY
BEFORE FLYING!
FLYING YOUR BIRD Cont’d
TIPS
5. When your bird flies steadily, you can start to control the directional flight of your bird. Move the right lever to left or right to turn.
You may need to pulse but not hold the right lever for easy adjustment.
This function depends on the rear rudder, please note that if the bird responds slowly to your command, you should throttle
up for better performance.
6. Landing: Steer your bird over a soft landing
area and throttle down. Never try to catch
your bird in mid-flight.
7. If your bird has minor damage, you can
fix it as shown, with labels provided.
8. Replacing the Rudder:
Remove the damaged or broken rudder as shown,
then insert the new rudder.
W
arning: Changes or modifications to this unit not expressly approved by the party responsible for compliance could void the user's authority to operate the equipment.
-
Keep hands, hair and loose clothing away from the wings when power switch is turned ON.
-
Turn off controller/charger and V-Wing Avenger™ when not in use.
-
Remove battery from controller/charger when not in use.
-
Parental guidance is recommended for the flight.
-
Keep your bird in your sight so that you can supervise it at all times.
-
New and alkaline batteries are recommended for use in controller/charger to obtain best and maximum performance.
-
You are advised to replace with new batteries as soon as the function becomes impaired.
-
Users should keep and retain this information for future reference.
-
Users should keep strict accordance with the instruction manual while operating the product.
-
Your controller/charger is tailor-made for the Li-Poly rechargeable battery used in bird. Do not use it to charge any battery other than that in the bird.
Safety Precautions:
Battery requirement for Controller/Charger:
Power Supply :
Rating : DC 6 V, 0.72 W
Batteries : 4 x 1.5 V “AA”/LR6/AM3
Requires 4 x 1.5 V “AA” size batteries (not included)
Battery requirement for V-Wing Avenger™:
Power Supply :
Rating : DC 3.7 V, 1.85 W
Batteries : 1 x 3.7 V Li-Poly Rechargeable Battery Pack
Requires 1 x 3.7 V Li-Poly Rechargeable Battery Pack (included)
Your bird is equipped with a Li-Poly battery,
please also pay attention to the following cautions for safety use:
- Do not dispose of the battery in fire.
- Do not use or leave the battery near a heat source such as fire or heater.
- Do not strike or throw the battery against a hard surface.
- Do not immerse the battery in water, and keep the battery in a cool dry environment.
- When recharging, only use the battery charger specifically for that purpose.
- Do not over-discharge the battery.
- Do not connect the battery to an electrical outlet.
- Do not directly solder the battery and pierce the battery with a nail or other sharp object.
- Do not transport or store the battery together with metal objects such as necklaces, hairpins etc.
- Do not disassemble or alter the battery.
- Charge the battery every 6 months.
- Turn off your equipment power switch after use.
- As for a used battery, please recycle after covering the battery terminals with insulation tape or inserting it to an individual poly-bag.
Battery Cautions:
- Non-rechargeable batteries are not to be recharged
- Rechargeable batteries are to be removed from the toy before being charged (controller/charger only).
- Rechargeable batteries are only to be charged by an adult
- Different types of batteries or new and used batteries are not to be mixed (controller/charger only).
- Only batteries of the same or equivalent type as recommended are to be used.
- Batteries are to be inserted with correct polarity.
- Exhausted batteries are to be removed from the toy (controller/charger only).
- The supply terminals are not to be short-circuited.
Care and Maintenance:
- Always remove batteries from the toy when it is not being used for a long period of time. (For controller/charger only)
- Wipe the toy gently with a clean damp cloth.
- Keep the toy away from direct heat.
- Do not submerge the toy into water that can damage the electronic assemblies.
Note:
- Parental guidance is recommended when installing or replacing batteries.
- Under the environment with electrostatic discharge, the sample may malfunction and require user to reset the sample.
Special Note to Adults:
- Regularly examine for damage to the plug, enclosure and other parts. In the event of any damage,
the toy must not be used with the controller/charger until the damage has been repaired.
- This toy is not intended for children under 3 years old.
- This toy must only be used with the recommended charger
- Do not try to charge other batteries with controller/charger.
pic.4pic.3
Sudden or rapid
acceleration will
cause the bird
to raise its nose,
stall and crash.
p
ic.6
L
R
p
ic.5
L
R
CHG OFF ON A B C
LR
Ascending
Steering
Descending
Go Straight
Turn Right
Turn Left
Balancing the bird:
1. If your bird is still turning to the RIGHT after
trimming without pushing the direction lever,
put a clear label on the LEFT upper wing
(bottom side) about 2.75” from the tip to
correct the imbalance (pic.7).
2. If your bird is still turning to the LEFT after
trimming without pushing the direction lever,
put a clear label on the RIGHT upper wing
(bottom side) about 2.75” from the tip to correct the imbalance (pic.8).
3. You can add more than one label onto the wing to obtain proper balance. However, too many labels will increase the weight of the
wing thus affecting the flying performance.
pic.7
clear label
pic.8
clear label
F
lying techniques for advanced users:
1
. Cut the rudder and elevator along the cutting lines indicated.
2. You can use these to adjust the flight path before flying, but we suggest
you use the steering trimmer first.
3. You can bend the rudder to different angles to achieve a spiral cruise.
4. If the elevator is adjusted too much up or down, the bird will go
down quickly.
Cut the airfoil along these lines
CAUTION:
Cutting of the airfoil
should be done by an
adult.
Tune the elevator upwards
Tune the elevator downwards
Ascending
Descending
Adjustment Action
16’ 16’
10’
-
 1
1
-
 2
2
-
 3
3
-
 4
4


Air Hogs Air Hogs RC V-Wing Avenger User manual
- Category
- Toys & accessories
- Type
- User manual
- This manual is also suitable for
Ask a question and I''ll find the answer in the document
Finding information in a document is now easier with AI
Related papers
-
Spin Master Havoc Stinger User manual
-
Air Hogs Sharpshooter User manual
-
-
-
-
-
-
-
-
Other documents
-
BIRD S3220 User manual
-
-
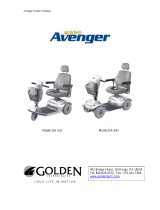 Golden Technologies GA 531 User manual
-
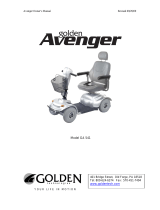 Golden Technologies GA 531 User manual
-
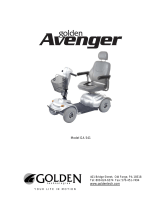 Golden Technologies GA 541 Owner's manual
-
Black Horse Model BH82 User manual
-
 Hobbico SUPERSTAR EP Assembly Instructions Manual
-
Century Hummingbird v.II Instructions Manual
-
MJX F46 User manual
-


