ANTAIRA MSC-102B1L Installation guide
- Category
- Interface cards/adapters
- Type
- Installation guide

1
Thank you for purchasing this 2-Port RS422/485 Serial PCI Card. It
is a universal add in card that connects to a PC or server via
the PCI Bus, providing high-speed serial connectivity. The serial
ports are fully compatible with RS422/485 standard by the
bundled Serial COM port drivers. Each port can be set at any
mode (RS485 2-wire, RS485 4-wire and RS422) and operate
simultaneously.
There is an optional model supports Isolation and ESD
protection feature. It provides an ideal solution for most critical
applications.
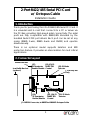
2-Port R422/485 Serial PCI Card
w/ Octopus Cable
Installation Guide
1. Introduction
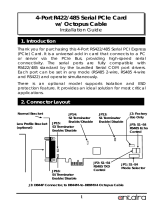
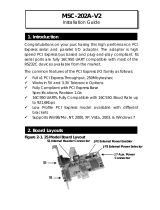
2. Connector Layout
J2: DB25M Connector, to DB25F-to-DB9MX2 Octopus Cable
JP5: S1 Mode
Selector
JP1,JP3: S1
RS485 TXD
Control
J1: Factory Use
Only
JP7:
S1 Terminator
Enable/Disable
JP8:
S2 Terminator
Enable/Disable
JP2, JP4: S2
RS485 TXD
Control
JP6: S2 Mode
Selector
Low Profile Bracket
(optional)
Normal Bracket

2-Port 422/485 Serial PCI Card
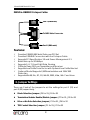
2
DB25F-to-DB9MX2 Octopus Cable:
Features:
Provides 2 RS422/485 Serial Ports over PCI Slot
Provides 2 DSUB-9 Connectors with the Octopus Cable
Supports PCI Specification 3.0 and Power Management 1.1
Baud Rate up to 921.6Kbps
Supports 5, 6, 7, 8 and 9-bit Data Framing
128-byte Deep FIFO per Transmitter and Receiver
Supports Low Profile Form Factor with Optional Low Profile Bracket
Optional Model Supports 2,500Vrms Isolation and 15KV ESD
Protection
Supports Win98, Me, XP, CE, Win2K, 2003, Vista, Win 7 and Linux
There are 2 sets of the jumpers to set the settings for port 1 (S1) and
port 2 (S2) respectively.
Mode Selection Jumper: JP5 for S1, JP6 for S2
Termination Resistor Enable/Disable Jumper: JP7 for S1, JP8 for S2
Echo or No Echo Selection Jumper: JP3 for S1, JP4 for S2
TXD Control Selection Jumper: JP1 for S1, JP2 for S2
3. Jumper Settings
P4
P2
P1
Port 2 (DB9 male)
To DB25 Male Connector
Port 1 (DB9 male)

2-Port RS422/485 Serial PCI Card
3
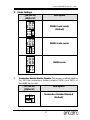
1.
Mode Settings:
JP5 (for S1)
JP6(for S2)
Description
RS485 2-wire mode
(Default)
RS485 4-wire mode
RS422 mode
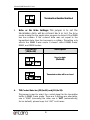
2. Termination Resistor Enable/Disable: This jumper enables/disables
the 120 Ohm termination resistor between DATA+ and DATA- of
the RS485 transceiver:
JP7 (for S1)
JP8(for S2)
Description
Termination Resistor Disabled
(Default)
485-4W
485-2W
422
485-4W
485-2W
422
485-4W
485-2W
422
OFF
ON

2-Port 422/485 Serial PCI Card
4
Termination Resistor Enabled
3.
Echo or No Echo Settings: This jumper is to set the
transmission data will be echoed back or not.
The Echo
mode is useful for the application program to detect if the RS485
bus has collision. If the echoed data was not equal to the
transmitted data, then the bus was in a collision. This setting only
affects the RS485 2-wire mode. It doesn’t affect RS485 4-wire,
RS422, and RS232 modes.
JP3 (for S1)
JP4(for S2)
Description
No echo data
(Default)
Transmission data will be echoed
4. TXD Control Selector: JP3 (for S1) and JP6 (for S2):
This jumper is used to select the control signal for the transmitter
buffer in RS485 2-wire mode. There are 2 settings are selectable,
one is “MAN” (manually) the other one is “AUT” (automatically,
factor default), please keep it at “AUT” in all cases.
OFF
ON
OFF
ON
ECHO
OFF
ON
ECHO

2-Port RS422/485 Serial PCI Card
5
JP1 (for S1)
JP2(for S2)
Description
TXD Control is Automatic
(Default)
TXD Control is Manual
(Needs to be Configured
Manually in the Device
Manager)
5. Factory Use Only Connectors (J1):
This connector is only used for factory production purpose, please
don’t install any jumper or cable on it!
1. Turn the system power OFF before installation!
2. Use static electricity discharge precautions.
3. Remove the chassis cover from your computer
4. Locate an unused PCI slot (typically white or ivory) and remove
the corresponding slot cover from computer chassis.
5. Plug the RS422/485 PCI card to the unused PCI expansion slot
and attached the I/O card bracket to the computer chassis
screw.
6. Put the chassis cover back on the computer.
7. Turn ON the power of your computer and peripherals.
8. Proceed with Software Driver Installation.
4. Installing the RS232/422/485 PCI Card
485TR
MAN
AUT
485TR
MAN
AUT

2-Port 422/485 Serial PCI Card
6
NOTE:
PLEASE DO NOT LET WINDOWS AUTO SEARCH THE DRIVERS ON THE CD, it
will cause problems because the INF files will be conflict in this case.
Instead, please browse to the correct location (folder) manually to
make sure the correct drivers are chosen and installed correctly.
Note: Windows NT driver Installations
To install the Windows NT driver, please go into WinNT4 sub-directory
and run (double click) Install_Serial.exe to install all Serial Port Drivers.
Installing Windows Drivers:
1. When the system is powered, Windows will invoke Windows’ New
Hardware Wizard. Click〝 Next 〞to continue, select〝 Install from
a list or specific location(Advanced) 〞and click〝 Next 〞.
2. Select〝 Include this location in the search 〞then click〝 Browse 〞
to specify the driver’s location for your OS (for example, XP is
E:\IO\OXFORD\XP32) and click〝 Next 〞to continue.
5. Software Installation
Drivers are in each
corresponding folder

2-Port RS422/485 Serial PCI Card
7
3. Click〝 Next 〞to continue, and click〝 Finish 〞to complete the
installation.
4. To check the Installation, right click on〝My Computer〞and
choose〝Manage〞. Choose〝 Device Manager 〞and double click
〝 Ports 〞.
DB9-Male Pin Assignment:
RS422 Cable Wiring:
RS485 (2-wire) Cable Wiring:
6. RS422/485 Pin Assignments and Cable Wiring
DB9 (RS422 to USB Cable)
1 TXD-
2 TXD+
3 RXD+
4 RXD-
5 GND
(RS422 Device)
1 TXD-
2 TXD+
3 RXD+
4 RXD-
5 GND
NC = No connection
1 5
6 9
9 Pins Signal
1 TXD- (DATA-)
2 TXD+ (DATA+)
3 RXD+
4 RXD-
5 GND
6 NC
7 NC
8 NC
9 NC
DB9 (485 to USB Cable)
1 DATA-
2 DATA+
3 NC
4 NC
5 GND
(RS485 Device)
1 DATA-
2 DATA+
3 NC
4 NC
5 GND

2-Port 422/485 Serial PCI Card
8
Power requirements: 5V DC, 450mA (max)
Operating temp.: 0 to 55
°C (32 to 131°F)
Operating humidity: 5 to 95% RH
8. Environmental Specifications
-
 1
1
-
 2
2
-
 3
3
-
 4
4
-
 5
5
-
 6
6
-
 7
7
-
 8
8


ANTAIRA MSC-102B1L Installation guide
- Category
- Interface cards/adapters
- Type
- Installation guide
Ask a question and I''ll find the answer in the document
Finding information in a document is now easier with AI
Related papers
-
 ANTAIRA MSC-202B1 Installation guide
-
 ANTAIRA UTS-1458B Installation guide
-
 ANTAIRA MSC-102B1 Installation guide
-
 ANTAIRA UTS-401BK-SI Installation guide
-
 ANTAIRA MSC-204B1 Installation guide
-
 ANTAIRA MSC-104B Installation guide
-
 ANTAIRA MSC-204A2 Installation guide
-
 ANTAIRA 2-Port RS232/422/485 Combo Serial to USB2.0Adapter Installation guide
-
ANTAIRA 2S RS232 Installation guide
-
 ANTAIRA MSC-202A-V2 Installation guide


Other documents
-
Roline USB 2.0 to RS422/485 Adapter User manual
-
 Sunbox URI-128i User manual
-
EXSYS EX-42372 User manual
-
EXSYS EX-45352 User manual
-
-
-
EXSYS EX-47999 User manual
-
 StarTech.com PCI2S232485I User manual
-
StarTech.com ICUSB422IS Owner's manual
-

