Page is loading ...


R
U
B
O
Y
F
G
H
J
L
M
K
J
D
D
C
J
E
J
A
I
J
A
E
R
N
S
T
U
V
R
P
S
L
W
H
J
I
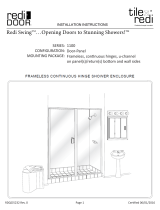
PARTS LIST
A. 1 Curb (with weep holes)
B. 2 Wall Jambs
C. 8 1/4” Plastic Wall Anchors
D. #8 x 2” Truss Head Screws
E. 2 Grey Setting Blocks
F. 1 Fixed Glass Panel
G. 1 180° Post
H. 1 Header
I. °2 90 Anchor Plates
J. #6 x 3/8” Truss Head Screws
K. 1 Strike Assembly
L. 2 Snap-in Fillers
M. Door Assembly
N. 2 Cone Head Bolts
O. 8 Pcs. Horizontal Glazing Vinyl
P. 2 Set Screws
R. 2 Tubular Handles
S. 4 Plastic Washers
T. 2 Plastic Bushings
U. 1 Handle Vinyl
V. 1 Magnet Catch
W. 1 Vinyl Door Sweep
X. 8 Pcs. Vert. Glazing Vinyl
Y. 90 Buttress Post°
O
X
Page 2 of 8
C
B

1
2
3
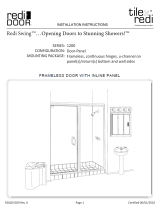
The shower door is completely reversible and can be
installed installed hinge-left or hinge right.
The door may hinge off the wall or the center post.
For maximum waterproofing, the hinge should be
opposite of the shower head. Using the illustration
determine the best position for your particular
situation.
CAUTION: Door must swing out for safety reasons
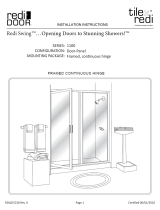
In most cases, the curb track will be assembled and
sized to fit your shower base. It may be necessary to
“round” out the bottom corners of the curb track so
that it will sit flush on the threshold.
Using a 1/8” drill bit (provided), drill the interior face of
the curb on both ends as shown in the illustration.
Place the curb (A) on the threshold so the weep holes
are facing into the shower. Mark with a pencil where
the curb is resting on the threshold on both sides of
the curb. Use painters tape to hold curb in place for
now.
Place wall jambs (B) into both ends of the curb (A).
Plumb the jambs and mark hole locations on the wall.
Remove wall jambs and also the curb track.
Drill 5/16” holes through the tile
and insert 1/4” anchors ( C ) (if there is wood backing
in the wall, no anchors are necessary).
Clean the debris off of the threshold.
ONYX wall panels or
Page 3 of 8
PIVOT
LEFT
PIVOT
RIGHT
(These face the inside
of the shower)
WEEP SLOT
CURB
WALL
JAMB

4
6
5
Apply a bead of silicone along the inside both of
the pencil lines made on step 2.
Silicone both ends of the curb (A) (be very generous
with the silicone at the ends of the track). Carefully
place curb down onto the threshold so it is resting on
the silicone between the pencil lines.
Insert the wall jambs into the curb track and then
attach the wall jambs, using the #8x2” truss head
screws (D).
Once the curb track is in place, add more silicone to
the inside of the curb track at the ends (very
important).
(B)
WEEP HOLE
TO INTERIOR
Place the grey setting blocks (E) into the curb (A) to
support the glass side panel (F). Position the block so
they are about 3” from the corner of the glass.
Place glass side panel (F) onto setting blocks and slide
glass panel into the wall jamb (B) about 1/ 2” using strip
of painters tape 1/ 2” from the edge of the glass will
help with alignment).
Press the 90° post into the curb and slide it over the
edge of the glass about 1/ 2”. Plumb post laterally.
Use the 4 short temporary vertical vinyls to help hold
glass and tracking in place.
NOTE: Obscure glass should be installed with textured
side out!
#8 x 2”
NOTE: To accommodate out of plumb walls, the 1/ 2”
overlap may be adjusted from 1/4” to 3/4”
SILICONE
Page 4 of 8
Hold the 90° post plumb and carefully measure
horizontally from the shower wall to the outside edge of
the 90° post. Add 3/16” to each measurement to find
the corresponding dimension on the header assembly
(from the outside mitered corner edge to the squared
wall end). Mark the ends of the header track and cut.
Using a 3/16” drill bit, drill the interior face of the
header assembly on both ends as shown to prepare for
a later step.

7
8
9
Press header (H) over the wall jambs (B), the 180
and the 90° post (Y).
Using the holes in the header (H) and curb (A) as a
guide, drill four 1/8” holes into the wall jambs (B), be
careful not to drill into the glass.
Drill an 1/8” hole thru the header (H) and the
curb (A) into the 180° post (G)
.
Note: The “door opening” measurement (normally
between the wall jamb and the 180° post) must be
between 7/8” and 1 3/4” wider than the “Door Panel
Width” (see illustration below in step #8).
Secure the header and curb to the wall jambs, the
180°post, and the #6 x 3/8” truss
head screws (J).
°
post, (G)
and also the 90° post
(Y)
90° post using the
Press the door assembly (M) and strike assembly (K)
over the wall jamb (B) and 180°post (G) (or appropriate
post).
Please remember that tempered glass must be
handled with care, keeping the edges of the glass from
hitting hard surfaces.
Use painters tape to hold door assembly and strike
assembly in place for now, as needed
The snap-in fillers should be 7/16” longer than the door
panel width.
Snap into place the snap-in fillers so that the lip of the
snap-in fillers is to the outside of the door (door will
leak if this is not done) and is centered between the
strike assembly and door assembly.
Page 5 of 8

10
11
12
1/8"
Remove tape and plumb door assembly laterally,
then drill two 1/8” holes about 1/4” vertically from the
header (H) and curb (A). Then screw the hinge jamb
into place using two #6 x 3/8” truss head screws.
Slide snap-in fillers (L) over to the hinge jamb so that
it is flush against it. Then slide the strike assembly (K)
over so that it is flush against the snap-in fillers (L)
and drill two 1/8” holes and screw into place.
NOTE: There should be a 1/4” gap from the edge of
the glass the inside face of the strike assembly (see
illustration in step 11).
(6) #6x3/8”
SCREWS
Slide magnet catch (V) over the edge of the glass and
line up magnets then mark with tape the location on
the glass where it should be.
Remove magnet catch (V). Wrap latch vinyl around the
edge of the glass where the magnet catch will go.
Slide magnet catch (V) over the vinyl ( use a rubber
mallet to pound the magnet catch on ).
Determine which side of the sweep needs to be
trimmed so that the deflector leg is to the inside of the
shower.
The sweep should be cut to DOOR PANEL WIDTH -
7/16”. It is recommended to leave the lower part of
the sweep attached to extend all the way to the edge
of the glass.
Slide sweep onto the bottom of the glass so that the
deflector leg is to the inside of the shower.
NOTE: The sweep can be adjusted up and down and
silicone can be used to help hold sweep on.
Apply a small bead of silicone to the notch that goes
under the hinge rail.
Page 6 of 8
1/4”
DEFLECTOR
DOOR
PANEL
HINGE RAIL
SIL
I
C
O
N
E
INSIDE

13
14
15
Inspect the pieces of black glazing vinyl,
and note the two different profiles. The smaller
shape (
X
) is installed vertically and the larger
shape (
O
) is installed horizontally. For structural
strength and maximum water resistance, these
vinyls are designed to fit tightly between the glass
and framing. To speed installation, use glass
cleaner or soapy water for lubrication.
NOTE: These glazing vinyls have been pre-
lubricated with a water-based silicone compound.
Wash hands thoroughly after glazing and avoid
contact with eyes or mouth.
1/4" GLASS
REQUIRES:
FIXED GLASS PANEL VERTICAL HORIZONTAL
V-219
V-220
3/16" GLASS
REQUIRES:
V-226 V-225
NOTCHNOTCH
STANDARD SIZES
SHIPPED WITH
4 PIECE VINYLS
(TEAR APART)
Loosen set screws using a small allen wrench (BE
CAREFUL NOT TO UNSCREW ALL THE WAY!).
Separate the handle and unscrew the cone head
screws.
Place one plastic washer and one plastic bushing
onto the cone head screw, slide screw through the
top hole in the glass door, next place one plastic
washer onto the screw then attach handle (do not
tighten all the way).
Repeat above step for bottom hole then tighten all
the way.
Slide handle over cone head screw then tighten set
screws using the allen wrench.
Cut the four vert. vinyls (X) 1” longer than the opening
and trim the ends at a 45° angle as shown.
Take one of the vert. vinyls (X) and, starting on the
outside jamb, press each end into the frame and work
toward the middle. Do not stretch the vinyl.
Install the other three pieces the same way.
Page 7 of 8

16
17
* Cut four of horizontal glazing vinyls 1/2” longer than
opening and trim the ends at a 45° angle.
* Start with the top exterior by pressing in the corners of
the horizontal glazing vinyl into place then work toward the
middle. Do not stretch the vinyl.
* Install the other vinyls the same way.
Using Onyx Adhesive / Sealer, caulk the entire exterior
and interior of the shower door. Also, fill the small gaps at
the corner of the vinyls that hold the glass side panels.
It is recommended to wait 24 hour be for using the shower
so that the caulking can cure.
Page 8 of 8
CURB
SETTING
BLOCK
GLASS
PANEL
GLAZING
VINYL
HEADER
/