Page is loading ...

Zubehör für Volkswagen
Accessories for Volkswagen
Accessoires pour Volkswagen
Distributed by Volkswagen Zubehör GmbH Printed in Germany by Volkswagen Zubehör GmbH 14.09.2017 -1-
000 071 105 J
Klappbarer Fahrradträger für Anhängevorrichtung
für maximal 2 Fahrräder, verstaubar in der Reserveradmulde
Folding bicycle carrier for towing hitch
for maximum 2 bicycles, stowable in spare wheel well
Porte-vélos pliant pour dispositif d'attelage
pour 2 vélos maximums, se range dans l'auge de la roue de secours
Portabicicletas plegable para dispositivo de remolque
para máximo 2 bicicletas, insertable en la cavidad de la rueda de repuesto
Portabiciclette ribaltabile per dispositivo di traino
per max. 2 biciclette, stipabile nella conca della ruota di scorta
Klapbare ¿ etsendrager voor trekhaak
voor maximaal 2 ¿ etsen, op te bergen in de uitsparing voor het reservewiel
Hopfällbar cykelhållare för dragkrok
för max 2 cyklar, kan förvaras i reservhjulsfacket
Porta-bicicletas rebatível para dispositivo de
reboque
para 2 bicicletas no máximo, pode ser guardado na concavidade da roda sobresselente
Skáadany uchwyt na rowery do montaĪu na haku
holowniczym
na maksymalnie 2 rowery, przechowywany w niecce na koáo zapasowe
Sklopný nosiþ jízdních kol na tažné zaĜízení
pro maximálnČ 2 jízdní kola, lze uschovat v prohlubni pro rezervní kolo
ɋɤɥɚɞɧɨɣ ɜɟɥɨɛɚɝɚɠɧɢɤ ɧɚ ɮɚɪɤɨɩ
ɧɟ ɛɨɥɟɟ ɞɜɭɯ ɜɟɥɨɫɢɩɟɞɨɜ ɫ ɜɨɡɦɨɠɧɨɫɬɶɸ ɭɤɥɚɞɤɢ ɜ ɩɨɥɨɫɬɶ ɞɥɹ
ɡɚɩɚɫɧɨɝɨ ɤɨɥɟɫɚ
Montageanleitung
Installation instructions
Instructions de montage
Instrucciones de montaje
Istruzioni di montaggio
Montage-aanwijzing
Monteringsanvisning
Instruções de montagem
Instrukcja montaĪu
Montá
ž
ní návod
ɂɧɫɬɪɭɤɰɢɹ ɩɨ ɦɨɧɬɚɠɭ
Änderungen des Lieferumfanges
vorbehalten.
Design and speci¿ cations sub-
ject to change without notice.
Sous réserve de modifications.
Se reservan las modificaciones
respecto al volumen de
suministro.
Ci riserviamo il diritto di apportare
modifiche al contenuto della
fornitura.
Wijzigingen in leveringsomvang
voorbehouden.
Ändringar av leverans-
omfattningen förbehålles.
Reservado o direito a alterações
do material fornecido.
Zastrzegamy sobie prawo zmian
zakresu dostawy.
ZmČny r ozsahu dodávky
vyhrazeny.
ȼɨɡɦɨɠɧɵ ɢɡɦɟɧɟɧɢɹ
ɤɨɦɩɥɟɤɬɚ ɩɨɫɬɚɜɤɢ.
E24 26R-030086
GB
GB
D
D
F
F
E
E
I
I
NL
NL
S
S
PT
PT
PL
PL
CZ
CZ
RU
RU

-2- Distributed by Volkswagen Zubehör GmbH Printed in Germany by Volkswagen Zubehör GmbH 14.09.2017
D
D
Vorsicht
Texte mit diesem Symbol weisen auf
gefährliche Situationen hin, die bei
Nichtbeachtung leichte oder mittelschwere
Verletzungen verursachen können.
Hinweis
Texte mit diesem Symbol weisen auf
Situationen hin, die bei Nichtbeachtung
Schäden an Ihrem Fahrzeug verursachen
können.
Texte mit diesem Symbol enthalten
zusätzliche Informationen.
GB
GB
F
F
Caution
Texts with this symbol indicate a hazardous
situation which, if disregarded, could result
in minor or serious injury.
Note
Texts with this symbol indicate situations
which could cause damage to your vehicle if
the warning is not observed.
Texts with this symbol contain additional
information.
Attention
Les textes indiqués par ce symbole
signalent des situations dangereuses
pouvant entraîner de légères blessures ou
des blessures moyennement graves, s'ils
ne sont pas respectés.
Remarque
Les textes indiqués par ce symbole signalent
des situations qui peuvent endommager le
véhicule, s'ils ne sont pas respectés.
Les textes suivis de ce symbole
comportent des informations supplémentaires.
E
E
¡Cuidado!
Los textos marcados con este símbolo
hacen referencia a situaciones peligrosas
que pueden derivar en lesiones de
gravedad media o ligera en caso de no
observarse la indicación.
Nota
Los textos marcados con este símbolo
hacen referencia a situaciones que pueden
provocar daños en el vehículo en caso de no
observarse la indicación.
Los textos marcados con este símbolo
contienen información adicional.
I
I
NL
NL
Prudenza
I testi che riportano questo simbolo indicano
situazioni di pericolo, che se non evitate
possono provocare lesioni lievi o moderate.
Avvertenza
I testi contrassegnati da questo simbolo
richiamano l'attenzione a situazioni che
possono provocare danni al veicolo, qualora
non vengano osservati i relativi avvertimenti e
avvertenze.
I testi preceduti da questo simbolo
contengono informazioni ulteriori ed
approfondimenti di vario genere.
Voorzichtig
Teksten met dit symbool wijzen
op gevaarlijke situaties, die bij
veronachtzaming lichte of matige
verwondingen kunnen veroorzaken.
Aanwijzing
Teksten met dit symbool wijzen op situaties,
die bij veronachtzaming schade aan uw
voertuig kunnen veroorzaken.
In teksten met dit symbool staat extra
informatie.
S
S
Viktigt
I texter med den här symbolen informeras
det om farliga situationer som kan orsaka
lätta eller medelsvåra personskador, om
anvisningarna ignoreras.
Observera
I texter med den här symbolen informeras det
om situationer som kan orsaka skador på ditt
fordon, om anvisningarna ignoreras.
I texter med den här symbolen finns det
ytterligare information.
PT
PT
CZ
CZ
Cuidado
Os textos com este símbolo alertam para
situações perigosas que, em caso de
incumprimento, podem provocar ferimentos
ligeiros ou moderados.
Nota
Os textos com este símbolo alertam para
situações que, em caso de incumprimento,
podem causar danos no seu veículo.
Os textos com este símbolo contêm
informações adicionais.
Varování
Texty s tímto symbolem upozorĖují na
nebezpeþné situace, ve kterých pĜi
nedodržení pokynĤ mĤže dojít k lehkým
nebo stĜednČ tČžkým zranČním.
UpozornČní
Texty s tímto symbolem upozorĖují na situace,
ve kterých pĜi nedodržení pokynĤ hrozí škody
na vašem vozidle.
Texty s tímto symbolem obsahují
doplĖující informace.
PL
PL
OstroĪnie
Teksty z tym symbolem wskazują na
niebezpieczną sytuacjĊ, która w przypadku
nieprzestrzegania wskazówek moĪe
spowodowaü lekkie lub Ğrednie obraĪenia
ciaáa.
Wskazówka
Teksty z tym symbolem wskazują na sytuacjĊ,
która w przypadku nieprzestrzegania moĪe
spowodowaü szkody w pojeĨdzie.
Teksty z tym symbolem zawierają
informacje dodatkowe.
RU
RU
Ɉɫɬɨɪɨɠɧɨ
ɇɚɥɢɱɢɟ ɞɚɧɧɨɝɨ ɫɢɦɜɨɥɚ ɪɹɞɨɦ ɫ
ɬɟɤɫɬɨɦ ɭɤɚɡɵɜɚɟɬ ɧɚ ɨɩɚɫɧɵɟ ɫɢɬɭɚɰɢɢ,
ɩɪɢ ɤɨɬɨɪɵɯ ɜ ɫɥɭɱɚɟ ɢɝɧɨɪɢɪɨɜɚɧɢɹ
ɭɤɚɡɚɧɢɣ ɜɨɡɦɨɠɧɵ ɥɟɝɤɢɟ ɬɪɚɜɦɵ ɢɥɢ
ɬɪɚɜɦɵ ɫɪɟɞɧɟɣ ɬɹɠɟɫɬɢ.
ɍɤɚɡɚɧɢɟ
ɇɚɥɢɱɢɟ ɞɚɧɧɨɝɨ ɫɢɦɜɨɥɚ ɪɹɞɨɦ ɫ ɬɟɤɫɬɨɦ
ɭɤɚɡɵɜɚɟɬ ɧɚ ɫɢɬɭɚɰɢɢ, ɩɪɢ ɤɨɬɨɪɵɯ ɜ
ɫɥɭɱɚɟ ɢɝɧɨɪɢɪɨɜɚɧɢɹ ɭɤɚɡɚɧɢɣ ɜɨɡɦɨɠɧɨ
ɩɪɢɱɢɧɟɧɢɟ ɭɳɟɪɛɚ ȼɚɲɟɦɭ ɚɜɬɨɦɨɛɢɥɸ.
Ɍɟɤɫɬɵ ɫ ɬɚɤɢɦ ɫɢɦɜɨɥɨɦ ɫɨɞɟɪɠɚɬ
ɞɨɩɨɥɧɢɬɟɥɶɧɭɸ ɢɧɮɨɪɦɚɰɢɸ.

GB
GB
General safety notes
Dear Customer,
We thank you for purchasing a Volkswagen Accessory
bicycle carrier. Adhere strictly to the work procedures
and safety notes described in the assembly and
operating instructions. We accept no responsibility
for damage caused through non-observance of the
instructions.
The vehicle user is responsible to ensure their own
vision and hearing are not impaired by the load and that
the load does not adversely affect the driving condition
of the vehicle. The vehicle user must ensure that the
vehicle and the load are loaded correctly and that the
road worthiness of the vehicle is not adversely affected.
Prescribed lighting and lighting equipment must be ¿ tted
and operational during daylight.
These assembly and operating instructions also contain
the general type approval for the bicycle carrier for use
with towing hitches and must always be carried in the
vehicle.
Always observe the respective legislation for bicycle
carriers in the country it is used in.
Caution
Adhere strictly to the work procedures and safety notes described in
the assembly and operating instructions.
A bicycle carrier for a towing hitch is only suitable for the
transportation of bicycles.
The bicycle carrier is not suitable for use offroad.
Check position, bolted connections and fastenings of bicycle
carrier and bicycles for tightness after each assembly, before every
journey and during longer journeys. Retighten if necessary. Repeat
the checks at regular intervals, depending on the road surface/
conditions.
While driving, regularly check in rear view mirrors for possible
undesired movement or shifting of bicycle carrier and/or bicycles.
For irregularities, drive on at vastly reduced speed to next possible
stopping place and check, readjust and retighten all bolts and
¿ ttings on bicycle carrier and/or bicycles.
Non-observance may allow the bicycle carrier along with the
mounted bicycles to loosen and detach from the vehicle and cause
injuries to you, the occupants of the vehicle and/or cause an
accident.
Caution
Moving parts, i.e. the threads of the screws of holders and quick-
release clamps must be cleaned and lubricated at regular intervals
to prevent seizure of the rotary knobs.
Do not lubricate preassembled nuts, bolts or other threaded
¿ ttings. The nuts, bolts and other threaded ¿ ttings may loosen and
the bicycle carrier and/or bicycles may become loose/fall off and
endanger you and other persons, or cause an accident.
Caution
If a load (the bicycles) project more than 40 cm (15.7 inches) beyond
the light surface of the side-marker light or tail light of rear carrier
system, then the load must be marked by, at side with a white light
facing forwards and a red light facing to rear and positioned at a
maximum of 40 cm (15.7 inches) from its edge and a maximum of
150 cm (4.9 feet) above the road surface.
When transporting bicycles which project, then mark wheels with
extra markings.
When travelling at night, cover light reÀ ectors, reÀ ectors and wheel
reÀ ectors of bicycles so as not to distort rear light picture of vehicle.
Not covering might otherwise hinder, deceive or endanger other road
users.
Non-compliance may cause an accident.
Caution
Check function of lighting before starting a journey. The rear fog
light on the vehicle must not light up when the rear fog light on the
bicycle carrier lights up. Therefore both lights must not light up
simultaneously.
For vehicles which have received an initial type approval after
01.10.1998: the ¿ tted bicycle carrier or the carried load (the bicycles)
may not cover/obscure the third brake light. The third brake light
of the vehicle must be visible: along the left and right sides of the
vehicle longitudinal axis – in a horizontal angle of 10°, in relation
upwards to the edge of the light – in a vertical angle of 10°, in relation
downwards to the edge of the light – in a vertical angle of 5°. If this is
not possible then another replacement third brake light must be ¿ tted.
Non-compliance may cause an accident.
Caution
The ¿ tting of a bicycle carrier and the ¿ tting of bicycles to the
carrier changes the handling, braking behaviour and the side wind
sensitivity of the vehicle. Do not exceed the maximum permitted
speed of 130 km/h (81 mph).
Do not cover the bicycles with tarpaulins or other protective covers
as they change the wind-exposed areas which greatly affects the
handling of the vehicle.
Position heavy loads in the luggage compartment as far forwards as
possible to prevent an excess rear-end weight.
Always adjust your speed and driving to match prevailing road,
traf¿ c and weather conditions and drive particularly carefully when
bicycles are mounted.
Non-observance may allow the bicycle carrier along with the
mounted bicycles to loosen and detach from the vehicle and cause
injuries to you, the occupants of the vehicle and/or cause an
accident.
Caution
Objects that are not secured, or are secured incorrectly, can
cause serious injuries in the event of a sudden driving or braking
manoeuvre or accident.
When the bicycle carrier is transported in the luggage compartment
or the spare wheel well, then always secure the bicycle carrier with
suitable lashings and/or securing straps to prevent it moving.
Note
The bicycle carrier is model dependently suitable for transportation in
the spare wheel well, please request information, where appropriate,
from your Volkswagen partner. To stow securely in the spare wheel
well, use securing strap and securing element (part number:
000 071 705 A) , see page 22.
Volkswagen Accessories recommends using the stowage bag (part
number 000 071 226 A), to prevent scratches and abrasion marks.
Note
If the vehicle is equipped with an electrically operated tailgate/boot
lid, ensure that there is suf¿ cient clearance when the bicycle carrier
is mounted on the towing hitch. If possible, deactivate the electrically
operated tailgate/boot lid and operate it only manually.
Remove bicycle carrier before using a car wash system. The bicycle
carrier, the vehicle and/or the car wash system may receive serious
damage.
Distributed by Volkswagen Zubehör GmbH Printed in Germany by Volkswagen Zubehör GmbH 14.09.2017 -13-
GB
GB

-14- Distributed by Volkswagen Zubehör GmbH Printed in Germany by Volkswagen Zubehör GmbH 14.09.2017
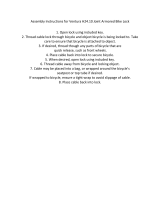
Scope of delivery
2 bicycle
carrier
Item Designation Quantity
1
Bicycle carrier 1
2
Holder, 1st bicycle 1
3
Holder, 2nd bicycle 1
4
Key 6
5
Carrier frame 1
6
Quick-release clamp for carrier frame 2
7
Wheel rails 4
8
Rear lights 2
9
Towing hitch mounting 1
10
Locking lever for towing hitch mounting 1
11
Connector for lighting system 1
12
Registration plate holder 1
The holders (2) and (3) are part of the items supplied
but are not preassembled. The key (4) are inserted in the
lock of the holders (2) and (3) as well as in the lock of the
securing lever (10), in each case.
Bulbs
Designation
1
Turn signal¹
BL PY21W 12V yellow
2
Registration plate lighting¹
BL C 5W 12V (35 mm long) white
3
Rear fog light¹ for left rear light
BL PR21W 12V red
Reversing light¹ for right rear light
BL P21W 12V white
4
Brake/rear light¹
BL P21/5W 12V white
¹
)
The bulbs are available on the commercial market
Technical data
Unladen Weight approx. 13 kg
(28.6 lb)
Maximum payload (load)
from D-¿ gure ²
)
5,3 kN
- with drawbar loading of min. 50 kg (110.2 lb)
37 kg (81.6 lb)
from D-¿ gure ²
)
6,7 kN
- with drawbar loading of min. 50 kg (110.2 lb)
37 kg (81.6 lb)
- with drawbar loading of min. 75 kg (165.3 lb)
60 kg (132.3 lb)
Voltage supply
for max. 2 bicycles
13-pin, 12 V
Maximum tube diameter of bicycle frame
Round tubing 75 mm
Oval tubing 75 x 45 mm
The bicycle carrier is for exclusive ¿ tting on a towing hitch with a
ball coupling in accordance with ISO 50.
²
)
See type plate on towing hitch

Distributed by Volkswagen Zubehör GmbH Printed in Germany by Volkswagen Zubehör GmbH 14.09.2017 -15-
Fitting bicycle carrier
Caution
The towing hitch must be suitable for use with a bicycle
carrier:
• D-¿ gure of ball coupling (see “Technical data” on
page 14)
• Material of towing hitch at least St 52-3 (see type plate
on towing hitch)
Non-observance may allow the bicycle carrier along with the
mounted bicycles to loosen and detach from the vehicle and
cause injuries to you, the occupants of the vehicle and/or
cause an accident.
The ball coupling must be cleaned and degreased before
¿ tting the carrier.
Caution
The revised vehicle dimensions (length, width, height) due to
the ¿ tting of the bicycle carrier may endanger you and other
persons, or cause serious damage if the revised dimensions
are not taken into account.
Remember revised dimensions of vehicle when entering
restricted areas and entrances etc. Take extra care when
reversing.
Caution
Check lighting equipment is working perfectly before every
journey, otherwise the result may be an accident.
Figure 1
1. Open cover of stowage bag, if carrier is stowed in a
bag. (The bag is available as a separate item and is not
included in the items supplied.)
2. Hold the bicycle carrier (1) as shown and press the
securing lever (2) (upper enlargement). The mounting folds
outwards (lower enlargement).
Figure 2
1. Hold bicycle carrier (1) vertically and slide the mounting (4)
on to the ball coupling (2) of the towing hitch.
Note
Ensure the mounting (4) remains in the horizontal position
(enlargement) when sliding it into position. When the
mounting is difficult to slide on or when the bicycle carrier
cannot be folded out, then remove the bicycle carrier from
the ball head and then slide it back on again. Do not use
force!
2. Tilt the bicycle carrier (1) downwards until the securing
lever (3) audibly engages.
The red marking on the securing lever (3) must no longer
be visible.
3. Check that the bicycle carrier (1) is parallel with the
bumper and approximately parallel with the ground.
Check that the bicycle carrier (1) is seated securely by
shaking the carrier. If necessary, remove the bicycle carrier
(1) and mount it again.
Figure 3
1. Lock the bicycle carrier (1) with the key (2) (observe arrow
on lock cylinder) and remove key (2).
2. Pull connector (3) out of connector holder on wheel rail (4).
3
1
2
GB
GB

-16- Distributed by Volkswagen Zubehör GmbH Printed in Germany by Volkswagen Zubehör GmbH 14.09.2017
Figure 4
1. Insert connector (1) into socket (2) on vehicle and turn it
clockwise on to stop.
Figure 5
1. Open quick-release clamp (2) upwards.
2. Fold carrier frame (1) upwards and close the quick-release
clamp (2) again completely, so that the carrier frame (1) is
locked securely (¿ xed).
Figure 6
1. Fold out wheel rails (3) with rear lights (1) using the ribs (2)
and lock in position.
Note
Always fold out the wheel rails (3) using the ribs (2) and not
the rear lights (1). As this could damage the rear lights (1).
2. Check function of lighting equipment.
6
5
4

Distributed by Volkswagen Zubehör GmbH Printed in Germany by Volkswagen Zubehör GmbH 14.09.2017 -17-
Figure 7
1. Press holders (4) downwards. Slide the registration
plate (1) into the registration plate holder (2), push it
upwards and insert it fully.
2. Release holders (4) and check that the registration plate is
seated correctly.
Note
To insert higher registration plates, push stopper (3) back and
slide the registration plate fully into the registration plate
holder (1).
The registration plate on the bicycle carrier and the vehicle
registration plate must display the same registration. The
registration plate on the bicycle carrier must be easily readable.
Removing bicycle carrier
Figure 8
1. First fold in the wheel rail (3) with rear light (1) on the left
side (arrow A) using the rib (2).
2. Then fold in the wheel rail (3) with rear light (1) on the right
side (arrow C) using the rib (2).
Note
Always fold in the wheel rails (3) using the ribs (2) and not the
rear lights (1). As this could damage the rear lights (1).
3. Open quick-release clamp (5) upwards.
4. Fold carrier frame (4) downwards (arrow B) and close
the quick-release clamp (5) again completely, so that the
carrier frame (4) is locked securely (¿ xed).
Note
The quick-release clamps (5) and the carrier frame (4) should
be cleaned regularly using a soapy water solution, especially
when soiled/difficult to move.
Figure 9
1. Remove connector (2) from socket (3) on vehicle and
insert it into the connector holder on the wheel rail (6).
2. Unlock the bicycle carrier (1) with the key (4) (observe
arrow on lock cylinder).
3. Press securing lever (5) and position bicycle carrier (1)
vertically upwards (arrow A).
4. Pull bicycle carrier (1) to rear off the ball coupling of the
towing hitch (8) (arrow B).
5. Place bicycle carrier (1) with mounting (7) on the ground
which will close the mounting (7).
In dependence on model, model equipment and fittings
in spare wheel well: remove all secured items from the spare
wheel well to allow the stowage of the carrier in the spare
wheel well.
8
9
7
GB
GB

-18- Distributed by Volkswagen Zubehör GmbH Printed in Germany by Volkswagen Zubehör GmbH 14.09.2017
Fitting/removing bicycles
Caution
A bicycle carrier for a towing hitch is only suitable for the
transportation of bicycles.
Only bicycles with a max. individual weight of 30 kg may be
transported on the bicycle carrier.
The maximum permitted load on the bicycle carrier, the
drawbar loading on the towing hitch, the total permissible
weight of the vehicle as well as the maximum permissible
axle loading of the vehicle must never be exceeded (see
Owners manual for the vehicle).
Non-observance may allow the bicycle carrier along with the
mounted bicycles to loosen and detach from the vehicle and
cause injuries to you, the occupants of the vehicle and/or
cause an accident.
Caution
Secure bicycles evenly loaded and with lowest point of centre
of gravity on bicycle carrier, Secure each bicycle to bicycle
frame with a holder and secure front and rear wheels of
bicycle using tensioning straps to stop wheels falling off.
Non-observance may allow the bicycles and/or the loose
items to fall off the moving vehicle which may cause an
accident and possible associated injuries and damage to
other road users.
Before ¿ tting of bicycles: remove child seat and all other
loose items such as drinks bottles, pannier/saddle bags,
batteries of e-bikes etc. and stow them.
Caution
Danger of an accident when bicycles slip-off/tilt. Secure
bicycles against slippage/tilting.
Fit and remove bicycles with the assistance of a second
person.
Note
The bicycle carrier with bicycles may be positioned too close to
the exhaust system, depending on type of vehicle. The bicycle
carrier and/or bicycles may be damaged by the hot exhaust
pipe and/or hot exhaust gasses. The use of the bicycle is
therefore not suitable in such cases.
Please check with the manufacturer/bicycle dealership of
bicycles with pressure sensitive frames e.g. carbon frames to
see if these bicycles can be transported with this bicycle carrier
before transporting them.
Figure 10
Observe allocation of bicycles in direction of travel (arrow), as
show here.
Note
Fit heavier bicycle close to vehicle and lighter bicycle (i.e child
bicycle) furthest away from vehicle on bicycle carrier.
Fit first bicycle with chain sprocket towards vehicle.
Fitting ¿ rst bicycle
Figure 11
1. Press lock (1) and pull out tensioning strap (2).
2. Position bicycle on wheel rail (3) and secure against
tipping.
10
11

Distributed by Volkswagen Zubehör GmbH Printed in Germany by Volkswagen Zubehör GmbH 14.09.2017 -19-
Figure 12
1. Unlock rotary knob (2) with key (6) if necessary.
2. Unscrew rotary knob (2) to open clamp (3) until clamp is
open to approx. hand width (A).
3. Press clamp (3) together and hold. Clamp (5) opens.
4. Position holder (4) in a suitable position on carrier
frame (1) and release clamp (3). Clamp (5) closes.
Figure 13
Note
Secure holder (2) only to bicycle frame, otherwise other items
of bicycle may be damaged. No other components such as
gear selector or brake cables may be clamped. Defective
holders must be replaced immediately.
1. Position holder (2) on bicycle frame and tighten clamp (3)
securely using rotary knob (1).
2. Lock holder (2) using key (4) and remove key (4).
3. Guide tensioning strap (6) centrally between two wheel
spokes and into buckle (7) then pull hand-tight.
4. Then use tensioning strap (6) tensioner (5) to fully tension
(arrow).
Note
Do not over tension the tensioning strap (6), otherwise the
tensioning strap (6) and/or the tyres/wheel rims may be
damaged.
The tension straps (6) are under tension when tightening.
The lock (8) may need to be forcibly depressed to release the
tension.
Note
The threads of the screws of the holder must be cleaned and
lubricated at regular intervals to prevent seizure of the rotary
knob.
Fitting second bicycle
Figure 14
The ¿ tting of the second bicycle is basically similar to the
¿ rst bicycle. The opposed allocation of both bicycles must be
observed.
Note
Secure holder (1) only to bicycle frame, otherwise other items
of bicycle may be damaged. No other components such as
gear selector or brake cables may be clamped. Defective
holders must be replaced immediately.
The second bicycle is secured using the longer holder (1).
Removing bicycle
The loosening of the holders and the removal of the bicycles is
carried out in reverse order procedure to fitting.
12
14
13
GB
GB

-20- Distributed by Volkswagen Zubehör GmbH Printed in Germany by Volkswagen Zubehör GmbH 14.09.2017
Tilting bicycle carrier downwards and tilting
back upwards
Caution
Slowly tilt the bicycle carrier and ensure that no person or
object is within the tilt area. There is a danger of people or
objects being crushed within the tilt area.
Ensure that the bicycle carrier engages fully and locks into
both hooks when folding back the carrier, otherwise there is a
danger that the bicycle carrier will tilt while driving and cause
injuries to you or other persons and/or cause damage.
Figure 15
Tilting bicycle carrier downwards
The bicycle carrier can be tilted to open the tailgate/boot lid
when loading and unloading vehicle.
1. Operate foot lever (3) and tilt the bicycle carrier (2) by
pulling on the carrier frame (1) or bicycle frame (when
bicycles are mounted on the bicycle carrier).
Note
The steering handle bar may contact the ground due to the
larger tilt angle. This may damage the steering handle bar.
Therefore remove bicycle before tilting, if necessary.
Figure 16
Tilting bicycle carrier back upwards
1. Fold back the bicycle carrier (1) until both hooks (2)
engage fully into frame (3) and lock.
2. Shake the bicycle carrier (1) to check it is seated correctly.
If necessary, tilt the bicycle carrier (1) downwards again
and then tilt it back up again.
Preparing for journey
Caution
Check position, bolted connections and fastenings of bicycle
carrier and bicycles for tightness after each assembly,
before every journey and during longer journeys. Retighten if
necessary.
Non-observance may allow the bicycle carrier along with the
mounted bicycles to loosen and detach from the vehicle and
cause injuries to you, the occupants of the vehicle and/or
cause an accident.
Repeat the checks at regular intervals, depending on the
road surface/conditions.
Caution
Check lighting equipment is working perfectly before every
journey, otherwise the result may be an accident.
Note
The registration plate and the lighting equipment of the bicycle
carrier must not be covered.
If the bicycle carrier is not fully loaded, then ensure the
following is observed:
• Remove non-required holders from the carrier frame and
stow them safely in the luggage compartment.
• All keys are removed and stored.
• Tensioning straps for all wheel rails are closed and secure.
15
16

Distributed by Volkswagen Zubehör GmbH Printed in Germany by Volkswagen Zubehör GmbH 14.09.2017 -21-
18
19
17
20
Changing bulbs
Note
Before changing bulbs: ensure vehicle ignition is switched off
and that the lighting equipment connector is removed from the
towing hitch electrics socket. Non-observance may cause a
short circuit or other damage. Please have the bulbs changed
by a specialist workshop if unsure.
Note
The changing of bulbs is described and shown for the left-hand
rear light on the bicycle carrier. The right-hand rear light is
similar.
Figure 17
1. Press locking devices (2) and pull rear light (1) out of
holder (3).
Figure 18
1. Remove cover (2) in direction of arrow.
2. Remove rear light (1) completely from holder (3).
Figure 19
1. Unscrew screws (1) and remove lens (2).
Figure 20
1. Press defective bulb lightly into holder (2), (4), (6) or (7).
2. Remove bulb (3) from holder (4). Turn bulb (1), (5) or (8)
approx. 90° anticlockwise in holder (2), (6) or (7) and pull
out.
3. Press new bulb lightly into ¿ tting (2), (4), (6) or (7).
4. Insert new bulb (1), (5) or (8) into holder (2), (6) or (7)
and additionally turn approx. 90° clockwise in holder. Bulb
details, see page 14.
Note
Touch glass of new bulbs only with a clean cloth and insert into
holder.
5. Fit lens again and tighten hand-tight, see ¿ gure 18.
GB
GB

-22- Distributed by Volkswagen Zubehör GmbH Printed in Germany by Volkswagen Zubehör GmbH 14.09.2017
Figure 21
1. Slide rear light (1) lightly into holder (2), without it
engaging.
2. Route cable (3) into cable guide in holder (2).
Figure 22
1. Guide longer tab of cover (2) into wheel rail (1) and insert
cover (2) completely into holder (3).
2. Slide rear light completely into holder until locking
device (4) engages audibly.
Installing securing element and tensioning
strap in luggage compartment (when
transportation in spare wheel well is
required)
Figure 23
Note
If necessary, remove securing elements for spare wheel or
foam insert by turning 90° anticlockwise.
1. Insert securing element (13) into opening on floor of spare
wheel well, as shown, and turn it through 90° clockwise.
Thread tensioning strap (15) through securing element (13)
and ensure both sides of strap are of equal length.
Note
When the securing element (13) will not turn through 90°
by hand: insert a suitable screwdriver or other into the slot
and use it as a lever.
2. Place bicycle carrier into the spare wheel well and secure it
with tensioning strap.
The securing element and the tensioning strap are
available separately from your Volkswagen partner and are not
part of the items supplied.
21
22
23
/