Page is loading ...

VORTEX FACTORY: Via E. Fermi, 5 – 27040 Campospinoso (PV)– ITALY – Tel. +39 0385 765200
OTK KART GROUP srl
Via dei Soprini, 16 – 25080 PREVALLE (Brescia) ITALY-Tel. +39 030 6804601 – Fax +39 030 6804698
MINI ROK
OWNER’S
MANUAL

VORTEX FACTORY: Via E. Fermi, 5 – 27040 Campospinoso (PV)– ITALY – Tel. +39 0385 765200
OTK KART GROUP srl
Via dei Soprini, 16 – 25080 PREVALLE (Brescia) ITALY-Tel. +39 030 6804601 – Fax +39 030 6804698
INDICE
1. GENERAL INFORMATION 3
1.1. Introduction 3
1.2. Symbols 3
1.3. Safety Information 3
1.4. Technical Specifications 4
1.5. Special Technical Specifications for Homologated Engine 4
1.6. Packaging 4
2. ENGINE ASSEMBLING 5
3. ENGINE/CHASSIS ASSEMBLY 15
4. STARTING AND BRAKE-IN 22
5. SERVICING YOUR ENGINE 23
5.1. Maintenance Schedule and Adjustments 23
5.2. Torque Chart 23
5.3. Sizes and Measures 24
5.4. Chain 24
5.5.Throttle Cable 24
5.6. Carburettor 24
5.7. Spark Plug 25
5.8. Exhaust 26
5.9. Clutch and Starter Gear 26
5.10. Pinion 28
5.11.Cylinder Head 29
5.12.Cylinder 30
5.13.Piston 31
5.14.Connecting Rod 32
5.15.Bottom End 32
6. ENGINE EXPLODED VIEW AND PARTS LIST 33
7. CONTACTS 41

VORTEX FACTORY: Via E. Fermi, 5 – 27040 Campospinoso (PV)– ITALY – Tel. +39 0385 765200
OTK KART GROUP srl
Via dei Soprini, 16 – 25080 PREVALLE (Brescia) ITALY-Tel. +39 030 6804601 – Fax +39 030 6804698
1.1. INTRODUCTION
Thank you for your purchasing of a Vortex engine. This manual contains information on how to
help you with getting the best results from your new engine. Furthermore, it will explain you how
to operate your Vortex engine safely and in a proper manner.
Vortex update this manual constantly. All the information in this manual is based on the latest
experience and product information available at the time of writing.
Vortex reserve the right to make any kind of changes to this manual at anytime without notice and
without incurring in any obligation.
This manual shall be considered part of the Vortex engine and should remain with the engine itself
if resold.
1.2. SYMBOLS
Personal injury Mechanical Danger Caution
Pay attention to the symbols of this manual. They alert you of dangerous situations for you or for
your engine.
1.3. SAFETY INFORMATION
-Do not start the engine indoor as garages, trailers, etc. Start the engine in a well-ventilated area
only. Exhaust emissions are hazardous to your health.
-Always wear gloves and proper clothing when working on your engine.
-Use caution when handling fuel. Gasoline is flammable and explosive. When working with fuel, do
not smoke or use it near fire or flames. Avoid any skin contact and inhaling fuel vapors.
-Never touch moving parts when the engine is running.
-During operation both engine and muffler, become very hot. Do not touch them and do not place
anything on them after operation.
-Do not touch the spark plug or cable. It may provoke electrical shocks.
-Understand the operation of all controls and learn how to stop the engine quickly in case of
emergency.
-Do not use the engine without clutch cover and chain protection.

VORTEX FACTORY: Via E. Fermi, 5 – 27040 Campospinoso (PV)– ITALY – Tel. +39 0385 765200
OTK KART GROUP srl
Via dei Soprini, 16 – 25080 PREVALLE (Brescia) ITALY-Tel. +39 030 6804601 – Fax +39 030 6804698
1.4. TECHNICAL SPECIFICATIONS
Cylinder Displacement (max)
60cc.
Cylinder Bore (max)
42,10 mm.
Piston Stroke
43,00 mm.
Admission system
Piston Port
Cooling System
Free air
Carburetor
Dell’Orto PHBG 18 BS
Ignition System
Selettra
Ignition Type
Digital
Ignition Timing
3 mm.
Spark Plug Gap
0,8 mm.
Fuel Mixture
3%
Engine Weight
-All sizes and measurements in this manual are expressed in metrics.
-Always use original Vortex parts and proper tools when working on your engine.
-Proper fuel mix is necessary for optimum engine life and performance.
1.5. SPECIAL TECHNICAL SPECIFICATIONS FOR HOMOLOGATED ENGINE
Vortex Mini Rok Engine is produced in one version only. However, refer to your country
homologation file for eventual specific rules and/or sizes.
1.6. PACKAGING
Your engine will be packed in a sealed box with the Vortex logo printed on and a sticker with
model and serial number attached. It will be a second box complete with accessories as
carburettor, muffler, fuel pump, air box, etc.

VORTEX FACTORY: Via E. Fermi, 5 – 27040 Campospinoso (PV)– ITALY – Tel. +39 0385 765200
OTK KART GROUP srl
Via dei Soprini, 16 – 25080 PREVALLE (Brescia) ITALY-Tel. +39 030 6804601 – Fax +39 030 6804698
2. ENGINE ASSEMBLING
In order to perform this job, you will need the following tools:
Compressed air
Allen Wrench
3 - 4 - 5 - 6 - 8 mm
Fixed Wrench
5 - 7 - 8 - 10 – 14 - 17 mm
Flat Pliers
Socket Spanner
11 mm
Hooker
Straight Ruler
Cross Screwdriver
Flat Screwdriver
Torque Wrench
1
Compressed air
Unpack the engine and remove any packaging
material on it.
2
6mm Allen Wrench
Lay the engine on its side and attach the engine
mount to the engine base with four 8 mm Allen
screws.

VORTEX FACTORY: Via E. Fermi, 5 – 27040 Campospinoso (PV)– ITALY – Tel. +39 0385 765200
OTK KART GROUP srl
Via dei Soprini, 16 – 25080 PREVALLE (Brescia) ITALY-Tel. +39 030 6804601 – Fax +39 030 6804698
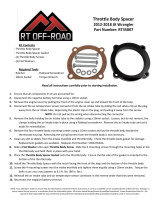
3
Engine Wheelbase Measurements in case you
need to drill your engine mount.
4
10mm Fixed Wrench
Attach the specific metal-chromed bracket
provided to the engine by using 2 of the 4 silent
blocks provided. Pass them through the support
in the engine and tighten with washer and 6
mm nut. Sometimes thread on the silent block
could be short. Use any threadlocker then.
5
10mm Fixed Wrench
Attach 1 of the remaining 2 silent blocks to the
front end of the bracket. Tighten with washer
and 6 mm nut. Sometimes thread on the silent
block could be short. Use any threadlocker
then.
6
10mm Fixed Wrench
Insert the silent block through the upper hole
on the specific metal-chromed bracket. Then
attach the brown cable (earth) coming from the
ignition, a flat washer and 6 mm nut. Tighten
everything. Sometimes thread on the silent
block could be short. Use any threadlocker
then.

VORTEX FACTORY: Via E. Fermi, 5 – 27040 Campospinoso (PV)– ITALY – Tel. +39 0385 765200
OTK KART GROUP srl
Via dei Soprini, 16 – 25080 PREVALLE (Brescia) ITALY-Tel. +39 030 6804601 – Fax +39 030 6804698
7
3 mm Allen Wrench + 7 mm Fixed
Wrench
Insert the two 4x30 mm screws into the plastic
electric plug. Attach the electric plug to the
short bracket provided. Secure it with washer
and 4 mm nut.
Sometimes the holes in the plastic electric plug
need to be widened with a 4 mm drill.
8
10 mm Fixed Wrench
Insert the short bracket with the electric plug
attached into the two free ends of the silent
blocks previously attached to the engine in
Point 4. Tighten with washer and 6 mm nut.
9
3 mm Allen Wrench + 7 mm Fixed
Wrench
Insert the 4x30 screw into the coil. Attach the
coil in the specific bracket located on top the
main bracket and secure it with washer and 4
mm nut.
10
The stop cable end from the ignition is “male”.
The stop cable end from the battery is “male”
too.
We provide a “female-female” extension to link
both end.

VORTEX FACTORY: Via E. Fermi, 5 – 27040 Campospinoso (PV)– ITALY – Tel. +39 0385 765200
OTK KART GROUP srl
Via dei Soprini, 16 – 25080 PREVALLE (Brescia) ITALY-Tel. +39 030 6804601 – Fax +39 030 6804698
11
Plug the two ends from the ignition to the coil.
Green cable goes in green plug.
12
3 mm and 5 mm Fixed Wrench
a. Attach the red cable to the electric starter
using the screw there is in it.
b. Unscrew the 5 mm Allen screw. Insert the
earth cable (black) plug into the screw and
screw firmly.
13
Cover both cables ends with the plastic covers
inserted in the cables.
14
10 mm Fixed Wrench
Attach the fuel pump to the free end of the
same silent block where the ground cable has
been attached in point 6. Secure it with 6 mm.
nut and washer provided.

VORTEX FACTORY: Via E. Fermi, 5 – 27040 Campospinoso (PV)– ITALY – Tel. +39 0385 765200
OTK KART GROUP srl
Via dei Soprini, 16 – 25080 PREVALLE (Brescia) ITALY-Tel. +39 030 6804601 – Fax +39 030 6804698
15
Flat Screwdriver
a. Remove the plastic cap from the depression
plug.
b. Insert the fuel line from the side of the fuel
pump into the depression plug in the crankcase
16
Flat Screwdriver
a. Remove the plastic cap from inlet manifold.
b. Remove carburettor from its box.
c. Fit the clamp provided together with the
carburettor over the inlet rubber manifold.
d. Insert the carburettor into the inlet rubber
manifold.
17
Flat Screwdriver
Ensure the carburettor is correctly seated, then
tighten the carburetor to the inlet manifold by
using the specific clamp.
18
Screw the air box mount to the carburettor
manually. Do not use any tool.

VORTEX FACTORY: Via E. Fermi, 5 – 27040 Campospinoso (PV)– ITALY – Tel. +39 0385 765200
OTK KART GROUP srl
Via dei Soprini, 16 – 25080 PREVALLE (Brescia) ITALY-Tel. +39 030 6804601 – Fax +39 030 6804698
19
Cross Screwdriver
Remove the top of the carburettor by
unscrewing the two screws.
20
Insert the throttle cable into the elbow on top
of the carburettor with the lead nut in.
21
8 mm Fixed Wrench
Tighten the carburettor throttle cable register
elbow.
22
Pass the throttle cable through the spring and
into the cut in the side of the plastic slide cover.

VORTEX FACTORY: Via E. Fermi, 5 – 27040 Campospinoso (PV)– ITALY – Tel. +39 0385 765200
OTK KART GROUP srl
Via dei Soprini, 16 – 25080 PREVALLE (Brescia) ITALY-Tel. +39 030 6804601 – Fax +39 030 6804698
23
Take the slide out of the carburettor.
24
Insert the lead at the end of the throttle cable
into the hole in the center of the slide.
25
Hook the lead nut in the slide by moving it
aside of the center.
26
Place the slide, plastic slide cover and spring
into the carburettor.

VORTEX FACTORY: Via E. Fermi, 5 – 27040 Campospinoso (PV)– ITALY – Tel. +39 0385 765200
OTK KART GROUP srl
Via dei Soprini, 16 – 25080 PREVALLE (Brescia) ITALY-Tel. +39 030 6804601 – Fax +39 030 6804698
27
Cross Screwdriver
Fix the top of the carburettor to the
carburettor by using the 2 screws unscrewed
before in Point 19
28
Insert the fuel line from the outlet on the
bottom of the fuel pump to the inlet on top
carburetor.
29
Insert the air tube into the intake silencer and
then place the plastic stone guard on top of the
air tube.
30
Insert the foam filter into the intake silencer.
There is a slot in the rubber manifold that
should be inserted in the intake silencer.

VORTEX FACTORY: Via E. Fermi, 5 – 27040 Campospinoso (PV)– ITALY – Tel. +39 0385 765200
OTK KART GROUP srl
Via dei Soprini, 16 – 25080 PREVALLE (Brescia) ITALY-Tel. +39 030 6804601 – Fax +39 030 6804698
31
Check the foam filter is properly fixed in intake
silencer. Wrong assembly will cause the loss of
the foam filter and intake silencer.
32
Flat Screwdriver
Attach the assembled intake silencer to the
adaptor and fix it by using the specific clamp
provided.
33
4 mm Allen Wrench + 10 mm Fixed
Wrench
Use the specific “S” bended bracket to connect
the intake silencer to the main bracket where
fuel pump is attached. Secure the intake silencer
by using one 6x25 screw (to the intake silencer)
and one 6x20 (to the bracket) screw, washer,
plastic spacer and nut.
34
Flat Screwdriver
Remove the plastic cap from the head.
Spark Plug Wrench
Tighten the spark plug in the engine head.
Tighten and loosen the spark plug 2/3 times to
allow the gasket to seat. Then tighten the spark
plug securely.

VORTEX FACTORY: Via E. Fermi, 5 – 27040 Campospinoso (PV)– ITALY – Tel. +39 0385 765200
OTK KART GROUP srl
Via dei Soprini, 16 – 25080 PREVALLE (Brescia) ITALY-Tel. +39 030 6804601 – Fax +39 030 6804698
35
Insert the coil cable into the rubber plug cup so
it is tight.
It is recommended to secure the coil cable by
using a cable tie.
Place the plug cap on to the spark plug and
push the plug cap down firmly.
36
Your engine is now ready to be installed to the
chassis.

VORTEX FACTORY: Via E. Fermi, 5 – 27040 Campospinoso (PV)– ITALY – Tel. +39 0385 765200
OTK KART GROUP srl
Via dei Soprini, 16 – 25080 PREVALLE (Brescia) ITALY-Tel. +39 030 6804601 – Fax +39 030 6804698
3. ENGINE/CHASSIS ASSEMBLY
1
5 mm Allen Wrench + 10 mm Fixed
Wrench
Place the sprocket in the sprocket carrier and
tighten with washer and nut.
2
8mm Allen Wrench
Now place the engine on the chassis. Tighten
the engine mount clamps to the engine mount
lightly enough to hold the engine in position.
Do not tighten completely
3
Straight Ruler
Align the rear sprocket (in the axle) with the
front sprocket (in the clutch bell). Then install
the chain of proper length. Chain length varies
with gear sizes.
4
To adjust chain tension, move the engine ahead
until the proper tension is reached. Proper
tension is around 1 cm. of free up and down
movements.

VORTEX FACTORY: Via E. Fermi, 5 – 27040 Campospinoso (PV)– ITALY – Tel. +39 0385 765200
OTK KART GROUP srl
Via dei Soprini, 16 – 25080 PREVALLE (Brescia) ITALY-Tel. +39 030 6804601 – Fax +39 030 6804698
5
17 mm Fixed Wrench
Once chain tension is correct, tighten mount
clamps completely and re-check the chain
tension again. Then set the engine stop to just
contact the engine mount, (if provided by the
chassis manufacturer.)
6
5 mm Allen Wrench
Attach the plastic guard bell cover to the
engine by using three 6x20 mm Allen screws.
7
Flat Pliers
By using flat pliers, very carefully, turn the two
carburetor overflow elbows on the carburettor
to point upwards.
8
Insert the plastic tube provided on to each one
of the carburettor overflow elbows.
The tube may be provided in one piece only. In
that case, cut the tube in half. The length of
each tube should be 40 cm. approx.

VORTEX FACTORY: Via E. Fermi, 5 – 27040 Campospinoso (PV)– ITALY – Tel. +39 0385 765200
OTK KART GROUP srl
Via dei Soprini, 16 – 25080 PREVALLE (Brescia) ITALY-Tel. +39 030 6804601 – Fax +39 030 6804698
9
Place a recovery tank under the carburettor
and secure it to the chassis by using cable ties.
Make two holes on top of the cap and insert
the free ends of the tubes coming from the
overflow elbows. This container must be able
to vent to atmosphere.
10
Insert now the throttle cable into the outer.
11
Insert the free end of the throttle cable into the
register attached to the main rail of the chassis.
12
3mm Allen Wrench
Insert a clamp into the throttle cable and pass
the free end through the welded ring on the
throttle pedal. Then loop it around and insert
the free end of the cable into the to the clamp
again and tighten it. Clamp not supplied.

VORTEX FACTORY: Via E. Fermi, 5 – 27040 Campospinoso (PV)– ITALY – Tel. +39 0385 765200
OTK KART GROUP srl
Via dei Soprini, 16 – 25080 PREVALLE (Brescia) ITALY-Tel. +39 030 6804601 – Fax +39 030 6804698
13
Flat Screwdriver
Take the intake silencer off the carburettor by
unscrewing the clamp. It is not necessary to
unscrew the bracket. The intake silencer will
turn easily.
14
8 mm Fixed Wrench
Adjust the throttle cable by setting the pedal
stop on the chassis in order to get the pedal to
stop at the point where the slide in the
carburettor is fully open.
15
5 mm Fixed Wrench
Attach now the battery cradle to the chassis
main rail next to the seat using the specific
plastic clamp provided.
A battery mounting spacer plate may be
required to clear the brake cable.
16
4 mm Allen Wrench + 10 mm Fixed
Wrench
Remove relay from socket in the wiring loom.
Secure the wiring loom to the battery cradle
using a 6x25 mm Allen screw, bi conical washer,
2 plastic spacer, washer and 4 mm nut.

VORTEX FACTORY: Via E. Fermi, 5 – 27040 Campospinoso (PV)– ITALY – Tel. +39 0385 765200
OTK KART GROUP srl
Via dei Soprini, 16 – 25080 PREVALLE (Brescia) ITALY-Tel. +39 030 6804601 – Fax +39 030 6804698
17
Insert manually the relay into the female plug
in the wiring loom. Do not use any tool.
18
14 mm Fixed Wrench
Place the start bottom (Green) and the stop
bottom (Red) in the two slots located in the
front of the battery cradle. Secure them with
the specific nut attached in the cables.
19
Place the battery in the battery cradle. Insert
the battery cables in the battery plugs. Red
cable in red plug, black cable in black plug.
Secure the battery using the two rubber O.R.
provided.
20
Secure the relay with the specific spring
provided.

VORTEX FACTORY: Via E. Fermi, 5 – 27040 Campospinoso (PV)– ITALY – Tel. +39 0385 765200
OTK KART GROUP srl
Via dei Soprini, 16 – 25080 PREVALLE (Brescia) ITALY-Tel. +39 030 6804601 – Fax +39 030 6804698
21
Pass the main wire loom under the seat and
secure it to the chassis by using plastic cable
ties. Make sure there is no loose wiring that
may drag on the track.
22
Plug in the electric plug coming from the battery to
the other half located aside the engine.
23
a. Cover the inside of the RPM limiter box
cradle with the specific foam tape provided.
Fit a small piece of fuel line to the O.R as
illustrated in the picture and secure the RPM
limiter box to the cradle with the O.R.
b. Attach the cradle to the seat or the chassis.
c. Insert the female plug coming from the
ignition on the male plug in the RPM limiter
box.
24
Hook the two springs provided into the exhaust
manifold.
/