Uniwill Computer Corp. SAZ-GUBTCRQ2426 User manual
- Category
- Notebooks
- Type
- User manual
This manual is also suitable for

1
I
I
IN
N
NT
T
TR
R
RO
O
OD
D
DU
U
UC
C
CT
T
TI
I
IO
O
ON
N
N
Welcome to the Notebook PC
Thank you for purchasing your new notebook. Your Notebook features the latest advances in
portable computing technology. Your new notebook will meet your computing needs both today
and in the future with modular design provides maximum expandability without compromising
portability.
There are a wide range of wireless home entertainment and networking products to experience
digital entertainment in a truly connected home without the need for messy cables and wiring.
USING THE USER GUIDE
This user guide has been designed to explain all of the important features and functions of your
new notebook and the Microsoft Windows XP Home Edition operating system.

2
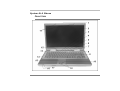
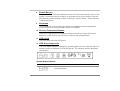
System At A Glance
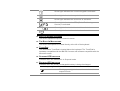
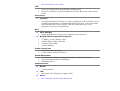
FRONT VIEW

3
1. LCD LATCH
The LCD latch unlock the LCD panel.
2. KEYBOARD
The keyboard is used to enter data. It has an embedded numeric keypad and
cursor control keys.
3. GPS
GPS (Global Positioning Service)
4. WIRELESS AND BLUETOOTH ON/OFF KEY
Press the On/Off key repeatedly to select one or both of wireless and Bluetooth
to enable or disable. When Wireless icon (key top) appears green, the wireless
LAN function is enabled.
5. WIRELESS AND BLUETOOTH ON/OFF KEY
Press the On/Off key repeatedly to select one or both of wireless and Bluetooth
to enable or disable.
6. MICROSOFT OUTLOOK KEY
Press this key to open the Microsoft Outlook to receive and send mail.
7. INTERNET QUICK KEY
The Internet Quick Key launches the Internet Explore.

4
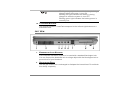
8. POWER BUTTON
The power button turns the notebook on and off. Press momentarily to turn on the
system. Press and hold for at least 3~4 seconds to turn off the system. How this
key behaves can be defined in [Start > Settings > Control Panel > Power Options
> Advanced] menu.
9. KEYBOARD
The keyboard is used to enter data. It has an embedded numeric keypad and
cursor control keys. (See Keyboard Section for details.)
10. OPTICAL FINGERPRINT READER
Place your finger gently on the glass window and slide your finger from top to
bottom. You will need to use this security feature with an application.
11. LCD LATCH
The LCD latch locks the LCD panel.
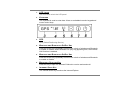
12. LED STATUS INDICATOR
The LED Status Indicator displays the operating status of your notebook. When a
certain function is enabled, an LED will light up. The following section describes
its indication.
System Status Indicator
LED Graphic Symbol Indication
Green light indicates the hard drive and/or optical drive is
being accessed.

5
Green light indicates the numeric keypad is activated.
Green light indicates the cap-lock is activated.
Green light indicates the scroll-lock is activated.
Green light indicates the GPS (Global Positioning
Service) is activated.
Green light indicates the bluetooth is activated.
Green light indicates the wireless is activated.
13. BUILT-IN STEREO SPEAKERS
The built-in speakers output the sound in stereo.
14. THE BUILT-IN MICROPHONE
The built-in microphone is located directly at the left of the keyboard.
15. TOUCHPAD
The dual-button TouchPad is located below the keyboard. The TouchPad is
hardware-compatible with the IBM PS/2 mouse and software-compatible with the
Microsoft mouse.
16. SUSPEND LED INDICATOR
Indicates when the Notebook is in Suspend mode.
17. BATTERY LED INDICATOR
Indicates when the primary rechargeable battery is being dis-charged.
LED Graphic Symbol Indication
Blinking green light indicates the notebook is in
suspend mode.

6
Blinking orange light indicates the battery is being
charged when the system is turn ON.
Blinking red light indicates the battery is being
charged in when the system is turn OFF.
Blinking green light indicates the battery power is
currently low.
18. TOUCHPAD BUTTONS
The buttons below the TouchPad correspond to the left and right buttons on a
standard mouse.
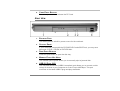
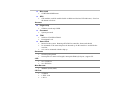
LEFT VIEW
1. KENSINGTON LOCK KEYHOLE
Your computer includes a keyhole to be used with a standard Kensington lock.
You can connect the Notebook lock to a large object with the Kensington lock to
prevent theft of your Notebook.
2. VENTILATION GRILL
The fan grill is where air is exchanged to dissipate the internal heat. Do not block
this airway completely.

7
3. 1394 USB
A fast external bus standard that supports data transfer rates of up to 400 Mbps
(400 million bits per second). Can be used to connect up 63 external devices,
also supports isochronous data -- delivering data at a guaranteed rate.
This makes it ideal for devices that need to transfer high levels of data in real-
time, such as video devices. Also supports both Plug-and-Play and hot plugging,
and also provides power to peripheral devices.
4. MICROPHONE JACK
The microphone jack (3.5-mm diameter) is where you connect a microphone.
5. WIRELESS AND BLUETOOTH ON/OFF KEY
Press the On/Off key repeatedly to select one or both of wireless and Bluetooth
to enable or disable. When Wireless icon (key top) appears green, the wireless
LAN function is enabled.
6. STEREO HEADPHONE / SPDIF-OUT JACK
The stereo headphone jack (3.5-mm diameter) is where you connect the
headphones or external speakers. Alternatively, you may connect the SPDIF
output to an external DTS, AC3, or PCM sound processor / decoder in your home
stereo system.
7. USB 2.0 PORT (X2)
The Universal Serial Bus (USB2.0-compliant) port allows you to connect a wide
variety of devices to your computer at a rate of up to 480 Mbps. This port
conforms to the latest USB2.0 plug-and-play standards.
8. PC CARD SLOT (TYPE I & II PCMCIA)
The slot is where PC Card (Type II PCMCIA) is inserted. The system also
supports 1394, Smart card and 4-1 card reader.

8
9. CARD EJECT BUTTON
Press the eject button to release the PC Card.
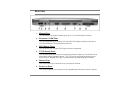
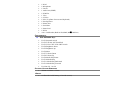
RIGHT VIEW
1. BATTERY PACK
The battery pack is a built-in power source for the notebook.
2. OPTICAL DRIVE
If your computer comes with the CD-RW/DVD Combo/DVD Dual, you may save
data onto a CD-R / CD-RW or DVD RW disc.
3. DISK EJECT BUTTON
Press the eject button to eject the disk tray.
4. MANUAL EJECT KEY HOLE
The manual eject keyhole allows you to manually eject a jammed disk.
5. USB 2.0 PORT (X2)
The Universal Serial Bus (USB2.0-compliant) port allows you to connect a wide
variety of devices to your computer at a rate of up to 480 Mbps. This port
conforms to the latest USB2.0 plug-and-play standards.

9
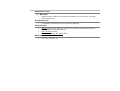
REAR VIEW
1. MODEM PORT
This is where you plug the phone jack (RJ-11) for fax/modem functions.
2. ETHERNET / LAN PORT
The port connects to a network hub via the RJ-45 cable and also conforms to
10/100/1000Base-TX transmission protocol.
3. PS/2 SERIAL PORT
This is where you connect PS/2-type mouse or keyboard.
4. TV (S-VIDEO) PORT
The S-Video port permits you to redirect the screen output to a television set or
any analog video playback device. This TV Port is copyright protected; when
DVD movie is played, the output is scrambled to prevent analog recording.
5. SERIAL PORT
The 9-pin serial port connects to any serial-port devices.
6. PARALLEL PORT
The 25-pin parallel port connects to any parallel-port devices such as a printer.

10
7. EXTERNAL VGA PORT
The 15-pin VGA analog port is for connecting the external CRT monitor or
projector.
8. POWER JACK (DC-IN)
The DC-out jack of the AC Adapter connects here and powers the computer.
9. VENTILATION GRILL
The fan grill is where air is exchanged to dissipate the internal heat. Do not block
this airway completely.
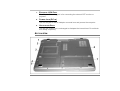
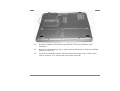
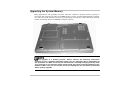
BOTTOM VIEW

11
1. PORT REPLICATOR PORT
The system can be docked onto an optional port replicator for additional input /
output ports.
2. SWAPPABLE DEVICE BAY LATCH
Push the latch and pull on the drive hard case to remove the swappable device.
3. SWAPPABLE DEVICE BAY
The optical drive resides in the Swappable Device Bay. Additionally, you may
also purchase an optional hard drive module, or an empty shell (to reduce travel
weight) to be used in this bay.
4. BATTERY PACK AND
The battery pack is a built-in power source for the notebook.
5. BATTERY LATCH
Slide the battery latch to release the battery pack.
6. EXPANSION COMPARTMENT
This compartment will serve as an expansion to upgrade your RAM module.
7. HARD DISK DRIVE BAY
This is where the hard disk drive is located. The hard disk drive stores all the
system data. The hard disk drive can be upgraded to a larger capacity.

1
S
S
ST
T
TA
A
AR
R
RT
T
TI
I
IN
N
NG
G
G
Y
Y
YO
O
OU
U
UR
R
R
N
N
NO
O
OT
T
TE
E
EB
B
BO
O
OO
O
OK
K
K
Operating Environment
You can use your computer under a wide range of environmental conditions. However, to ensure
long use and continued high performance, consider the following factors when setting up your
computer:
Set the computer on a flat, stable surface. To prevent damage to the computer’s hard disk
drive, avoid using the computer where it will be exposed to strong vibration.
Place the computer away from electromagnetic or radio frequency interference.
Avoid using or storing the computer where it will be exposed to extreme temperatures. In
particular, do not leave the computer in direct sunlight, over a radiator, or near a heat
source for a long period of time. High temperature can damage the circuitry.
Avoid exposing the computer to high or low humidity. Extreme humidity can contribute to
disk drive failure.
If you are using the computer with the AC adapter, do not allow anything to rest on the
power cord. Do not place the computer where people can step on or trip over the cord.
The openings on the computer are provided to protect the computer from overheating. To
ensure reliable operation, leave about 10 cm (4 inches) around the computer for
unobstructed air circulation. Avoid exposing the computer to dust or smoke.

2
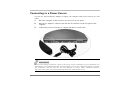
Connecting to a Power Source
You can use the provided AC adapter to supply your computer with power from an AC wall
outlet.
1. Place the computer so that you have easy access to its rear panel.
2. Plug the AC adapter’s connector into the DC-IN connector on the rear panel of the
computer.
3. Connect the power cord to the AC adapter and then to a wall outlet.
Do not use inferior extension cords as this may result in damage to your Notebook. An
AC adapter is provided along with your Notebook. Do not use a different adapter to power
the computer, and do not use the AC adapter to power other electrical devices.
Try not to turn off or reset your Notebook while the hard disk is in use.

3
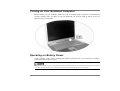
Turning on Your Notebook Computer
Before turning on your computer, make sure you are familiar with its features as mentioned in
previous chapter. Once you have set up your notebook you are now ready to turn it on. To do
this press the power button.
Operating on Battery Power
Your computer comes with a rechargeable battery pack that lets you operate the computer
without an external power source.
We recommend you to use batteries that are approved by an authorized dealer. Try not to
use the wrong battery for it would cause serious damage to your computer.

4
Battery Low-Power Warning
Low Battery Warning
Low battery condition occurs when battery power is reduced to 6%. The green power LED
indicator blinks and the system beeps once every 16 seconds or so.
Very Low Battery Warning
Very Low battery condition occurs at 3 % power remaining. The power LED indicator blinks
and the system beeps at 4-second interval. When the notebook warns you of its low battery
condition, you will have about 3-5 minutes to save your current work.
Do not expose battery packs to temperatures below 0 degree Celsius (32 degree F) or
above 60 degree C (140F). This may adversely affect the battery pack.
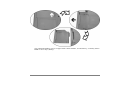
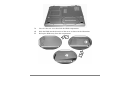
Inserting and Removing the Battery Pack
The battery pack should already be inserted in your Notebook computer when you unpack it. If it
is not inserted, follow these directions:
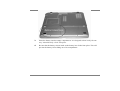
1. Turn off the notebook.
2. Turn the Notebook over and locate the battery compartment.

5
3. Insert the battery into the empty compartment. It is designed so that it only fits one
way. It should easily “click” into place.
4. Be sure that the battery release latch on the battery has clicked into place. This will
prevent the battery from sliding out of its compartment.

6
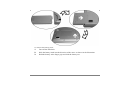
To remove the battery pack:
1. Turn off the Notebook.
2. Slide the battery latch into the direction of the arrow as shown in the illustration.
3. Hold the battery at the finger grip and slide the battery out.

7
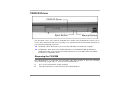
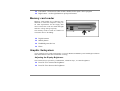
Charging the Battery and Charging Time
To charge the battery, while the battery pack is in the notebook, plug the AC adapter into the
notebook and an electrical outlet.
The charging time is approximately 2.5 hours when the notebook is turned off and approximately
4.5-6 hours when the notebook is turned on.
When the battery is fully charged, the battery charge indicator becomes dark (off).
If system runs at heavy loading or in a high temperature environment, the battery may not
be fully charged. You need to continue to charge it with the AC adapter plugged in until
the charging LED turns off.

8
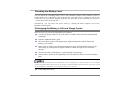
Checking the Battery Level
You can check the remaining battery power in the Windows battery status indicator, which is
located at the lower right-hand corner of the task bar. (If you do not see a battery or AC-in icon
on the task tray, go to Power Options Properties box and click on the Advanced tab. Check off
``Always show icon on the task bar``.)
Alternatively, you can access the power meter by clicking the Power Options icon in the
Windows Control Panel.
Prolonging the Battery’s Life and Usage Cycles
There are ways you can do to prolong the use of battery.
Use the AC adapter wherever AC wall outlet is available. This will ensure uninterrupted
computing.
Purchase additional battery pack.
Store the battery pack in room temperature. Higher temperature tends to deplete the
battery’s power faster.
Make good use of the power management function. Save To Disk (Hibernate) saves the
most energy by storing current system contents in a hard disk space reserved for this
function.
The life expectancy of the battery is approximately 300 recharges.
See the notices section in the beginning of the user manual on how to care for the battery
pack.
Read Section Protecting Your Notebook in the beginning of this manual for tips about
how to maintain the battery pack. To achieve optimal battery performance, you may need
to do a battery calibration at a 3-month interval. To do this:
Fully charge the battery.

9
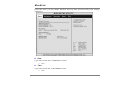
Then discharge the battery by entering the BIOS setup screen. (Press F2 key as soon as you
turn on the computer. And let it remain at the setup screen until the battery runs out.
Fully charge the battery again.
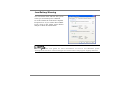
Using Windows Power Options
Windows Power Management provides basic power saving features. In the Windows Power
Options Properties [Start > Settings > Control Panel > Power Options] dialogue box, you may
enter time-out values for display and hard disk drive. Windows power manager saves power by
turning off hard drive after 1 minute of inactivity, for example.
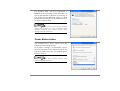
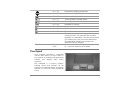
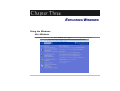
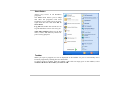
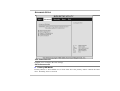
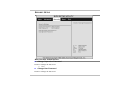
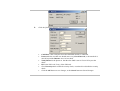
Windows’ Power Schemes
The power management control panel in Windows XP, known as Power Schemes, is designed to
provide the user with an easy-to-use interface. The Power Schemes tab can be found in the
Power Options Properties panel that is accessible via the control panel window.
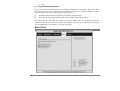
Schemes are easy to understand, based on
notebook usage scenarios, and control not
only processor power usage but other
system peripherals as well.
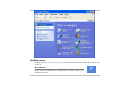
Go to [Start > Settings > Control Panel]
and double-click the Power Options icon.
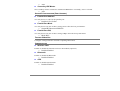
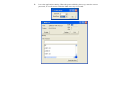
Always on mode puts the processor into
maximum performance mode, which
provides no power saving. The other
schemes control processor performance
based on demand. For example, Max
Battery mode lowers the processor’s speed
and voltage to conserve power as much as
possible.
Page is loading ...
Page is loading ...
Page is loading ...
Page is loading ...
Page is loading ...
Page is loading ...
Page is loading ...
Page is loading ...
Page is loading ...
Page is loading ...
Page is loading ...
Page is loading ...
Page is loading ...
Page is loading ...
Page is loading ...
Page is loading ...
Page is loading ...
Page is loading ...
Page is loading ...
Page is loading ...
Page is loading ...
Page is loading ...
Page is loading ...
Page is loading ...
Page is loading ...
Page is loading ...
Page is loading ...
Page is loading ...
Page is loading ...
Page is loading ...
Page is loading ...
Page is loading ...
Page is loading ...
Page is loading ...
Page is loading ...
Page is loading ...
Page is loading ...
Page is loading ...
Page is loading ...
Page is loading ...
Page is loading ...
Page is loading ...
Page is loading ...
Page is loading ...
Page is loading ...
Page is loading ...
Page is loading ...
Page is loading ...
Page is loading ...
Page is loading ...
Page is loading ...
Page is loading ...
Page is loading ...
Page is loading ...
Page is loading ...
Page is loading ...
Page is loading ...
Page is loading ...
Page is loading ...
Page is loading ...
Page is loading ...
Page is loading ...
Page is loading ...
Page is loading ...
Page is loading ...
Page is loading ...
Page is loading ...
Page is loading ...
Page is loading ...
-
 1
1
-
 2
2
-
 3
3
-
 4
4
-
 5
5
-
 6
6
-
 7
7
-
 8
8
-
 9
9
-
 10
10
-
 11
11
-
 12
12
-
 13
13
-
 14
14
-
 15
15
-
 16
16
-
 17
17
-
 18
18
-
 19
19
-
 20
20
-
 21
21
-
 22
22
-
 23
23
-
 24
24
-
 25
25
-
 26
26
-
 27
27
-
 28
28
-
 29
29
-
 30
30
-
 31
31
-
 32
32
-
 33
33
-
 34
34
-
 35
35
-
 36
36
-
 37
37
-
 38
38
-
 39
39
-
 40
40
-
 41
41
-
 42
42
-
 43
43
-
 44
44
-
 45
45
-
 46
46
-
 47
47
-
 48
48
-
 49
49
-
 50
50
-
 51
51
-
 52
52
-
 53
53
-
 54
54
-
 55
55
-
 56
56
-
 57
57
-
 58
58
-
 59
59
-
 60
60
-
 61
61
-
 62
62
-
 63
63
-
 64
64
-
 65
65
-
 66
66
-
 67
67
-
 68
68
-
 69
69
-
 70
70
-
 71
71
-
 72
72
-
 73
73
-
 74
74
-
 75
75
-
 76
76
-
 77
77
-
 78
78
-
 79
79
-
 80
80
-
 81
81
-
 82
82
-
 83
83
-
 84
84
-
 85
85
-
 86
86
-
 87
87
-
 88
88
-
 89
89


Uniwill Computer Corp. SAZ-GUBTCRQ2426 User manual
- Category
- Notebooks
- Type
- User manual
- This manual is also suitable for
Ask a question and I''ll find the answer in the document
Finding information in a document is now easier with AI