Page is loading ...

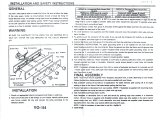
1) Assemble mounting screws to backpan using hexnut.
2) At the center of the backpan are knockout slots. Remove the set that
matches your outlet box.
3) Secure the backpan to the outlet box.
4) Anchor the backpan to the wall using the set of holes at each end of
xtureusingwoodscrews,togglebolts,plasticanchors,etc.
5) TURN OFF POWER.
IMPORTANT:Beforeyoustart,NEVERattemptanyworkwithout
shutting off the electricity until the work is done.
a) Gotothemainfuse,orcircuitbreaker,boxinyourhome.Place
the main power switch in the “OFF” position.
b) Unscrewthefuse(s),orswitch“OFF”thecircuitbreakerswitch(s),
thatcontrolthepowertothextureorroomthatyouareworkingon.
c) Placethewallswitchinthe“OFF”position.Ifthexturetobe
replacedhasaswitchorpullchain,placethoseinthe“OFF”position.
6) Grounding instructions: (See Illus. A or B).
A) Onxtureswheremountingstrapisprovidedwithaholeandtwo
raised dimples. Wrap ground wire from outlet box around green
groundscrew,andthreadintohole.
B) Onxtureswhereacuppedwasherisprovided.Attachground
wire from outlet box under cupped washer and green ground
screw,andthreadintomountingstrap.
Ifxtureisprovidedwithgroundwire.Connectxturegroundwireto
outlet box ground wire with wire connector (not provided.) after following
the above steps. Never connect ground wire to black or white power
supply wires.
7) Make wire connections (connectors not provided). Reference chart below
for correct connections and wire accordingly.
8) Carefullypushwireconnectionsbackintooutletboxmakingsureall
connections remain secure.
9) Slip faceplate over mounting screws and backpan. NOTE: Be certain
wires do not get pinched between backpan and faceplate.
10) Secure faceplate to backpan using threaded balls.
11)Raiseglassuptoxture.Passholeinglassoversocket.
12) Thread socket ring onto socket. Tighten socket ring to secure glass in
place. (DO NOT over tighten.)
1) Ensamble los tornillos de montaje a la placa de montaje usando la tuerca
hexagonal.
2) Enelcentrodelaplacademontajeseencuentranoriciosciegos.
Retire el juego que corresponda con su caja de salida.
3) Fije la placa de montaje a la caja de salida.
4) Anclelaplacademontajealaparedusandolaseriedeoriciosen
cadaextremodelartefactousandotornillosdemadera,pernosdelengüeta,
anclajesdeplástico,etc.
5) APAGUELAALIMENTACIÓNELÉCTRICA.
IMPORTANTE: Antesdecomenzar,NUNCAtratedetrabajarsinantes
desconectar la corriente hasta que el trabajo se termine.
a) Vayaalacajaprincipaldefusibles,ointerruptorocajadecircuitos
desucasa.Coloqueelinterruptordelacorrienteprincipalen
posición de apagado “OFF”.
b) Desatornilleel(los)fusible(s),ocoloqueelinterruptoro
interruptoresdelbreakerenposicióndeapagado“OFF”,que
controla (n) la corriente hacia el artefacto o habitación donde está
trabajando.
c) Coloqueelinterruptordeparedenposicióndeapagado“OFF”.Si
el artefacto que se va a reemplazar tiene un interruptor o cadena
quesejala,colóquelosenlaposicióndeapagado“OFF”.
6) Instrucciones de conexión a tierra solamente para los Estados
Unidos.(VealailustracionAoB).
A) Enlaslámparasquetieneneleje,demontajeconunagujeroy
dos hoyue los realzados. Enrollar el alambre a tierra de la caja
tomacorriente alrededor del tornillo verde y pasarlo por el aquiero.
B) En las lámparas con una arandela acopada. Fijar el alambre a
tierra de la caja tomacorriente del ajo de la arandela acoada y
tornilloverde,ypaserporelejedemontaje.
Silalámparavieneconalambreatierra.Conecterelalambreatierra
de la lámpara al alambre a tierra de la caja tomacorriente con un
conector de alambres (no incluido) espués de seguir los pasos
anteriores. Nunca conectar el alambra a tierra a los alambres eléctros
negro o blanco.
7) Haga les conexiones de los alambres (no se proveen los connectores.)
La tabla de referencia de abajo indica las conexiones correctas y los alambres
correspondientes.
8) Coloqueconcuidadonuevamentelasconexionesdealambreenlacaja
desalida,asegurandoquetodaslasconexionesesténseguras.
9) Deslice la placa de sujeción sobre los tornillos de montaje y la placa de
montaje. NOTA: Asegúrese que los alambres no queden oprimidos
entre la placa de montaje y la placa de sujeción (chapa de pared).
10) Fije la placa de sujeción a la placa de montaje usando las esferas
roscadas.
11) Levante el vidrio hasta el artefacto pasando el agujero en el vidrio
encima del casquillo.
12) Rosque el anillo del casquillo al casquillo. Apriete el anillo del casquillo
para sujetar el vidrio en el lugar. (NO apriete excesivamente.)
Connect Black or
Red Supply Wire to:
Connect
White Supply Wire to:
Black White
*Parallel cord (round & smooth) *Parallel cord (square & ridged)
Clear, Brown, Gold or Black
without tracer
Clear, Brown, Gold or Black
with tracer
Insulated wire (other than green)
with copper conductor
Insulated wire (other than green)
with silver conductor
*Note: When parallel wires (SPT I & SPT II)
are used. The neutral wire is square shaped
or ridged and the other wire will be round in
shape or smooth (see illus.)
Neutral Wire
Conectar el alambre de
suministro negro o rojo al
Conectar el alambre de
suministro blanco al
Negro Blanco
*Cordon paralelo (redondo y liso)
*Cordon paralelo (cuadrado y estriado)
Claro, marrón, amarillio o negro
sin hebra identificadora
Claro, marrón, amarillio o negro
con hebra identificadora
Alambre aislado (diferente del verde)
con conductor de cobre
Alambre aislado (diferente del
verde) con conductor de plata
*Nota: Cuando se utiliza alambre paralelo
(SPT I y SPT II). El alambre neutro es de forma
cuadrada o estriada y el otro alambre será de
forma redonda o lisa. (Vea la ilustracíón).
Hilo Neutral
BACKPAN
PLACADEMONTAJE
Date Issued: 4/20/12 IS-45423-US
GREEN GROUND
SCREW
CUPPED
WASHER
A
B
OUTLET BOX
GROUND
FIXTURE
GROUND
DIMPLES
WIRE CONNECTOR
(NOT PROVIDED)
OUTLET BOX
GROUND
GREEN GROUND
SCREW
FIXTURE
GROUND
ARANDELA
CONCAVA
A
B
TIERRA DE LA
CAJA DE SALIDA
TORNILLO DE TIERRA,
VERDE
DEPRESIONES
TIERRA
ARTEFACTO
CONECTOR DE ALAMBRE
(NO SE PROVEE)
TIERRA DE LA
CAJA DE SALIDA
TORNILLO DE TIERRA,
VERDE
TIERRA
ARTEFACTO
THREADED BALL
BOLAROSCADO
FACEPLATE
PLACADESUJECIÓN
GLASS
VIDRIO
SOCKETRING
ANILLODELCASQUILLO

1) Assemble mounting screws to backpan using hexnut.
2) At the center of the backpan are knockout slots. Remove the set that
matches your outlet box.
3) Secure the backpan to the outlet box.
4) Anchor the backpan to the wall using the set of holes at each end of
xtureusingwoodscrews,togglebolts,plasticanchors,etc.
5) Turn off power.
IMPORTANT:Beforeyoustart,NEVERattemptanyworkwithout
shutting off the electricity until the work is done.
a)Gotothemainfuse,orcircuitbreaker,boxinyourhome.Placethe
main power switch in the “OFF” position.
b)Unscrewthefuse(s),orswitch“OFF”thecircuitbreakerswitch(s),
thatcontrolthepowertothextureorroomthatyouareworkingon.
c)Placethewallswitchinthe“OFF”position.Ifthexturetobe
replacedhasaswitchorpullchain,placethoseinthe“OFF”position.
6) Connectxturegroundwiretooutletboxgroundwirewithwireconnector.
Neverconnectgroundwiretoblackorwhitepowersupplywire.
7) Make wire connections (connectors not provided). Reference chart
below for correct connections and wire accordingly.
8) Carefully push wire connections back into outlet box making sure all
connections remain secure.
9) Slip faceplate over mounting screws and backpan.
NOTE: Be certain wires do not get pinched between backpan
and faceplate.
10) Secure faceplate to backpan using threaded balls.
11)Raiseglassuptoxture.Passholeinglassoversocket.
12) Thread socket ring onto socket. Tighten socket ring to secure glass in
place.(DONOTovertighten.)
1) Installerlesvisdemontagesurlepanneauarrièreàl’aidedel’écrou
hexagonal.
2) Aucentredupanneauarrièresetrouventdesfentesamovibles.Enlever
l’ensemblecorrespondantàvotreboîteàprises.
3) Visserlepanneauarrièresurlaboîteàprises.
4) Fixerlepanneauarrièreaumurenutilisantlesetdetroussurchacune
desextrémitésdesluminairesl’aidedesvisàbois,boulonsàailettes,
ancres en plastique etc.
5) Couper le courant.
IMPORTANT:TOUJOURScouperl’électricitéavantdecommencerle
travail.
a) Localiserlecoffretàfusiblesouledisjoncteurdudomicile.Mettre
l’interrupteurprincipalenpositiond’Arrêt.
b)Dévisserleoulesfusibles(oumettreledisjoncteursurArrêt)qui
contrôlentl’alimentationversleluminaireoulapiècedanslaquellele
travailesteffectué.
c)Mettrel’interrupteurmuralenpositiond’Arrêt.Sileluminaireà
remplacerestdotéd’uninterrupteuroud’unechaîneconnectéeà
l‘interrupteur,placercesélémentsenpositiond’Arrêt.
6) Avecl’attache-l,connecterleldemiseálaterreauld’alimentation
noirouáceluiquiestblanc.
7) Connecterlesls(connecteursnonfournis).Sereporterautableauci-
dessous pour faire les connexions.
8) Replacersoigneusementleslsdanslaboîteàprisesenveillantàce
quelesconnexionsnesoientpasdéconnectées.
9) Passerlaplaquedecontactsurlesvisdemontageetlepanneauarrière.
REMARQUE:Veilleràcequeleslsneseretrouventpascoincés
entrelepanneauarrièreetlaplaquefrontale.
10)Fixerlaplaquefrontaleaupanneauarrièreàl’aidedesboules.
11)Souleverleverrejusqu’auluminaire.Passerletroudansleverresurla
douille.
12)Serrerl’anneaudeladouillesurladouille.Resserrerl’anneaudela
douillepourbienxerleverre.(NEPASserreravecexcès).
Connect Black or
Red Supply Wire to:
Connect
White Supply Wire to:
Black White
*Parallel cord (round & smooth) *Parallel cord (square & ridged)
Clear, Brown, Gold or Black
without tracer
Clear, Brown, Gold or Black
with tracer
Insulated wire (other than green)
with copper conductor
Insulated wire (other than green)
with silver conductor
*Note: When parallel wires (SPT I & SPT II)
are used. The neutral wire is square shaped
or ridged and the other wire will be round in
shape or smooth (see illus.)
Neutral Wire
DateIssued:4/20/12 IS-45423-CB
Connecter le fil noir ou
rouge de la boite
Connecter le fil blanc de la boîte
A Noir A Blanc
*Au cordon parallèle (rond et lisse)
*Au cordon parallele (à angles droits el strié)
Au bransparent, doré, marron, ou
noir sans fil distinctif
Au transparent, doré, marron, ou
noir avec un til distinctif
Fil isolé (sauf fil vert) avec
conducteur en cuivre
Fil isolé (sauf fil vert) avec
conducteur en argent
*Remarque: Avec emploi d’un fil paralléle
(SPT I et SPT II). Le fil neutre est á angles
droits ou strié et l’autre fil doit étre rond ou
lisse (Voir le schéma).
Fil Neutre
INSTRUCTIONS
For Assembling and Installing Fixtures in Canada
Pour L’assemblage et L’installation Au Canada
GLASS
VERRE
SOCKETRING
BAGUEDELADOUILLE
FACEPLATE
PLAQUEFRONTALE
BACKPAN
PANNEAUARRIÈRE
THREADEDBALL
BOULE
/