Page is loading ...

082019 Rev. 4Luxier
1
Freestanding Bathtub Installation and Care Guide
Features:
- Contemporary Freestanding Design
- Integrated Overow System
- Adjustable Feet for Easy Installation
Materials:
- Acrylic / Fiberglass Composite
Luxier
1-877-711-8828

082019 Rev. 4Luxier
2
IMPORTANT:
• Read and understand this installation guide completely before installation. It will increase the
chance of a successful installation.
• This product should be installed by professional installers.
• Observe all local plumbing and building codes.
• Prepare the oor with sucient support and waterproong the oor before installing this bathtub.
The nished oor must be leveled.
• Make sure there is adequate space around the bathtub for bath faucet and future maintenance.
• Unpack and inspect the bathtub from the package for shipping damage and make sure all parts
are included with the bathtub.
• Keep the bathtub and its accessories in the original package until installation.
• Rough in the drain with enough clearance before installation.
• Make sure the installation site is clean and free of dust and debris.
CAUTION:
• Risk of personal injury! This bathtub is heavy, obtain help when moving and installing
this bathtub.
NOTICE:
• This installation guide is subject to change without notice, please contact us to request the most
updated version of this installation guide.
• Product drawings in this installation guide are for illustration purpose only. Actual product may
vary depends on model.
• This product is for residential use ONLY.
• Keep this installation guide for your records.
1. Freestanding Bathtub
2. Drain Assembly
3. Installation Guide
Tape Measure Adjustable Wrench
Pencil / Marker Silicon Sealant
Safety Glasses and Safety Shoes Gloves
PTFE Tape Level
Drop Cloth Plumbers Putty
Before You Begin
Tools (Recommended)
Parts
Thank you for purchasing Luxier products. Please read the information below and keep this
installation guide for future reference. If you require assistance, please contact our customer service
department at 1-877-711-8828, Monday - Friday 9 AM - 5 PM Pacic Time or by email at

082019 Rev. 4Luxier
3
Risk of Personal Injury! Bathtub may become slippery when wet. Exercise
caution when entering and exiting the bathtub. Do not overll the bathtub
before entering. Overlling will cause overow and slippery conditions.
Risk of Drowning! Do not leave children unattended when using the
bathtub. Supervise small children at all time when using this bathtub.
Risk of Personal Injury! Accidental falls may occur. Handrails and other
handicap accessories are recommended for seniors or persons with
disabilities.
Risk of Electric Shock! Do not use any electrical appliances in or near the
bathtub when bathtub containing water.
People using medications and/or having adverse medical conditions should
consult a physician before using this product.
If you are or think you are pregnant, consult your doctor before using this
product.
Important Safety Instructions

082019 Rev. 4Luxier
4
Installation - Site Preparation
Installation - Drain Assembly
• Provide sucient oor support. Check the oor at the installation site and make repairs as
needed.
• Waterproof the oor is highly recommended. Finished oor must be level.
• Provide adequate clearance on all sides of the bathtub.
• Minimum of 2 inch waste drain pipe is required.
NOTICE: It is recommended to dry t the parts before installation.
1. Place a large drop cloth on the oor to protect the bathtub.
2. With help, lift the bathtub and place it on its side. Secure the bathtub to prevent it from moving.
3. Connect the 1 1/2” femail adapter as shown in gure 1. Wrap PTFE tape to the thread on the
drain body and connect the adapter.
4. Upright the bathtub and carefully move it to the nal installation position. (NOTICE: Do not drag
the bathtub on the oor as it will damage the bathtub.)
5. Connect the drain assembly to the waste drain pipe. (NOTICE: additional connectors and pipes
are needed to complete the installation.)
Drain Body
Flange Gasket
Overow
Overow Channel
1 1/2” ABS Female Adapter
(included)
Waste Drain Pipe (not included)
Drain Gasket
Locking Nut
NOTE: Drain assembly is pre-installed on the bathtub.
Install the included 1 1/2” female adapter rst and connect
the drain to the waste pipe. (Additional adapter or pipe will
be required to complete the installation)
Fig. 1

082019 Rev. 4Luxier
5
Installation - Bathtub
Care and Cleaning
Repair and Maintenance
CAUTION: Risk of Personal Injury. Get extra help when moving the bathtub into its nal position.
1. Use a level to make sure the bathtub is level in all direction. (Fig. 2)
2. Adjust the feet under the tub as needed.
3. It is recommended to leave a 1/16” to 1/8” gap all around the base of the bathtub.
4. Close the drain and remove any debris or plastic lms from the tub. Wipe the surface clean with a
piece of soft cloth.
5. Fill the tub with some water and test the drainage to make sure the water drains freely. Also
check for any leaks around the drain and pipe. (NOTE: Due to surface tension, it is normal for a
small amount of water to pool around the drain)
6. Apply a continuous bead of clear or color matching silicon sealant around the base of the bathtub
to complete the installation. (Fig. 3) (NOTE: let silicon sealant cure for at least 12 hours before
using the tub.)
Fig. 3Fig. 2
• Most dirt will wash o with mild soap and warm water.
• For tough spots, use liquid dish washing soap or non-chlorine bleach.
• Do not use abrasive material such steel wool or scouring pads to clean the acrylic surface.
• Always test the cleaning solution on a small area before using it on the entire surface.
• Do not allow cleaning to soak on the acrylic surface.
• Rinse thoroughly with water immediately and wipe dry with soft cloth.
• Use liquid polish compound such as Gel-Gloss Kitchen and Bath Polish
(TM)
to keep the original
shine of acrylic surface.
• Light scratches can be removed with polishing compound for automobiles.
• For deeper scratches use wet sandpaper (1500 grit or higher). Always add water when sanding
and lightly sand the area larger than the scratch in a circular motion to remove the scratches.
Repeat until the scratch is removed. Use soft cloth and small amount of polishing compound to
restore shine. Repeat as needed until surface shine is restored.

082019 Rev. 4Luxier
6
Thank you for purchasing Luxier products. Please read the information below and keep this
installation guide for future reference. If you require assistance, please contact our customer service
department at 1-877-711-8828, Monday - Friday 9 AM - 5 PM Pacic Time. Or by email at
Limited One Year (1) Warranty (For USA Only)
The manufacturer warrants this product to be free of manufacture defects during daily normal
household use for a period of one (1) year to the original purchaser of this product. Please keep a
copy of the original invoice as proof of purchase.
Should a malfunction occur within the warranty period, Luxier USA will, as its option, (1)
repair or replace the defective part(s) or product(s) at no charge; (2) issue a refund of the original
purchase price of the product(s) (Valid within 30 days from the date of purchase); or (3) issue a
credit to be applied toward the purchase of a new Décor Star product. Shipping/delivery charges
may apply and are in Luxier USA’s sole discretion.
This limited warranty shall not apply to goods which have been subject to accident, negligence,
improper installation, product abuse, product misuse, or use of cleaners containing abrasives, alcohol
or other organic solvents, whether performed by a contractor, service company, or yourself, are
excluded from this warranty.
Our responsibility under this limited warranty is limited to only to replacement parts and no other
costs. Luxier USA will not be responsible for labor charges and/or damage incurred by installation,
repair or replacement, nor for any indirect incidental or consequential damages, losses, injury or
costs of any nature relating to this product. Except as provided by law, this limited warranty
is in lieu of and excludes all other warranties, conditions, and guarantees, whether expressed or
implied, statutory or otherwise, including without restriction those merchantability of tness for use.
This limited warranty is non-transferable. This limited warranty only applies to products purchased
and installed in the United States. This limited warranty covers the original consumer purchase only
and does not include business, commercial or industrial use of this product. To obtain service under
the Limited Warranty, please contact Luxier USA at [email protected] or 1-877-711-8828. The
Luxier USA Customer Care Department will determine whether to repair or replace your product,
issue a refund, or issue a credit.
Warranty

1
FTF01 Rev.2 042019
Luxier
Model Number:
FTF01-TB
FTF01-TC
Features:
- Brass and Zinc Alloy Construction
- Single Hole Installation
- Drip Free 40 mm Ceramic Cartridge
- Hand shower ow rate 1.8 gpm at 80 psi
- Tub spout ow rate 3.7 gpm at 20 psi
- Rough-in kit included
- Complies with:
IAPMO / UPC / cUPC
ADA
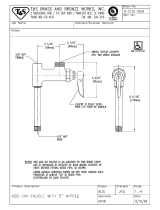
Freestanding Floor Mount Bathtub Filler
32”
38 1/8”
27 3/4”
43 1/16”
8 1/8”
5 1/2”
2”
4 5/16”
3 11/16”
1/2 NPT
* All Measurements are Approximate *

2
FTF01 Rev.2 042019
Luxier
Thank you for purchasing Luxier products. Please read the information below and keep this installation
guide for future reference. If you require assistance, please contact our customer service department at
1-877-711-8828, Monday - Friday 9AM - 5PM Paci c Time or by email at
suppor[email protected].
Limited Lifetime Warranty (For USA Only)
The manufacturer warrants this product to be leak and drip free during daily normal household use for as long as it is owned by
the original purchaser of this product. Please keep a copy of the original invoice as proof of purchase.
Should a malfunction occur within the warranty period, Luxier USA will, as its option, (1) repair or replace the defective part(s) or
product at no charge; (2) issue a refund of the purchase price paid for the product (Valid within 30 days from the date of purchase);
or (3) issue a credit to be applied against the purchase of a new Luxier product. Shipping/delivery charges may apply and are in
Luxier USA’s sole discretion.
This limited warranty shall not apply to goods which have been subject to accident, negligence, improper installation, product
abuse, product misuse, or use of cleaners containing abrasives, alcohol or other organic solvents, whether performed by a
contractor, service company, or yourself, are excluded from this warranty.
Our responsibility under this warranty is limited to only to replacement parts and no other costs. Luxier USA will not be
responsible for labor charges and/or damage incurred by installation, repair or replacement, nor for any indirect incidental or
consequential damages, losses, injury or costs of any nature relating to this faucet. Except as provided by law, this warranty is
in lieu of and excludes all other warranties, conditions, and guarantees, whether expressed or implied, statutory or otherwise,
including without restriction those merchantability of tness for use.
This limited warranty is non-transferable. This limited warranty only applies to products purchased and installed in the United
States. This limited warranty covers the original consumer purchase only and does not include business, commercial or industrial
use of this product. To obtain service under the Limited Warranty, please contact Luxier USA at
[email protected]. The Luxier USA Customer Care Department will determine whether to repair or replace your product,
issue a refund, or issue a credit.

3
FTF01 Rev.2 042019
Luxier
Important Points
• This installation guide is subject to change without notice, please contact us to request the most
updated version of this installation guide.
• This is a general installation guideline, actual installation may vary. Consult a professional if
necessary.
• Read and understand this instructions completely before installation.
• Please follow all local building and plumbing codes.
• Product drawings in this installation guide is for illustration purpose only. Actual product may vary
depends on model.
• Always take extra precautions and wear appropriate safety equipment when installing this
product.
• Wrap all threaded connections, except the aerator in the spout, with Te on (TPFE) tape. Always
wrap in a counterclockwise direction.
• When installing your new faucet, rst hand tighten the water supply hoses then use a wrench to
give the compression nuts an additional (1/4) turn. Do not over tighten the compression nuts as it
will reduce the integrity of the sealed connection.
You may also need the following tools
1. Safety Glasses 5. Adjustable / Pipe Wrench
2. Teon (PTFE) Tape 6. Screwdriver
3. Plumber’s Putty and Caulking 7. Electric Drill
4. Pipe Cutter
Maintenance Guide
Please follow the cleaning material manufacturer’s instructions. Damage caused by improper
treatment will not be covered by product warranty. In addition, pay attention to the following points:
• Regular cleaning can prevent mineral build up on faucet spout.
• Carefully read the cleaner product label to ensure the cleaner is safe for use on the material.
• Test the cleaner on a small area before using on the entire surface.
• Use a mild detergent such as liquid dishwashing soap and warm water for cleaning.
• Do not use abrasive / harsh chemical when cleaning the xture as they will damage and dull the
nish.
• When using spray cleaners, spray rst onto a soft cloth or sponge. Never spray directly onto the
faucet as droplets can enter openings and gaps and cause damage.
• After cleaning, rinse thoroughly with clean water to remove any cleaner residue.

4
FTF01 Rev.2 042019
Luxier
Installation
1. Insert the RISER TUBE (1) over hot and cold
SUPPLY HOSES (5). Thread the Top RISER TUBE
(1) into base of the VALVE BODY (2) and tighten
it fully. Slide the FLOOR MOUNTING FLANGE (3)
onto the Bottom RISER TUBE with the ange (4).
Thread RISER TUBE (4) into the bottom of RISER
TUBE (1) and fully tighten the tubes.
3. Make sure the oor is level in both directions.
Determine the distance from the nished wall to
the center of the oor water supply hose. Mark the
centerline. Drill a 2” (51mm) diameter hole for the
Hot and Cold water supply hoses.
Insert the water supply hoses through the hole and
place Tub Filler Assembly on the oor and check for
alignment.
Insert SPOUT (1) into faucet body (2) tighten
Setscrew (3) with the supplied small hex wrench
supplied. Insert Handle (4) on the cartridge stem,
tighten the Setscrew (5) and install Cap (6) to the
Handle. (4)
5
1
Top Riser Tube
2
4
Bottom Riser Tube
3
1
1
3
4
5
6
2
Cartridge Stem
2
Level
BASE BOARD
2" Hole
FINISHED WALL LINE
COLD
HOT
Top View
3

5
FTF01 Rev.2 042019
Luxier
Installation
1
2
4
4-1
4. With the Tub Filler Assembly aligned in the desired
position, mark each of the 4 mounting holes from the
Mounting Flange (1) on the oor.
4-1. Use a drill with 1/4” drill bit, drill the holes 1 3/4” deep
and insert the included Anchors (2). Make sure the Anchors
are ush with the nished oor.
5. Make sure both Hot and Cold water supply hoses pass
through the 2” mounting hole with at least 1 1/4” of the
hose in the oor space.
1/2 " Supplies Hoses
Hot Cold
1 1/4”
Finished Floor
Sub-Floor
HOT
COLD
5
pipe support
1
water pipe
water pipe
6
6. Apply PTFE tape to the threads of the T-Connector (1)
and the 2 Thread Adapters. Connect the 2 adapters to the
T-Connector (1) and tighten fully. Secure pipe below oor
to oor joist with pipe supports. Connect the 2 water supply
hoses to the T-Connector (1) and use an adjustable wrench
to tighten connections. Do not over tighten the connections.

6
FTF01 Rev.2 042019
Luxier
Installation
COLD
HOT
1
2
3
7
7. Hold the Tub Filler Assembly (1) in place and install
the four Mounting Screws (3). Check aligment and level
before fully tightening the Mounting Screws (3). After
tightening the screws slide the Escutcheon (2) down to
cover the ange.
8. Connect the Hand Shower Hose (5) to the Tub Filler.
Use an adjustable wrench to connect the Hand Shower
Hose (5) with hex nut end to the Tub Filler. (NOTE:
Make sure the rubber washers (1) are installed on both
end of the hose)
Hand tighten the Hand Shower Wand (6) to the Hand
Shower Hose (5). The Hand Shower Wand should be
placed in the Holder (3) when not in sue.
Remove the aerateor assembly (2) from the spout
and turn on water for couple of minutes and check all
connections for leaks. Move the Handle (4) throughout
the temperature range to ush out any debris in both
hot and cold water lines thoroughly.
Hex Fitting
1
5
2
3
4
1
6
8

7
FTF01 Rev.2 042019
Luxier
1
2
3
4
5
8
7
6
12
13
14
15
16
9
10
11
Parts
Operations
01. Aerator Assembly
02. Hand Shower Wand
03. Diverter Knob
04. Hand Shower Hose
05. Hot and Cold Water Supply Hose
06. T-Connector
07. Mounting Screws and Anchors
08. Escutcheon
09. Cartridge
10. Cartridge Locking Nut
11. Dome Cap
12. Cap, Setscrew and Hex Wrench
13. Handle
14. Diveter Cartridge
15. Hand Shower Connector Assembly
16. Setscrew
OFF
Front View
Diverter Knob
Side View
ON
HOT COLD
To operate the tub ller simply move the
handle to the ON position to turn on the water.
Adjust the temperature by moving the handle
from side to side to set the desired water
temperature.
To operate the hand shower wand, remove
the hand shower from its holder and direct the
jets into the tub. Pull the diverter knob on the
faucet body. Push the diverter knob to direct
the water back to the spout.
/