Page is loading ...

V4.0 8819922
Please read and understand all instructions before use. Retain this manual for
future reference.
User Manual
Auto-Darkening PAPR
Welding Helmet

8819922 Auto-Darkening PAPR Welding Helmet V4.0
2 For technical questions call 1-800-665-8685
SPECIFICATIONS
Applications
ARC (Stick, MIG and TIG Welding
Viewing Area
3.86 x 1.69 in.
Optical Classification
1/1/1/1
ADF Controls
External
Variable Shade
DIN 9 to DIN 13
Light State Shade
DIN 4
UV/IR Protection
Up to shade DIN 16 at all times
Reaction Time
1/15,000 Second (0.066 millisecond
Delay Control (Dark to Light
0.1 to 1.0 Seconds
Grind Mode
Yes
Arc Sensors
4
Power Supply
Solar cells with replaceable CR2450 Lithium Battery
Battery Duration
6 Hours (Low, 4 Hours (High
Battery Life
500 Charges
ADF Power ON/OFF
Fully Automatic
TIG Rating
5 Amps or More
Filter
Type
Particle Filter P R SL, 0.3 micrometers
Class
TH2P
Audible Alarm
85 dBA at 10 cm
Headgear
Adjustable Ratcheting Type
Airflow Rate
Low Speed
150+ Lpm (5.29 CFM
High Speed
180+ Lpm (6.35 CFM
Operating Temperature and Humidity
23 to 131°F (-5 to 55°C, up to 90% Humidity
Storage Temperature
14 to 122°F (-10 to 50°C
Overall Weight
2.42 lb (1.1 kg
Compliance
EN 12941 TH2 P (SL, NIOSH 42 CFR Part 84,
AS/NZS 1716 P2, CSA Z94.3-07
Auto-Darkening PAPR
Welding Helmet

V4.0 Auto-Darkening PAPR Welding Helmet 8819922
Visit www.princessauto.com for more information 3
INTRODUCTION
The Auto-Darkening Powered Air Purifying Respirator Welding Helmet provides the
welder with continuous flow of filtered air that creates high pressure in the helmet
to prevent welding fumes from entering and being inhaled. The user can adjust the
airflow speed. There are visual/audible and vibration alarms for an insufficient
airflow rate or low battery.
SAFETY
WARNING! Read and understand all instructions before using this tool. The
operator must follow basic precautions to reduce the risk of personal injury
and/or damage to the equipment.
Keep this manual for safety warnings, precautions, operating or inspection and
maintenance instructions.
HAZARD DEFINITIONS
Please familiarize yourself with the hazard notices found in this manual. A notice
is an alert that there is a possibility of property damage, injury or death if certain
instructions are not followed.
DANGER! This notice indicates an immediate and specific hazard that will
result in severe personal injury or death if the proper precautions
are not taken.
WARNING! This notice indicates a specific hazard or unsafe practice that
could result in severe personal injury or death if the proper
precautions are not taken.
CAUTION! This notice indicates a potentially hazardous situation that may result
in minor or moderate injury if proper practices are not taken.
NOTICE! This notice indicates that a specific hazard or unsafe practice will
result in equipment or property damage, but not personal injury.
WORK AREA
1. Operate in a safe work environment. Keep your work area clean, well-lit
and free of distractions. Place lights so you are not working in a shadow.

8819922 Auto-Darkening PAPR Welding Helmet V4.0
4 For technical questions call 1-800-665-8685
2. Keep anyone not wearing the appropriate safety equipment away from the
work area.
3. Store unused tools properly in a safe and dry location to prevent rust or
damage. Lock tools away and keep out of the reach of children.
4. This system is not suitable for work area atmospheres that are immediately
hazardous, unhealthy or contains oxygen content of less than 17%.
5. Do not use this system in confined areas or areas of low ventilation.
6. Do not use this system in an area where there are high winds.
PERSONAL SAFETY
WARNING! Wear personal protective equipment approved by the Canadian
Standards Association (CSA or American National Standards In stitute (ANSI.
PERSONAL PROTECTIVE EQUIPMENT
1. Always wear impact safety goggles that provide front and side protection
for the eyes. Eye protection equipment should comply with CSA Z94.3-07
or ANSI Z87.1 standards based on the type of work performed.
2. Wear a NIOSH approved respirator when working on materials that
produce hazardous fumes, dust or particulate matter.
3. This tool can cause hearing damage. Wear hearing protection gear with an
appropriate Noise Reduction Rating to withstand the decibel levels.
PERSONAL PRECAUTIONS
Control the tool, personal movement and the work environment to avoid
personal injury or damage to tool.
1. Do not operate any tool when tired or under the influence of drugs, alcohol
or medications.
2. Avoid wearing clothes or jewelry that can become entangled with the
moving parts of a tool. Keep long hair covered or bound.
SPECIFIC SAFETY PRECAUTIONS
WARNING! DO NOT let comfort or familiarity with product (gained from
repeated use replace strict adherence to the tool safety rules. If you use
this tool unsafely or incorrectly, you can suffer serious personal injury.

V4.0 Auto-Darkening PAPR Welding Helmet 8819922
Visit www.princessauto.com for more information 5
WARNING! The Auto-Darkening Welding Helmet does not protect against severe
impact hazards, explosions or corrosive liquids. Machine guards or eye splash
protection must be used when these hazards are present.
1. Use the correct tool for the job. This tool was designed for a specific function.
Do not modify or alter this tool or use it for an unintended purpose.
2. Do not use the tool if any parts are damage broken or misplaced. Repair or
replace the parts.
3. This auto-darkening welding helmet is not recommended for overhead welding
applications, laser welding or laser cutting applications.
4. This welding helmet is not suitable for oxy-acetylene welding.
5. In the event of electronic failure, the filter remains dark to protect against UV
and IR radiation at Shade 16.
6. The auto-darkening welding filter should always be used with original inner
and outer cover lenses. Never open or tamper with the filter cartridge.
7. Ensure the front cover lens is mounted before use and remove protective film.
8. Ensure that the lens is clean and there is no dirt or spatter covering the 4
sensors at the front of the filter cartridge.
9. Inspect all parts for signs of wear or damage. Any scratched or cracked parts
should be replaced prior to use.
10. Never place the helmet on a hot surface.
11. Arc rays can burn both eyes and skin. Arc welding produces intense visible
and invisible (ultraviolet and infrared rays. Wear a welding helmet fitted with
the proper shade to protect your face and eyes when welding or watching.
12. Check whether welding or grinding mode is chosen before use.
13. The reaction of the filter’s liquid crystal will be slower if the ambient
temperature is low, but it will not affect protective functions.
14. Replace the protective lenses immediately if broken or scratched. The damage
will obscure vision and reduce the filter’s protective performance.
15. Do not modify filters to fit the welding helmet or use filters from different
blower models. This will compromise the system’s safety features.
16. Never attempt to clean a filter by knocking or blowing out accumulated
material. Doing so will damage the filter media and compromise the
regulator. Replace the filters when necessary.

8819922 Auto-Darkening PAPR Welding Helmet V4.0
6 For technical questions call 1-800-665-8685
RESPIRATOR LIMITATIONS
1. Do not wear this respirator system to enter areas where:
a. Atmospheres are oxygen deficient.
b. Contaminant concentrations are unknown.
c. Contaminant concentrations are immediately dangerous to life or health.
d. Contaminant concentrations exceed the maximum use concentration
determined using the Assigned Protection Factor for the specific
respirator system.
2. The user must leave the work area immediately if any of the following occurs:
• The system’s alarm sounds.
• Breathing becomes difficult.
• Dizziness or distress occurs.
• Any part of the system becomes damaged.
• Airflow into the headgear decreases or stops.
• Welding fumes are smelt or tasted inside the headgear.
BATTERY PRECAUTION
1. Do not expose the lithium battery to heat or throw it in a fire. The contents are
flammable and the battery may explode. Do not inhale smoke issuing from the
burning battery as it is toxic.
2. Do not disassemble or crush the battery as the contents are corrosive and
flammable. Exposure may cause an injury.
3. Only charge lithium batteries with the supplied charger. The battery may suffer
damage if the charger is not designed for lithium batteries.
4. Discontinue charging a lithium battery if it changes shape or is abnormally hot.
The battery may leak or ignite. Move the battery to a fire proof location and
observe for 15 minutes. Safely dispose of the battery.
5. Do not recharge lithium battery on a flammable surface such as wood or
carpet.
6. Do not leave lithium battery unattended when recharging. Remain to observe
the recharging process in case a problem occurs. Place the battery into a fire-
proof container.

V4.0 Auto-Darkening PAPR Welding Helmet 8819922
Visit www.princessauto.com for more information 7
CHARGER SAFETY PRECAUTIONS
WARNING! 120 volts are present at the charging terminals, do not probe with
conductive objects. Electric shock or electrocution may result.
1. Do not use the charger with an extension cord.
2. Do not attempt to use a step-up transformer, an engine generator or DC power
receptacle.
3. Place the charger on a flat non-flammable surface and away from flammable
materials when re-charging the batteries.
4. For indoor use only. Do not use the battery charger in damp or wet locations.
5. Do not operate the charger if it has received a sharp blow, been dropped or
otherwise damaged in any way. Take the charger to a qualified service
technician.
6. Do not disassemble the charger or batteries. Take the charger to a qualified service
technician when service or repair is required.
7. Do not charge batteries when the temperature is below 50°F (10°C or above
104°F (40°C . Store the tool and batteries in a location where the temperature will
not exceed 122°F (50°C. This is important to prevent serious damage to the
battery cells.
UNPACKING
WARNING! Do not operate the tool if any part is missing. Replace the
missing part before operating. Failure to do so could result in a malfunction
and personal injury.
Remove the parts and accessories from the packaging and inspect for damage.
Make sure that all items in the contents are included.
Contents: • Helmet • Respirator • Particle Filter
• Battery • Flow Meter

8819922 Auto-Darkening PAPR Welding Helmet V4.0
8 For technical questions call 1-800-665-8685
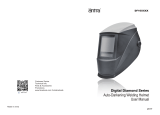
IDENTIFICATION KEY
A Auto-Darkening Welding Helmet
B Face Seal
C Headgear Inlet
D Breathing Tube Terminal 1
E Breathing Tube
F Breathing Tube Terminal 2
G Blower Outlet
H Belt
I Blower Body
ASSEMBLY & INSTALLATION
Letter references in parenthesis (A refer to the included Identification Key. Dashed
numbers in parenthesis (Fig. 1-1 refer to a specific point in an illustration or image.
ADJUST THE WELDING HELMET FIT
The headband should be adjusted both in diameter and height. The angle between
face and helmet should also be adjusted (recommended 10° to 12°.
1. Adjust the headgear diameter with the twist knob on the back (Fig. 2-1 .
The knob is locked until pushed in. Once unlocked, twist clockwise to
tighten and counterclockwise to loosen.
2. Adjust the height by snapping the pin into the
hole to lock securely in place (Fig. 2-2 .
3. To adjust the viewing angle, loosen the knob on
both sides of the helmet (Fig. 2-3 and change
angle locker to the desired tilt position
(5 selection and positioned in the middle by
default . Once achieving the desire angle,
tighten the knobs until snug. The helmet should
still swing up, but it should not drift downward
when in place for welding.
Fig. 1
Fig. 2

V4.0 Auto-Darkening PAPR Welding Helmet 8819922
Visit www.princessauto.com for more information 9
4. Adjust the distance between the user’s face and ADF by loosening the
knobs on both sides of the helmet (Fig. 2-4 until the headband can move
back and forth freely. Reposition the headband at one of the 3 slots (the
headband is positioned in the middle by default. Do this one side at a
time. Secure both sides at the same position for proper auto-darkening
filter operation.
SHADE CONTROL
Select the shade DIN 9 to 13 based upon the welding process
you will use by consulting the Welding Shade Guide in
Appendix A. The variable shade control knob is for external
adjustment.
Slide the button to Grind to select Grind Mode. This setting
prevents the filter lens from auto-darkening while grinding.
The filter will remain at DIN 4.
SENSITIVITY CONTROL
The sensitivity can be set from MIN to MAX by using the infinite
dial knob (Fig. 4. The MIN setting suits excessive ambient light
or glare from another welding machine close by. The MAX setting
suits low amperage welding and welding in areas with low light
conditions. Selections between MIN and MAX are suitable for
most indoor and outdoor welding operations.
DELAY CONTROL
The viewing window automatically changes from dark back to
light when welding ceases, but with a pre-set delay to
compensate. The delay time can be set from SLOW (0.8s to MIDDLE (0.5s to
FAST (0.2s, by the DELAY switch (Fig. 4 . The minimum delay suits spot or
short welds.
The maximum delay suits heavy current welding and reduces eye fatigue from the
arc. Selections between SLOW-MIDDLE are suitable for most of indoor and outdoor
welding operations.
Fig. 3
Fig. 4

8819922 Auto-Darkening PAPR Welding Helmet V4.0
10 For technical questions call 1-800-665-8685
RESPIRATOR ASSEMBLY
1. Slide the square end of the battery (Fig. 5-1
into the bottom of the blower body (I until
the lock button (Fig. 5-2 clicks into place.
2. Lay the blower body (I down onto a level
surface. Inspect the filter and bottom gasket
before installation and replace either if damaged.
3. Install the HEPA filter (Fig. 6-2 into the blower
with the rim upwards. Place the foam prefilter
(Fig. 6-3 onto the HEPA filter. Push the spark
guard cover (Fig. 6-4 down and rotate it
clockwise until it clicks into position.
4. Connect the breathing tube (E to the blower
body by inserting terminal 2 (F into the blower
body outlet (G and screwing the cap an 1/8 of a
turn clockwise to secure.
5. Screw breathing tube terminal 1 (D into the
headgear inlet (C and turn clockwise to secure.
OPERATION
WARNING! Do not use the respirator without the cover, foam filter and HEPA
filter installed. Failure to have the filters properly installed may allow
environmental contaminents into the airflow that can harm or kill the user.
Make it a habit to test the PAPR Welding Helmet before each use to make sure it
is working correctly.
Confirm the filter is the correct type for the welding environment.
BATTERY POWER LEVEL
The battery power indicator (Fig. 3-5 shows the power remaining :
• Green light indicates 90% or above.
• Yellow light indicates between 30 to 89%.
• Red light indicates between 10 and 29%.
• Flashing red light indicates less than 10%.
Fig. 5
Fig. 6

V4.0 Auto-Darkening PAPR Welding Helmet 8819922
Visit www.princessauto.com for more information 11
TESTING THE AIRFLOW ALARM
1. Disconnecting the breathing tube from the helmet inlet.
2. Start the blower and place your hand over the breathing tube opening.
3. Keep hand on opening until the alarm sounds and the blower vibrates. If
neither happens, check both the battery power level and the filter.
4. Press the ON/OFF button (Fig. 7-1 to
start the blower. The lights for the
Danger (Fig. 7-4 , Low Speed (Fig. 7-2
and High Speed (Fig. 7-3 will shine for
a moment, the alarm will sound and the
blower will vibrate. The blower will start
at low speed.
5. Stop the blower by pressing the ON/OFF button. The alarm and the blower
will stop.
6. Several situations will set-off the Danger indicator, alarm and the blower
vibration: low battery power (Fig. 7-5, reduced airflow due to a dirty filter,
a blocked breathing tube or reduced airflow in general.
a. The Battery Level indicator light shows the power remaining in the
battery.
• Green: 90% or above
• Yellow: 30% to 89%
• Red: 10% to 29%
• Flashing Red: 10% or below
TESTING THE AIRFLOW
1. Disconnect the breathing tube (E from the hood (B.
Insert the flow meter (Fig. 8-1 into the breathing tube
and hold the meter straight up. Start the blower.
2. The ball (Fig. 8-2 should rise above the MIN mark (Fig. 8-3
on the side. Check the battery power and filter elements if
the ball is below the MIN mark. Replace the filter elements or
battery if necessary.
Fig. 7
Fig. 8

8819922 Auto-Darkening PAPR Welding Helmet V4.0
12 For technical questions call 1-800-665-8685
FINAL CHECKS
1. Screw breathing tube terminal 1 (D into the
headgear inlet (C.
2. Screw breathing tube terminal 2 (F into the blower
outlet (G.
3. Position the blower (I on your lower back and
secure with the belt (H.
4. Place the headgear over your head and adjust the fit.
5. Adjust the face seal (B under your chin and in front
of your ears.
6. Turn the blower on and confirm the airflow is
sufficient for your needs. Recheck the face seal for
possible leaks and adjust.
7. The unit is ready for use.
CARE & MAINTENANCE
1. Maintain the tool with care. A tool in good condition is efficient, easier to
control and will have fewer problems.
2. Inspect the tool components periodically. Repair or replace damaged or
worn components. Only use identical replacement parts when servicing.
3. Follow instructions for changing accessories.
4. Only use accessories intended for use with this tool.
5. Maintain the tool’s labels and name plates. These carry important information.
If unreadable or missing, contact Princess Auto Ltd. for replacements.
6. Replace a damaged or dirty air filter. Do not wash filters, clean with
compressed air, or reuse dirty air filters. Dirty filters compromise the
filtering capability of the blower.
WARNING! Only qualified service personnel should repair the tool. An
improperly repaired tool may present a hazard to the user and/or others.
Fig. 9

V4.0 Auto-Darkening PAPR Welding Helmet 8819922
Visit www.princessauto.com for more information 13
CHARGING THE BATTERY
1. Remove battery from the blower assembly
2. Connect the charge cord (Fig. 6-2
to the battery’s terminal (Fig. 6-1
3. Connect the charger to 110V-
120V AC power outlet.
FRONT COVER LENS REPLACEMENT
Replace the front cover lens if it is damaged (cracked, scratched, pitted or
dirty. Remove the old front cover lens by pressing two lock switches at the
bottom of the retaining frame and pull the frame and ADF out. Take the old front
cover lens out, and remove any protective film before installing the new one.
INSIDE COVER LENS REPLACEMENT
Replace the inside cover lens if it is damaged (cracked, scratched, pitted or
dirty. Place your finger or thumb into the recess and flex the inside cover lens
upwards until it releases from one edge. Then remove any protective film before
installing the new one.
BATTERIES REPLACEMENT
When low voltage indicator (inside the helmet, on the left turns red, you have
to change the battery. Slide the cover plates off and replace the old battery by a
new CR2450 battery. Slide the cover plates back into place.
CLEANING
WARNING! Do not use a detergent or abrasive cleaner on the welding helmet
or respirator. They can damage the surfaces and compromise safety
features. Only use water and a mild pH neutral cleaning solution to clean
the helmet and respirator unit.
WARNING! Do not use compressed air or a vacuum to clean the blower
interior to avoid damaging the mechanisms.
1. Remove the breathing tube from the helmet and respirator.
2. Wipe the outer surfaces of the helmet and blower body with a soft damp
cloth. Dry with a lint-free cloth or allow to air dry.
a. Make sure all electrical contacts are dry before reassembly.
Fig. 10

8819922 Auto-Darkening PAPR Welding Helmet V4.0
14 For technical questions call 1-800-665-8685
3. Open the filter cover and check the foam and HEPA filters. Replace either if
they are dirty. Do not attempt to clean them.
4. Clean the breathing tube and connectors. The tube can be immersed fully
for cleaning. Ensure it is completely dry before reassembly by allowing to
air dry or blowing the water out with compressed air.
5. Reassemble the unit for future use. Switch the shade control to Grind
mode and store.
STORAGE
Remove the filter and battery from the unit and store in clean, dry place free of
solvent vapors. Seal the filter to prevent contamination.
DISPOSAL
Recycle a tool damaged beyond repair at the appropriate facility.
Contact your local municipality for a list of disposal facilities or by-laws for
electronic devices, batteries, oil or other toxic liquids.

V4.0 Auto-Darkening PAPR Welding Helmet 8819922
Visit www.princessauto.com for more information 15
TROUBLESHOOTING
Visit a Princess Auto Ltd. location for a solution if the tool does not function
properly or parts are missing. If unable to do so, have a qualified technician
service the tool.
Problem(s) Possible Cause(s) Suggested Solution(s)
Blower does not
supply air to hood
1. Blower not ON.
2. Battery is low.
3. Battery terminals failing
to contact.
4. Breathing tube and
blower outlet blocked.
1. Press ON/OFF to start blower.
2. Recharge battery.
3. Verify battery is properly
connected to blower.
4. Remove blockage from
blower outlet and breathing
tube.
Battery pack’s
charge lasts less
than expected
1. Battery only partially
charged.
2. Battery is depleted or
damaged.
3. Charger does not work.
4. Filter may be clogged,
forcing fan to work
harder.
1. Ensure Battery pack is fully
charged.
2. Replace battery.
3. Replace charger.
4. Check the air filter(HEPA filter
& Foam prefilter and replace
them if necessary.
Blower cannot be
turned off
ON/OFF button not
properly pressed.
Press ON/OFF button for one
second.
Battery red level
light is flashing
Battery power is low. Charge or replace the battery.
Danger light is on,
alarm sounds or
blower vibrates
Airflow is compromised. Leave the welding environment
immediately. Test the respirator
and helmet as per Operation
section instructions.

8819922 Auto-Darkening PAPR Welding Helmet V4.0
16 For technical questions call 1-800-665-8685
PARTS BREAKDOWN
PARTS LIST
# DESCRIPTION
1
Shade & Grind Switch Knob
2
Shade Knob
3
Self-Test Button
4
Low Volume Indicator
5
LCD
6
Arc Sensor
7
Solar Panel
8
UV/IR Filter
9
Sensitivity Control Knob
10
Delay Control Knob
11
Helmet Body
12
Headgear Top Adjustment
13
Headgear Tightness Adjusting Knob
14
Headgear Angle & Distance
Adjusting Knob
15
Front Cover Lens
16
Battery Compartment
17
Delay Time Control
18
Sensitivity Control
19
Filter Cartridge
20
LCD
21
Weld & Grind Control
22
Variable Shade Control
23
Inside Cover Lens
24
Filter Fixture Holder

V4.0 Auto-Darkening PAPR Welding Helmet 8819922
Visit www.princessauto.com for more information 17
APPENDIX A

V 4,0 8819922
Vous devez lire et comprendre toutes les instructions avant d'utiliser l'appareil.
Conservez ce manuel afin de pouvoir le consulter plus tard.
Manuel d'utilisateur
Casque de soudeur à
assombrissement automatique avec
appareil de protection respiratoire à
épuration d’air électrique

8819922 Casque de soudeur à assombrissement automatique avec appareil V 4,0
de protection respiratoire à épuration d’air électrique
2 En cas de questions techniques, appelez le 1-800-665-8685
SPÉCIFICATIONS
Applications
Soudage ARC (baguette, MIG et TIG
Zone de visibilité
3,86 x 1,69 po
Classification optique
1/1/1/1
Commandes du filtre à assombrissement
automatique
Externe
Teinte variable
DIN 9 à DIN 13
Niveau de teinte légère
DIN 4
Protection UV/IR Jusqu’à un indice de teinte DIN 16 en tout temps.
Temps de réaction
1/15,000 secondes (0.066 milliseconde
Commande temporisée (de sombre à
éclairé
0.1 to 1.0 Seconds
Mode de meulage
Oui
Capteurs d'arc
4
Source d'énergie
Cellules solaires avec pile au lithium CR2450
remplaçable
Durée de vie de la pile
6 heures (basse, 4 heures (haute
Durée utile de la pile
500 Charges
Alimentation du filtre à assombrissement
automatique MARCHE/ARRÊT
Entièrement automatique
Cote pour le soudage TIG
5 ampère ou plus
Filtre
Type
Filtre à particules PRSL, 0.3 micromètre
Catégorie
TH2P
Alarme sonore
85 dBA à10 cm
Harnais
Type à cliquet réglable
Airflow Rate
Vitesse minimale
150+ Lpm (5,29 pi cube/min
Vitesse maximale
180+ Lpm (6,35 pi cube/min
Casque de soudeur à
assombrissement automatique avec
appareil de protection respiratoire à
épuration d’air électrique

V 4,0 Casque de soudeur à assombrissement automatique avec appareil 8819922
de protection respiratoire à épuration d’air électrique
Visitez www.princessauto.com pour plus d'informations 3
Températures de fonctionnement et
humidité
-5 à 55 °C (23 à 131 °F, humidité jusqu’à 90 %
Température d'entreposage -10 à 50 °C (14 à 122 °F
Poids total 1,1 kg (2,42 lb
Conformité
EN 12941 TH2 P (SL, NIOSH 42 CFR Part 84,
AS/NZS 1716 P2, CSA Z94,3-07
INTRODUCTION
Le casque de soudeur à assombrissement automatique avec appareil respiratoire
électrique qui purifie l’air et procure au soudeur un flux continu d'air filtré qui
entraîne une pression élevée à l'intérieur du masque afin d'empêcher les
émanations d'entrer et d'être inhalées. L'utilisateur peut ajuster la vitesse du
débit d'air. Des alarmes visuelle et sonore en cas de débit d'air insuffisant ou de
pile faible ont été prévues.
SÉCURITÉ
AVERTISSEMENT ! Veuillez lire et comprendre toutes les instructions avant
d'utiliser cet outil. L'utilisateur doit respecter les précautions de base
lorsqu'il utilise cet outil afin de réduire le risque de blessure ou de
dommage à l'équipement.
Conservez ce manuel qui contient les avertissements de sécurité, les
précautions, les instructions de fonctionnement ou d'inspection et d'entretien.
DÉFINITIONS DE DANGER
Veuillez-vous familiariser avec les avis de danger qui sont présentés dans ce
manuel. Un avis est une alerte indiquant qu'il existe un risque de dommage à la
propriété, de blessure ou de décès si on ne respecte pas certaines instructions.
DANGER ! Cet avis indique un risque immédiat et particulier qui
entraînera des blessures corporelles graves ou même la
mort si on omet de prendre les précautions nécessaires.
AVERTISSEMENT ! Cet avis indique un risque particulier ou une pratique non
sécuritaire qui pourrait entraîner des blessures
corporelles graves ou même la mort si on omet de
prendre les précautions nécessaires.
/