Godex RT700iW series User manual
- Category
- Label printers
- Type
- User manual

RT700i SERIES BARCODE PRINTER
RT700iW SERIES BARCODE PRINTER
USER MANUAL
User Manual
Version
Issue Date
P/N
: RT700i series
: Rev. 1.9
: 2015.03.13
: 920-014811-01

Contents
CONTENTS
1 Barcode Printer 001
1.1
1.2
Box Content
Getting to Know Your Printer
001
002
2 Printer Setup 006
2.1
2.2
2.3
2.4
2.5
Open the Printer
Loading the Ribbon
Loading the Label Roll Module
Connecting the Printer to the Host Computer
Installing Printer Driver and QLabel with Super
Wizard CD
006
007
012
014
016
3 Printer Setting and Control 021
3.1
3.2
3.3
3.4
3.5
3.6
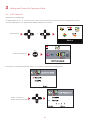
Operation Panel
LCD Interface Introduction
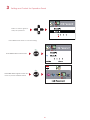
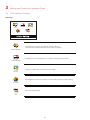
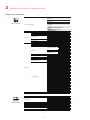
LCD Interface Function
Label Calibration and Self Test
Error Alerts
021
022
026
028
0
30
034
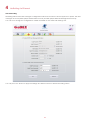
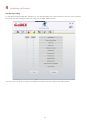
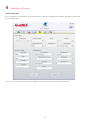
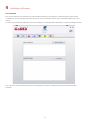
4 NetSetting for Ethernet 041
4.1
4.2
Installing the NetSetting Software
The Interface of NetSetting
041
042
5 Accessories 049
5.1
5.2
5.3
Preparation Steps
Installing the Label Dispenser
Installing the Cutter
049
051
057
6 Maintenance and Adjustment 061
6.1
6.2
Cleaning the Print Head
Troubleshooting
061
062
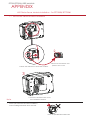
Appendix
Product Specifications
Interface
File Manipulation When Using USB Stick
3.7
3.8 USB Host
LAN Setting
LCD Password
036
038
Bluetooth Module
3.9 Dump Mode Begin 039
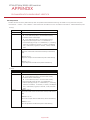
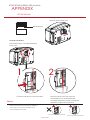
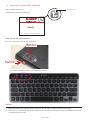
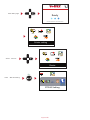
WiFi Printer Server Module Installation - For RT700iW/ RT730iW
RT700i/RT700iW SERIES USER MANUAL

Declaration
RT700i/RT700iW SERIES USER MANUAL
FCC COMPLIANCE STATEMENT
FOR AMERICAN USERS
This equipment has been tested and found to comply with the limits for a CLASS A digital device,
pursuant to Part 15 of the FCC Rules. These limits are designed to provide reasonable protection
against harmful interference when the equipment is operated in a commercial environment. This
equipment generates, uses, and can radiate radio frequency energy and, if not installed and used
in accordance with the instructions, may cause harmful interference to radio communications.
Operation of this equipment in a residential area is likely to cause harmful interference in which case
the user will be required to correct the interference at own expense.
EMS AND EMI COMPLIANCE STATEMENT
FOR EUROPEAN USERS
This equipment has been tested and passed with the requirements relating to electromagnetic
compatibility based on the standards EN55022:2010 Class A, EN61000-3-2:2006/A1:2009/A2:2009,
EN 61000-3-3:2008 and EN55024:2010, IEC 61000-4-2:2008 series The equipment also tested and passed in
accordance with the European Standard EN55022 for the both Radiated and Conducted emissions limits.
RT700i SERIES
TO WHICH THIS DECLARATION RELATES
IS IN CONFORMITY WITH THE FOLLOWING STANDARDS
IEC 60950-1:2005(2nd Edition)+Am 1:2009, CB9254-2008 (Class A ) ; GB17625. 1-2003; GB4943.1-2011,
EN55022:2010 Class A, EN61000-3-2:2006/A1:2009/A2:2009, EN 61000-3-3:2008 and EN55024:2010,
IEC 61000-4-2:2008 series, UL 60950-1, 2nd Edition, 2011-12-19, CSA C22.2 No. 60950-1-07, 2nd Edition,
2011-12, CFR 47, Part 15
,
.

RT700i/RT700iW SERIES USER MANUAL
SAFETY INSTRUCTIONS
Please read the following instructions carefully.
1. Keep the equipment away from humidity.
2. Before you connect the equipment to the power outlet, please
check the voltage of the power source.
3. Make sure the printer is off before plugging the power connector
into the power jack.
4. It is recommended that you connect the printer to a surge
protector to prevent possible transient overvoltage damage.
5. Be careful not to get liquid on the equipment to avoid electrical
shock.
6. For safety and warranty reasons, ONLY qualified service personnel
should open the equipment.
7. Do not repair or adjust energized equipment under any
circumstances.
Safety instructions
**** Danger of explosion if battery is incorrectly replaced. Replace only with the equivalent type recommended by
the manufacturer.
**** Dispose of used batteries according to the manufacturer’s instructions.
**** Only use with designated power supply adapter model.
**** Changes or modifications not expressly approved by the party responsible for compliance could void the user's
authority to operate the equipment.
Specifications are subject to change without notice.
Caution

1
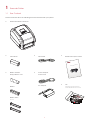
1 Barcode Printer
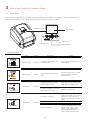
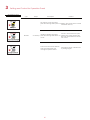
1.1 Box Content
Please check that all of the following items are included with your printer.
001
USB Cable
RT700i Series Barcode Printer
CD
Including GoLabel software
and RT700i/RT730i user manual.
Label Stock
Ribbon Module
Empty Ribbon Core
Ribbon
Ribbon Hubs
Set of 2.
Power Adapter
Power Cord
AC Adapter
RT700i Series Quick Guide
RT700/RT700i/RT700
x
Series
RT700i

2
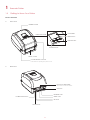
Front View
1 Barcode Printer
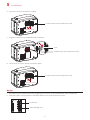
1.2 Getting to Know Your Printer
002
Device Overview
Rear View
RT700i
COVER RELEASE CATCHES
Pull catches for opening the printer cover
FRONT COVER
PRINTER COVER
OPERATION PANEL
RT700i
FEED BUTTON
POWER BUTTON
LCD SCREEN
DIRECTION KEY
RT700i
ETHERNET PORT
SERIAL PORT
POWER JACK
USB PORT
CALIBRATION BUTTON
USB HOST
FAN-FOLD LABEL INSERT
Feed slot for continuous labels

3
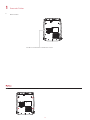
Bottom View
1 Barcode Printer
003
COVER OF THE MODULE CONNECTION JACKS
**** Cut-outs are not intended for wall-mount use.

4
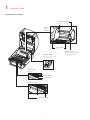
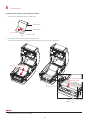
1 Barcode Printer
The Internal View of Printer
004
RELEASE CATCH
Release catch for closing
the printer cover
LABEL SENSOR
MODULE
GUIDE TRACK
LABEL SENSOR
PLATEN MODULE
PLATEN
PLATEN LOCKERS
LABEL
SUPPLY
MODULE
RELEASE CATCH
Release catch for opening
the label supply hub
LABEL SUPPLY HUB
Set of 2
LABEL GUIDE
Set of 2

5
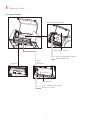
1 Barcode Printer
005
The Printing Mechanism
RIBBON REWIND MECHANISM
RIBBON WINDOW COVER
NOTCH OF RIBBON REWIND WHEEL
RIBBON REWIND WHEEL
PRINT HEAD
RIBBON
SUPPLY
MECHANISM
NOTCH OF RIBBON SUPPLY WHEEL
PAPER PRESS BAR
RIBBON SUPPLY WHEEL

6
2 Printer Setup
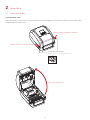
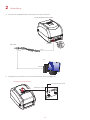
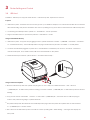
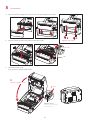
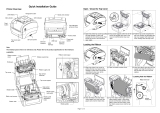
2.1 Open the Printer
Open the Printer Cover
Place the printer on a flat surface. Open the printer cover by pulling the cover release catches on both sides of the
printer and lift the printer cover.
006
RT700i
Pull the catches toward the direction
COVER RELEASE CATCHES
Pull the catches for opening the printer cover
Pull the catches toward the direction
Open the printer cover

7
2 Printer Setup
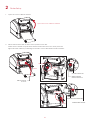
2.2 Loading the Ribbon
007
A New Ribbon Module Installation
1. Attach the ribbon to the empty ribbon core with the adhesive strip at the end of the ribbon.
2. Insert the ribbon hub into empty ribbon core and new ribbon. Wind the ribbon around the empty ribbon core
for 2 to 3 circles.
3. A ribbon module is assembled as below.
A NEW RIBBON MODULE
RIBBON HUB
EMPTY RIBBON COREA NEW RIBBON
Stick on empty ribbon core
Wind the ribbon around the core
Insert the ribbon hub
RIBBON REWIND MODULE
RIBBON SUPPLY MODULE

8
2 Printer Setup
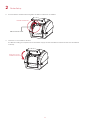
008
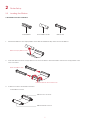
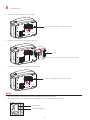
Load the Ribbon on the Printer
For Ribbon Supply Module
RIBBON SUPPLY MECHANISM
RIBBON SUPPLY SPINDLE FIXED SLOT
RIBBON SUPPLY WHEEL
Place
RIBBON SUPPLY
MODULE
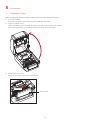
1. Place the ribbon module into the printing mechanism. Please the left-hand side of ribbon supply spindle
fixed slot first. Make sure the holder of square fixed shaft is inserted into the notch. Then place the
right-hand side of ribbon positioning round shaft. Can be fixed ribbon supply module.
放入
Left side
SQUARE FIXED SHAFT
RIBBON SUPPLY SPINDLE
FIXED SLOT
Place
Right side
POSITIONINGROUND SHAFT
Place
POSITIONING HOLES

9
2 Printer Setup
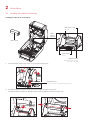
009
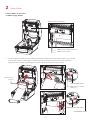
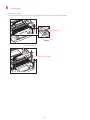
2. The ribbon supply module loading is completed. Pull the ribbon.
Push the release catch forward to unlock it. Close the printer cover.
For Ribbon Rewind Module
Close the printer cover
2
Push
1
RELEASE CATCH
Release catch for closing
the printer cover
RIBBON REWIND MECHANISM
RIBBON REWIND SPINDLE FIXED SLOT
RIBBON REWIND WHEEL
RIBBON WINDOW COVER
The cover for Ribbon rewind mechanism

10
2 Printer Setup
010
1. Open the cover of ribbon window.
2. Please the left-hand side of ribbon rewind spindle fixed slot first.
Make sure the holder of square fixed shaft is inserted into the notch. Then place the
right-hand side of ribbon positioning round shaft. Can be fixed ribbon rewind module.
Open the cover of ribbon window
Place
RIBBON REWIND
MODULE
Left side
Place
SQUARE FIXED SHAFT
RIBBON REWIND
SPINDLE FIXED SLOT
Place
Right side
Place
POSITIONING ROUND SHAFT
POSITIONING HOLES

11
2 Printer Setup
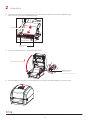
011
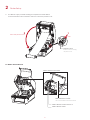
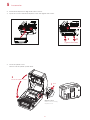
3. Turn the ribbon rewind wheel to tighten the ribbon until it has no wrinkles.
4. Close the cover of ribbon window.
The ribbon loading is completed once the ribbon supply module and ribbon rewind module are assembled
correctly.
Close the cover
of ribbon window
RIBBON REWIND WHEEL
Rotate backward

12
2 Printer Setup
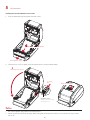
2.3 Loading the Label Roll Module
012
Loading the Label Stock on the Printer
LABEL STOCK
LABEL
SUPPLY
MODULE
RELEASE CATCH
Release catch for opening
the label supply hub
LABEL SUPPLY HUB
Set of 2
LABEL GUIDE
Set of 2
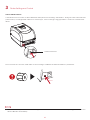
1. Press the ribbon catch and pull to open the label supply hub.
2. The label roll into the label supply module and align the label supply hub.
Moving the label supply hub. The label roll is indeed installed in the label supply hub.
1
2
2
RELEASE CATCH
Release catch for opening the label supply hub
Place

13
2 Printer Setup
013
3. Feed the Label through the label guides. The label guides will help to prevent the label swaying.
(Press release catch removable label guide.)
Through the label guides
LABEL GUIDE
Set of 2
4. Unlock the release catch to close the printer cover.
5. Press the FEED key and make sure the label is fed smoothly. The label loading is completed now.
2
1
RELEASE CATCH
Release catch
for closing the printer cover
Close the printer cover
**** Please keeps the rack gear clean to ensure the smoothness of paper roll supply module.
RT700i

14
2 Printer Setup
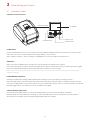
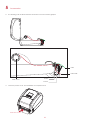
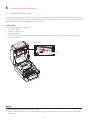
2.4 Connecting the Printer to the Host Computer
014
1. Please make sure that the printer is switched off.
2. Connect the power cord to the AC adapter.
AC ADAPTER
POWER CORD
Connect the jack of the power adapter to the printer and connect the plug of the power adapter to the socket
of the wall.
RT700i
RT700i SERIES BARCODE PRINTER
POWER ADAPTER
THE WALL
SOCKET
SLOT
JACK
PLUG

15
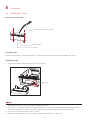
2 Printer Setup
015
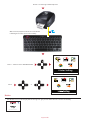
3. Connect the USB/serial cable to the printer and host computer.
4. Pressing the power button. The power LED indicator should now lights up.
RT700i
RT700i SERIES BARCODE PRINTER
USB CABLE
PC
SOCKET
USB PORT
PLUG
PLUG
RT700i
Pressing the power button
POWER LED INDICATOR
OPERATION PANEL

16
2 Printer Setup
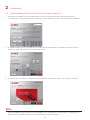
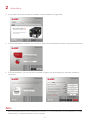
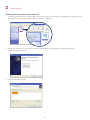
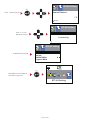
2.5 Installing Printer Driver and GoLabel with Super Wizard CD
016
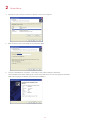
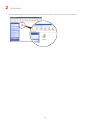
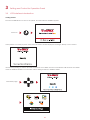
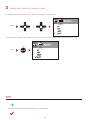
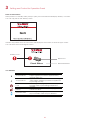
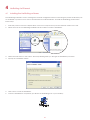
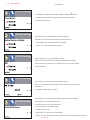
1. Insert the Super Wizard CD in the CD/DVD drive of the host computer and the program should pop up
automatically. You will see the Welcome screen first. On the Welcome screen, choose “Standard Installation”.
2. The wizard will then ask you to make sure your USB and power cables are connected and that the power is
turned on. Make sure that is done and then click “Next”.
3. The next screen you will see is, “Install the GoLabel Software and Windows driver”. Click “Next” to continue.
****If the Super Wizard program did not run automatically, you can either turn on the “Auto-run” setting for your
CD/DVD driver or double-click the icon of CD/DVD driver to run the program.
Page is loading ...
Page is loading ...
Page is loading ...
Page is loading ...
Page is loading ...
Page is loading ...
Page is loading ...
Page is loading ...
Page is loading ...
Page is loading ...
Page is loading ...
Page is loading ...
Page is loading ...
Page is loading ...
Page is loading ...
Page is loading ...
Page is loading ...
Page is loading ...
Page is loading ...
Page is loading ...
Page is loading ...
Page is loading ...
Page is loading ...
Page is loading ...
Page is loading ...
Page is loading ...
Page is loading ...
Page is loading ...
Page is loading ...
Page is loading ...
Page is loading ...
Page is loading ...
Page is loading ...
Page is loading ...
Page is loading ...
Page is loading ...
Page is loading ...
Page is loading ...
Page is loading ...
Page is loading ...
Page is loading ...
Page is loading ...
Page is loading ...
Page is loading ...
Page is loading ...
Page is loading ...
Page is loading ...
Page is loading ...
Page is loading ...
Page is loading ...
Page is loading ...
Page is loading ...
Page is loading ...
Page is loading ...
Page is loading ...
Page is loading ...
Page is loading ...
Page is loading ...
Page is loading ...
Page is loading ...
-
 1
1
-
 2
2
-
 3
3
-
 4
4
-
 5
5
-
 6
6
-
 7
7
-
 8
8
-
 9
9
-
 10
10
-
 11
11
-
 12
12
-
 13
13
-
 14
14
-
 15
15
-
 16
16
-
 17
17
-
 18
18
-
 19
19
-
 20
20
-
 21
21
-
 22
22
-
 23
23
-
 24
24
-
 25
25
-
 26
26
-
 27
27
-
 28
28
-
 29
29
-
 30
30
-
 31
31
-
 32
32
-
 33
33
-
 34
34
-
 35
35
-
 36
36
-
 37
37
-
 38
38
-
 39
39
-
 40
40
-
 41
41
-
 42
42
-
 43
43
-
 44
44
-
 45
45
-
 46
46
-
 47
47
-
 48
48
-
 49
49
-
 50
50
-
 51
51
-
 52
52
-
 53
53
-
 54
54
-
 55
55
-
 56
56
-
 57
57
-
 58
58
-
 59
59
-
 60
60
-
 61
61
-
 62
62
-
 63
63
-
 64
64
-
 65
65
-
 66
66
-
 67
67
-
 68
68
-
 69
69
-
 70
70
-
 71
71
-
 72
72
-
 73
73
-
 74
74
-
 75
75
-
 76
76
-
 77
77
-
 78
78
-
 79
79
-
 80
80


Godex RT700iW series User manual
- Category
- Label printers
- Type
- User manual
Ask a question and I''ll find the answer in the document
Finding information in a document is now easier with AI
Related papers
Other documents
-
 Automated Equipment LLC DF22 User manual
-
MUNBYN 8541731922 User manual
-
Gainscha GS-2406T User manual
-
 Printronix Auto ID T600 Quick Setup
-
Metapace META-T3S Datasheet
-
-
Citizen CL-S300 Owner's manual
-
-
EC Line EC-FT-420 User manual
-
MUNBYN ITPP941 User guide

