
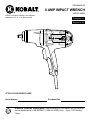
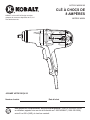
ITEM #0028180
8 AMP IMPACT WRENCH
MODEL #6904
Questions, problems, missing parts? Before returning to your retailer, call our customer
service department at 1-888-3KOBALT (1-888-356-2258), 8 a.m. - 8 p.m., EST, Monday -
Friday.
KOBALT
®
and the K & Design
®
are registered
trademarks of LF, LLC. All rights reserved.
Français p. 11
Español p. 22
ATTACH YOUR RECEIPT HERE
Serial Number Purchase Date

2
TABLE OF CONTENTS
Safety Information ...............................................................3
Package Contents ...............................................................6
Preparation. . . . . . . . . . . . . . . . . . . . . . . . . . . . . . . . . . . . . . . . . . . . . . . . . . . . . . . . . . . . . . . . . . . . . 7
Assembly Instructions ............................................................8
Operating Instructions ............................................................8
Care and Maintenance ............................................................9
Troubleshooting ................................................................10
Warranty ......................................................................10
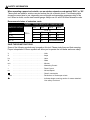
PRODUCT SPECIFICATIONS
COMPONENT SPECIFICATIONS
Motor 120 V, 60 Hz , 8 A
No-load speed 2,100 RPM
Impacts per minute 2,700 IPM
Anvil size 1/2 in. (12.7 mm)
Maximum fastening torque 350 ft. lbs.
Capacity (Standard bolt) M12 - M20 (1/2 in. - 3/4 in.) (12.7 mm - 19.1 mm)
Capacity (High-tensile bolt) M12 - M16 (1/2 in. - 5/8 in.) (12.7 mm - 15.9 mm)
7-pc socket set 11/16 in., 3/4 in., 13/16 in., 7/8 in., 17 mm, 19 mm, 21 mm

SAFETY INFORMATION
3
KNOW THE TOOL
To operate this tool, carefully read this manual and all labels afxed to the impact wrench before
using. Keep this manual available for future reference.
IMPORTANT
This tool should only be serviced by a qualied service technician.
READ ALL INSTRUCTIONS THOROUGHLY
GENERAL SAFETY RULES FOR ALL POWER TOOLS
WARNING: Some dust created by using power tools contains chemicals known to the
State of California to cause cancer and birth defects or other reproductive harm.
WARNING: Read and understand all instructions. Failure to follow all instructions listed below
may result in electric shock, re and/or serious personal injury.
SAVE THESE INSTRUCTIONS
WORK AREA
Keep your work area clean and well-lit. Cluttered benches and dark areas invite accidents.
Do not operate power tools in explosive environments, such as in the presence of
flammable liquids, gases, or dust. Power tools create sparks that may ignite the dust or fumes.
Keep bystanders, children, and visitors away while operating a power tool. Distractions can
cause you to lose control.
Make the workshop child-proof with padlocks, master switches, or by removing starter keys.
Use the right tool. Don’t force a tool or attachment to do a job for which it was not designed.
ELECTRICAL SAFETY
Double-insulated tools are equipped with a polarized plug (one blade is wider than the
other). This plug will fit in a polarized outlet only one way. If the plug does not t in the outlet,
reverse the plug. If it still does not t, contact a qualied electrician to install a polarized outlet.
Do not change the plug in any way. Double insulation eliminates the need for a three-wire,
grounded power cord and grounded power-supply system.
Avoid contact with grounded surfaces such as pipes, radiators, ranges and refrigerators.
There is an increased risk of electric shock if your body is grounded while using the tool.
Do not expose power tools to rain or wet conditions. A wet power tool will increase the risk of
electric shock.
Do not abuse the cord. Never use the cord to carry the tool or to pull the plug from an outlet. Keep
the cord away from heat, oil, sharp edges, or moving parts.
Replace damaged cords immediately. Damaged cords increase the risk of electric shock.

SAFETY INFORMATION
4
When operating a power tool outside, use an outdoor extension cord marked “W-A” or “W”.
These cords are rated for outdoor use and reduce the risk of electric shock. The following table
shows the correct size to use, depending on cord length and nameplate amperage rating of the
tool. When in doubt, use the next heavier gauge. Always use UL and CSA listed extension cords.
Recommended sizes of extension cords
AMPERE RATING
VOLTS TOTAL LENGTH OF CORD IN FEET
120 V~
25 ft. 50 ft. 100 ft. 150 ft.
A. W. G.
0~6 18 16 16 14
6~10 18 16 14 12
10~12 16 16 14 12
12~16 14 12 not recommended
SAVE THESE INSTRUCTIONS
Some of the following symbols may be used on this tool. Please study them and their meaning.
Proper interpretation of these symbols will allow you to operate the tool better and more safely.
V .................................... Volts
A .................................... Amps
Hz .................................... Hertz
W .................................... Watts
min .................................... Minutes
.................................... Alternating Current
.................................... Direct Current
no .................................... No-load Speed
.................................... Class II construction
.../min .................................... Revolutions or Strokes per minute
.................................... Indicates danger, warning, caution. It means attention!
Your safety is involved.

SAFETY INFORMATION
5
PERSONAL SAFETY
WARNING: The operation of any power tool can result in foreign objects being thrown into
your eyes, which can result in severe eye damage. Before beginning power-tool operation, always
wear safety goggles or safety glasses with side shields and a full-face shield, when needed. We
recommend using a wide vision safety mask over eyeglasses or standard safety glasses with
shields. Always use eye protection marked to comply with ANSI Z87.1.
Stay alert, watch what you are doing and use common sense when operating a power tool.
Do not use the tool while tired or under the influence of drugs, alcohol, or medication. A
moment of inattention while operating power tools may result in serious personal injury.
Dress properly. Do not wear loose clothing or jewelry. Keep your hair, clothing, and gloves
away from moving parts. Loose clothes, jewelry, or long hair can be caught in moving parts.
Avoid accidental starting. Be sure the switch is off before plugging in the tool. Carrying tools
with your nger on the switch or plugging in tools that have the switch on invites accidents.
Remove adjusting keys or wrenches before turning the tool on. A wrench or a key that is left
attached to a rotating part of the tool may result in personal injury.
Do not overreach. Keep proper footing and balance at all times. Proper footing and balance
enables better control of the tool in unexpected situations.
Use safety equipment. A dust mask, non-skid safety shoes, hard hat, or hearing protection must
be used for appropriate conditions.
Before connecting the tool to a power source (receptacle, outlet, etc.), be sure that the
voltage supplied is the same as that specified on the nameplate of the tool. A power source
with voltage greater than that specied for the tool can result in serious injury to the user as well as
damage to the tool.
TOOL USE AND CARE
Use clamps or another practical means to support and secure the workpiece to a stable
platform. Holding the work by hand or against your body is unstable and may lead to loss of
control.
Do not force the tool. Use the correct tool for your application. The correct tool will do the job
better and more safely at the rate for which it is designed.
Do not use tool if the switch does not turn it on or off. Any tool that cannot be controlled with
the switch is dangerous and must be repaired.
Disconnect the plug from the power source before making any adjustments, changing
accessories, or storing the tool. Such preventive safety measures reduce the risk of starting the
tool accidentally.
Store idle tools out of the reach of children and other untrained persons. Tools are dangerous
in the hands of untrained users.
Check for misalignment or binding of moving parts, breakage of parts, and any other
condition that may affect the tool’s operation. If damaged, have the tool serviced before using.
Many accidents are caused by poorly maintained tools.
Use only accessories that are recommended by the manufacturer for your model.
Accessories that may be suitable for one tool may become hazardous when used on another tool.
Do not alter or misuse tool. These tools are precision built. Any alteration or modication not
specied is misuse and may result in a dangerous condition.

SAFETY INFORMATION
6
SERVICE
Tool service must be performed only by qualied repair personnel. Service or maintenance
performed by unqualied personnel could result in a risk of injury.
When servicing a tool, use only identical replacement parts. Follow instructions in the
maintenance section of this manual. Use of unauthorized parts or failure to follow maintenance
instructions may create a risk of electric shock or injury.
SPECIFIC SAFETY RULES FOR IMPACT WRENCH
Hold the tool by the insulated gripping surfaces when performing an operation where the
tool may contact hidden wiring or its own cord. Contact with a “live” wire will make exposed
metal parts of tool “live” and shock the operator.
Check the socket carefully for wear, cracks or damage before installing it on the impact wrench.
Hold the tool rmly with both hands.
Always be sure that you have a rm footing. Be sure that no one is below you when using the
tool in elevated locations.
Check the torque required with a torque wrench. The proper fastening torque may vary
depending on the type or size of the bolt.
Use of accessories that are not recommended for use with this tool may create hazardous
conditions.
WARNING: Some dust created by power sanding, sawing, grinding, drilling and other
construction activities contains chemicals known to the State of California to cause cancer,
birth defects or other reproductive harm.
SOME EXAMPLES OF THESE CHEMICALS ARE:
• Lead from lead-based paints.
• Crystalline silica from bricks, cement, and other masonry products.
• Arsenic and chromium from chemically-treated lumber.
Your risk from these exposures varies, depending upon how often you do this type of work.
To reduce your exposure to these chemicals:
• Work in a well-ventilated area.
• Work with approved safety equipment, such as dust masks that are specially designed to lter out
microscopic particles.
Avoid prolonged contact with dust from power sanding, sawing, grinding, drilling, and other
construction activities. Wear protective clothing and wash exposed areas with soap and water.
Allowing dust to get into your mouth or eyes or to lie on the skin may promote absorption of
harmful chemicals.
PACKAGE CONTENTS
Impact wrench, 7 pc. socket set, socket holder, instruction manual

7
PREPARATION
KNOW YOUR IMPACT WRENCH
Before attempting to use this impact wrench, become familiar with all of its operating features and
safety requirements. For optimum performance and safety, read the following operating instructions
carefully before using the impact wrench.
WARNING: Do not allow familiarity with your impact wrench to make you careless. Remember
that a careless fraction of a second is sufcient to cause severe injury.
WARNING: Remove the impact wrench from the package and examine it carefully. Do not
discard the carton or any packaging material until all parts have been examined.
WARNING: If any part of the impact wrench is missing or damaged, do not plug the tool in
or use it until the part has been repaired or replaced. Failure to heed this warning could result in
serious injury.
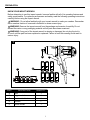
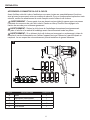
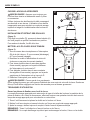
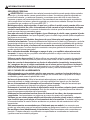
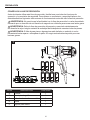
PART DESCRIPTION QUANTITY
A Anvil 1
B Trigger switch 1
C Live-circut indicator 1
D Sockets 7
E Socket holder 1
1
C
B
A
D
E

8
OPERATING INSTRUCTIONS
SELECTING THE CORRECT SOCKET
CAUTION: Always verify that the tool is switched off
and unplugged before installing any accessories on the
tool.
Always use the correct size socket for bolts and nuts. An
incorrect socket will result in inaccurate and inconsistent
fastening torque and/or damage to the bolt or nut.
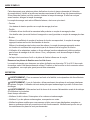
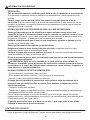
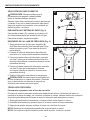
INSTALLING AND REMOVING A SOCKET (Fig. 2)
To install a socket (D), push it onto the anvil (A) of the
tool until it locks into place.
To remove the socket, simply pull it off.
TURNING ON THE IMPACT WRENCH (Fig. 3)
1. Note that the trigger switch (B) on the impact wrench
is marked with R for reverse and F for forward.
2. Connect the power cord of your impact wrench to a
standard household power outlet.
3. Depress the lower part of the switch marked F to run
the tool in the forward direction (clockwise rotation).
4. Depress the upper part of the switch marked R to
reverse the direction (counter-clockwise rotation).
5. Release the switch to stop the tool.
CAUTION: Do not allow familiarity with your
impact wrench to make you careless. Remember that
a careless fraction of a second is sufcient to cause
severe injury.
IMPACTING TECHNIQUES
Tightening fasteners with the impact wrench
The proper fastening torque may differ depending on the type or size of the bolt, the material of
the workpiece to be fastened, etc. Before starting your job, always perform a test operation to
determine the proper fastening time for your bolt or nut.
1. Hold the tool rmly and place the socket over the bolt or nut.
2. Turn the tool on and fasten the bolt or nut to the proper torque.
3. After fastening, always check the torque with a torque wrench.
NOTE: Hold the tool straight along the axis of the bolt or nut.
NOTE: Excessive fastening torque may damage the bolt/nut or socket.
3
B
2
A
D

9
OPERATING INSTRUCTIONS
Practice with various fasteners, noting the length of time required to reach the desired torque.
Check the tightness with a torque wrench. If the fasteners are too tight, reduce the impacting time.
If they are not tight enough, increase the impacting time.
The fastening torque is affected by a wide variety of factors, including the following:
• Voltage
A voltage reduction will cause a reduction in the fastening torque.
• Socket
Failure to use the correct size socket will cause a reduction in the fastening torque.
A worn socket (wear on the hex end or square end) will cause a reduction in the fastening torque.
• Bolt
Although the torque coefcient and the class of bolt may be the same, the proper fastening torque
will differ according to the diameter of the bolt.
Although the diameters of bolts may be the same, the proper fastening torque will differ according
to the torque coefcient, the class of bolt and the bolt length.
• The use of a universal joint or an extension bar (both available separately) will somewhat reduce
the fastening force of the impact wrench. Compensate by fastening for a longer period of time.
• The manner of holding the tool or the material to be fastened will affect the torque.
Loosening fasteners with the impact wrench
The torque that is required to loosen a fastener averages 75% to 80% of the tightening torque,
depending on the condition of the contacting surfaces. However, if rust or corrosion causes seizing,
more torque may be required.
CARE AND MAINTENANCE
WARNING: To ensure safety and reliability, all repairs should be performed by a qualied
service technician.
WARNING: When servicing, use only identical replacement parts. The use of any other parts
may create a hazard or cause damage to the product.
WARNING: Unplug the impact wrench from the power source before cleaning or performing any
maintenance.
Before each use:
• Inspect the impact wrench, the switch, and the cord for damage.
• Check for damaged, missing, or worn parts.
• Check for loose screws, misalignment or binding of moving parts, or any other condition that may
affect the operation.

10
CARE AND MAINTENANCE
• If abnormal vibration or noise occurs, turn the impact wrench off immediately and have the
problem corrected before further use.
Using compressed air may be the most effective cleaning method. Always wear safety goggles
when cleaning tools with compressed air.
WARNING: Do not allow brake uids, gasoline, petroleum-based products, penetrating oil, etc.,
to come into contact with plastic parts. These substances contain chemicals that can damage,
weaken, or destroy plastic.
TROUBLESHOOTING
PROBLEM POSSIBLE CAUSE CORRECTIVE ACTION
The tool does not work.
1. Plugs have not been fully
connected.
1. Verify that plugs are fully
connected.
2. Incorrect voltage.
2. Check that the power source
voltage is 120 V.
Fasteners cannot be
loosened.
The torque exceeded the
tool's capacity.
Use a more powerful wrench.
5-YEAR HASSLE-FREE WARRANTY
This impact wrench is warranted to the original purchaser from the original purchase date for
ve (5) years subject to the warranty coverage described herein.
This impact wrench is warranted for the original user to be free from defects in material and
workmanship.
If you believe that the impact wrench is defective at any time during the specied warranty period,
simply return the impact wrench along with proof of purchase to the place of purchase for a free
replacement or refund, or call 1-888-3KOBALT for warranty service.
This warranty is void if: defects in materials or workmanship or damages result from repairs
or alterations which have been made or attempted by others or the unauthorized use of
nonconforming parts; the damage is due to normal wear, damage is due to abuse (including
overloading of the tool beyond capacity), improper maintenance, neglect or accident; or the
damage is due to the use of the tool after partial failure or use with improper accessories or
unauthorized repair or alteration.
This warranty excludes blades, bits, bulbs and accessories.
This warranty gives you specic legal rights, and you may also have other rights that vary from
state to state.
Printed in China
Page is loading ...
Page is loading ...
Page is loading ...
Page is loading ...
Page is loading ...
Page is loading ...
Page is loading ...
Page is loading ...
Page is loading ...
Page is loading ...
Page is loading ...
Page is loading ...
Page is loading ...
Page is loading ...
Page is loading ...
Page is loading ...
Page is loading ...
Page is loading ...
Page is loading ...
Page is loading ...
-
 1
1
-
 2
2
-
 3
3
-
 4
4
-
 5
5
-
 6
6
-
 7
7
-
 8
8
-
 9
9
-
 10
10
-
 11
11
-
 12
12
-
 13
13
-
 14
14
-
 15
15
-
 16
16
-
 17
17
-
 18
18
-
 19
19
-
 20
20
-
 21
21
-
 22
22
-
 23
23
-
 24
24
-
 25
25
-
 26
26
-
 27
27
-
 28
28
-
 29
29
-
 30
30


Ask a question and I''ll find the answer in the document
Finding information in a document is now easier with AI
in other languages
- français: Kobalt 6904 Manuel utilisateur
- español: Kobalt 6904 Manual de usuario
Related papers
-
Kobalt 6904 User manual
-
-
-
-
-
-
-
-
-