Page is loading ...

120
IO
(120IO) SEQUOIA SPIRIT™ WOOD-GRAIN FRAME POOL ENGLISH 7.5” X 10.3” PANTONE 295U 08/08/2009
English
OWNER’S MANUAL
IMPORTANT
SAFETY RULES
Read, understand, and follow all
instructions carefully before installing
and using this product.
Don’t forget to try these other fine Intex products: pools, pool accessories,
inflatable pools and in-home toys, airbeds and boats available at fine
retailers or visit our website.
For illustrative purposes only. Accessories may not be provided with pool.
120IO-A0-1008
Sequoia Spirit
®
Wood-Grain Frame Pool
16'8" x 49" (508 cm x 124 cm) &
18'8" x 53" (569 cm x 135 cm)
©2009 Intex Marketing Ltd. - Intex Development Co. Ltd. - Intex Trading Ltd.
- Intex Recreation Corp.
All rights reserved/Tous droits réservés/Todos los derechos reservados/Alle
Rechte vorbehalten. Printed in China/Imprimé en Chine/Impreso en China/Gedruckt in China.
®™ Trademarks used in some countries of the world under license from/®™ Marques utilisées dans certains pays sous
licence de/Marcas registradas utilizadas en algunos países del mundo bajo licencia de/Warenzeichen verwendet in einigen
Ländern der Welt in Lizenz von/Intex Marketing Ltd. to/à/a/an Intex Trading Ltd., Intex Development Co. Ltd., G.P.O
Box 28829, Hong Kong & Intex Recreation Corp., P.O. Box 1440, Long Beach, CA 90801 • Distributed in the European
Union by/Distribué dans l’Union Européenne par/Distribuido en la unión Europea por/Vertrieb in der Europäischen Union
durch/Intex Trading B.V., P.O. Box nr. 1075 – 4700 BB Roosendaal – The Netherlands

120
IO
SAVE THESE INSTRUCTIONS
Page 2
(120IO) SEQUOIA SPIRIT™ WOOD-GRAIN FRAME POOL ENGLISH 7.5” X 10.3” PANTONE 295U 08/08/2009
English
TABLE OF CONTENTS
Warnings......................................................................... 3
Parts List & Reference................................................... 4-9
Setup Instructions......................................................... 10-22
Pool Maintenance and Chemicals................................ 23-24
Common Pool Problems............................................... 23
Pool Draining.................................................................. 24
Storage............................................................................ 24-25
General Aquatic Safety.................................................. 26
Intex Service Center Locations.................................... 27
Special Introductory note:
Thanks for buying an Intex pool and enclosure. Please take a few minutes
to read this manual before setting up your pool and enclosure. This
information will help extend the pool life and make the pool safer for your
family's enjoyment. View the video included before installation. A team of 2-3
people is recommended for pool and enclosure set up. Additional people will
speed up the installation.

120
IO
SAVE THESE INSTRUCTIONS
Page 3
(120IO) SEQUOIA SPIRIT™ WOOD-GRAIN FRAME POOL ENGLISH 7.5” X 10.3” PANTONE 295U 08/08/2009
English
SAFETY RULES
IMPORTANT SAFETY RULES
Read, Understand and Follow All Instructions Carefully Before Installing and Using this Product.
• Continuous and competent adult supervision of children and the handicapped is
required at all times.
• Secure all doors, windows and safety barriers to prevent unauthorized, unintentional or
unsupervised pool entry.
• Install a safety barrier that will eliminate access to the pool for young children and pets.
• Pool and pool accessories are to be assembled and disassembled by adults only.
• Never dive, jump or slide into an above-ground pool or any shallow body of water.
• Failure to set up pool on flat, level, compact ground could result in the pool’s collapse or the
possibility that a person lounging in the pool could be swept out.
• Do not allow anyone to stand, walk, sit on, climb, or straddle the sides of the pool.
• Remove all toys and flotation devices from, in and around the pool when it is not in use.
Objects in the pool attract young children.
• Position the small enclosure more than 2 meters away from the pool to prevent a child
from climbing on the enclosure to access pool.
• Keep toys, chairs, tables, or any objects that a child could climb on at least four feet away
from the pool.
• Keep rescue equipment by the pool and clearly post emergency numbers at the phone
closest to the pool. Examples of rescue equipment: coast guard approved ring buoy with
attached rope, strong rigid pole not less than twelve feet (12') [365.76cm] long.
• Never swim alone or allow others to swim alone.
• Keep your pool clean and clear. The pool floor must be visible at all times from the outside
barrier of the pool.
• If swimming at night use artificial lighting to illuminate all safety signs, ladders, pool floor and
walkways.
• Stay away from the pool when using alcohol or drugs.
• Keep children away from pool covers to avoid entanglement, drowning, or other serious
injury.
• Pool covers must be completely removed before pool use. Children and adults cannot be
seen under a pool cover.
• Do not cover the pool while you or anyone else is in the pool.
• Keep the pool and pool area clean and clear to avoid slips and falls and objects that may
cause injury.
• Protect all pool occupants from recreational water illnesses by keeping the pool water clean.
Don’t swallow the pool water. Practice good hygiene.
• All pools are subject to wear and deterioration. Certain types of excessive or accelerated
deterioration can lead to an operation failure. And can ultimately cause the loss of large
quantities of water from your pool. So, therefore it is very important that you properly
maintain your pool on a regular basis.
• This pool is for outdoor use only.
• Empty and store the pool when not in use for a longer period.
• While the swimming pool is in use, you will need to operate the filter pump to ensure that
there is at least one complete change of water a day. Consult your pump’s manual to
calculate the necessary operating hours.
POOL BARRIERS AND COVERS ARE NOT SUBSTITUTES FOR CONTINUOUS AND
COMPETENT ADULT SUPERVISION.
FAILURE TO FOLLOW THESE WARNINGS MAY RESULT IN
PROPERTY DAMAGE, SERIOUS INJURY OR DEATH.
Advisory:
Pool owners may need to comply with local or state laws relating to childproof fencing, safety
barriers, lighting, and other safety requirements. Customers should contact their local building
code enforcement office for further details.
WARNING

120
IO
SAVE THESE INSTRUCTIONS
Page 4
(120IO) SEQUOIA SPIRIT™ WOOD-GRAIN FRAME POOL ENGLISH 7.5” X 10.3” PANTONE 295U 08/08/2009
English
PARTS LIST
7
1
9
4 5
2
6
PARTS LIST
3
NOTE: Drawings for illustration purpose only. May not reflect actual product size. Not to scale.
8
10 11 12
13 14 15

120
IO
SAVE THESE INSTRUCTIONS
Page 5
(120IO) SEQUOIA SPIRIT™ WOOD-GRAIN FRAME POOL ENGLISH 7.5” X 10.3” PANTONE 295U 08/08/2009
English
PARTS LIST
PARTS LIST (continued)
16 17 18
19 20 21
22 23 24
25 26 27
28 29 30
31
NOTE: Drawings for illustration purpose only. May not reflect actual product size. Not to scale.
32

120
IO
SAVE THESE INSTRUCTIONS
Page 6
(120IO) SEQUOIA SPIRIT™ WOOD-GRAIN FRAME POOL ENGLISH 7.5” X 10.3” PANTONE 295U 08/08/2009
English
PARTS REFERENCE
PARTS REFERENCE
Before assembling your product, please take a few minutes to check the contents
and become familiar with all the parts.
1
2
3
4
5
6
7
8 9 10 11
16'8'' (508 cm) model
NOTE: Drawings for illustration purpose only. May not reflect actual product size.
Not to scale.

120
IO
SAVE THESE INSTRUCTIONS
Page 7
(120IO) SEQUOIA SPIRIT™ WOOD-GRAIN FRAME POOL ENGLISH 7.5” X 10.3” PANTONE 295U 08/08/2009
English
PARTS REFERENCE (continued)
Before assembling your product, please take a few minutes to check the contents
and become familiar with all the parts.
PARTS REFERENCE
1
13
27
28
31
30
26
NOTE: Drawings for illustration purpose only. May not reflect actual product size. Not to scale.
31
12
13
14
15
16
17
18
19
22
20
21
23
24
25
29

120
IO
SAVE THESE INSTRUCTIONS
Page 8
(120IO) SEQUOIA SPIRIT™ WOOD-GRAIN FRAME POOL ENGLISH 7.5” X 10.3” PANTONE 295U 08/08/2009
English
PARTS REFERENCE
REF. NO. DESCRIPTION
POOL SIZE & QUANTITY
1 36 40
2 34 38
3 16 18
4 16 18
5 16 18
6 16 18
7 16 18
8 1 1
9 1 1
10 1 1
11 1 1
12 36 40
13 44 48
14 16 18
15 16 18
16 16 18
17 16 18
18 2 2
19 2 2
20 124 141
21 0 17
22 1 1
23 1 1
24 16 18
25 16 18
26 1 1
27 1 1
28 1 1
29 1 1
30 1 1
31 2 2
32 1 1
16'8" x 49"
(508 cm x
124 cm)
18'8" x 53"
(569 cm x
135 cm)
PIN (WITH 2 EXTRA)
SEAL (WITH 2 EXTRA)
T - JOINT
SPRING PIN
VERTICAL LEG (SPRING PIN INCLUDED)
LEG CAP
HORIZONTAL BEAM
POOL LINER (DRAIN VALVE CAP INCLUDED)
RESTRAINING ROPE
DRAIN VALVE CAP
GROUND CLOTH
WATERPROOF CAP (WITH 4 EXTRA)
BOLT (WITH 4 EXTRA)
TOP CLAMP COVER
TOP BOARD
TOP CLAMP
SUPPORT POST
PLUNGER VALVE CONNECTOR
STRAINER VALVE CAP
SIDE BOARD A
SIDE BOARD B
SIDE BOARD COMBINATION WITH TWO HOLES
SIDE BOARD COMBINATION WITH ONE HOLE
BOTTOM RAIL
BOTTOM CAP
SMALL ENCLOSURE TOP PANEL (FOR FILTER PUMP) OR
SMALL ENCLOSURE TOP PANEL (FOR SALTWATER
SYSTEM / FILTER PUMP)
SMALL ENCLOSURE BACK PANEL (FOR FILTER PUMP) OR
SMALL ENCLOSURE BACK PANEL (FOR SALTWATER
SYSTEM / FILTER PUMP)
SMALL ENCLOSURE LEFT PANEL (FOR FILTER PUMP) OR
SMALL ENCLOSURE LEFT PANEL (FOR SALTWATER
SYSTEM / FILTER PUMP)
SMALL ENCLOSURE RIGHT PANEL (FOR FILTER PUMP) OR
SMALL ENCLOSURE RIGHT PANEL (FOR SALTWATER
SYSTEM / FILTER PUMP)
SMALL ENCLOSURE FRONT PANEL (FOR FILTER PUMP) OR
SMALL ENCLOSURE FRONT PANEL (FOR SALTWATER
SYSTEM / FILTER PUMP)
BOLT WRENCH
DRAIN CONNECTOR

120
IO
SAVE THESE INSTRUCTIONS
Page 9
(120IO) SEQUOIA SPIRIT™ WOOD-GRAIN FRAME POOL ENGLISH 7.5” X 10.3” PANTONE 295U 08/08/2009
English
PARTS REFERENCE
REF. NO. DESCRIPTION
SPARE PART NO.
1 10312 10312
2 10648 10648
3 10861 10862
4 10313 10313
5 10864 10865
6 10309 10309
7 10414 10414
8 11015 11110
9 10317 10317
10 11044 11044
11 18927 18933
12 11102 11102
13 11024 11024
14 11177 11177
15 11174 11174
16 11017 11017
17 11175 11176
18 11040 11040
19 11240 11240
20 11105 11105
21 11021 11021
22 11107 11107
23 11108 11109
24 11019 11019
25 11178 11178
26
11111 11111
11115 11115
27
11112 11112
11116 11116
28
11113A 11113A
11117A 11117A
29
11113B 11113B
11117B 11117B
30
11114 11114
11118 11118
31 11053 11053
32 10201 10201
PIN (WITH 2 EXTRA)
SEAL (WITH 2 EXTRA)
T - JOINT
SPRING PIN
VERTICAL LEG (SPRING PIN INCLUDED)
LEG CAP
HORIZONTAL BEAM
POOL LINER (DRAIN VALVE CAP INCLUDED)
RESTRAINING ROPE
DRAIN VALVE CAP
GROUND CLOTH
WATERPROOF CAP (WITH 4 EXTRA)
BOLT (WITH 4 EXTRA)
TOP CLAMP COVER
TOP BOARD
TOP CLAMP
SUPPORT POST
PLUNGER VALVE CONNECTOR
STRAINER VALVE CAP
SIDE BOARD A
SIDE BOARD B
SIDE BOARD COMBINATION WITH TWO HOLES
SIDE BOARD COMBINATION WITH ONE HOLE
BOTTOM RAIL
BOTTOM CAP
SMALL ENCLOSURE TOP PANEL (FOR FILTER PUMP) OR
SMALL ENCLOSURE TOP PANEL (FOR SALTWATER
SYSTEM / FILTER PUMP)
SMALL ENCLOSURE BACK PANEL (FOR FILTER PUMP) OR
SMALL ENCLOSURE BACK PANEL (FOR SALTWATER
SYSTEM / FILTER PUMP)
SMALL ENCLOSURE LEFT PANEL (FOR FILTER PUMP) OR
SMALL ENCLOSURE LEFT PANEL (FOR SALTWATER
SYSTEM / FILTER PUMP)
SMALL ENCLOSURE RIGHT PANEL (FOR FILTER PUMP) OR
SMALL ENCLOSURE RIGHT PANEL (FOR SALTWATER
SYSTEM / FILTER PUMP)
SMALL ENCLOSURE FRONT PANEL (FOR FILTER PUMP) OR
SMALL ENCLOSURE FRONT PANEL (FOR SALTWATER
SYSTEM / FILTER PUMP)
BOLT WRENCH
DRAIN CONNECTOR
16'8" x 49"
(508 cm x
124 cm)
18'8" x 53"
(569 cm x
135 cm)

120
IO
SAVE THESE INSTRUCTIONS
Page 10
(120IO) SEQUOIA SPIRIT™ WOOD-GRAIN FRAME POOL ENGLISH 7.5” X 10.3” PANTONE 295U 08/08/2009
English
SETUP INSTRUCTIONS
IMPORTANT SITE SELECTION AND GROUND
PREPARATION INFORMATION
• The pool location must allow you to secure all doors, windows, and safety
barriers to prevent unauthorized, unintentional or unsupervised pool entry.
• Install a safety barrier that will eliminate access to the pool for young children
and pets.
• Failure to set up the pool on flat, level, compact ground and in accord with the
following instructions could result in the pool’s collapse or the possibility that a
person lounging in the pool could be swept out, resulting in serious injury or
property damage.
• Risk of electric shock: connect the filter pump only to a grounding type
receptacle protected by a ground-fault circuit interrupter (GFCI) or residual
current device (RCD). To reduce the risk of an electrical shock, do not use
extension cords, timers, plug adapters or converter plugs to connect the pump
to an electrical supply. Always provide a properly located outlet. Locate the cord
where it cannot be damaged by lawn mowers, hedge trimmers, and other
equipment. See the filter pump manual for additional warnings and instructions.
Select an outdoor location for the pool with the following in mind:
1. The area where the pool is to be set up must be absolutely flat and level.
Do not set up the pool on a slope or inclined surface.
2. The ground surface must be compacted and firm enough to withstand the pressure and
weight of a fully set up pool. Do Not set up the pool on mud, sand, soft or loose soil
conditions.
3. Do Not set up the pool on a deck or platform.
4. The pool requires at least 4 feet of space all around pool from objects that a child could
climb on to gain access to the pool.
5. The chlorinated poolwater could damage the surrounding vegetation. Certain types of
grass such as St. Augustine and Bermuda, may grow through the liner.
POOL SETUP
WARNING

120
IO
SAVE THESE INSTRUCTIONS
Page 11
(120IO) SEQUOIA SPIRIT™ WOOD-GRAIN FRAME POOL ENGLISH 7.5” X 10.3” PANTONE 295U 08/08/2009
English
GROUND PREPARATION
Select an outdoor location for the pool which should be on a level concrete pad. If there is no
concrete pad available, follow the instructions below to prepare the installation area. It is
important you ask a professional (builder or gardener) to perform the following ground
preparation.
Note: Tools are not included.
1. Mark the installation area
• Once the location area is chosen, drive stake at center point of where you wish pool to
be located. Attach string to center stake. Measure the length A on string, and attach
marking stick, paint marker, or funnel with flour to string. Mark circumference of pool
area using string and marker (see drawing 1.1).
• For 16'8" (508 cm) pool, where
A = 8'9” (266.7 cm) = Radius of grass area need to be removed and leveled.
For 18’8" (569 cm) pool, A = 9'9" (297.1 cm)
see drawing 1.2.
SETUP INSTRUCTIONS
POOL SETUP (continued)
A
1.1
1.2

120
IO
SAVE THESE INSTRUCTIONS
Page 12
(120IO) SEQUOIA SPIRIT™ WOOD-GRAIN FRAME POOL ENGLISH 7.5” X 10.3” PANTONE 295U 08/08/2009
English
2. Clear the installation area
• Remove all grass, stones and sticks from marked area. Also remove center stake and
string.
3. Leveling
• Establish lowest point in pool area. Level entire pool site by digging or scraping away
uneven areas to the level of the lowest point. Always remove material from the top of
the slope rather than filling in the bottom to ensure greater ground stability and
firmness. When all the areas are level and when excess ground is removed, you may fill
any small low areas which are left to level (with fined dirt or sieved sand). Always
compact and level ground afterwards (see drawing 2.1).
• Use a large mason rule (aluminum or wood) and a level. Level out the ground by cutting
rectangles (or squares), locating this rule in the selected and cleaned area (see
drawing 2.2).
4. Finishing
• On the cleaned and leveled ground, spread a light coat of sieved sand to a maximum
depth of 1/2 inch (1 cm). Spray water and compact it (with a garden roller). Double
check and ensure it is well leveled. The ground has to be perfectly level in order to
proceed further.
SETUP INSTRUCTIONS
POOL SETUP (continued)
Always remove material from the top of the
slope rather than filling in the bottom.
Do not add
RemoveRemove
Unacceptable
Grade
Acceptable
Grade
2.1
2.2

120
IO
SAVE THESE INSTRUCTIONS
Page 13
(120IO) SEQUOIA SPIRIT™ WOOD-GRAIN FRAME POOL ENGLISH 7.5” X 10.3” PANTONE 295U 08/08/2009
English
SETUP INSTRUCTIONS
POOL SETUP (continued)
5. Patio block installation
• Purchase 16 pieces of patio block for 16'8" pool or 18 pieces for 18'8" pool. The
minimum dimensions of each block should be 18” x 18” x 2”. Mark the area where the
blocks will be buried (see drawing 3.1), then remove 2” (5.08 cm) of soil from the
marked area (see drawing 3.2).
• For 16'8" (508 cm) pool, where
A = 8’9” (266.7 cm) = Radius of grass area need to be removed and leveled.
B = 3’5” (104.1 cm) = Distance between each Patio Block.
For 18’8" (569 cm) pool, where
A = 9'9" (297.1 cm)
B = 3'5" (104.1 cm)
A
B
3.1
3.3
3.2
• The top of blocks should be flush with soil surface and level with the area surface and
with all patio blocks around entire pool (see drawing 3.3).
18” (45.7 cm)
18” (45.7 cm)
2” (5.08 cm)

120
IO
SAVE THESE INSTRUCTIONS
Page 14
(120IO) SEQUOIA SPIRIT™ WOOD-GRAIN FRAME POOL ENGLISH 7.5” X 10.3” PANTONE 295U 08/08/2009
English
SETUP INSTRUCTIONS
POOL SETUP (continued)
You may have purchased this pool with the Intex Krystal Clear™ filter pump.
The pump has its own separate set of installation instructions. First
assemble your pool unit and then set up the filter pump.
1. • Open the carton containing the liner, joints, legs, etc., very carefully as this carton can be
used to store the pool during the winter months.
• Take out the ground cloth (11) and spread
it over the cleared area. Then take out the
liner (8) and spread it out over the ground
cloth, with the drain valve directed towards
the draining area. Place the drain valve
away from the house. Allow the sun to
warm up the liner before inserting the
beams (7) into the sleeve openings.
IMPORTANT: Always set up the pool
unit with at least 2 persons. Do not drag the liner across the ground as this can
cause leaks or other damages (see drawing 4).
• During the setup of the pool liner, point the hose connections or openings in the
direction of the electrical power source. The outer edge of the pool should be within
reach of the pump’s electrical connection.
2. • The frame pool’s legs (5) and beams (7) fall into two groups. The larger diameters are
the horizontal beams that are slid (pushed) into the sleeve openings at the top of the
liner. The smaller diameters are the vertical legs. Both these legs and beams fit into the
T-joints (3).
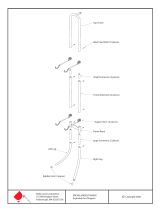
• Starting at any location, but always working in the
same direction, push the horizontal beam into the
sleeve. Once the beam is centered take one of the
T- joints and using the connection pin (1), attach the
joint to one end of the beam by inserting the pin
through the seal (2) and in the pre-drilled holes.
Repeat this procedure in a circular fashion until all
the beams and joints have been connected
(see drawing 5.1).
The last joint connection may be difficult to
complete. You can do it though, if you first
simultaneously raisethe last joint and beam about 2
inches (5 cm). Now, insert the beam into the joint while
lowering the pieces into position. The beam will easily
slide into the joint (see drawing 5.2). Ensure that the
last joint is fully connected before proceeding to
assemble the legs.
8
4
1
2
7
3
5.1
5.2
3

120
IO
SAVE THESE INSTRUCTIONS
Page 15
(120IO) SEQUOIA SPIRIT™ WOOD-GRAIN FRAME POOL ENGLISH 7.5” X 10.3” PANTONE 295U 08/08/2009
English
SETUP INSTRUCTIONS
POOL SETUP (continued)
3. Next slide the vertical legs into the belt loop
located in the middle of the pool liner.
The bottom of the leg should be inside the white
restraining rope (9) located near the liner’s bottom
edge. Carefully slide the leg into the belt loop and place
the leg’s bottom inside the rope and then insert the
top of the leg into the bottom of the joint. Snap the leg
into the joint’s holes by aligning the holes and the
spring-loaded pin. Attach the leg’s end cap (6) to the
bottom of the leg (see drawings 6.1 & 6.2).
4. • Grab hold of the frame pool’s top beams in 2 – 3
locations. Shake the pool to be sure that all the joints,
legs and beams fit into each other. Ensure that all pins
are in position by pushing them downwards through
the holes (see drawing 7.1).
• Pull gently, in an outward direction, at the bottom of
the leg; making sure the leg is inside the restraining
rope. The leg is to end up in an upright vertical
position and sitting in the middle of the patio block.
5. See Krystal Clear™ filter pump manual, install the strainer nuts, flat strainer rubber
washers and threaded strainer connectors on the liner pre-cut holes. Use strainer valve
caps (19) and plug them into the threaded strainer connectors from the inside of the pool
so water will not run out while filling.
6. • Before filling the pool with water, ensure that the drain plug inside the pool is closed and
that the drain cap on the outside is screwed on tightly. Fill the pool with no more than 1
inch of water. Check to see whether the water is level.
IMPORTANT: If the water in the pool flows to one side, the pool is not completely
level. Setting up the pool on unlevel ground will cause the pool to tilt resulting in
the sidewall material bulging. If the pool is not completely level, you must drain the
pool, level the area or move the pool to a different area that is level, and re-fill the
pool.
• Smooth out the remaining wrinkles (from inside the pool) by pushing out where the pool
floor and pool sides meet. Or, (from outside pool) reach under the side of the pool ,
grasp the pool floor and pull it out. If the ground cloth is causing the wrinkles, have 2
adults pull from either side to remove all wrinkles.
7. Fill the pool with water up to just below the
sleeve line. (see drawing 7.2).
6.1
3
5
9
6
6.2
4
7.1
7.2
WATER LEVEL

120
IO
SAVE THESE INSTRUCTIONS
Page 16
(120IO) SEQUOIA SPIRIT™ WOOD-GRAIN FRAME POOL ENGLISH 7.5” X 10.3” PANTONE 295U 08/08/2009
English
SETUP INSTRUCTIONS
POOL ENCLOSURE SETUP
Once the pool has been filled with water, and it has been confirmed that it is completely level
and that all vertical legs are positioned in the middle of each patio block, proceed with the
assembly of the pool enclosure.
1. Top clamp installation
• Fasten a top clamp (16) to the T-joint of the pool frame from the underneath. Ensure the
two bolts on top clamp are facing upward. Repeat the procedure until all the top clamps
are fastened to the T joints of the pool frame (see drawings 8.1 & 8.2).
2. Bottom cap and bottom rail installation
• Place a bottom cap (25) on the ground and align it with the leg cap. Ensure that the
threaded side hole in the bottom cap is facing outward. Place all bottom caps in
position.
• Starting at any location, but always working in the same direction, connect a bottom
rail (24) in between two bottom caps (25). Ensure the pre-drilled holes on the bottom rail
hook through the knobs on the bottom cap. Repeat this procedure in a circular fashion
until all the bottom rails and bottom caps have been connected. Adjust the distance of
the bottom cap to the leg cap by estimating that the support post (17) will stand vertical
after it is installed (see drawings 9.1 & 9.2).
8.1 8.2
9.1
9.2

120
IO
SAVE THESE INSTRUCTIONS
Page 17
(120IO) SEQUOIA SPIRIT™ WOOD-GRAIN FRAME POOL ENGLISH 7.5” X 10.3” PANTONE 295U 08/08/2009
English
SETUP INSTRUCTIONS
POOL ENCLOSURE SETUP (continued)
3. Support post installation
• Remove the cardboard inserts from the both slides of each support post.
• Insert the support post (17) into the bottom cap (25). Lift up the support post slightly to
let the slot on the upper end of the support post hook onto the ridge at the top clamp.
Push downward to ensure the support post is connected firmly with the top clamp and
inserted in the bottom cap (see drawings 10.1, 10.2 & 10.3).
• Repeat these procedures until all the support posts are joined to the top clamps and
bottom caps (see drawing 10.4).
4. Side panel installation
The number of the side panels depends of the size of your pool. There are two side panels
which need special attention during installation: First, the side panel which needs to be
installed outside the pool inlet & outlet holes, and second, the side panel with the warning
panel which needs to be installed in a location that the warning display is easily seen by
pool users before entering the pool. The side boards for these two special panels are
wrapped separately from others.
10.1
10.2
10.3
10.4

120
IO
SAVE THESE INSTRUCTIONS
Page 18
(120IO) SEQUOIA SPIRIT™ WOOD-GRAIN FRAME POOL ENGLISH 7.5” X 10.3” PANTONE 295U 08/08/2009
English
SETUP INSTRUCTIONS
POOL ENCLOSURE SETUP (continued)
4a. Side panel with holes installation
• Locate the side panel with holes outside the pool liner where the inlet & outlet holes are
located. Unwrap the side boards from pack and slide the side board combination with
one hole (23) first down the support posts and insert onto the vertical edge of the
bottom rail. Follow with the number sequence from bottom to top. The groove of the
board needs to be inserted fully onto the tongue of previous board. The printing on the
side boards needs to be facing outward. Then slide the side board combination with two
holes (22) marked with number “5 & 6” through the support posts and insert onto the
tongue of side board marked with number “4” (see drawings 11.1 & 11.2).
• In clockwise motion screw the plunger valve connectors (18) onto the threaded strainer
connectors which were already installed on the pool liner during the pool set up (see
drawing 11.3). In a clockwise motion screw the plunger valves onto the plunger valve
connectors (18). Close the plunger valves by pushing the handle down and turn in a
clockwise direction to lock as described in filter pump manual. Now, the strainer valve
caps (19) can be unplugged out of the threaded strainer connectors from the inside of
the pool (see drawings 11.4 & 11.5).
• Continue to finish the side panel installation by installing the rest of the side boards
marked with number “7” and “8” (see drawing 11.6).
11.1
11.3
11.4 11.5
11.6
11.2

120
IO
SAVE THESE INSTRUCTIONS
Page 19
(120IO) SEQUOIA SPIRIT™ WOOD-GRAIN FRAME POOL ENGLISH 7.5” X 10.3” PANTONE 295U 08/08/2009
English
SETUP INSTRUCTIONS
POOL ENCLOSURE SETUP (continued)
4b. Side panel with “warnings” installation
• Locate the side panel with warnings such that the warnings will be easily seen by
pool users before entering the pool. Unwrap the side boards from pack and slide the
side board first down the support posts and insert onto the vertical edge of the bottom
rail. Follow with the number sequence from bottom to top. The groove of the board
needs to be inserted fully onto the tongue of the previous board. The printing on the side
boards needs to be facing outward (see drawings 12.1 & 12.2).
4c. Other side panel installation
• For 49" height pool, install the rest of the side panels by using eight pieces of side
boards A (20) each. For 53" height pool, install the rest of the side panels by using one
piece of side board B (21) at the bottom plus eight pieces of side boards A (20) each.
Install the side boards one by one from bottom to top. Insert the groove of the first side
board onto the vertical edge of the bottom rail, and the groove of the other side boards
onto the tongue of each previous board. The side boards with wood veins printed need
to be faced outward (see drawings 13.1 & 13.2).
12.1
12.2
13.1
13.2

120
IO
SAVE THESE INSTRUCTIONS
Page 20
(120IO) SEQUOIA SPIRIT™ WOOD-GRAIN FRAME POOL ENGLISH 7.5” X 10.3” PANTONE 295U 08/08/2009
English
SETUP INSTRUCTIONS
POOL ENCLOSURE SETUP (continued)
5. Top Board Installation
Attach the top board (15) on the top of the side panel, with the holes at its two ends
aligning with the nuts on the top clamps (16). Make sure the groove underneath the top
board fits firmly onto the tongue of the top board (15). Repeat this procedure until all the
top boards are fixed to the top clamps and side boards. NOTE: There are four pieces of
top board which are printed with warnings. Install those four top boards three pieces apart
from each other (see drawings 14.1, 14.2 & 14.3).
6. Top Clamp Cover Installation
Install the top clamp cover (14) where the two top boards meet. Insert the ridge of top
clamp cover into the slot on the top end of the support post. Align the top holes on top
clamp cover with the nuts of the top clamp. Insert and screw bolt (13) to each of the
threaded holes by using the wrench (31) provided, and then cover with the waterproof
caps (12). Repeat this procedure until all the top clamp covers are fixed to the top clamps
and support posts (see drawings 15.1, 15.2 & 15.3).
14.1
14.2
14.3
15.2
15.3
15.1
/