This unit’ s rear output (rear speaker leads output and
RCA rear output) can be used for full-range speaker
(Rear SP :F.Range) or subwoofer (Rear S P :S/W) con-
nection. If you switch the rear output setting to Rear
SP :S/W, you can connect a rear speaker lead directly
to a subwoofer without using an auxiliary amp.
1 Press M.C. to switch the rear output setting.
! When no subwoofer is connected to the rear
output, select Rear SP :F.Range (full-range
speaker).
! When a subwoofer is connected to the rear
output, select Rear SP :S/W (subwoofer).
! Even if you change this setting, there is no output
unless you turn the subwoofer output on (refer to
Sub W.1 (subwoofer on/off setting) on page 16).
! If you change this setting, subwoofer output in
the audio menu will return to the factory settings.
! Both rear speaker lead outputs and RCA rear out-
put are switched simultaneously in this setting.
Demonstration (demo display setting)
1 Press M.C. to turn the demo display on or off.
! You can also turn on or off feature demo by
pressing DISP while this unit is turned off. For
more details, refer to Demo mode on page 5.
Reverse mode (reverse mode setting)
1 Press M.C. to turn the reverse mode on or off.
! You can also turn on or off reverse mode by
pressing BAND while this unit is turned off.
For more details, refer to Reverse mode on
page 5.
Ever-scroll (scroll mode setting)
When ever scroll is set to ON, recorded text informa-
tion scrolls continuously in the display. Set to OFF if
you prefer the information to scroll just once.
1 Press M.C. to turn the ever scroll on or off.
BT AUDIO (Bluetooth audio activation)
You need to activate the BT Audio source in order to
use a Bluetooth audio player.
! You can only operate this function when Blue-
tooth adapter (e.g. CD-BTB200) is connected to
this un it.
1 Press M.C. to turn the BT Audio source on or off.
Pin code input (PIN code input)
To connect your cellular phone to this unit via Blue-
tooth wireless technology, you need to enter PIN code
on your phone to verify the connection. The default
code is 0000, but you can change this in this func-
tion.
With some Bluetooth audio players, you may be re-
quired to enter the Bluetooth audio player PIN code
in advance to set this unit for a connection.
! You can only operate this function when Blue-
tooth adapter (e.g. CD-BTB200) is connected to
this un it.
1 Push M.C. up or down to select a number.
2 Push M.C. left or right to move the cursor to the
previous or next position.
3 After inputting PIN code (up to 16 digits), press
M.C.
PIN code can be stored in memory.
! When you press M.C. again on the same dis-
play, the PIN code you entered is stored in this
unit.
! Pushing M.C. right in the confirmation display
returns you to the PIN code input display, and
you can change the PIN code.
BT Version info. (Bluetooth version display)
You can display the system versions of this unit and
of Bluetooth module.
! You can only operate this function when Blue-
tooth adapter (e.g. CD-BTB200) is connected to
this un it.
1 Push M.C. left or right to display the information.
! Push M.C. left to switch to the version of the
Bluetooth module of this unit.
! Pushing M.C. right to switch to the system
version of this unit.
Other Functions
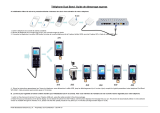
Using the AUX source
Up to two auxiliary devices such as VCR or
portable devices (sold separately) can be con-
nected to this unit. When connected, auxiliary
devices are automatically read as AUX sources
and assigned to AUX1 or AUX2. The relation-
ship between AUX1 and AUX2 sources is ex-
plained below.
En
18
Section
02
Operating this unit