
PerfectView REC 400
DE 5 Digitaler Videorekorder
Montage- und Bedienungsanleitung
EN 26 Digital video recorder
Installation and Operating Manual
FR 47 Magnétoscope numérique
Instructions de montage et de service
ES 69 Grabadora digital de vídeo
Instrucciones de montaje y de uso
IT 91 Videoregistratore digitale
Istruzioni di montaggio e d’uso
NL 112 Digitale videorecorder
Montagehandleiding en gebruiks-
aanwijzing
DA 133 Digital videooptager
Monterings- og betjeningsvejledning
SV 154 Digital videoinspelare
Monterings- och bruksanvisning
NO 174 Digital videoopptaker
Monterings- og bruksanvisning
FI 194 Digitaalinen videonauhuri
Asennus- ja käyttöohje
PT 215 Videogravador digital
Instruções de montagem e manual de
instruções
RU 236 Цифровой видеомагнитофон
Инструкция по монтажу и
эксплуатации
PL 258 Cydrowa nagrywarka wideo
Instrukcja montażu i obsługi
CS 280 Digitální videorekordér
Návod k montáži a obsluze
SK 301 Digitálny videorekordér
Návod na montáž a uvedenie do
prevádzky

Fordern Sie weitere Informationen zur umfangreichen Produktpalette aus dem Hause
Dometic WAECO an. Bestellen Sie einfach unsere Kataloge kostenlos und
unverbindlich unter der Internetadresse: www.dometic-waeco.de
We will be happy to provide you with further information about Dometic WAECO
products. Please order our free catalogue with no obligation to buy on our homepage:
www.dometic-waeco.com
Demandez d’autres informations relatives à la large gamme de produits de la maison
Dometic WAECO. Commandez tout simplement notre catalogue gratuitement et sans
engagement à l’adresse internet suivante : www.dometic-waeco.com
Solicite más información sobre la amplia gama de productos de la empresa Dometic
WAECO. Solicite simplemente nuestros catálogos de forma gratuita y sin compromiso
en la dirección de Internet: www.dometic-waeco.com
Per ottenere maggiori informazioni sull’ampia gamma di prodotti Dometic WAECO è
possibile ordinare una copia gratuita e non vincolante del nostro Catalogo all’indirizzo
Internet: www.dometic-waeco.com
Maak kennis met het omvangrijke productscala van de firma Dometic WAECO. Bestel
onze catalogus gratis en vrijblijvend onder het internetadres:
www.dometic-waeco.com
Bestil yderligere information om det omfattende produktudvalg fra Dometic WAECO.
Bestil vores katalog gratis og uforpligtende på internetadressen:
www.dometic-waeco.com
Inhämta mer information om den omfattande produktpaletten från Dometic WAECO:
Beställ våra kataloger gratis och utan förpliktelser under vår Internetadress:
www.dometic-waeco.com
Be om mer informasjon om det rikholdige produktutvalget fra Dometic WAECO. Bestill
vår katalog gratis uforbindtlig på Internettadressen: www.dometic-waeco.com
Pyytäkää lisää tietoja Dometic WAECOn kattavista tuotevalikoimista. Tilatkaa
tuotekuvastomme maksutta ja sitoumuksetta internet-osoitteesta:
www.dometic-waeco.com
Peça mais informação sobre a ampla gama de produtos da empresa Dometic
WAECO. Peça simplesmente os nossos catálogos de forma gratuita e sem qualquer
compromisso, disponível no site: www.dometic-waeco.com
Запросите дальнейшую информацию об обширном ассортименте продукции
компании Dometic WAECO. Просто закажите наши каталоги на сайте
www.dometic-waeco.com; эта услуга предоставляется бесплатно и ни к чему не
обязывает.
Proszę się zapoznać z informacjami na temat szerokiej gamy produktów Dometic
WAECO. Proszę zamówić nasz bezpłatny katalog i zapoznać się z niewiążącą ofertą
pod adresem: www.dometic-waeco.com
Žádejte další informace o rozsáhlé nabídce výrobků firmy Dometic WAECO. Stač
í
zdarma a nezávazně objednat naše katalogy na internetové adrese:
www.dometic-waeco.com
Vyžiadajte si ďalšie informácie o rozsiahlej palete výrobkov Dometic WAECO.
Objednajte si bezplatne a nezáväzne náš katalóg na internetovej adrese:
www.dometic-waeco.com
DE
EN
FR
ES
IT
NL
DA
SV
NO
FI
PT
RU
PL
CS
SK

PerfectView REC 400
3
1
1 2 3 4 5
6
7
8910
1 2 3 4 5 6 7 8 9
10
GPS POWER IN
G ACC DC12V
1 2 3 4 G
IR
ALARM IN
MIC
A/V OUTCAM1 CAM2 CAM3 CAM4
2

PerfectView REC 400
4
1 2 3 4 5
3
4
Page is loading ...
Page is loading ...
Page is loading ...
Page is loading ...
Page is loading ...
Page is loading ...
Page is loading ...
Page is loading ...
Page is loading ...
Page is loading ...
Page is loading ...
Page is loading ...
Page is loading ...
Page is loading ...
Page is loading ...
Page is loading ...
Page is loading ...
Page is loading ...
Page is loading ...
Page is loading ...
Page is loading ...

EN
Explanation of symbols PerfectView REC 400
26
Please read this instruction manual carefully before installation and
first use, and store it in a safe place. If you pass on the product to an
-
other person, hand over this instruction manual along with it.
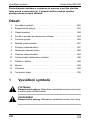
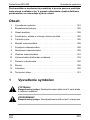
Table of contents
1 Explanation of symbols . . . . . . . . . . . . . . . . . . . . . . . . . . . . . . . . . . 26
2 Safety instructions . . . . . . . . . . . . . . . . . . . . . . . . . . . . . . . . . . . . . . 27
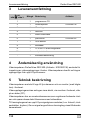
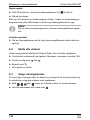
3 Scope of delivery . . . . . . . . . . . . . . . . . . . . . . . . . . . . . . . . . . . . . . . 30
4 Intended use . . . . . . . . . . . . . . . . . . . . . . . . . . . . . . . . . . . . . . . . . . 30
5 Technical description . . . . . . . . . . . . . . . . . . . . . . . . . . . . . . . . . . . . 31
6 Installing the video recorder. . . . . . . . . . . . . . . . . . . . . . . . . . . . . . . 33
7 Connecting the video recorder. . . . . . . . . . . . . . . . . . . . . . . . . . . . . 34
8 Setting the video recorder . . . . . . . . . . . . . . . . . . . . . . . . . . . . . . . . 35
9 Operating the video recorder . . . . . . . . . . . . . . . . . . . . . . . . . . . . . . 40
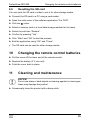
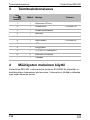
10 Changing the remote control batteries. . . . . . . . . . . . . . . . . . . . . . . 45
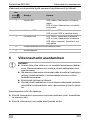
11 Cleaning and maintenance . . . . . . . . . . . . . . . . . . . . . . . . . . . . . . . 45
12 Warranty . . . . . . . . . . . . . . . . . . . . . . . . . . . . . . . . . . . . . . . . . . . . . 46
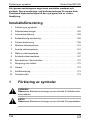
13 Disposal . . . . . . . . . . . . . . . . . . . . . . . . . . . . . . . . . . . . . . . . . . . . . . 46
14 Technical data . . . . . . . . . . . . . . . . . . . . . . . . . . . . . . . . . . . . . . . . . 46
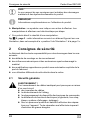
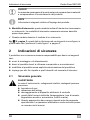
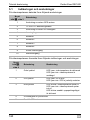
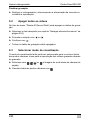
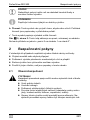
1 Explanation of symbols
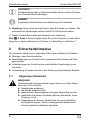
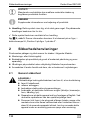
!
WARNING!
Safety instruction: Failure to observe this instruction can cause
fatal or serious injury.
!
CAUTION!
Safety instruction: Failure to observe this instruction can lead to
injury.

EN
PerfectView REC 400 Safety instructions
27
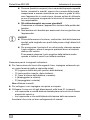
A
NOTICE!
Failure to observe this instruction can cause material damage and
impair the function of the product.
I
NOTE
Supplementary information for operating the product.
➤ Action: This symbol indicates that action is required on your part. The
required action is described step-by-step.
✓ This symbol describes the result of an action.
fig. 1 5, page 3: This refers to an element in an illustration. In this case,
item
5 in figure 1 on page 3.
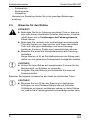
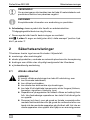
2 Safety instructions
The manufacturer accepts no liability for damage in the following cases:
Faulty assembly or connection
Damage to the product resulting from mechanical influences and excess
voltage
Alterations to the product without express permission from the manu-
facturer
Use for purposes other than those described in the operating manual
2.1 General safety
!
WARNING!
Inadequate supply cable connections could result in short circuits,
causing:
Cable fires
The airbag being triggered
Damage to electronic control equipment
Electrical malfunctions (indicators, brake light, horn, ignition,
lights)
This appliance may only be repaired by qualified personnel. In-
adequate repairs may cause serious hazards.

EN
Safety instructions PerfectView REC 400
28
People (including children) whose physical, sensory or mental
capacities prevent them from using this device safely may not
be allowed to operate it without the supervision of a responsible
adult.
Electrical devices are not toys
Always keep and use the device out of the reach of children.
Children must be supervised to ensure that they do not play with
the device.
A
NOTICE!
Before start-up, check that the voltage specification on the type
plate is the same as that of the power supply.
To prevent the risk of short circuits, always disconnect the neg-
ative terminal of the vehicle's electrical system before working
on it.
If the vehicle has an additional battery, its negative terminal
should also be disconnected.
Therefore, please observe the following instructions:
When working on the following cables, only use insulated cable terminals,
plugs and flat sockets:
– 30 (direct supply from positive battery terminal)
– 15 (connected positive terminal, behind the battery)
– 31 (return cable from the battery, earth)
– L (indicator lights, left)
– R (indicator lights, right)
Do not use porcelain wire connectors.
Use a crimping tool to connect the cables.
Screw the cable when connecting cable 31 (earth)
– using a cable terminal and serrated washer to one of the vehicle's
earth bolts or
– screw the cable to the bodywork using a cable terminal and a self-tap-
ping screw
Make sure there is a good earth connection.
If you disconnect the negative terminal of the battery, all data stored in the
volatile memories will be lost.
The following data must be reset, depending on the vehicle equipment op-
tions:
– Radio code
– Vehicle clock

EN
PerfectView REC 400 Safety instructions
29
–Timer
– On-board computer
– Seat position
You can find instructions for making these settings in the operating man-
ual.
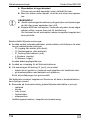
2.2 Installation notes
!
CAUTION!
Secure the parts installed in the vehicle to prevent them from
becoming loose under any circumstances (sudden braking, ac-
cidents) and causing injuries to vehicle occupants.
Secure any parts of the system concealed by the bodywork in
such a manner that they cannot be come loose or damage other
parts or cables, or impair vehicle functions (steering, pedals,
etc).
Always follow the safety instructions issued by the vehicle man-
ufacturer.
Some work (e.g. on retention systems such as the AIRBAG etc.)
may only be performed by qualified specialists.
A
NOTICE!
To prevent damage when drilling, make sure there is sufficient
space on the other side for the drill head to emerge.
Deburr all drill holes and treat them with a rust-protection agent.
Observe the following instructions when working with electrical parts:
A
NOTICE!
Only use a diode test lamp or voltmeter to test voltages in elec-
tric cables.
Test lamps with a bulb consume too much voltage, which can
damage the vehicle's electronic system.
When making electrical connections, ensure that:
– they are not kinked or twisted
– they do not rub on edges
– they are not laid in sharp-edged ducts without protection.
Insulate all connections.
Secure the cables against mechanical wear by using cable
binders or insulating tape, for example on existing cables.

EN
Scope of delivery PerfectView REC 400
30
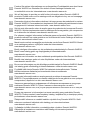
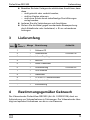
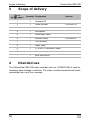
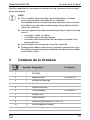
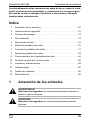
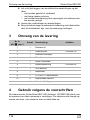
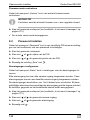
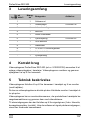
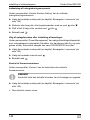
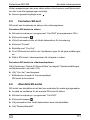
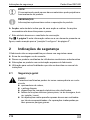
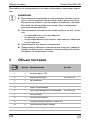
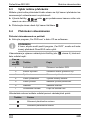
3 Scope of delivery
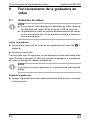
4 Intended use
The PerfectView REC 400 video recorder (item no. 9102200138) is used for
recording video footage in vehicles. The video recorder transmits and saves
recordings from up to four cameras.
No. in
fig. 1, page 3
Quantity Designation Item no.
1 1 Software CD
2 1 Video recorder 9102200138
3 1 Infrared receiver
4 1 Microphone
5 1 Audio/video cable
6 1 Remote control 9102200142
7 1 GPS antenna
8 1 Alarm cable
9 1 12 V/24 Vg connection cable
10 4 Camera adapter cable
- 1 Brief instructions

EN
PerfectView REC 400 Technical description
31
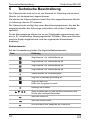
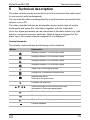
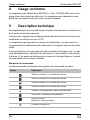
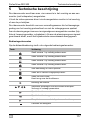
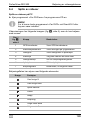
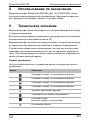
5 Technical description
The video recorder can be connected to up to four cameras in the vehicle and
to one monitor (with loudspeakers).
You can view the video recordings directly using the monitor connected in the
vehicle, or on a PC.
The video recorder features an acceleration sensor which logs all vehicle
movements and saves this information together with the video data.
Up to four signal generators can be connected to the alarm inputs (e.g. light
barriers, movement sensors, switches). When a signal is triggered at the
alarm input, the camera channel assigned to it is displayed.
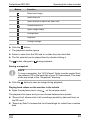
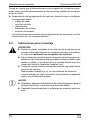
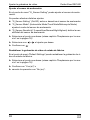
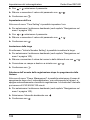
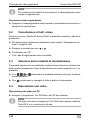
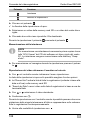
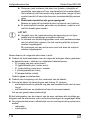
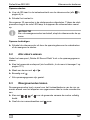
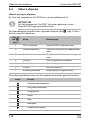
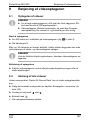
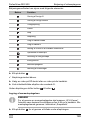
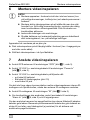
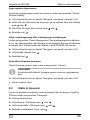
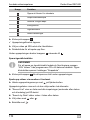
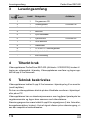
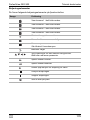
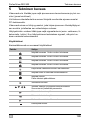
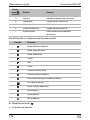
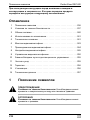
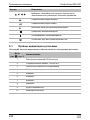
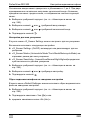
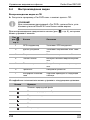
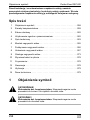
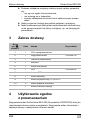
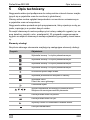
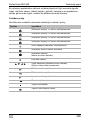
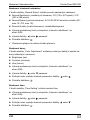
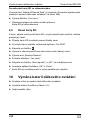
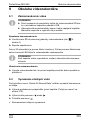
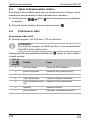
Control elements
The remote control features the following control elements:
Button Explanation
Displays camera 1 in full screen mode.
Displays camera 2 in full screen mode.
Displays camera 3 in full screen mode.
Displays camera 4 in full screen mode.
Starts video recording manually.
Displays all 4 cameras simultaneously.
Displays the menu.
Returns to the main menu.
Confirms the selection.
Selects settings for the current menu item.
Increases or decreases parameters.
Fast-forwards the video.
Rewinds the video.
Opens the menu for playing back videos.
Pauses playback.

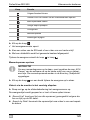
EN
Technical description PerfectView REC 400
32
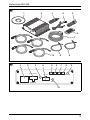
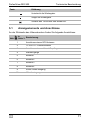
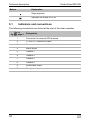
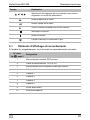
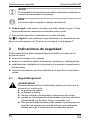
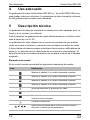
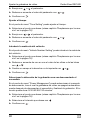
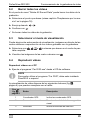
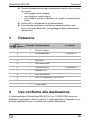
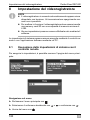
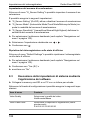
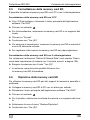
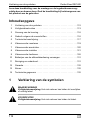
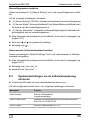
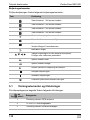
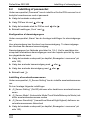
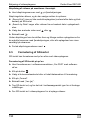
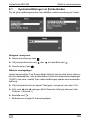
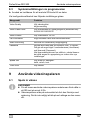
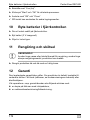
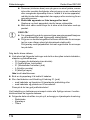
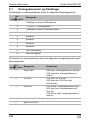
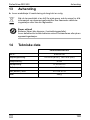
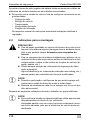
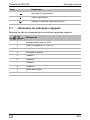
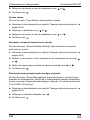
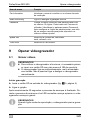
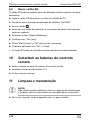
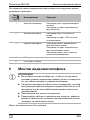
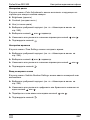
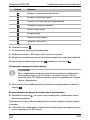
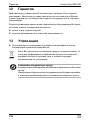
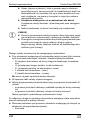
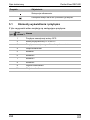
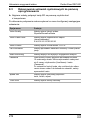
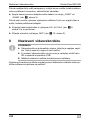
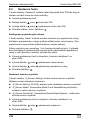
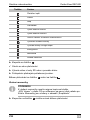
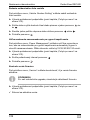
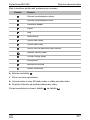
5.1 Indicators and connections
The following connections are found at the rear of the video recorder:
Stops playback.
Switches the sound on or off.
No. in
fig. 2, page 3
Designation
1 Connection for external GPS antenna
2 12 V/24 Vg connection cable
3 Connection for external infrared receiver
4 Alarm inputs
5 Camera 1
6 Camera 2
7 Camera 3
8 Camera 4
9 Audio/video output
10 Microphone input
Button Explanation

EN
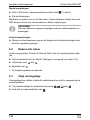
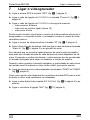
PerfectView REC 400 Installing the video recorder
33
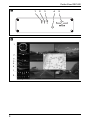
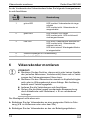
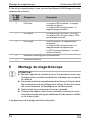
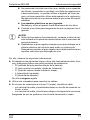
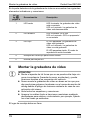
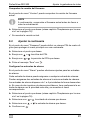
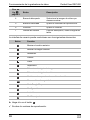
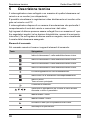
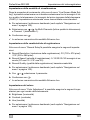
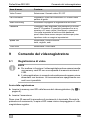
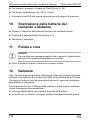
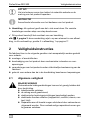
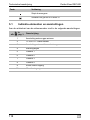
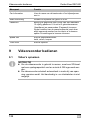
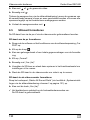
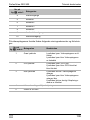
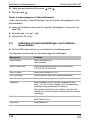
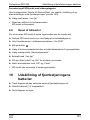
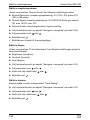
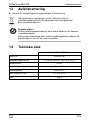
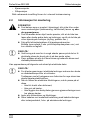
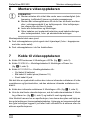
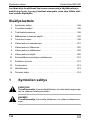
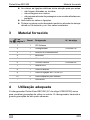
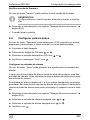
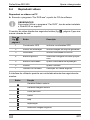
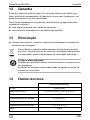
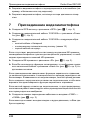
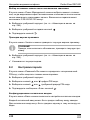
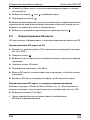
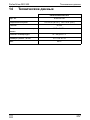
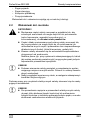
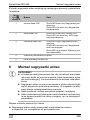
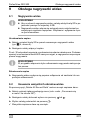
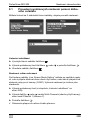
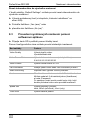
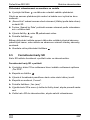
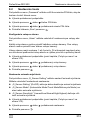
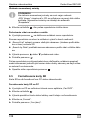
The following indicators and connections are found at the front of the video
recorder:
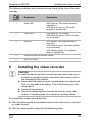
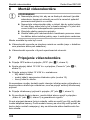
6 Installing the video recorder
A
CAUTION!
Install the device so that it cannot become loose under any cir-
cumstances (sudden braking, accidents) and cause injuries to
the occupants of the vehicle.
Never install the video recorder in areas where your head could
hit it, or in the path of an airbag. This could cause injury if the
airbag opens.
Insulate all connections.
Secure the cables against mechanical wear by using cable
binders or insulating tape, for example on existing cables.
The installation location should be level.
➤ Affix the video recorder to a suitable location in the vehicle (e.g. in the boot
or under the seat)
.
➤ Affix the video recorder using the four fastening holes.
No. in
fig. 3,
page 4
Designation Description
1 Green LED LED lights up: The video recorder is
switched on
LED does not light up: The video
recorder is switched off
2 Yellow LED LED lights up: GPS ready
LED does not light up: GPS not ready/
not connected
3 Red LED LED flashes: The video recorder is
recording
LED does not glow: The video recorder
is not recording
LED flashes quickly: The playback
mode is switched on
4 Infrared receiver for remote control
5 Slot for SD card

EN
Connecting the video recorder PerfectView REC 400
34
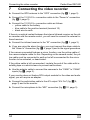
7 Connecting the video recorder
➤ Connect the GPS antenna to the “GPS” connection (fig. 2 1, page 3).
➤ Connect the 12 V/24 Vg connection cable to the “Power In” connection
(
fig. 2 2, page 3).
➤ Connect the 12 V/24 Vg connection cable as follows:
– yellow cable to the battery
– blue cable to the positive terminal (terminal 15)
– black wire to earth
If there is no optical contact between the internal infrared receiver on the vid-
eo recorder and the remote control, you will need to connect the external in-
frared receiver:
➤ Connect the infrared receiver to the “IR” connection (fig. 2 3, page 3).
➤ If you are using the alarm function, you must connect the alarm cable to
the “Alarm In” connection (
fig. 2 4, page 3) and to the signal generators.
If the camera connected features a mirror function, use the yellow cable of
the camera adapter cable for this. Depending on the camera model, the yel
-
low cable must be connected to earth or be left unconnected for the mirror
function to be activated, or deactivated.
If the yellow cable is left unconnected, insulate the end of the cable with in-
sulating tape or a shrink sleeve to prevent malfunctions.
➤ Use the adapter cable to connect the cameras to the “CAM1” to “CAM4”
inputs (
fig. 2, page 3).
If your monitor does not feature RCA output sockets for the video and audio
signal, you will require an adapter.
➤ Connect the audio/video cable to the A/V output “A/V Out” (fig. 2 9,
page 3) and to the monitor.
➤ Connect the microphone to the “MIC” connection (fig. 2 10, page 3).

EN
PerfectView REC 400 Setting the video recorder
35
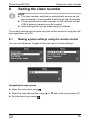
8 Setting the video recorder
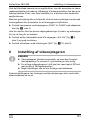
I
NOTE
The video recorder switches on automatically as soon as volt-
age is supplied. It is not possible to switch it on and off manually.
To start operating the video recorder, an SD card with at least
4 GB of memory capacity must be inserted.
Some settings can only be made using the software.
The system settings can be made using the remote control or using the soft-
ware application on a PC.
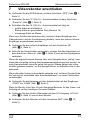
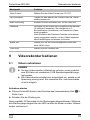
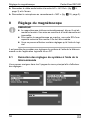
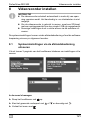
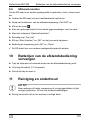
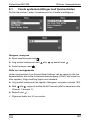
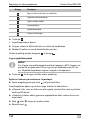
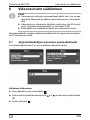
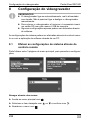
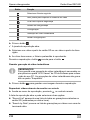
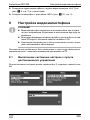
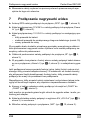
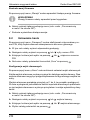
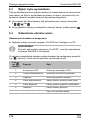
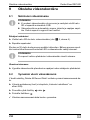
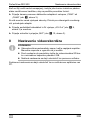
8.1 Making system settings using the remote control
You can scroll between 3 pages of the main menu to make settings:
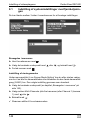
Navigating through menus
➤ Open the main menu using .
➤ Select the required sub-item using or and confirm by pressing .
➤ Exit the menu by pressing .

EN
Setting the video recorder PerfectView REC 400
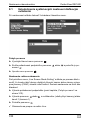
36
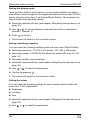
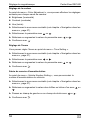
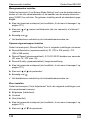
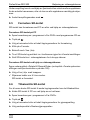
Setting the display mode
Once you have started up the device, you can select whether you wish to
view all four camera images or the images from the first camera input (CAM1)
live by using the menu item “Live Screen Mode Setting”. The preferred set
-
ting is saved as the standard setting.
➤ Select the required sub-item (see chapter “Navigating through menus” on
page 35).
➤ Use or to choose between multi-channels (all four cameras) or
channel 1 (camera 1).
➤ Press to confirm.
✓ The screen will switch to the live screen mode.
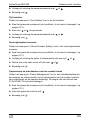
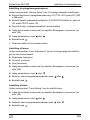
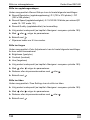
Setting recording properties
You can make the following settings under the menu item “Record Setup”:
Recording resolution: D1 (720 x 576 pixels) / CIF (352 x 288 pixels)
Recording speed: 5 / 15 / 20 / 25 / 30 frames per second (D1 max.15 / CIF
max. 30)
Recording quality: low/normal/high
➤ Select the required sub-item (see chapter “Navigating through menus” on
page 35).
➤ Use or to select the parameters.
➤ Confirm by pressing .
✓ The screen will switch to the live scree mode.
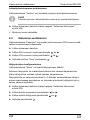
Setting the colour
You can make the following settings for each camera channel under the
menu item “Color Adjustment”:
Brightness
Contrast
Hue
➤ Select the required sub-item (see chapter “Navigating through menus” on
page 35).
➤ Use or to select the parameters.

EN
PerfectView REC 400 Setting the video recorder
37
➤ Decrease or increase the parameter value using or .
➤ Confirm by pressing .
Setting the time
You can set the time under the menu item “Time Setting”.
➤ Select the required sub-item (see chapter “Navigating through menus” on
page 35).
➤ Use or to select the parameters.
➤ Decrease or increase the parameter value using or .
➤ Confirm by pressing .
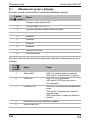
Entering the vehicle registration number
You can enter the vehicle registration number under the menu item “Vehicle
Number Setting”.
➤ Select the required sub-item (see chapter “Navigating through menus” on
page 35).
➤ Decrease or increase the numerical value or letter of the alphabet one-by-
one using
or .
➤ Move one field to the right or left using or .
➤ Confirm by pressing .
Selecting ‘stop recording’ when the ignition is off
You can select the switch-off time under the menu item “Power Manage-
ment”, after which the video recorder switches off automatically and ceases
recording after the ignition has been switched off. The length of the interval
can amount to 0
/ 30 / 60 / 90 / 120 minutes.
➤ Select the required sub-item (see chapter “Navigating through menus” on
page 35).
➤ Select the preferred interval using .
➤ Confirm by pressing .

EN
Setting the video recorder PerfectView REC 400
38
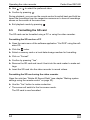
Checking the firmware version
You can check the current firmware version under the menu item “Version”.
I
NOTE
Start by checking the current firmware before performing an up-
grade.
➤ Select the required sub-item (see chapter “Navigating through menus” on
page 35).
✓ The current version is displayed.
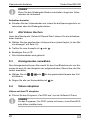
8.2 Setting the password
You can define a four-digit PIN number to password-protect access to the
main menu under the menu item “Password”.
➤ Select the required sub-item.
➤ Use or to select digits for the PIN.
➤ Use or to select a particular digit within the PIN.
➤ Confirm the “Sure” message by pressing .
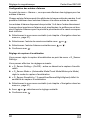
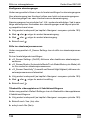
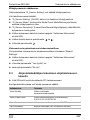
Configuring alarm inputs
You can make the settings for the alarm inputs under the menu item “Alarm”.
Each alarm input can be allocated to each camera input. Two alarm inputs
can be allocated to the same camera input.
The alarm inputs feature priorities in descending order, from 1 to 4. In the
event of two simultaneous alarm impulses,
the alarm input with the high pri-
ority is shown first, with the respective channel being displayed.
➤ Select the required sub-item (see chapter “Navigating through menus” on
page 35).
➤ Use or to select the preferred camera input.
➤ Use or to select the preferred alarm input.
➤ Confirm by pressing .

EN
PerfectView REC 400 Setting the video recorder
39
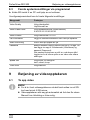
Setting the acceleration sensor
You can set the acceleration sensor under the menu item „G_Sensor
Setting".
You can make the following settings:
“G_Sensor Setting” (on/off) activates or deactivates the acceleration sen-
sor
“G_Sensor Mode” (automobile mode/truck mode/motorcycle mode) sets
the preferred acceleration sensor mode.
“G_Sensor Sensitivity" (lowest/low/normal/high/highest) defines the sen-
sitivity of the acceleration sensor
➤ Select the required sub-item (see chapter “Navigating through menus” on
page 35).
➤ Use or to select the preferred setting.
➤ Confirm by pressing .
Resetting the video recorder to its default settings
You can restore the factory settings of the video recorder under the menu
item “Default Settings”.
➤ Select the required sub-item (see chapter “Navigating through menus” on
page 35).
➤ Confirm by pressing “Yes” or
➤ cancel by pressing “No”.
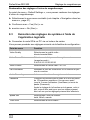
8.3 Making system settings using the software
application
➤ Connect the SD card to a PC using a card reader.
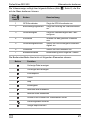
You can make the following settings using the configuration window:
Menu item Function
Video quality Select the video quality:
high/normal/low
Video frame rate Select the recording frequency (frames/second):
2 / 4 / 6 / 8 / 10 / 15 / 20 / 25 / 30
Video format Select the video format: D1 / CIF

EN
Operating the video recorder PerfectView REC 400
40
9 Operating the video recorder
9.1 Making video recordings
I
NOTE
To start operating the video recorder, an SD card with at least
4 GB of memory capacity must be inserted first.
The video recorder switches on automatically as soon as volt-
age is supplied. It is not possible to switch it on and off manually.
Starting recordings
➤ Insert the SD card into the slot in the video recorder (fig. 3 5, page 4).
➤ Switch on the ignition.
After approximately 30 seconds, the starting process is complete. The red
LED lamp begins to flash during the starting process and the video recorder
starts recording.
I
NOTE
If you switch on playback mode, the video recorder will stop record-
ing.
Car information Enter the name of the driver or the driver's licence
number.
Audio recording Switch the audio recording on or off.
Password Protect the data by entering a password with a maxi-
mum of 15 digits. You can enter up to 2 user names
and passwords.
After setting the password function, you must enter
the password to play back videos or to make other
settings.
Speed unit Select the unit for measuring speed:
km/h, miles/h, knots.
Time zone Select the time zone.
Menu item Function

EN
PerfectView REC 400 Operating the video recorder
41
Ending a recording
➤ Switch the video recorder off by disconnecting the voltage or starting play-
back.
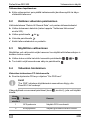
9.2 Deleting all videos
You can delete recorded data under the menu item “Delete All Recorded
Data”.
➤ Select the required sub-item (see chapter “Navigating through menus” on
page 35).
➤ Make a selection using or .
➤ Confirm by pressing .
✓ All recorded data will be deleted.
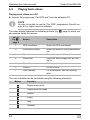
9.3 Selecting display mode
You can select the display mode – both the live screen showing the four cam-
eras as well as playback of the video recording – using the recorder.
➤ Use , , or to select fullscreen mode for a particular camera.
➤ Display all four camera images using .
Page is loading ...
Page is loading ...
Page is loading ...
Page is loading ...
Page is loading ...
Page is loading ...
Page is loading ...
Page is loading ...
Page is loading ...
Page is loading ...
Page is loading ...
Page is loading ...
Page is loading ...
Page is loading ...
Page is loading ...
Page is loading ...
Page is loading ...
Page is loading ...
Page is loading ...
Page is loading ...
Page is loading ...
Page is loading ...
Page is loading ...
Page is loading ...
Page is loading ...
Page is loading ...
Page is loading ...
Page is loading ...
Page is loading ...
Page is loading ...
Page is loading ...
Page is loading ...
Page is loading ...
Page is loading ...
Page is loading ...
Page is loading ...
Page is loading ...
Page is loading ...
Page is loading ...
Page is loading ...
Page is loading ...
Page is loading ...
Page is loading ...
Page is loading ...
Page is loading ...
Page is loading ...
Page is loading ...
Page is loading ...
Page is loading ...
Page is loading ...
Page is loading ...
Page is loading ...
Page is loading ...
Page is loading ...
Page is loading ...
Page is loading ...
Page is loading ...
Page is loading ...
Page is loading ...
Page is loading ...
Page is loading ...
Page is loading ...
Page is loading ...
Page is loading ...
Page is loading ...
Page is loading ...
Page is loading ...
Page is loading ...
Page is loading ...
Page is loading ...
Page is loading ...
Page is loading ...
Page is loading ...
Page is loading ...
Page is loading ...
Page is loading ...
Page is loading ...
Page is loading ...
Page is loading ...
Page is loading ...
Page is loading ...
Page is loading ...
Page is loading ...
Page is loading ...
Page is loading ...
Page is loading ...
Page is loading ...
Page is loading ...
Page is loading ...
Page is loading ...
Page is loading ...
Page is loading ...
Page is loading ...
Page is loading ...
Page is loading ...
Page is loading ...
Page is loading ...
Page is loading ...
Page is loading ...
Page is loading ...
Page is loading ...
Page is loading ...
Page is loading ...
Page is loading ...
Page is loading ...
Page is loading ...
Page is loading ...
Page is loading ...
Page is loading ...
Page is loading ...
Page is loading ...
Page is loading ...
Page is loading ...
Page is loading ...
Page is loading ...
Page is loading ...
Page is loading ...
Page is loading ...
Page is loading ...
Page is loading ...
Page is loading ...
Page is loading ...
Page is loading ...
Page is loading ...
Page is loading ...
Page is loading ...
Page is loading ...
Page is loading ...
Page is loading ...
Page is loading ...
Page is loading ...
Page is loading ...
Page is loading ...
Page is loading ...
Page is loading ...
Page is loading ...
Page is loading ...
Page is loading ...
Page is loading ...
Page is loading ...
Page is loading ...
Page is loading ...
Page is loading ...
Page is loading ...
Page is loading ...
Page is loading ...
Page is loading ...
Page is loading ...
Page is loading ...
Page is loading ...
Page is loading ...
Page is loading ...
Page is loading ...
Page is loading ...
Page is loading ...
Page is loading ...
Page is loading ...
Page is loading ...
Page is loading ...
Page is loading ...
Page is loading ...
Page is loading ...
Page is loading ...
Page is loading ...
Page is loading ...
Page is loading ...
Page is loading ...
Page is loading ...
Page is loading ...
Page is loading ...
Page is loading ...
Page is loading ...
Page is loading ...
Page is loading ...
Page is loading ...
Page is loading ...
Page is loading ...
Page is loading ...
Page is loading ...
Page is loading ...
Page is loading ...
Page is loading ...
Page is loading ...
Page is loading ...
Page is loading ...
Page is loading ...
Page is loading ...
Page is loading ...
Page is loading ...
Page is loading ...
Page is loading ...
Page is loading ...
Page is loading ...
Page is loading ...
Page is loading ...
Page is loading ...
Page is loading ...
Page is loading ...
Page is loading ...
Page is loading ...
Page is loading ...
Page is loading ...
Page is loading ...
Page is loading ...
Page is loading ...
Page is loading ...
Page is loading ...
Page is loading ...
Page is loading ...
Page is loading ...
Page is loading ...
Page is loading ...
Page is loading ...
Page is loading ...
Page is loading ...
Page is loading ...
Page is loading ...
Page is loading ...
Page is loading ...
Page is loading ...
Page is loading ...
Page is loading ...
Page is loading ...
Page is loading ...
Page is loading ...
Page is loading ...
Page is loading ...
Page is loading ...
Page is loading ...
Page is loading ...
Page is loading ...
Page is loading ...
Page is loading ...
Page is loading ...
Page is loading ...
Page is loading ...
Page is loading ...
Page is loading ...
Page is loading ...
Page is loading ...
Page is loading ...
Page is loading ...
Page is loading ...
Page is loading ...
Page is loading ...
Page is loading ...
Page is loading ...
Page is loading ...
Page is loading ...
Page is loading ...
Page is loading ...
Page is loading ...
Page is loading ...
Page is loading ...
Page is loading ...
Page is loading ...
Page is loading ...
Page is loading ...
Page is loading ...
Page is loading ...
Page is loading ...
Page is loading ...
Page is loading ...
Page is loading ...
Page is loading ...
Page is loading ...
Page is loading ...
Page is loading ...
Page is loading ...
Page is loading ...
Page is loading ...
Page is loading ...
Page is loading ...
Page is loading ...
Page is loading ...
Page is loading ...
Page is loading ...
Page is loading ...
Page is loading ...
Page is loading ...
Page is loading ...
Page is loading ...
Page is loading ...
-
 1
1
-
 2
2
-
 3
3
-
 4
4
-
 5
5
-
 6
6
-
 7
7
-
 8
8
-
 9
9
-
 10
10
-
 11
11
-
 12
12
-
 13
13
-
 14
14
-
 15
15
-
 16
16
-
 17
17
-
 18
18
-
 19
19
-
 20
20
-
 21
21
-
 22
22
-
 23
23
-
 24
24
-
 25
25
-
 26
26
-
 27
27
-
 28
28
-
 29
29
-
 30
30
-
 31
31
-
 32
32
-
 33
33
-
 34
34
-
 35
35
-
 36
36
-
 37
37
-
 38
38
-
 39
39
-
 40
40
-
 41
41
-
 42
42
-
 43
43
-
 44
44
-
 45
45
-
 46
46
-
 47
47
-
 48
48
-
 49
49
-
 50
50
-
 51
51
-
 52
52
-
 53
53
-
 54
54
-
 55
55
-
 56
56
-
 57
57
-
 58
58
-
 59
59
-
 60
60
-
 61
61
-
 62
62
-
 63
63
-
 64
64
-
 65
65
-
 66
66
-
 67
67
-
 68
68
-
 69
69
-
 70
70
-
 71
71
-
 72
72
-
 73
73
-
 74
74
-
 75
75
-
 76
76
-
 77
77
-
 78
78
-
 79
79
-
 80
80
-
 81
81
-
 82
82
-
 83
83
-
 84
84
-
 85
85
-
 86
86
-
 87
87
-
 88
88
-
 89
89
-
 90
90
-
 91
91
-
 92
92
-
 93
93
-
 94
94
-
 95
95
-
 96
96
-
 97
97
-
 98
98
-
 99
99
-
 100
100
-
 101
101
-
 102
102
-
 103
103
-
 104
104
-
 105
105
-
 106
106
-
 107
107
-
 108
108
-
 109
109
-
 110
110
-
 111
111
-
 112
112
-
 113
113
-
 114
114
-
 115
115
-
 116
116
-
 117
117
-
 118
118
-
 119
119
-
 120
120
-
 121
121
-
 122
122
-
 123
123
-
 124
124
-
 125
125
-
 126
126
-
 127
127
-
 128
128
-
 129
129
-
 130
130
-
 131
131
-
 132
132
-
 133
133
-
 134
134
-
 135
135
-
 136
136
-
 137
137
-
 138
138
-
 139
139
-
 140
140
-
 141
141
-
 142
142
-
 143
143
-
 144
144
-
 145
145
-
 146
146
-
 147
147
-
 148
148
-
 149
149
-
 150
150
-
 151
151
-
 152
152
-
 153
153
-
 154
154
-
 155
155
-
 156
156
-
 157
157
-
 158
158
-
 159
159
-
 160
160
-
 161
161
-
 162
162
-
 163
163
-
 164
164
-
 165
165
-
 166
166
-
 167
167
-
 168
168
-
 169
169
-
 170
170
-
 171
171
-
 172
172
-
 173
173
-
 174
174
-
 175
175
-
 176
176
-
 177
177
-
 178
178
-
 179
179
-
 180
180
-
 181
181
-
 182
182
-
 183
183
-
 184
184
-
 185
185
-
 186
186
-
 187
187
-
 188
188
-
 189
189
-
 190
190
-
 191
191
-
 192
192
-
 193
193
-
 194
194
-
 195
195
-
 196
196
-
 197
197
-
 198
198
-
 199
199
-
 200
200
-
 201
201
-
 202
202
-
 203
203
-
 204
204
-
 205
205
-
 206
206
-
 207
207
-
 208
208
-
 209
209
-
 210
210
-
 211
211
-
 212
212
-
 213
213
-
 214
214
-
 215
215
-
 216
216
-
 217
217
-
 218
218
-
 219
219
-
 220
220
-
 221
221
-
 222
222
-
 223
223
-
 224
224
-
 225
225
-
 226
226
-
 227
227
-
 228
228
-
 229
229
-
 230
230
-
 231
231
-
 232
232
-
 233
233
-
 234
234
-
 235
235
-
 236
236
-
 237
237
-
 238
238
-
 239
239
-
 240
240
-
 241
241
-
 242
242
-
 243
243
-
 244
244
-
 245
245
-
 246
246
-
 247
247
-
 248
248
-
 249
249
-
 250
250
-
 251
251
-
 252
252
-
 253
253
-
 254
254
-
 255
255
-
 256
256
-
 257
257
-
 258
258
-
 259
259
-
 260
260
-
 261
261
-
 262
262
-
 263
263
-
 264
264
-
 265
265
-
 266
266
-
 267
267
-
 268
268
-
 269
269
-
 270
270
-
 271
271
-
 272
272
-
 273
273
-
 274
274
-
 275
275
-
 276
276
-
 277
277
-
 278
278
-
 279
279
-
 280
280
-
 281
281
-
 282
282
-
 283
283
-
 284
284
-
 285
285
-
 286
286
-
 287
287
-
 288
288
-
 289
289
-
 290
290
-
 291
291
-
 292
292
-
 293
293
-
 294
294
-
 295
295
-
 296
296
-
 297
297
-
 298
298
-
 299
299
-
 300
300
-
 301
301
-
 302
302
-
 303
303
-
 304
304
-
 305
305
-
 306
306
-
 307
307
-
 308
308
-
 309
309
-
 310
310
-
 311
311
-
 312
312
-
 313
313
-
 314
314
-
 315
315
-
 316
316
-
 317
317
-
 318
318
-
 319
319
-
 320
320
-
 321
321
-
 322
322
-
 323
323
-
 324
324


Waeco Waeco PerfectView REC400 Operating instructions
- Type
- Operating instructions
- This manual is also suitable for
Ask a question and I''ll find the answer in the document
Finding information in a document is now easier with AI
in other languages
- italiano: Waeco Waeco PerfectView REC400 Istruzioni per l'uso
- français: Waeco Waeco PerfectView REC400 Mode d'emploi
- español: Waeco Waeco PerfectView REC400 Instrucciones de operación
- Deutsch: Waeco Waeco PerfectView REC400 Bedienungsanleitung
- русский: Waeco Waeco PerfectView REC400 Инструкция по эксплуатации
- Nederlands: Waeco Waeco PerfectView REC400 Handleiding
- português: Waeco Waeco PerfectView REC400 Instruções de operação
- slovenčina: Waeco Waeco PerfectView REC400 Návod na používanie
- dansk: Waeco Waeco PerfectView REC400 Betjeningsvejledning
- polski: Waeco Waeco PerfectView REC400 Instrukcja obsługi
- čeština: Waeco Waeco PerfectView REC400 Operativní instrukce
- svenska: Waeco Waeco PerfectView REC400 Bruksanvisningar
- suomi: Waeco Waeco PerfectView REC400 Käyttö ohjeet
Related papers
-
Waeco PerfectView M55L, M75L Owner's manual
-
Waeco PerfectView M75LX Owner's manual
-
-
-
-
-
-
-
-
Other documents
-
RoadHawk E10 User manual
-
Vacron VVH-MDE204 User manual
-
Pyle PLCMDVR5 Owner's manual
-
Dometic M9LQ Operating instructions
-
-
-
-
Clarion CC2000E User manual
-
-
Topfield TF 5200 PVRc User manual