Pioneer CDJ-400 User manual

Category
CD players
Type
User manual

This manual is also suitable for

COMPACT DISC PLAYER
DJS Control Guide
CDJ-400
2
DJS Ver. 1.500
DJS Control Guide
By connecting your CDJ-400 (compact disc player) to your computer, you can control programs on your PC, including the DJ software
made by Pioneer, namely DJS. When you combine your CDJ-400 with DJS, you can use the CDJ-400 to achieve all of the following:
1. Control two players (A and B) in DJS
2. Manipulate selected songs
3. Play back DJS sound (functions as a computer controlled audio device)
* There are functions that cannot be achieved with other companies’ PC programs. For further information, refer to the Operating
Instructions of the relevant PC program.
DJS software is designed for using MP3 files to enjoy playing the DJ on a computer. (You may not record the audio created in DJ play.)
Please refer to the CDJ-400 Operating Instructions (printed manual) and the DJS users manual (PDF file) together when you work with
DJS.
Table of Contents
Chapter 1   Connecting your CDJ-400 and DJS
1-1   Using 2 CDJ-400s . . . . . . . . . . . . . . . . . . . . . . . . . . . . . . . . . . . . . . . . . . . . . . . . . . . . . . . . . . . . . . 3
1-2   Using 1 CDJ-400 . . . . . . . . . . . . . . . . . . . . . . . . . . . . . . . . . . . . . . . . . . . . . . . . . . . . . . . . . . . . . . . 4
Chapter 2   Precautions when Starting Up
2-1   Selecting a Player Control . . . . . . . . . . . . . . . . . . . . . . . . . . . . . . . . . . . . . . . . . . . . . . . . . . . . . . . . 5
2-2   CDJ-400 Audio Device Function Settings . . . . . . . . . . . . . . . . . . . . . . . . . . . . . . . . . . . . . . . . . . . . 6
Chapter 3   Using your CDJ-400 to Control DJS
3-1   Operating a Player with DJS . . . . . . . . . . . . . . . . . . . . . . . . . . . . . . . . . . . . . . . . . . . . . . . . . . . . . . 8
3-2   Selecting Songs . . . . . . . . . . . . . . . . . . . . . . . . . . . . . . . . . . . . . . . . . . . . . . . . . . . . . . . . . . . . . . . . 9
3-3   Switching the Player Control . . . . . . . . . . . . . . . . . . . . . . . . . . . . . . . . . . . . . . . . . . . . . . . . . . . . . . 9
Chapter 4   Using the Support Site . . . . . . . . . . . . . . . . . . . . . . . . . . . . . . . . . . . . . . . . 10
Please be sure to read the Software End User License Agreement thoroughly before starting to use DJS.
For more information on the DJS Software End User License Agreement, its minimum operating environment and installation
procedures, please refer to the Quick Start Guide (PDF file).
Copying of copyrighted materials such as music is unlawful unless permitted by a legal exception or consented to by the
rightowners.
Music recorded from CDs, etc. is protected by the copyright laws of each country, as well as by international agreements. The person
who makes such a recording, himself, bears full responsibility for legal compliance in the use thereof.
* Pioneer is a registered trademark of the Pioneer Corporation.
* Microsoft and Windows are registered trademarks of the Microsoft Corporation of the United States and other countries. The formal name of
Windows is the Microsoft Windows Operating System.
* MPEG Layer-3 audio coding technology licensed from Fraunhofer IIS and Thomson multimedia.
Supply of this product only conveys a license for private, non-commercial use and does not convey a license nor imply any right to use this product
in any commercial (i.e. revenue-generating) real time broadcasting (terrestrial, satellite, cable and/or any other media), broadcasting/streaming via
internet, intranets and/or other networks or in other electronic content distribution systems, such as pay-audio or audio-on-demand applications. An
independent license for such use is required. For details, please visit http://www.mp3licensing.com.
* All other company names and names of products are either the trademarks or registered trademarks of their respective company(ies).
©2007 PIONEER CORPORATION. All rights reserved.
DJS Ver. 1.500
3
1
Chapter 1
Connecting your CDJ-400 and DJS
When you use your CDJ-400 in conjunction with DJS, you can control DJS from your
CDJ-400.
By controlling DJS from your CDJ-400, you can manipulate it with the feel of using a
DJ player for operations that to date you have done with your computer’s mouse and
keyboard.
Connecting 1 CDJ-400
Using just one CDJ-400, you can switch between and control two DJS players.
‘1-2 Using 1 CDJ-400’
1-1
Using 2 CDJ-400s
Connecting two CDJ-400s to your computer gives a direct feel to controlling your DJS player
A and player B, and thus expands the range for DJ performance.
Of course all the basic functions, such as play, cue, scratch, tempo control and so on can make
song selections from the DJS music list using controls like the Rotary dial.
Configuration of Audio Output from a CDJ-400 (connection example)
The CDJ-400 is set up with a function for operating as a computer’s audio device.
If you set the DJS audio output to your CDJ-400, you can output the DJS audio from the
audio output terminal of your CDJ-400 in the very same way as a music source, such as
music CD or USB memory that can be played on the CDJ-400.
‘2-2 CDJ-400 Audio Device Function Settings’
Configuration when not Outputting Audio from a CDJ-400
For configurations (connection examples) when the CDJ-400’s audio output is not used
and the DJS audio is output from another audio device, please refer to Configuration
when using the DJS Mixer Functions (Example of Connections)’ and Configuration
when using an External DJ mixer (Example of Connections)’ on the next page.
Warning!
Updating your Version of DJS
In order to use your CDJ-400 in conjunction with
DJS, it is necessary to update DJS to version
1.500 or later. Please refer to the DJS users
manual for directions on how to update your
version of DJS.
‘Chapter 4 Using the Support Site’
Warning!
Before Connecting to your
Computer
If you are going to connect and use a CDJ-400
with your computer, install the driver software
for the CDJ-400 onto your computer.
For information on obtaining the driver software
for your CDJ-400 and how to install it, please
refer to CONNECTIONS of the CDJ-400 as well
as the following Web page:
http://www.prodjnet.com/support/en/
Connecting a CDJ-400 and a DJ
mixer
Connect the audio output terminal (AUDIO OUT)
of the CDJ-400 and the audio input terminal (CH)
of the DJ mixer.
Connect the white plugs of the audio cable that
comes with the CDJ-400 to the white L (left)
terminals and the red plugs to the red R (right)
terminals.
Connecting Amps & Headphones to
a DJ mixer
Connect either an amp or speakers to the audio
output terminal (MASTER) of the DJ miser, and/
or connect headphones to the headphone terminal
(PHONES). For information on how to make the
connections, please refer to Operating Instructions
of the DJ mixer you are using.
AUDIO OUT
RL
CH-2CH-1
RL
MASTER
RLRL
USB
PC
AUDIO OUT
RL
USB
PC
Amp/Speakers
DJ mixer
Headphones
4
DJS Ver. 1.500
1
1-2
Using 1 CDJ-400
Using just one CDJ-400, you can switch between and control DJS players A & B.
Of course all the basic functions, such as play, cue, scratch, tempo control and so on can make
song selections from the DJS music list using controls like the Rotary dial.
Configuration when using the DJS Mixer Functions (Example of Connections)
DJS master (for amp or speakers) and monitor (for headphones) audio is output to each
audio output of your computer.
Your computer needs to have two or more audio output systems.
Configuration when using an External DJ mixer (Example of Connections)
The DJS player A and player B audio is output to each audio output of your computer.
Your computer needs to have two or more audio output systems.
Warning!
Before Connecting to your
Computer
If you are going to connect and use a CDJ-400
with your computer, install the driver software
for the CDJ-400 onto your computer.
For information on obtaining the driver software
for your CDJ-400 and how to install it, please
refer to CONNECTIONS of the CDJ-400 as well
as the following web page.
http://www.prodjnet.com/support/en/
DJS Mixer Functions
On the DJS settings screen, switch the setting to
using the internal mixer and specify where the
audio is output to for the master (amp or speakers)
and the monitor (headphones).
‘2-2 CDJ-400 Audio Device Function Settings’
Audio Unit
If your computer only has one audio output
system, please add another audio device, such as a
sound card or an audio unit.
For information on connecting your computer
with audio devices as well as on driver
installation, please refer to the Operating
Instructions of each of the audio devices.
USB
PC
USB
PC
Audio Unit
(Two units may also be connected.)
Amp/Speakers
Headphones
Using an External DJ mixer
On the DJS settings screen, switch the setting to
using an external mixer and specify where to
output the audio for player A and player B.
‘2-2 CDJ-400 Audio Device Function Settings’
Audio Unit
If your computer only has one audio output
system, please add another audio device, such as a
sound card or an audio unit.
For information on connecting your computer
with audio devices as well as on driver
installation, please refer to the Operating
Instructions of each audio device.
List Player
If your computer has three or more audio output
systems, you can output audio for three players,
namely player A, player B and a list player.
Connecting Amps & Headphones to
a DJ mixer
Connect either an amp or speakers to the audio
output terminal (MASTER) of the DJ mixer, and/
or connect headphones to the headphone terminal
(PHONES). For information on how to make the
connections, please refer to the Operating
Instructions of the DJ mixer you are using.
CH-2CH-1
RL
MASTER
RLRL
USB
PC
USB
PC
Amp/Speakers
DJ mixer
Headphones
Audio Unit
(Two units may also be connected.)
DJS Ver. 1.500
5
2
Chapter 2
Precautions when Starting Up
Before starting to play with your CDJ-400, computer and DJS, select a player control
and where the audio is output.
2-1
Selecting a Player Control
Connect the CDJ-400 to your computer with a USB cable.
For information on each of the cables that come with the CDJ-400 as well as each type of the
CDJ-400’s cable terminals, please refer to CONNECTIONS in the Operating Instructions of
your CDJ-400.
1
Start up your computer.
2
Connect a USB cable to the USB port on the back of your CDJ-400
and to your computer’s USB port and then turn on your CDJ-400.
Alternatively, you can also power up your CDJ-400 first and then connect the CDJ-
400 to your computer.
3
Start up DJS.
Once DJS starts up, the [DJ Play] screen is displayed.
4
Select PC with your CDJ-400’s USB select button (SOURCE
SELECT).
Each time you press the USB select button, the indicator switches between
MEMORY and PC.
5
Rotate the CDJ-400’s rotary knob (SELECT PUSH) to select the DJS
player (A or B) you wish to assign.
Assigning a CDJ-400 to DJS Player A
When you turn the Rotary dial to the left, PLAYER A? is shown on the Display of
your CDJ-400; press the Rotary dial to select it.
Assigning a CDJ-400 to DJS Player B
When you turn the Rotary dial to the right, PLAYER B? is shown on the Display of
your CDJ-400; press the Rotary dial to select it.
When connecting two CDJ-400s
After you assign one of your CDJ-400s to a player (Either A or B), assign the other
CDJ-400 to the other DJS player (A or B).
When connecting one CDJ-400
When PC is selected, if you press the EJECT button (EJECT), the assigned DJS player
switches from A to B (or from B to A).
‘3-3 Switching the Player Control’
Warning!
Before Connecting to your
Computer
If you are going to connect and use a CDJ-400
with your computer, install the driver software
for the CDJ-400 onto your computer.
For information on obtaining the driver software
for your CDJ-400 and how to install it, please
refer to CONNECTIONS of the CDJ-400 as well
as the following web page.
http://www.prodjnet.com/support/en/
Warning!
Starting up DJS
First connect your CDJ-400 and power it up, then
start up DJS.
Removing a CDJ-400
Always close DJS before disconnecting your
CDJ-400 or turning it OFF.
Display
USB select button
(SOURCE SELECT)
EJECT
b
u
tt
on
(EJECT)
Rotary knob
(SELECT PUSH)
Warning!
When three or more CDJ-400s are
connected
Even if you connect three or more CDJ-400s,
you will not be able to use the third or additional
CDJ-400s to operate DJS or to output the DJS
audio.
6
DJS Ver. 1.500
2
2-2
CDJ-400 Audio Device Function Settings
Make the setting for where audio will be output on the DJS [DJ Play] screen.
Start up DJS and make the settings on the [Mixer/Sound Card] screen in Preferences.
When Using the DJS Mixer Functions
Set the audio outputs for the DJS master (amp and/or speakers) and the monitor
(headphones).
Configuration when using the DJS Mixer Functions (Example of Connections)’
When Using an External DJ mixer
Specify where to output the audio for the DJS players A and B.
Configuration when using an External DJ mixer (Example of Connections)’
Configuration of Audio Output from a CDJ-400 (connection example)’
1
Open the [Mixer/ Sound Card] settings screen in Preferences.
On the settings menu on the left hand side of Preferences, click [Mixer/ Sound
Card] to open the [Mixer/ Sound Card] settings screen.
2
Click either [Internal Mixer] or [External Mixer] and then click [ASIO].
Internal Mixer:
Select if you are using the DJS mixer functions.
External Mixer:
Select if you are using an external DJ mixer (outputting audio from CDJ-400).
Changing DJS Settings
Make changes to the various DJS settings on the
different types of Preferences settings screens.
After clicking [File] on the DJS menu, click
[Preferences].
Selecting ASIO or DirectX
When using a CDJ-400, we recommend that you
select [ASIO]. Before you connect your CDJ-400
to your computer, be sure to install the driver
software for the CDJ-400. If you are using an
audio device that is not [ASIO] compliant, please
select [DirectX].
CDJ-400 Driver Software
For information on obtaining the driver software
and how to install it, please refer to
CONNECTIONS of the CDJ-400 as well as the
following Web page:
http://www.prodjnet.com/support/en/
DJS Ver. 1.500
7
2
3
Select the output terminal of the CDJ-400 as a sound card.
Sound card 1 (SC1):
After clicking the check box for [Sound Card 1 (SC1)] ON, click to select the audio
output terminal (device/channel name) from the list of sound cards.
Sound card 2 (SC2):
After clicking the check box for [Sound Card 2 (SC2)] ON, click to select the audio
output terminal (device/channel name) from the list of sound cards.
CDJ-400 Audio Output Terminal (Device/Channel Name)
If one CDJ-400 is connected:
“PIONEER CDJ-400 ASIO” is displayed in the list of sound cards.
If two CDJ-400s are connected:
Both “PIONEER CDJ-400 ASIO: CDJ-400 1” and “PIONEER CDJ-400 ASIO: CDJ-
400 2” are displayed in the list of sound cards. “CDJ-400 1” or “CDJ-400 2” is
displayed in the CDJ-400 display corresponding to its respective channel, so select
the CDJ-400 that is positioned on the left for player A and the CDJ-400 positioned
on the right for player B.
Selecting a Sound Card:
You can select audio devices other than the CDJ-400 as the sound card. When
one is selected, the DJS audio is output from the selected audio device and audio
is not output from the CDJ-400 Audio output connectors.
4
Click [OK].
Click [OK]. The [Mixer/Sound Card] setting screen will close.
Selecting a Sound Card
Sound cards and/or audio units other than the
CDJ-400 may be selected from the sound cards
that are displayed in the list.
When one is selected, the DJS audio is output
from the selected sound card or audio unit and
audio is not output from the CDJ-400 audio output
terminal.
Configuration when using the DJS Mixer
Functions (Example of Connections)’
Configuration when using an External DJ
mixer (Example of Connections)’
Adding Audio Devices
If your computer only has one audio output
system, please add another audio device, such as a
sound card or an audio unit.
For information on connecting your computer
with audio devices as well as on driver
installation, please refer to the Operating
Instructions of each audio device.
Adjusting the Delay Time
If you are using more than one sound card and/or
audio unit and there are differences in their
responsiveness, you can match them up by setting
a delay time (adding a delay time) for the audio
output with a fast response time to the audio
output timing of the audio output unit with the
slower response time.
If you are using two CDJ-400s, no adjustments in
the delay time are required. Set the delay time of
sound card 1 (SC1) and sound card 2 (SC2) to 0
msec.
Adjusting the Buffer Size
If the audio gets interrupted during playback,
increase the size of the buffer.
Player L (List Player)
If your computer has three or more audio output
systems, you can output audio for three players,
namely player A, player B and a list player.
8
DJS Ver. 1.500
3
Chapter 3
Using your CDJ-400 to Control DJS
When you connect your CDJ-400 to your computer, you can control DJS from the
CDJ-400.
By controlling DJS from your CDJ-400, you can manipulate it with the feel of using a
DJ player for operations that to date you have done with your computer’s mouse and
keyboard
Of course all the basic functions, such as play, cue, scratch, tempo control and so on
can make song selections from the DJS music list using controls like the Rotary dial.
3-1
Operating a Player with DJS
You can use the CDJ-400 to operate either player A or player B on the [CJ Play] screen.
1
Select PC with your CDJ-400’s USB select button (SOURCE
SELECT).
If you have set the DJS audio output to your CDJ-400, the DJS audio will be output
from your CDJ-400’s audio output terminal.
‘2-2 CDJ-400 Audio Device Function Settings’
2
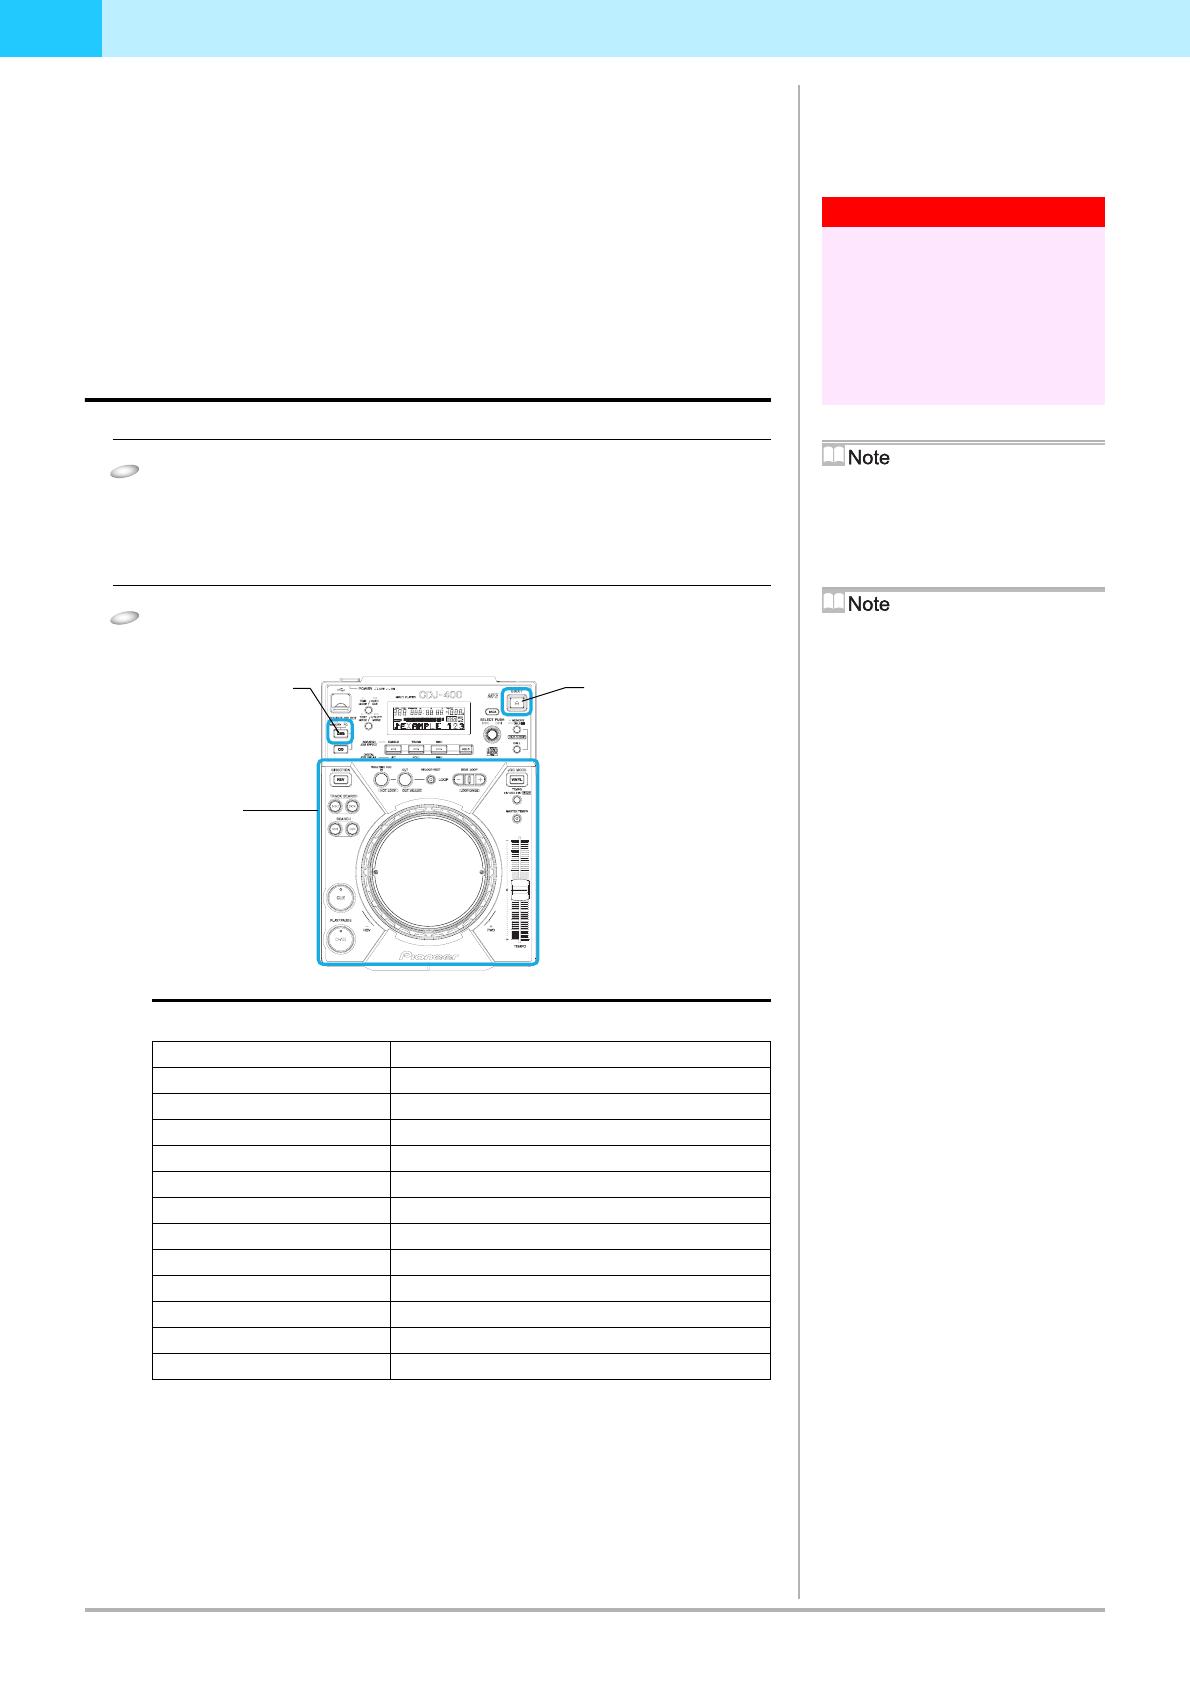
Operate the CDJ-400 Player.
When you operate the various buttons on your CDJ-400, such as the jog dial or the
tempo adjustment knob, it operates the player in the [DJ Play] screen.
Functions that are Linked with the [DJ Play] Screen (Player Functions)
For information on how the different button functions work, please refer to PANEL
FACILITIES in the CDJ-400 Operating Instructions.
Warning!
Before Connecting to your
Computer
If you are going to connect and use a CDJ-400
with your computer, install the driver software
for the CDJ-400 onto your computer.
For information on obtaining the driver software
for your CDJ-400 and how to install it, please
refer to CONNECTIONS of the CDJ-400 as well
as the following web page.
http://www.prodjnet.com/support/en/
USB Select Button
(SOURCE SELECT)
Each time you press the USB select button, the
indicator switches between MEMORY and PC.
EJECT Button (EJECT)
When one CDJ-400 is connected, you can switch
DJS operations from player A to player B (or
from player B to player A).
‘3-3 Switching the Player Control’
Spin (when in VINYL mode)
If you spin the jog dial of your CDJ-400 very
quickly, even after you let go of it, it will continue
playing at the speed and in the direction that the
jog dial is rotating until it stops.
You cannot do this Spin play with the mouse.
Simultaneous Operations
You can do the following operations at the same
time from a CDJ-400 player.
If you rotate the jog dial while holding down
SEARCH, it accelerates the search play speed.
While playing a cue point sample, if you hold
down the CUE button, you can operate the jog
dial.
While playing a cue point sample, if you hold
down the CUE button and the press the PLAY
button, even if you let go of the CUE button, it
keeps on playing without returning to the CUE
point.
While playing a cue point sample, if you hold
down the CUE button and press the Loop In
Button (Real Time Cue), the playback point is
recorded as the CUE point. When you release
the CUE button, it returns to the CUE point.
When you are in the VINYL mode, if you hold
down the jog dial and press the CUE button, the
playback point is recorded as the CUE point.
When you release the jog dial, it returns to the
CUE point.
When you are in the VINYL mode, if you hold
down the jog dial and press the Loop In (Real
Time Cue) button, the playback point is
recorded as the CUE point. Even when you
release the jog dial, it continues playing without
returning to the CUE point.
Unlinked Player Functions
The following CDJ-400 buttons do not link up
with the [DJ Play] screen. (No Function in DJS)
Beat Loop / Loop Divide Buttons (BEAT
LOOP)
Reverse Button (DIRECTION)
CDJ-400 Operation Control Control Linked on the [DJ Play] Screen
PLAY/PAUSE PLAY/PAUSE button
CUE CUE button
SEARCH SEARCH buttons
TRACK SEARCH TRACK SEARCH buttons
IN / REAL TIME CUE IN/REALTIME CUE/HOT LOOP button
OUT OUT/OUT ADJUST button
RELOOP/EXIT RELOOP/EXIT button
JOG MODE JOG MODE VINYL button (VINYL mode / CDJ mode)
TEMPO ±6/±10/±16/WIDE
TEMPO control range button
MASTER TEMPO MASTER TEMPO button
TEMPO TEMPO control slider
JOG (-REV/+FWD) Jog dial
Player
USB select button
(SOURCE SELECT)
EJECT button
(EJECT)
DJS Ver. 1.500
9
3
3-2
Selecting Songs
You can use the CDJ-400 to operate Tracklists or Playlists on the [DJ Play] screen.
1
Select PC with your CDJ-400’s USB select button (SOURCE
SELECT).
If you have set the DJS audio output to your CDJ-400, the DJS audio will be
output from your CDJ-400’s audio output terminal.
‘2-2 CDJ-400 Audio Device Function Settings’
2
Operate the track list or play list.
You can use the controls of your CDJ-400, like the Rotary dial, Folder BACK
button, and the HOLD button to work with the track list or play list that is
displayed in the [DJ Play] screen.
Aligning the selected line with the song you want to play
3-3
Switching the Player Control
When one CDJ-400 is connected, if you press the EJECT button (EJECT) while PC is selected,
the assigned DJS player switches from A to B (or from B to A). However, where the DJS
audio is output does not switch automatically switch from A to B (or from B to A), so when
you are outputting the DJS audio from the audio output terminal of the CDJ-400, be sure to
switch where the DJS audio is output, using the [Mixer/Sound Card] screen in Preferences, as
necessary.
‘2-2 CDJ-400 Audio Device Function Settings’
When two CDJ-400s are connected
The assigned DJS player doesn’t switch even if the EJECT button (EJECT) is pressed.
Close DJS and turn off your CDJ-400, and then select a player control and where the
audio is output by following ‘Chapter 2 Precautions when Starting Up’.
USB Select Button
(SOURCE SELECT)
Each time you press the USB select button, the
indicator switches between MEMORY and PC.
Track Lists and Play Lists
The format of music lists can be switched on the
[Play Style] settings screen in DJS Preferences.
On the settings menu on the left hand side of
Preferences, click [Play Style] to open the [Mixer/
Sound Card] settings screen.
Vertical Scrolling
If you move the selected line to the top (or the
bottom), the list will scroll vertically and display
the selected line.
Selecting artists or albums
If you put the selected line on [Artist/Album] in
the category column and then push the Rotary
dial, a list of artists or albums is displayed.
If you put the selected line on an artist or an
album and then press the Rotary dial, a list of
songs is displayed.
TEXT MODE Button (TEXT MODE)
Switches the text that is shown on the CDJ-400’s
Display.
Title, Album, Artist
TIME MODE/AUTO CUE button (TIME
MODE / AUTOCUE)
Switches the time display.
Elapsed Time (TIME) / Time Remaining
(REMAIN)
If you press and hold it, it toggles the autocue
function ON and OFF.
The Auto Cue Function
When a song is loaded, this function automatically
sets a cue to the point immediately before the
audio starts to play.
When using a play list
When the format of the music list is in Play List,
the selected song is loaded and goes into standby
mode.
Warning!
When three or more CDJ-400s are
connected
Even if you connect three or more CDJ-400s,
you will not be able to use the third or additional
CDJ-400s to operate DJS or to output the DJS
audio.
CDJ-400 Operation Control Functions that are Linked with the [DJ Play] screen
Rotary dial (Rotate) Rotate it clockwise and the selected line moves
downwards.
Rotate it counterclockwise and the selected line moves
upwards.
Rotary dial (Push) If the selected line is on a song, then the selected song is
loaded to player A (or player B) and played.
If the selected line is on a category, such as a genre,
artist, album, etc., then the line moves to the next list
down and the list of songs in the selected category is
displayed.
Folder BACK button (Push) The line moves to the next list up. (Genre, artist, album,
etc.)
HOLD button (Push) If a list is closed, it opens the list.
Folder BACK button
(BACK)
Rotary knob
(SELECT PUSH)
HOLD button
(HOLD)
10
DJS Ver. 1.500
4
Chapter 4 Using the Support Site
Before contacting us about how to use DJS or with technical questions, please check the User’s Manual recorded on the DJS
CD-ROM as well as the FAQ on the DJS support site.
To connect to the DJS support site, click [File] on the DJS menu and then click [Internet].
When using the DJS support site, it is necessary to enter the login name and password you specified when you registered as a DJS user.
When using the DJS support site, please have the following details at hand when you contact us: customers name, product name,
installation key, model and specs of the computer (CPU, amount of memory, peripheral devices connected, etc.), version of the operating
system and a detailed description of the problem you are experiencing.
We are only able to provide support for DJS users who have completed user registration. Please take care of the login name and password
you specified during user registration in the same way as the installation key and registration ID so you do not forget them.
* For information about installation of DJS or how to complete user registration, please refer to the Users Manual that is recorded on
the DJS CD-ROM.
If you experience difficulties in installing the software or completing user registration, please refer to our home page on the internet.
Information on Installation and User Registration
http://www.prodjnet.com/djs/support
* If you have questions about your computer, peripheral devices or technical questions, such as about combinations with products
other than those we support, please check with the manufacturer of the device or contact the sales outlet.
There are DJS version updates scheduled in order to improve the performance and add functionality. By completing the user registration,
you not only gain access to our support site, but it also allows you to download the updater program. By all means update your version of
DJS with this updater program so you can always have the latest version to use.
1 / 1

Pioneer CDJ-400 User manual

Category
CD players
Type
User manual
This manual is also suitable for

Ask a question and I''ll find the answer in the document

Finding information in a document is now easier with AI

Ask the document