Lexmark C 750 User manual

Category
Print & Scan
Type
User manual
www.lexmark.com
Laser Printers
April 2004
Card Stock & Label Guide
2
Edition: April 2004
The following paragraph does not apply to any country where such provisions are inconsistent with local law: LEXMARK
INTERNATIONAL, INC. PROVIDES THIS PUBLICATION “AS IS” WITHOUT WARRANTY OF ANY KIND, EITHER EXPRESS OR
IMPLIED, INCLUDING, BUT NOT LIMITED TO, THE IMPLIED WARRANTIES OF MERCHANTABILITY OR FITNESS FOR A
PARTICULAR PURPOSE. Some states do not allow disclaimer of express or implied warranties in certain transactions, therefore, this
statement may not apply to you.
This publication could include technical inaccuracies or typographical errors. Changes are periodically made to the information herein;
these changes will be incorporated in later editions. Improvements or changes in the products or the programs described may be made
at any time.
References in this publication to products, programs, or services do not imply that the manufacturer intends to make these available in all
countries in which it operates. Any reference to a product, program, or service is not intended to state or imply that only that product,
program, or service may be used. Any functionally equivalent product, program, or service that does not infringe any existing intellectual
property right may be used instead. Evaluation and verification of operation in conjunction with other products, programs, or services,
except those expressly designated by the manufacturer, are the user’s responsibility.
Lexmark and Lexmark with diamond design, MarkVision, Optra, and Prebate are trademarks of Lexmark International, Inc., registered in
the United States and/or other countries. Diamond Fine and WinWriter are trademarks of Lexmark International, Inc.
Other trademarks are the property of their respective owners.
© 1997, 2004 Lexmark International, Inc.
All rights reserved.
UNITED STATES GOVERNMENT RIGHTS
This software and any accompanying documentation provided under this agreement are commercial computer software and
documentation developed exclusively at private expense.
Contents
3
Contents
Overview.......................................................................................... 5
General Information........................................................................ 6
The Industry .................................................................................................. 6
Print Volumes ................................................................................................ 6
Print Material Testing ..................................................................................... 7
Card Stock..................................................................................... 11
Weight.......................................................................................................... 11
Grain Orientation.......................................................................................... 12
Coatings....................................................................................................... 13
Offset Powders............................................................................................. 14
Labels............................................................................................. 15
Label Characteristics.................................................................................... 15
Printing on Labels......................................................................................... 16
Duplexing Paper Labels............................................................................... 16
Label Components....................................................................................... 18
Label Design Guidelines .............................................................................. 20
Printer Specifications................................................................... 27
Lexmark X215.............................................................................................. 27
Lexmark X422.............................................................................................. 30
Lexmark C510.............................................................................................. 33
Lexmark C720.............................................................................................. 35
Lexmark C750.............................................................................................. 37
Lexmark C752.............................................................................................. 42
Lexmark C910.............................................................................................. 47
Contents
4
Lexmark C912.............................................................................................. 49
Lexmark E220.............................................................................................. 51
Lexmark E320, E322.................................................................................... 53
Lexmark E321, E323.................................................................................... 55
Lexmark T420 .............................................................................................. 57
Lexmark T520, T522.................................................................................... 60
Lexmark T620, T622.................................................................................... 66
Lexmark T630, T632, T634.......................................................................... 72
Lexmark W812............................................................................................. 79
Lexmark W820............................................................................................. 80
Optra C......................................................................................................... 82
Optra C710................................................................................................... 82
Optra Color 1200.......................................................................................... 84
Optra E310, E312......................................................................................... 85
Optra E, Ep................................................................................................... 86
Optra Es Special Media Printer.................................................................... 87
Optra K 1220................................................................................................ 91
Optra M410, M412 ....................................................................................... 92
Optra N......................................................................................................... 95
Optra plus, 4039, 4029, 4019, WinWriter 600 Printers................................. 96
Optra S....................................................................................................... 101
Optra SC 1275 ........................................................................................... 107
Optra T....................................................................................................... 108
Optra W810................................................................................................ 114
Glossary....................................................................................... 116
Index............................................................................................. 120
Overview
5
Overview
Lexmark has had many years of experience in successful card stock and label design, testing, and
cross education programs with print material vendors and converters.
This document provides guidelines to help you select appropriate print materials for the following
Lexmark laser printers: all Optra models, the 4039 12C, the 4039 10 plus, all 4029 models, all
4019 models, WinWriter 600 (4035 5W), and the Lexmark C510, C720, C750, C752, C910,
C912, E220, E320, E321, E322, E323, T420, T520, T522, T620, T622, T630, T632, T634, W812,
W820, X215, and X422. The information supplied here supersedes other information relating to card
stock and labels included with your printer. Refer to other printer documentation for detailed
information about the paper, envelopes, and transparencies suitable for your printer.
In addition to printer-specific media recommendations, this document also explains design factors
you should consider when purchasing all types of print materials. The glossary on page 116 defines
many industry terms. If you have specific stock or design questions, talk with your print materials
supplier.
Refer to your printer documentation for general printing information and terms. Refer to the printer
registration card, to information on the printer CD or visit our Lexmark Web site at
www.lexmark.com/publications for technical assistance contact numbers.
Always test print materials thoroughly before buying large quantities. Doing so will help you avoid
unexpected problems when you begin regular printing.
General Information
6
General Information
The Industry
The paper and label industry includes several different types of businesses: manufacturers,
converters, and distributors.
Manufacturers produce the base stock. If the base is for labels, manufacturers may ship it on large
rolls or in a cut-sheet form.
Converters take the base stock and convert it into cut-sheet products. Converters may work from
rolls with or without the adhesive applied, or they may take a base stock and convert it to meet their
customers specifications.
The conversion process includes, but is not limited to, cutting the stock to size, perforating the stock,
die-cutting, and applying inks and topcoats. Converters work with their customers to convert the
base material into a cut-sheet product designed for use in laser printers.
Distributors generally are the direct link to the customer.
Distributors may work with different converters, and converters may work with different
manufacturers, as their needs and prices change. Most businesses follow accepted industry
conventions, but specifications, standards, formulations, and processes may vary with time or with
different companies.
Note: Labels or papers that performed satisfactorily in the past may suddenly create
printing problems because of a change in material or process.
Some large businesses perform all three functions, from manufacturing to distribution. These
companies may offer greater expertise and product consistency than companies that concentrate on
one facet of the process.
Print Volumes
Printing numerous sheets of card stock or labels in a short period of time can create printing
problems. Exclusive printing of labels, for example, may result in more frequent service calls. Proper
printer maintenance helps alleviate these problems. (Look under Maintenance Procedures in the
index for specific information about maintaining your printer.)
Print Material Testing
7
Print Material Testing
Choosing print materials can seem complex. Unfortunately, it is not possible to write a simple
cookbook explaining how to select print materials, because there are too many variables you need
to address for each specific application.
Be aware that critical factors at the vendorsuch as the physical characteristics of the base stock
and the manufacturing processesmay change over time.
Print materials can significantly affect printer reliability and downtime. Using materials from
converters or vendors who are unfamiliar with laser printing may result in unsatisfactory print quality
or other printing problems.
Note: Once you have a successful design, test the print material before placing a large
order to avoid costly mistakes.
Your print materials supplier should be able to help develop your application, or solve a problem you
have with an existing application. In addition, Lexmark has worked with several suppliers and has
Business Partners in this field. Refer to the printer registration card, to information on the printer CD
or visit our Web site at www.lexmark.com\publications for technical assistance contact numbers.
Design Factors
Print materials all have measurable characteristics that you need to consider when selecting or
designing forms for your particular application.
Basis Weight
Not all basis weights are related to the same standard sheet size: for example, 70 lb material can be
lighter than 40 lb material if it is based on larger base size paper (see the Card Stock Weights
Comparison Guide on page 12). You may want to refer to the metric measurement of grams per
square meter (g/m
2
) for a more consistent way to compare weights.
Your printer can accept a wide range of stock weights, but materials either too light or too heavy can
cause printing problems. Heavy and/or thicker materials may not heat quickly enough in the fuser,
resulting in poor print quality. They may also feed less reliably or skew due to their weight or rigidity.
Conversely, lighter materials can wrinkle and jam in the printer due to low beam strength (stiffness).
Depending on the orientation of the stock as it feeds through the printer, you may need to request
that heavier materials be cut grain short or grain long to provide flexibility in paper path turns. See the
specifications for each printer for more precise recommendations.
Dimensions
All printers have print material dimension limitations. Refer to the printer documentation shipped with
your printer for details. You can sometimes redesign forms to overcome these limitations. For
example, if you use forms that are shorter than the minimum length supported by your printer, you
may be able to link two forms together when printing multiple forms. An optional Universally
Print Material Testing
8
Adjustable Tray designed for the Optra S, Optra T, and Lexmark T printer families prints on a range of
paper sizes including A6 and 3-inch by 5-inch index cards, 3-inch by 7-inch punch cards and 4-inch
by 6-inch post cards.
Environment
Lexmark printers meet or exceed all industry emission regulations and standards. Continuous
printing on some papers or other media may create fumes that are not a problem with occasional
printing. Make sure your printer is located in a well ventilated area.
Temperature and humidity can have a major impact on printing. Even small changes (such as from
day to night) can greatly affect feed reliability if the print material is just within the range of
acceptability.
We recommend that you condition stock while it is still in the original wrapper. To condition stock,
store it in the same environment as the printer for 24 to 48 hours before printing to let the stock
stabilize at the new conditions. You may need to extend this time several days if the storage or
transportation environment is very different from the printer environment. Thick stock may also
require a longer conditioning period because of the mass of the material.
If you remove the wrapper from the stock before youre ready to load it in the printer, the stock may
develop uneven moisture content that can cause curl. Prior to loading your stock, we recommend
that curl not exceed 3 mm (0.125 in.). Lighter materials, such as paper labels and some integrated
forms, are more likely to have printing problems if curl is present.
Most label manufacturers recommend printing in a temperature range of 18 to 24°C (65 to 75°F) with
relative humidity of 40 to 60%. Lexmark printers are designed to operate in a temperature range of
15.5 to 32°C (60 to 90°F) with relative humidity of 8 to 80%. Printing in an environment outside these
recommendations may cause jams, feeding problems, reduced print quality, and predispensing
(peeling) labels.
Inks (Preprinted Stock)
Preprinted stock introduces semi-liquid and volatile components to the high temperatures and
pressure used in the laser printing process. Preprinted inks and colorations must withstand a fuser
temperature up to 225°C (437°F) and pressure up to 25 psi without contaminating the printer or
creating hazardous fumes.
Thermography inks are not recommended. Thermography inks have a waxy feel and the printed
image appears raised above the surface of the print material. These inks can melt and damage the
fuser assembly.
Preprinted inks must also be abrasion resistant to reduce ink dust and ink contamination in the
printer. If you are printing over a preprinted area, the ink must be receptive to toner to ensure
adequate fusing.
All preprinted inks must be thoroughly dry before using printed materials. However, we do not
recommend using offset powders or other foreign materials to speed drying. Check with your
converter, or the manufacturer or vendor of the ink you plan to use, to determine if the ink is
compatible with laser printers that heat the ink to 225°C (437°F).
Print Material Testing
9
Perforations and Die-Cuts
If your form has perforations, the perforation line should stop 1.6 mm (0.06 in.) from each edge of the
form to avoid separating the form in the printer path, resulting in a jam. The location of the perforation
affects initial pick strength. Perforations closer to the edge may increase the number of jams. For
pressure sensitive materials such as labels, minimize the number of perforations that go through the
backing material, or liner, since these can also affect the strength of the form.
Perforations should be ironed so the print material lies flat, reducing nesting of forms. Edges should
be smooth and clean with no roll-over. Laser-perfs (also known as micro-perfs or data-perfs) provide
greater stability and are preferred. These smaller perforations do not normally nest or create
excessive paper dust and debris. Make sure paper chaff and dust created during the conversion
process are removed before packaging.
If perforations tent, or crease at the perforation line, the perfs may break, causing a paper jam.
Tenting may increase skew, cause double sheet feeding, or smear the toner on the print material
before fusing, resulting in poor print quality. To reduce tenting, use micro-perfs. If the print material is
lightly snapped as it moves through the printer, the perforations should hold without breaking.
Die-cutting is used to create shapes in a label or a card stock design. When designing labels, round
all corners to prevent delamination of the labels, and avoid cuts through the liner (anvil cuts). Back
splits and pop-out windows are also not recommended.
If perforations or die-cuts are part of the design of the print material, ties are recommended. These
small uncut areas (approximately 1.6 mm or 0.06 in.) help stabilize the form and prevent tearing at
perforations and die-cuts during printing.
For areas with die-cuts or perforations that create a small end product, or where die-cuts or
perforations intersect, ties on the corners of the design provide added stability. Ties may be located
anywhere along perforations or die-cuts. For pressure sensitive products, ties help prevent the labels
from peeling off the liner while in the printer. Ties cannot, however, be used to compensate for
inadequate release strength of the adhesive in label designs.
Note: For specific perforation and die-cut guidelines for your printer, see the appropriate
topic under Printer Specifications on page 27.
Debossing and Embossing
Avoid debossing and embossing materials. Embossing leads to nesting and double sheet feeds, and
the fusing process significantly reduces the height of the raised image. Printing too close to
embossments results in poor print quality and poor fuse grade.
Metallics
We do not recommend using metallics in forms, whether in inks or other materials, due to their
conductivity and their ability to bleed charge. This can interfere with toner transfer and cause poor
print quality.
Print Material Testing
10
Basic Form Design
When designing forms, include a non-print area of 8.38 mm (0.33 in.) at the top and bottom of the
form and 6.35 mm (0.25 in.) on both sides of the form.
In general, portrait orientation is the preferred layout, especially if you are printing bar codes. If your
forms require landscape orientation, be aware that variations in paper path speed may produce
spacing variations when printing bar codes.
Note: We do not warrant uninterrupted or error-free operation of a product. Warranty
service does not include repair of failures caused by:
modification or attachments
accidents or misuse
unsuitable physical or operating environment
maintenance by anyone other than Lexmark or a Lexmark authorized servicer
operation of a product beyond the limit of its duty cycle
failure to have installed a maintenance kit as specified (if applicable)
use of printing media outside of Lexmark specifications
use of other than Lexmark supplies (such as toner cartridges, inkjet
cartridges, and ribbons)
use of other than Lexmark product or component
Card Stock
11
Card Stock
Card stock is a rigid, stiff material that can have a wide variety of constructions. Orientation of paper
fibers (grain direction), moisture content, thickness, texture, and other properties can significantly
impact printing, as can preprinting, perforation, creasing, and other features common to forms. For
example, preprinting introduces semi-liquid, volatile components that must withstand the high
temperatures used in laser printing. Perforation and creasing may cause nesting, or interlocking,
which can cause paper jams and double sheet feeds.
The following sections describe some of the basic characteristics of card stock. In general, we
recommend a single-ply construction of 100% chemically pulped wood with a vellum finish. Before
purchasing large quantities of card stock, make sure you test samples of the print material in your
printer.
Weight
The weight of card stock plays a significant role in the print quality and feed reliability of the stock.
Confusion often arises when specifying the basis weight of a stock. The basis weight, measured in
pounds (for example, 60 lb Cover stock), is determined by a specified number of sheets for a
particular sheet size. Since the sheet size varies from one type of card stock to another, the basis
weights are not always easily comparable. For example, a 100 lb Tag stock may at first glance
appear to be heavier than a 65 lb Cover stock, when in fact the Cover stock is heavier. The area of
the Cover stock is smaller, thus making the weight per sheet higher.
It may be much easier to compare metric weights for card stock (g/m
2
). If you look at the metric
weights of the two stocks in the previous example, it is immediately evident that the 65 lb Cover
(176 g/m
2
) is heavier than the 100 lb Tag (163 g/m
2
).
Grain Orientation
12
Use the following table to compare the weights of various types of card stock.
Depending on the printer, material thicker than 0.30 mm (0.012 in.) may present feed reliability
problems, and material thicker than 0.17 mm (0.007 in.) may reduce print quality. Contact your
supplier to determine the weight of any card stock you currently use.
See the individual printer specifications in this document for more information about the card stock
weights your printer supports.
Grain Orientation
Grain refers to the alignment of the paper fibers in a sheet of paper. Grain is either grain short,
running the width of the paper, or grain long, running the length of the paper.
The orientation of the grain contributes to the rigidity of card stock and affects feed reliability. The
recommended grain orientation depends on the weight of the stock and whether the printer feeds the
stock short-edge first or long-edge first. For lighter card stocks, grain long is recommended to reduce
potential curl problems. Curl may decrease the ability of the form to move reliably through the printer.
Card Stock Weights Comparison Guide
Metric
Equivalent
(g/m
2
)
Basis Weight (lbs/ream)
Bond
431.8 x
558.8 mm
(17 x 22 in.)
Offset
635 x
965.2 mm
(25 x 38 in.)
Cover
508 x
660.4 mm
(20 x 26 in.)
Printing
Bristol
571.5 x
889 mm
(22.5 x 35 in.)
Index
Bristol
647.7 x
774.7 mm
(25.5 x 30.5 in.)
Tag
609.6 x
914.4 mm
(24 x 36 in.)
75 20 50 —— 50
90 24 60 ——
105 28 70 ——
108 29 40 ——
118 31 80 ——
120 32 —— 67 74
131 35 90 ——
135 36 50 ——
148 39 100 ——
163 43 60 90 100
176 47 120 65 ——
199 53 —— 110 110
203 54 —— 125
Card stocks weights may vary ± 5%.
Coatings
13
Most printers feed paper short-edge first. If your printer supports larger paper sizes, such as 11x17
in. or A3 mm, it may feed some paper sizes long-edge first. Refer to your printer documentation for
more information.
For materials fed short edge first:
For materials fed long edge first:
See the individual printer specifications in this document for more information about the
recommended grain direction for card stock you use with your printer.
Coatings
Surface texture and coatings on card stock significantly affect toner adhesion (fuse grade), print
quality, and feed reliability. We recommend a vellum finish for the best printing performance. We do
not recommend glossy coatings and slick surfaces or surfaces that mimic laid finishes. Paper
smoothness also affects print quality. If the paper is too rough, the toner does not fuse to the paper
properly; if the paper is too smooth, it can affect feed reliability. We recommend smoothness to be
GRAIN SHORT IS RECOMMENDED FOR STOCK
HEAVIER THAN
135 g/m
2
GRAIN LONG IS RECOMMENDED FOR STOCK
LIGHTER THAN 135 g/m
2
GRAIN LONG IS RECOMMENDED FOR STOCK
HEAVIER THAN
135 g/m
2
GRAIN SHORT IS RECOMMENDED FOR STOCK
LIGHTER THAN
135 g/m
2
Grain
Direction
Feed
Direction
Grain
Direction
Feed
Direction
Feed
Direction
Grain
Direction
Grain
Direction
Feed
Direction
Offset Powders
14
between 100 and 400 Sheffield points (150 to 250 is optimal). Using media higher than 300 Sheffield
could result in printing degradation.
Offset Powders
We do not recommend using offset powders or other foreign materials to speed drying. Offset
powders are used by print shops to prevent printed pages from sticking together. Powder is usually
sprayed on the printed page right before it reaches the stacker on the offset printing press. This
powder provides an intermediate layer between two sheets of paper, preventing ink transferring from
one sheet to another.
Labels
15
Labels
Labels (also called pressure sensitive materials) are multi-ply materials consisting of a sandwich of
various combinations of face sheets (printable stock), adhesives, and removable protective backings
(liners). The multiple layers can result in thick, difficult-to-handle materials.
Labels are among the most difficult print materials for any printer to reliably feed and print. The heat,
pressure, and paper paths required by laser printers create a particularly difficult environment for
printing labels. Temperatures near 225°C (437°F) [temperatures vary between printers; check the
section for your specific printer] and pressures to 25 psi can be necessary for the fusing process.
Heavy label stock can absorb heat, which in turn affects toner adhesion and print quality and causes
problems such as delamination.
Note: To prevent labels peeling off or delaminating, make sure the release strength of the
labels you use is sufficient to withstand the temperature and pressure extremes
generated during printing.
Label Characteristics
The materials used to construct labels have a wide range of properties that can affect printing. In
addition to volatile components in adhesive, volatiles are also in some label materials. We
recommend that volatile emissions from the label, up to 160°C (320°F), should be a minimal amount.
These low boiling point volatiles can produce emissions when they are heated in the fuser and they
can potentially produce vapors which can cause damage to the printer. Preprinted inks can also
cause printer contamination, and may be present on one or both sides of the label sheet.
Observing recommended label design guidelines can minimize contamination as well as prevent
other critical problems, such as labels peeling off and causing jams in the printer, or the label or
adhesive melting if the sheet stops in the fuser during a paper jam.
Review label designs with a converter or vendor who is knowledgeable about labels and laser printer
characteristics to ensure you use labels suitable for your application.
Note: Before purchasing large quantities of labels, make sure you extensively test the
labels with your printer.
Printing on Labels
16
Printing on Labels
Use full label sheets only. Partial sheets (with areas exposed by missing labels) can cause labels to
peel off during printing, resulting in a paper jam. Partial sheets can also contaminate your printer and
cartridge with adhesive and can void the printer and cartridge service warranties.
Do not feed labels through the printer more than once. Doing so may result in adhesive
contamination to the cartridge and other components.
Depending on your printer model and the number of labels you print, printing labels may require
special printer maintenance. (Look under printer maintenance in the index of your Users Guide or
publications CD for specific information about maintaining your printer.)
If you print large quantities of labels or other glossy print media on a Lexmark C750 or C752, replace
the fuser housing with a web oiler field upgrade kit (P/N 12G6307 for a 115 V printer, P/N 12G6308
for a 220 V printer).
Duplexing Paper Labels
Due to the special construction of labels, they are not typically duplexed. However, if certain design,
construction, and usage guidelines are followed, you can print on both sides of the label sheet
successfully.
When developing a paper label for duplexing, the converter should ensure that the label design
protects against contamination or buildup. Contamination adversely affects paper feeding and
causes paper jams in the printer.
We recommend labels used for duplexing have a non-adhesive border around the label area. In
addition, make sure the release strength is sufficient to withstand temperatures of 225°C (437°F) and
pressures to 25 psi. This is particularly important with a duplex application since the label is
subjected to these extremes twice. Use label ties whenever possible. These small uncut areas
(approximately 1.6 mm or 0.06 in.) help stabilize the label sheet and prevent tearing at perforations
and die-cuts during printing. In addition, using ties helps prevent the labels from predispensing in the
printer.
The slits and cuts in the labels expose the adhesives to the printer. For best results when duplexing
labels, position the label sheet so that the slits and cuts are not aligned with the ribs in the duplex or
redrive areas of the printer. (Figure 1 and Figure 2 on page 17 illustrate the rib locations for the
Optra S and the Optra T, respectively.) This eliminates any contact points between the label adhesive
and the printer, thereby preventing any adhesive contamination in the printer.
Other steps to ensure optimal printing include orienting the label in the tray so that the label end is
fed into the printer first, and using long grain paper. Long grain paper tends to feed more reliably than
short grain paper, which tends to curl more easily. As with any industry, product changes and
improvements are constantly being developed. Therefore, if a converter develops a short grain sheet
for use with duplexed labels, test the sheet to make sure it performs satisfactorily. In fact, we
recommend testing any material with your application and printer before purchasing large quantities.
In order to use the duplex label application, you must install a special fuser wiper. The wax wiper that
is used with the S1855, T612, T614, T520, and T522 is P/N 99A1082. The wax wiper that is used
with the T620 and T622 is P/N 18A1467. The wax wiper that is used with the T630, T632 and T634 is
Duplexing Paper Labels
17
P/N 56P2109. This wiper makes it possible to print on both sides of paper labels specifically
designed for duplexing. In addition, you can use this wiper to simplex paper labels and duplex paper
in the same printer. When ordering a new cartridge, be sure to order the cartridge that includes the
correct fuser wiper.
Figure 1. Optra S Rib Locations
(rib width = 2mm)
Figure 2. Optra T and Lexmark T Rib Locations
(rib width = 2mm)
20 mm
21 mm
27 mm
22 mm
15.5 mm
21.5 mm
28 mm
26 mm
17 mm
15 mm
Reference
Plate
16 mm
11 mm
15 mm
13 mm
16 mm
17 mm
26 mm
18 mm
12 mm
20 mm
15 mm
12 mm
4.02 mm
Reference
Plate
Label Components
18
Label Components
Labels are composed of three basic parts: the liner, the adhesive, and the face sheet. Labels may
also have topcoats that affect printing. Choosing appropriate materials for each of these label
components will help ensure reliable printing.
Liners
The liner, also known as the carrier or backing, is the material onto which the label is attached. The
liner carries the label through the printer and directly affects feed reliability. Liner weights and
construction vary based on the printable face stock used. (See Face Sheet (Printable Stock) on
page 20.) Tissue-backed, plain bond, or bond-like, porous, lay-flat liners are preferred. Liners
constructed for use in high speed laser printers (50 or more pages per minute) may not produce
acceptable results.
A liner should bend easily and snap back to its original flat state when released. If the form remains
bent, it may cause paper jams or damage to the edge of the sheet, particularly in earlier printer
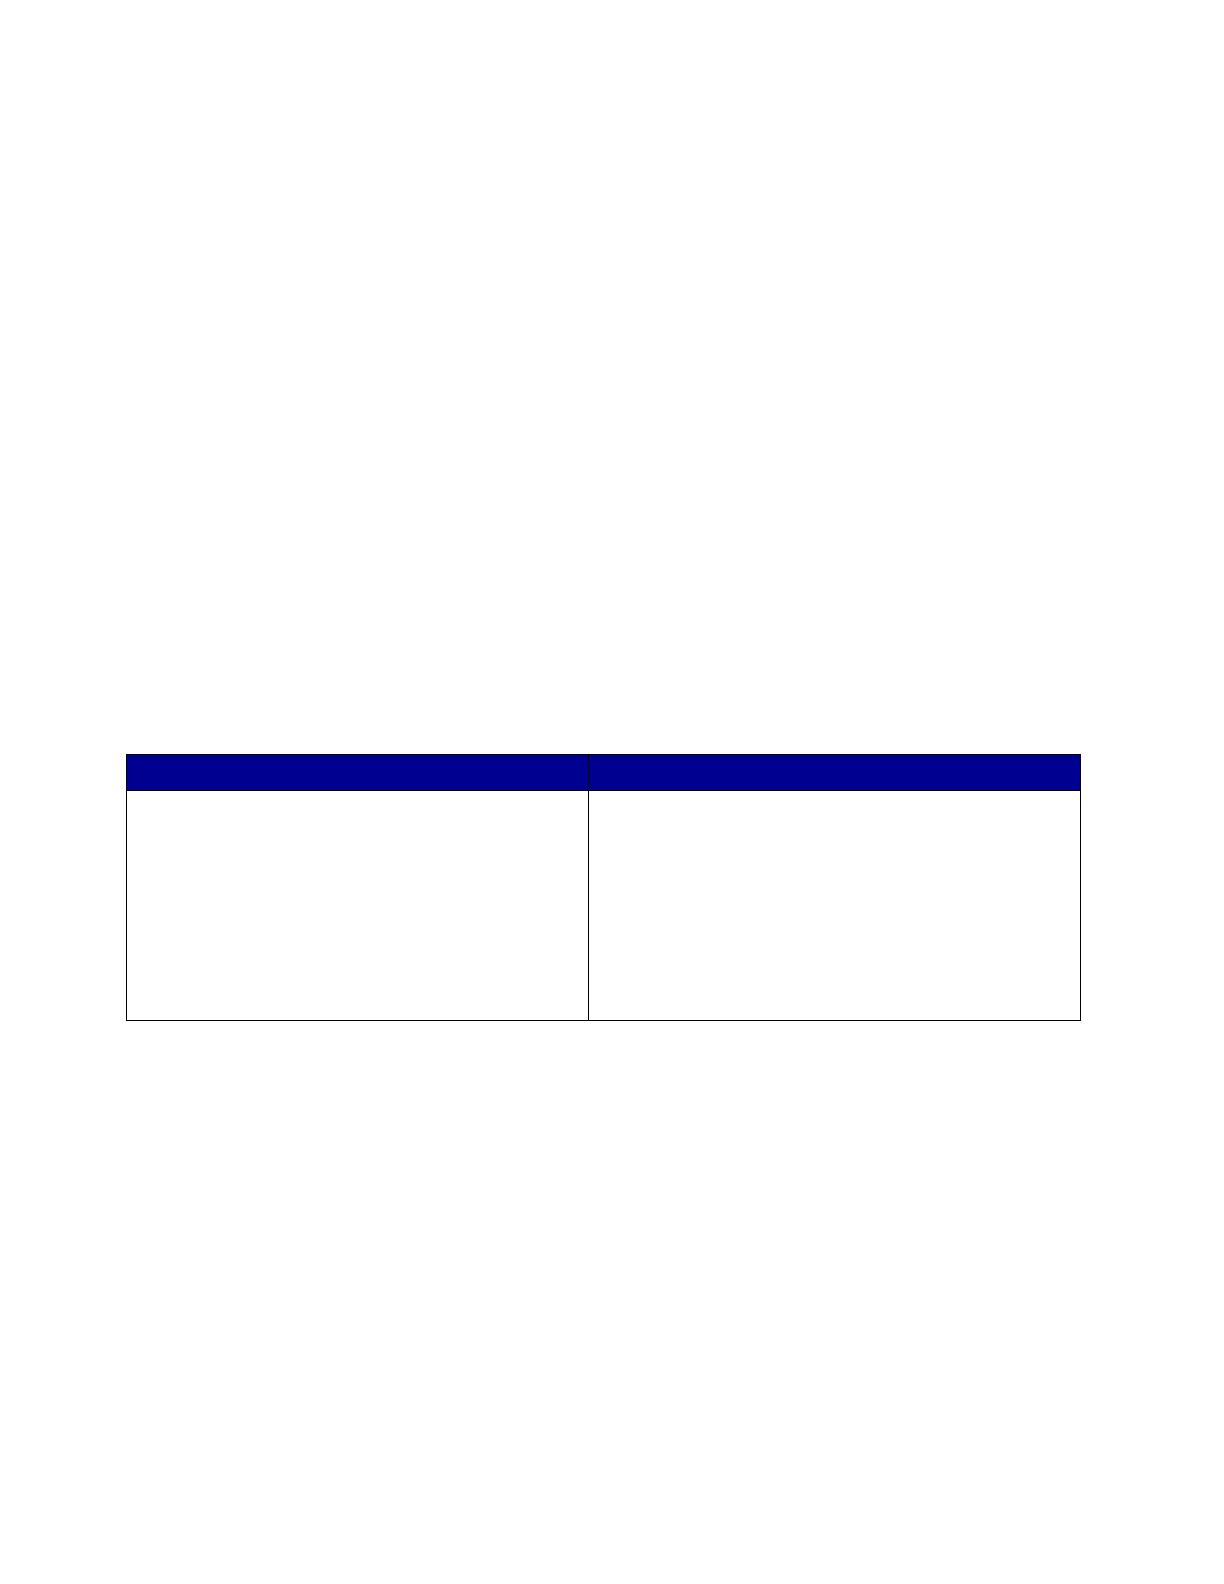
models using a corner buckler rather than an auto compensator to separate the sheets. The following
table shows which printers use a corner buckler and which use an auto compensator.
Note: If your printer is not listed here, contact your Lexmark representative to verify which
method your printer uses to separate sheets of labels.
Some liner materials used in pressure sensitive constructions are called label papers. Label papers
are either M.F. (machine finish) or E.F. (English finish) papers that are calendered, supercalendered,
or coated on one side. Machine finishes have varying degrees of surface smoothness. The
smoothness is determined by the number of times the paper passes through the rollers (wet or dry)
during manufacturing. An English finish is uncoated and low gloss in appearance. Label papers may
also be used as the face sheet for pressure sensitive paper products, such as the materials used in
dual web forms construction.
Supercalendering produces high gloss surfaces that may be slick. Some supercalendered liners are
difficult for printers to pick and feed reliably. We do not recommend using supercalendered liners
designed for high speed laser printers (50 or more pages per minute).
Some pressure sensitive constructions use Kraft liners or bleached Kraft liners. Kraft liners are made
from sulfate pulp and are M.F. or M.G. (machine glazed). Most machine glazed papers have a high
Printers Using a Corner Buckler Printers Using an Auto Compensator
4019, 4029, 4039, 4049,
Lexmark E220, E320, E321, E322, E323, T420,
W820, X422,
Optra 12L, 12R, Lxi, Lx, Rx,
Optra R+, Rt+, Lx+, Lxi+,
Optra C, Optra Color 1200, Optra N,
Optra M410, M412, W810
Lexmark C510, C750, C752, T520, T522, T620,
T622, T630, T632, T634, X215,
Optra S 1250, S 1650, S 2450,
Optra S 1255, S 1625, S 1855, S 2455,
Optra Se 3455,
Optra T610(n), T612(n), T614(n), T616(n)
Label Components
19
gloss appearance. High gloss, glazed surfaces may increase skew and are more difficult for the
printers feed mechanism to handle reliably. Some Kraft liners may produce acceptable results;
however, we strongly recommend extensive testing of pressure sensitive constructions using Kraft
liners.
Tissue-backed or plain bond liners reduce toner contamination inside the printer and improve feed
performance. Slick, non-porous liners are harder to feed and increase toner buildup in the fuser and
on the backup roll. Rough backings, on the other hand, can increase paper path friction, which can
cause skew and paper jams. The face material of the liner needs to have a melt temperature that can
also withstand the fuser temperatures of nearly 225°C (437°F). Since there is a stripped area of a
maximum of 3 mm, this can expose the face material to these temperatures and could cause melting
or contamination in the fuser.
Excessive paper dust or chaff associated with the liner may affect print quality. If a liner material
produces excessive paper dust or chaff during the conversion process, some of this debris may be
packaged with the material and end up in the printer. Liner materials that produce excessive paper
dust or chaff as they feed through the printer may also affect print quality.
Your forms supplier can provide additional information on liners.
Adhesives
There are three basic types of label adhesives: removable, permanent, and semi-permanent (cold
temp). All types, with proper design, can be used with your printer. Acrylic-based adhesives are
generally preferred for cut sheet label printers.
The major adhesive-related printing problem is printer and cartridge contamination. The adhesives
are semi-liquid and may contain volatile components. If the sheet jams in the fuser, the adhesive can
melt, thereby contaminating parts of the printer or releasing fumes. To avoid exposing adhesive to
the paper path guides, drive rollers, charge roller, photoconductor drum, transfer roller, and detack
fingers, use full label sheets.
Zone coating means placing the adhesive only where needed. Paper labels and integrated forms
typically use zone coating. In addition, a non-adhesive border of 1 mm (0.04 in.) around the outside
edge of the label sheet generates good results. Check with your adhesive manufacturer or forms
supplier for more information about designing labels for your printer.
A stripped edge matrix along the outer border of the stock, combined with adhesive that does not
ooze, helps prevent adhesive contamination. This design requires a stiffer backing material to
prevent damage when the sheet is aligned on the reference edge. Generally, vinyl and polyester
labels are well suited for this design. Paper and dual web designs may require testing to determine
which backing produces good results. (See Label Design Guidelines on page 20 for more
information on matrices.)
Make sure the release strength is adequate so labels stay attached to the liner and do not peel off in
the printer. Adhesives must be able to withstand pressures to 25 psi and fuser temperatures of
225°C (437°F) without delaminating, creating hazardous fumes, or oozing around edges of labels,
perforations, or die-cuts. Shear strength should be strong enough to prevent adhesive stringers.
Contact your forms supplier for additional information.
Label Design Guidelines
20
Face Sheet (Printable Stock)
Paper, vinyl, and polyester are the most common materials used for printable stock. Your forms
supplier can provide information on whether the printable stock you want to use can withstand
temperatures of 225°C (437°F) [temperatures vary between printers; check the section for your
specific printer] and pressures to 25 psi. Carefully test the stock to ensure it functions satisfactorily
with your printer.
Topcoats
Topcoats for non-paper labels may be either water based or solvent based. Avoid topcoats containing
chemicals that emit hazardous fumes when heated or exposed to pressure. Topcoats affect the print
quality, feed reliability, and adhesion of toner to the face sheet. Topcoats must be able to withstand
temperatures up to 225°C (437°F) [temperatures vary between printers; check the section for your
specific printer] and pressures up to 25 psi for 100 milliseconds to prevent fuser damage.
Water-based topcoats tend to be more conductive than solvent-based topcoats and are more difficult
to fuse. With some water-based topcoats and heavy liners, the fuse grade may fall below acceptable
levels. Solvent-based topcoats tend to be lower in conductivity than water-based topcoats. With
some solvent-based topcoats, fuse grade is within acceptable levels when heavier liners are used.
Print quality may degrade when using topcoats on labels with heavier liners. Using a lighter liner may
reduce the appearance of splatter. Test forms carefully with your printer to be sure the topcoat used
performs acceptably for your application.
Label Design Guidelines
Labels with a stripped edge matrix have the area around the outer edge of the cut sheet removed.
Labels with a total strip matrix have the unneeded portion of the die-cut stock around the labels
(including a portion between the labels) removed to make it easier to peel the labels from the
backing.
Butt cut labels are cut flush to one another, with no extra area between them. Avoid using butt cut
labels without a stripped edge matrix.
Die-cut labels are cut with a non-print area between each label. For best results, do not print within
2.3 mm (0.090 in.) of the edge of the label, of the perforations, or of the die-cuts of the label.
If you are using a butt cut or die-cut label, make sure adhesive contamination does not occur. Labels
use varying levels and types of adhesive, as well as a variety of liner materials and face stocks.
Adhesive can ooze with all label stocks. Make sure die-cuts are free of adhesive stringers. Zone
coating or pattern adhesive with a 1 mm (0.04 in.) or larger non-adhesive border provides the
greatest protection from adhesive contamination.
  • Page 1 1
  • Page 2 2
  • Page 3 3
  • Page 4 4
  • Page 5 5
  • Page 6 6
  • Page 7 7
  • Page 8 8
  • Page 9 9
  • Page 10 10
  • Page 11 11
  • Page 12 12
  • Page 13 13
  • Page 14 14
  • Page 15 15
  • Page 16 16
  • Page 17 17
  • Page 18 18
  • Page 19 19
  • Page 20 20
  • Page 21 21
  • Page 22 22
  • Page 23 23
  • Page 24 24
  • Page 25 25
  • Page 26 26
  • Page 27 27
  • Page 28 28
  • Page 29 29
  • Page 30 30
  • Page 31 31
  • Page 32 32
  • Page 33 33
  • Page 34 34
  • Page 35 35
  • Page 36 36
  • Page 37 37
  • Page 38 38
  • Page 39 39
  • Page 40 40
  • Page 41 41
  • Page 42 42
  • Page 43 43
  • Page 44 44
  • Page 45 45
  • Page 46 46
  • Page 47 47
  • Page 48 48
  • Page 49 49
  • Page 50 50
  • Page 51 51
  • Page 52 52
  • Page 53 53
  • Page 54 54
  • Page 55 55
  • Page 56 56
  • Page 57 57
  • Page 58 58
  • Page 59 59
  • Page 60 60
  • Page 61 61
  • Page 62 62
  • Page 63 63
  • Page 64 64
  • Page 65 65
  • Page 66 66
  • Page 67 67
  • Page 68 68
  • Page 69 69
  • Page 70 70
  • Page 71 71
  • Page 72 72
  • Page 73 73
  • Page 74 74
  • Page 75 75
  • Page 76 76
  • Page 77 77
  • Page 78 78
  • Page 79 79
  • Page 80 80
  • Page 81 81
  • Page 82 82
  • Page 83 83
  • Page 84 84
  • Page 85 85
  • Page 86 86
  • Page 87 87
  • Page 88 88
  • Page 89 89
  • Page 90 90
  • Page 91 91
  • Page 92 92
  • Page 93 93
  • Page 94 94
  • Page 95 95
  • Page 96 96
  • Page 97 97
  • Page 98 98
  • Page 99 99
  • Page 100 100
  • Page 101 101
  • Page 102 102
  • Page 103 103
  • Page 104 104
  • Page 105 105
  • Page 106 106
  • Page 107 107
  • Page 108 108
  • Page 109 109
  • Page 110 110
  • Page 111 111
  • Page 112 112
  • Page 113 113
  • Page 114 114
  • Page 115 115
  • Page 116 116
  • Page 117 117
  • Page 118 118
  • Page 119 119
  • Page 120 120
  • Page 121 121
  • Page 122 122
  • Page 123 123

Lexmark C 750 User manual

Category
Print & Scan
Type
User manual

Ask a question and I''ll find the answer in the document

Finding information in a document is now easier with AI