Page is loading ...

AM/FM Emergency Weather
Radio/Light
With Hand Crank Back-Up Power
VEC173
USER’S MANUAL
& WARRANTY INFORMATION
IMPORTANT SAFETY INFORMATION, SAVE THESE INSTRUCTIONS
TO REDUCE THE RISK OF INJURY, USER MUST READ AND UNDERSTAND
THIS INSTRUCTIONAL MANUAL. THIS MANUAL CONTAINS IMPORTANT
INFORMATION REGARDING THE OPERATION AND WARRANTY OF THIS
PRODUCT. PLEASE RETAIN FOR FUTURE REFERENCE.
8
ONE YEAR LIMITED WARRANTY PROGRAM
This limited warranty program is the only one that applies to this product, and it sets forth all the
responsibilities of Vector Manufacturing, regarding this product. There is no other warranty, other than those
described herein. Any implied warranty of merchantability or fitness for a particular purpose on this product
is limited in duration to the duration of this warranty.
This Vector Manufacturing product is warranted, to the original purchaser only, to be free of defects in
materials and workmanship for one year from the date of purchase without additional charge. The
warranty does not extend to subsequent purchasers or users. Manufacturer will not be responsible for any
amount of damage in excess of the retail purchase price of the product under any circumstances. Incidental
and consequential damages are specifically excluded from coverage under this warranty.
This product is not intended for commercial use. This warranty does not apply to damage to units from
misuse or incorrect installation/connection. Misuse includes wiring or connecting to improper polarity
power sources.
RETURN/REPAIR POLICY: Defective products may be returned to manufacturer. Any defective product that
is returned to manufacturer within 30 days of the date of purchase will be replaced free of charge. If such
a product is returned more than 30 days but less than one year from the purchase date, manufacturer will
repair the unit or, at its option, replace it, free of charge.
If the unit is repaired, new or reconditioned replacement parts may be used, at manufacturer’s option. A
unit may be replaced with a new or reconditioned unit of the same or comparable design. The repaired or
replaced unit will then be warranted under the terms of the remainder of the warranty period. The customer
is responsible for the shipping charges on all returned items. During the warranty period, manufacturer will
be responsible for the return shipping charges to the customer in the United States.
LIMITATIONS: This warranty does not cover accessories, such as charging adapters, bulbs, fuses and
batteries, damage or defects resulting from normal wear and tear (including chips, scratches, abrasions,
discoloration or fading due to usage or exposure to sunlight), accidents, damage during shipping to our
service facility, alterations, unauthorized use or repair, neglect, misuse, abuse, failure to follow instructions
for care and maintenance, fire, flood and Acts of God.
If your problem is not covered by this warranty, call our Technical Support Department at (954) 584-4446
or toll free at (866) 584-5504 for general repair information and charges if applicable. You may also
contact us through our website at www.vectormfg.com.
STATE LAW RIGHTS: This warranty gives you specific legal rights. Some states do not allow limitations on
how long an implied warranty lasts or the exclusion or limitation of incidental or consequential damages,
so the exclusions or limitations stated herein may not apply. This warranty gives the purchaser specific legal
rights; other rights, which vary from state to state, may apply.
TO REQUEST WARRANTY SERVICE FOR THIS PRODUCT: Contact Technical Support by telephone, fax or
mail (see below). We suggest that you keep the original packaging in case you need to ship the unit. When
returning a product, include your name, address, phone number, dated sales receipt (or copy) and a
description of the reason for return and product serial number. After repairing or replacing the unit, we will
make every effort to return it to you within four weeks.
WARRANTY ACTIVATION: Please complete Warranty Activation Card and mail to Vector Manufacturing.
Enter “VEC173” as Model and “AM/FM Emergency Weather Radio/Light With Hand Crank Back-Up
Power” as Product Type. All Vector products must be registered within 30 days of purchase to activate this
warranty. Mail the completed registration form, along with a copy of the original sales receipt, to:
ATTN.: CUSTOMER SERVICE
4140 SW 30th Ave., Ft. Lauderdale, FL 33312
• TOLL FREE: (866 ) 584-5504 • FAX: (954) 584-5556 •
WARRANTY IS NON-TRANSFERABLE.
BD082305
www.vectormfg.com
4140 S.W. 30th Ave., Ft. Lauderdale, FL 33312
Toll Free: (866) 584-5504
VEC173_ManualEN_082305 3/15/06 2:42 PM Page 8

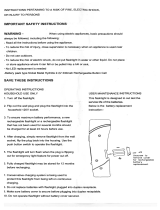
IMPORT
ANT SAFETY INSTRUCTIONS
PLEASE READ THIS USER’S MANUAL COMPLETELY FOR ALL SAFETY AND
WARNING INSTRUCTIONS.
CAUTIONS
1. Only use the DC adapter included with the unit.
2. Do not operate while recharging.
3. Do not crush, cut or pull charging adapter cords.
4. Do not expose cords to extreme heat.
5. Do not use charging adapter cords with exposed wires.
6. Do not operate if the unit is damaged.
7. Do not look directly into either set of lights.
8. Do not shine flashlight into eyes.
9. Do not immerse flashlight in water.
10. This is not a toy — keep away from children.
WARNING
Changes or modifications to this unit not expressly approved by the party
responsible for compliance could void the user’s authority to operate the
equipment.
SAVE THESE INSTRUCTIONS
This device complies with part 15 of the FCC rules. Operation is subject to the
following two conditions: (1) this device may not cause harmful interference, and
(2) this device must accept any interference received, including interference that
may cause undesired operation.
This equipment has been tested and found to comply with the limits for a Class
B digital device, pursuant to part 15 of the FCC Rules. These limits are designed
to provide reasonable protection against harmful interference in a residential
installation. This equipment generates, uses and can radiate radio frequency
energy and, if not installed and used in accordance with the instructions, may
cause harmful interference to radio communications. However, there is no
guarantee that interference will not occur in a particular installation. If equipment
does cause harmful interference to radio or television reception, which can be
determined by turning the equipment off and on, the user is encouraged to try to
correct the interference by one or more of the following measures:
• Reorient or relocate the receiving antenna.
• Increase the separation between equipment and receiver.
• Connect the equipment into an outlet on a circuit different from that to which
the receiver is connected.
• Consult the dealer or an experienced radio/TV technician for help.
VEC173_ManualEN_082305 3/15/06 2:42 PM Page ii

1
TABLE OF CONTENTS
Introduction . . . . . . . . . . . . . . . . . . . . . . . . . . . . . . . . . . . . . . . . . . . . . . . . . . . 1
Features . . . . . . . . . . . . . . . . . . . . . . . . . . . . . . . . . . . . . . . . . . . . . . . . . . . . . 1
Controls and Functions . . . . . . . . . . . . . . . . . . . . . . . . . . . . . . . . . . . . . . . . . . . 2
Powering the Unit . . . . . . . . . . . . . . . . . . . . . . . . . . . . . . . . . . . . . . . . . . . . . . . 3
Operating Instructions . . . . . . . . . . . . . . . . . . . . . . . . . . . . . . . . . . . . . . . . . . . . 4
Using the Flashlight . . . . . . . . . . . . . . . . . . . . . . . . . . . . . . . . . . . . . . . . . . . 4
Using the LED Area Lights . . . . . . . . . . . . . . . . . . . . . . . . . . . . . . . . . . . . . . . 4
Using the AM/FM Radio . . . . . . . . . . . . . . . . . . . . . . . . . . . . . . . . . . . . . . . . 4
Using the Weather Band Radio . . . . . . . . . . . . . . . . . . . . . . . . . . . . . . . . . . . 5
Care and Maintenance . . . . . . . . . . . . . . . . . . . . . . . . . . . . . . . . . . . . . . . . . . . 6
Recharging Back-Up Power . . . . . . . . . . . . . . . . . . . . . . . . . . . . . . . . . . . . . . 6
Flashlight Bulb Replacement . . . . . . . . . . . . . . . . . . . . . . . . . . . . . . . . . . . . . . 6
Battery Replacement/Disposal . . . . . . . . . . . . . . . . . . . . . . . . . . . . . . . . . . . . 6
Specifications . . . . . . . . . . . . . . . . . . . . . . . . . . . . . . . . . . . . . . . . . . . . . . . . . . 7
INTRODUCTION
Thank you for purchasing the
VEC173 AM/FM Emergency Weather Radio/
Light
. Please read this manual carefully before use to ensure optimum performance
and avoid damage to the unit itself or power sources from which it operates.
FEATURES
• AM/FM/emergency weather radio
• Powerful main beam flashlight
• Long-lasting LED area light
• Automatic emergency alert
• External antenna and jack
• Earphone and jack for privacy
• Battery, 12 volt DC or 120 volt AC powered
• Built-in batteries for auxiliary back-up power
• Hand crank to recharge internal back-up batteries
• Includes 12 volt DC and 120 volt AC adapters for external power supply
Power System
The
VEC173
has a unique power system. Its primary power source is the common
household “C” size battery, but it may also be powered using the AC-DC power
adapter that plugs into a standard 120 volt AC household outlet, or using an external
12 volt DC power supply (such as a car/vehicle’s accessory outlet) and the 12 volt
DC power adapter.
Back-Up Power
This unit also comes with built-in Ni-Cd rechargeable batteries, which serve as
“auxiliary” back-up power for the AM/FM/emergency weather radio and LED area
light, should no other power source be available. This auxiliary power system may be
recharged using the AC-DC power adapter plugged into an 120 volt AC household
VEC173_ManualEN_082305 3/15/06 2:42 PM Page iv

3
POWERING THE UNIT
The unit can be powered in one of three ways:
1. With two conventional dry cell “C” size batteries (not included).
2. With household 120 volt AC 60 Hz power and the AC-DC power adapter
included with the unit.
3. With 12 volt DC power and the 12 volt DC power adapter included with the unit.
In addition, a back-up power system consisting of built-in rechargeable batteries
allows the radio and area lights to operate when no other power source is
available. The rechargeable back-up battery unit is not user-accessible
and can only be used to power the radio and LED area light.
Note: Before first use, the unit’s rechargeable batteries should be charged for a
full 12 hours. See also “Recharging Back-Up Power” in the “Care and
Maintenance” section on page 6.
Using Battery Power
• Open the battery cover located on the underside of the flashlight (see Figure 2) and
insert two conventional dry cell “C” size batteries.
• Test by turning the flashlight on before proceeding to general operation.
Using the AC/DC Power Adapter/Charger
• Plug the AC/DC power adapter/charger’s barrel connector into the “DC 12V IN”
receptacle on the bottom of the handle (see Figure 5).
• Plug the AC/DC power adapter/charger’s plug into a powered 120 volt AC wall
outlet.
• Test by turning the flashlight on before proceeding to general operation.
Note: Flashlight is powered by AC/DC adapters as well as “C” batteries.
2
wall outlet, a 12 volt DC power adapter connected to a 12 volt DC source, or, in
emergency situations when no other power is available, by using the hand crank.
Note: Back-up battery power will only operate the radio and LED area light. It cannot
power the flashlight.
CONTROLS AND FUNCTIONS
LED ON/OFF
PUSHBUTTON
Figure 5
DC 12 VOLT IN
ADAPTER JACK
FOR EXTERNAL
POWER SUPPLY
HAND CRANK
TO RECHARGE
BACK-UP
BATTERIES
EARPHONE
JACK
EXTERNAL
ANTENNA
JACK
SPEAKER
Figure 3 Figure 4
RADIO TUNER
DIAL
HANDLE
ALERT ON/OFF
PUSHBUTTON
Figure 1
FLASHLIGHT
ON/OFF
SWITCH
RUBBER
GUARD
COVER
BATTERY
COVER
LED AREA
LIGHT
ALARM LOCK
ON/OFF
PUSHBUTTON
RADIO BAND
SELECTOR
SWITCH
Figure 2
VOLUME
CONTROL
VEC173_ManualEN_082305 3/15/06 2:42 PM Page 2

5
Using the Emergency Weather Radio
The
VEC173 AM/FM Emergency Weather Radio/Light
receives all seven
of the National Oceanic and Atmospheric Administration (NOAA) weather
channels and is useful for monitoring storm alert and emergency warning system
broadcasts.
• Slide the Radio Band Selector Switch (see Figure 1) to “Weather.”
• Rotate the Radio Tuner Dial to search for a station.
• Adjust volume using the Volume Control slider on the underside of the unit (see
Figure 2).
• Insert the earphones (supplied) into the Earphone jack (see Figure 3), if private
listening is desired.
• Insert the external antenna (supplied) into the External Antenna jack (see Figure
4) and adjust for better reception, if necessary.
Alert Function
The Alert function is only available when “Weather” has been selected on the Radio
Band Selector Switch.
• Using the Radio Tuner Dial, select the desired weather station.
• Press the Alert ON/OFF pushbutton located on the top of the unit (see Figure 1).
• The green Alert ON/OFF LED will light, indicating this function is operating. The
weather station will remain muted until a weather alert is detected and then an
alarm siren will sound briefly.
Alarm Function
The Alarm function is only available when “Weather” has been selected on the
Radio Band Selector Switch.
• Using the Radio Tuner Dial, select the desired weather station.
• Press the Alarm/Lock pushbutton located on the top of the unit (see Figure 1).
• The green Alarm/Lock LED will light, indicating this function is operating. The
weather station will remain muted until a weather alert is detected and then an
alarm siren will sound continuously until the Alarm/Lock pushbutton is pushed
again.
ALERT ON/OFF
PUSHBUTTON
ALERT ON/OFF LED
ALARM/LOCK LED
ALARM/LOCK
PUSHBUTTON
4
Using the 12 Volt DC Power Adapter
• Plug the 12 volt DC power adapter/charger’s barrel connector into the “DC 12V
IN” receptacle on the bottom of the handle (see Figure 5).
• Plug the 12 volt DC power adapter/charger’s large connector into a vehicle’s
accessory power outlet or other 12 volt DC power source.
• Test by turning the flashlight on before proceeding to general operation.
OPERATING INSTRUCTIONS
Using the Flashlight
The flashlight is controlled by an ON/OFF trigger switch on the underside of the
unit (see Figure 2).
Using the LED Area Light
The LED area light is controlled by the LED ON/OFF pushbutton located on the
bottom of the unit’s handle (see Figure 5). The LED area light can operate
continuously for up to 12 hours.
Using the AM/FM Radio
The Radio Band Selector Switch on the top of the unit (see Figure 1) controls the
radio’s On/Off function and allows the user to select AM or FM frequency.
• After sliding the Radio Band Selector Switch to desired frequency, rotate the Radio
Tuner Dial to search for a station.
• Adjust volume using the Volume Control slider on the underside of the unit (see
Figure 2).
• Insert the earphones (supplied) into the Earphone jack (see Figure 3), if private
listening is desired.
• Insert the external antenna (supplied) into the External Antenna jack (see Figure
4) and adjust for better reception, if necessary.
VEC173_ManualEN_082305 3/15/06 2:42 PM Page 4

7
SPECIFICATIONS
Flashlight Bulb: 2.4 volt, 1.5 W
DC Input Jack: 12 volt
Radio Bands: AM (530 ~ 1710 kHz)
FM (88 ~ 108 MHz)
Weather: 162.400, 162.425, 162.450
162.475, 162.500,162.525 and 162.550 MHz
Speaker: 8 ohms, 1W
External DC Adapters: DC 12V input,
120 VAC, 500 mA
Battery: 2 “C” Size (not included)
6
CARE AND MAINTENANCE
Recharging Back-Up Power
See “Powering the Unit” on page 3 for notes on power sources and instructions for
first-time use. You can listen to the radio while recharging the back-up batteries.
Charge the back-up power battery regularly so it is ready for emergency use.
120 Volt AC Charging
1. Plug the AC plug of the AC/DC adapter/charger into any standard 120 volt AC
wall outlet.
2. Plug the barrel connector attached to the AC/DC adapter/charger into the “DC
12V IN” receptacle on the bottom of the handle (see Figure 5).
12 Volt DC Charging
1. Plug the 12 volt DC power adapter’s barrel connector into the “DC 12V IN”
receptacle on the bottom of the handle (see Figure 5).
2. Plug the 12 volt DC power adapter’s large connector into a vehicle’s accessory
power outlet or other 12 volt DC power source.
Hand-Crank Charging
If the rechargeable battery power is low and there is no external power source
available, rotate the dynamo crank handle to generate power and recharge the
batteries.
Two minutes of cranking produces approximately 15 minutes of runtime for the
radio or LED area light.
Flashlight Bulb Replacement
1. Twist the rubber guard cover (see Figure 2) counterclockwise and remove.
2. Twist the bulb counterclockwise and remove.
3. Insert replacement bulb (2.7 volt, 1.5 watt) twist clockwise.
4. Re-attach the rubber guard and twist clockwise.
Battery Replacement/Disposal
Battery Replacement
It is recommended that the unit be returned to manufacturer for battery replacement.
Contact Vector Customer Service, toll-free, at (866) 584-5504.
Battery Disposal
This unit contains a Ni-Cd battery and should be disposed of
properly. For more information on recycling batteries, call toll free
(800) 822-8837.
WARNINGS
• Do not dispose of the battery in fire. This may result in an explosion.
• Before disposing of the battery, protect exposed terminals with
heavy-duty electrical tape to prevent shorting, which can result in
injury or fire.
• Do not expose the battery to fire or intense heat as it may explode.
VEC173_ManualEN_082305 3/15/06 2:42 PM Page 6
/