Page is loading ...

2319 Laurelbrook Street, Raleigh, NC 27604 Phone (800)542-7221 Fax (919)834-4526
UP (6-0043) 4/05
2/08

Air-Powered Door Operator
Installation Guide
This is an installation guide for the Air-Powered Door Operator. It is a general guideline for a normal installation. If
problems arise call (800)542-7221 for specific advice.
Necessary tools:
Drill and 1/4” bit (to drill mounting holes in operator bracket and door track)
2 vise-grips
Set of Allen wrenches
Set of open-end wrenches — 1/4” to 9/16”
Set of screwdrivers — flat head and Phillips
Set of sockets — 1/4” to 9/16”
Impact wrench
3/8” drill — cordless or electric
2-foot level
Masonry drill — 1/2” or 3/8” bit
Saw saw
Supplies needed but not included with this kit:
Track bolts to mount operator to track
Air compressor
Fasteners to mount controls to walls
1

1
Note: Inspect door for smooth rolling and proper balancing before installing Air Powered Operator.
Part 1:BELT INSTALLATION
Step 1
Determine which side of door to install the air
powered operator. 6” of shaft is required
beyond track bracket.
Clearance Requirements
8” of side clearance is required to mount
operator.

2
Step 2 Installing Sprocket Kit
Position the 1½” spacer (Part No. SP101)
onto the shaft against the bearing as
shown.
Next slide the sprocket (Part No. BSP01)
against the spacer.
Insert key (Part No. K101) of sprocket kit
into the keyway of sprocket and tighten the
set screws.
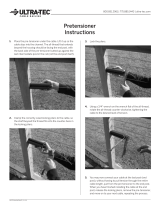
Installing Tensioner Kit
Before installing the air cylinder, the
tensioner kit must be installed.(Part No.
OT101).
Set Screws
Washers (4)
Tension
Rod
Tensioner Roller
Cotter
Pins

3
Installing Tensioner Kit
Insert one end of the tensioner rod with
holes into round hole of the track bracket.
Place 1 washer on each side of bracket and
add cotter pins (Part No. DF330).
Place tensioner roller on rod (as shown).
End support bracket will be installed after
hanging the operator. Proceed to Step 3.

4
Step 3
Install speed control kit to the
operator. (Part No. TC2002).
Speed Control Kit (Part No. TC2002)
Installing Speed Control Kit
Before installing the speed control
kit to the operator, place the
operator flat on floor with the red
plugs facing up. Remove red
plugs from the air powered
operator.Insert brass elbows
(Part No. AP1080B) into
ports of both cylinders where red
plugs were removed.
Tighten elbows slightly with 9/16
open-end wrench. Attach speed
control valve at top of operator
bracket with (2) two each
10x24x3/8 machine screws.
As shown on Page 5
After installing valves stretch air
lines from top to bottom elbows,
cutting air lines ¾” longer than
bottom elbow. Attach air lines as
shown.
See next page for
Larger Image

5
10 x 24 x 3/8 Machine Screws
Speed Control Valve with bracket
Step 4 Attaching Belt to Operator
NOTE: Remove clamp assembly CL-102
from belt before installing belt onto
operator.
Operator Belt

6
Remove belt roller (Part No. OP01) from
center of operator. (roller is attached when
operator is shipped from factory)
Slide bottom of turnbuckle onto rod closest
to the wall leaving ½” of rod above
turnbuckle (Part No. CL100). Tighten bolts
of turnbuckle down onto rod and reinstall
Belt Roller on operator.
NOTE: Turnbuckle will always be installed
on rod that is closest to the wall
Hanging Operator
Step 5
Note: Insure door is fully closed before
hanging operator.
Hang operator from the belt by placing the
belt around the sprocket and behind
Tensioner Roller, as shown.

7
Install end support bracket (Part No.
BB103A) on door shaft. Making sure
tensioner rod goes through hole of end
support bracket. Attach end support
bracket to wall before attaching operator
to vertical track.
Completed Tensioner Kit will be as
shown.

8
1/4 x 1"
Attach top and bottom of the operator to the vertical track with self-tapping screws. ( As seen in figures J and K on pg. 8 )

Item ‘C’
Item B
Item ‘A’
CL101
Step 7
Raise door manually to height of desired
operation -- For example, if you want door to
open 8 feet, raise bottom of door to be 8’ off
finished floor.
Begin by removing ½” nut from top of turnbuckle – (Item ‘A’)
Lower nut (Item 'C') down until desired tightness is achieved.
Begin by removing ½” nut from top of turnbuckle – (Item ‘A’)
Lower nut (Item 'C') down until desired tightness is achieved.
Begin by removing ½” nut from top of turnbuckle – (Item ‘A’)
Lower nut (Item 'C') down until desired tightness is achieved.
Using ½” open end wrench tighten nut (Item ‘B’) until belt is snug
After achieving desired tightness, install nut (Item ‘A’) back onto assembly
And tighten both item ‘A’ and Item ‘C’
Step 6 Setting Open and Close Door Limits
9

10
Rod with turnbuckle (Part No. CL100 and
CL101) will rise when opening the door
Thus after opening door to desired height,
the rod closest to the wall will be extended
out of the cylinder
Now we will attach Part No. ‘CL102’ to the
rod that is not extended out of the cylinder
Your open and close door limits are set. You
are now ready for control box installation.
(See Part 3)
Completed Operator set up view.

11
Installation
Of
Chain
Drive

12
Part 2:
INSTALLING CHAIN DRIVE
STEP 1
NOTE: Before beginning installation
make sure you have chain roller set-up
(Part No. AP1325).
Determine which side of the door you are
installing the air operator on; you will need at
least 6” of shaft beyond track bracket for
installing air-powered operator with chain.
See Figure A.
STEP 2
Position the chain sprocket assembly ( part # spk 1000
) onto shaft against bearing as shown in figure B. Do
not tighten set screws until you have hung operator
around sprocket.

13
Step 3
Installing Chain
Lay air powered operator on floor with red plugs facing up. Remove chain roller (Part No. AP1325) from top of operator See Figures C & D. If you
are installing operator on right hand side of door, install turnbuckle of chain on the rod that is closest to the wall. Insert chain around bottom of roller
(Part No. AP1325), attach roller back onto operator with threaded rod of turnbuckle, ½” above piston rod. See Figure E.
Note: Turnbuckle will
ALWAYS be installed on
the rod that is closest to the
wall.
Chain
Roller

14
Step 4
Before hanging air-powered operator, install speed control kit (Part No. TC2002). Locate kit with speed control valves, elbows, and two remaining
elbows of sprocket kit. Remove red plugs from air powered operator insert brass elbows See Figure F. Tighten slightly with 9/16 open-end wrench.
Attach speed control valve at top of operator bracket with (2) two each 10x24x3/8 machine screws (provided) as shown in Figure G. After installing
valves stretch air lines to bottom elbows, cutting air lines ¾” longer than top of elbow. Attach air lines as shown in Figure H.
Speed Control Kit

15
Step 5
Hang chain of air powered operator around chain sprocket. Align operator with vertical track and align sprocket with operator. Tighten all set screws
on sprocket and collars of sprocket assembly, add support bracket (Part No. BB103A) before attaching operator to vertical track. See Figures I & J.
Sprocket Assembly (Part No. SPK1000)

16
Step 6
Attach operator to vertical track after it is aligned with
sprocket and operator hangs straight down using self-
taping screws. See Figure K. Tighten chain with
turnbuckle. After chain is tight, lock turnbuckle into place
with ½” nut on threaded rod. See Figure L. Slide one
enclosed clamp assembly Part No. AP1055 so that ¾” of
the rod extends above the clamp assembly as shown in
Figure M. Tighten all bolts.

17
Rod with turnbuckle (Part No. CL100 and
CL101) will rise when opening the door
Thus after opening door to desired height,
the rod closest to the wall will be extended
out of the cylinder
Now attach Part No. ‘CL102’ to the
rod that is not extended out of the cylinder
Your open and close door limits are set. You
are now ready for control box installation.
Completed Chain Operator set up, see
Page 35.
ULTIMATE PRODUCTS (800) 542-7221
ULTIMATE PRODUCTS INC.
PHONE: (800)

Part 3:
Install the control
A.
There are several different control options
available for your air-powered operator,
depending on how you would like to control
your door.
Choices are as follows:
DC1000: Manual, lever-operated, 3-position
air valve.
DC4000: 24V Control Box that only works
when the electricity is on. It Does NOT
HAVE buttons.
DC5000: 24V Control Box that only works
when electricity is on. Has buttons.
DC6000: 24V Pneumatic control box that will
work without electricity by drawing upon the
air built up in the compressor.
DC7000: 120V Pneumatic control box that
will work without electricity by drawing upon
the air built up in the compressor. Has large,
red emergency buttons.
B.
Mounting and Electronic Control Box:
1.
Before installing control box (seen below),
install all regulators, dryers etc.
2.
Install control box near operator and 110V
power supply. If not possible, the control box
can be installed in equipment rooms, attics etc.
Installing a Quick Dump Exhaust may be
needed depending on the distance between the
control box and the operators. The control box
should be mounted 4-5 ft off finished floor
with proper anchors. (See below)
Note: Control Boxes require 110V AC power
unless specified on the unit
18
Air line dryer
/