Daewoo KOC-9Q4T Owner's manual
- Category
- Microwaves
- Type
- Owner's manual
This manual is also suitable for

VVIISSIIOONN
CCRREEAATTIIVVEE,,
IINNCC..
서울 종로구 통의동
6번지 이룸빌딩 4층
ABOUT THIS MANUAL
ABOUT THIS MANUAL
담담 당당
이태희 님
IITTEEMM
I-MANUAL
FF..MMOODDEELL
KOC-9Q4T7R21
브브랜랜드드
DAEWOO
BB..MMOODDEELL
KOC-9Q4T
언언 어어
영어
BB
UU
YY
EE
RR
DESUK
CCOOUUNNTTRRYY
1차
2차
일일 정정
3차
4차
5차
제제 판판
한
인인쇄쇄
MMEEMMOO
총 33p
SSEETT
LLAABBEELL
LLIISSTT
발발행행 NNoo..
DDEESSIIGGNN
DDOOCCUUMMEENNTT
NNoo..
연락처
VISION
담담 당당
방문수
TEL: 730-0660 FAX: 730-3788
10.12.14-2p, 7p, 15p, 25p_ 신규 4p

OWNER’S
MANUAL
Before operating this oven, please read
this manual completely.
MICROWAVE
CONVECTION/GRILL OVEN
KOC-9Q4T

1
TABLE OF CONTENTS
• INSTALLATION AND EARTHING INSTRUCTIONS...................... 2
• IMPORTANT SAFETY INSTRUCTIONS........................................ 3
• WHICH UTENSILS CAN BE USED IN THE OVEN?..................... 5
• COOKING INSTRUCTIONS .............................................................6
• CONTROL PANEL............................................................................ 7
• ACCESSORIES ................................................................................ 8
• BEFORE OPERATION......................................................................9
SETTING THE CLOCK.................................................................... 9
CHILD LOCK AND POWER SAVE MODE.................................. 10
• OPERATION.................................................................................... 11
MICROWAVE COOKING...............................................................11
GRILL COOKING........................................................................... 12
CONVECTION COOKING (WITH PRE-HEAT)........................... 13
CONVECTION COOKING (TRADITIONAL COOKING)............. 14
COMBINATION COOKING ........................................................... 15
(1) WEIGHT DEFROST MODE..................................................... 16
(2) TIME DEFROST MODE............................................................16
AUTO COOK .................................................................................. 17
SPEEDY COOK ..............................................................................20
DISH WARMER (FOR PREMIER OPTION MODEL ONLY).......20
WARM ..............................................................................................19
STEAM CLEANING.........................................................................19
REMINDER MODE
(FUNCTION TO REMIND COOKING COMPLETE).....................19
TO STOP THE OVEN WHILE THE OVEN IS OPERATING........20
ABNORMAL MESSAGE.................................................................20
ARCING............................................................................................20
• GENERAL GUIDE LINES................................................................21
• KEEP THE OVEN CLEAN ..............................................................22
• BEFORE CALLING FOR SERVICE...............................................23
• QUESTIONS AND ANSWERS.......................................................24
• SPECIFICATIONS...........................................................................25
• PRINCIPLE OF MICROWAVE........................................................25
• DISPOSAL OF USED ELECTRICAL &
ELECTRONIC EQUIPMENT..........................................................25
• COOKING TECHNIQUES...............................................................26
• DEFROSTING GUIDE.....................................................................27
• COOKING & REHEATING CHART................................................28
• VEGETABLE CHART......................................................................29
• RECIPES..........................................................................................30
PRECAUTIONS TO AVOID POSSIBLE EXPOSURE
TO EXCESSIVE MICROWAVE ENERGY
(a) Do not attempt to operate this oven with the door open since open-door operation
can result in harmful exposure to microwave energy. It is important not to defeat or
tamper with the safety interlocks.
(b) Do not place any object between the oven front face and the door or allow soil or
cleaner residue to accumulate on sealing surfaces.
(c) WARNING : If the door or door seals are damaged, the oven must not be operated until it
has been repaired by a competent person: (1) door (bent), (2) hinges and latches (broken
or loosened), (3) door seals and sealing surfaces.
(d) WARNING : It is hazardous for anyone other than a competent person to carry out any
service or repair operation which involves the removal of a cover which gives protection
against exposure to microwave energy.
(e) WARNING : Liquids and other foods must not be heated in sealed containers since
they are liable to explode.
(f) WARNING : Only allow children to use the oven without supervision when adequate
instructions have been given so that the child is able to use the oven in a safe way and
understands the hazards of improper use.
(g) WARNING : When the appliance is operated in the combination mode, children should only
use the oven under adult supervision due to the temperatures generated.

2
INSTALLATION AND EARTHING INSTRUCTIONS
How to examine your microwave oven after unpacking.
Unpack oven, remove all packing material, and examine the
oven for any damage such as dents, broken door, latches or
cracks in the door. Do not remove the film from inside the door.
Notify dealer immediately if the oven is damaged. Do not install if
the oven is damaged.
Where to place your microwave oven.
1. Place the oven on a flat and stable surface.
2. The microwave oven shall not be placed in a cabinet unless it
is a purpose built cabinet model.
3. The surface of the oven is protected by a plastic film which
should be removed before using.
4. Leave space behind and the sides and upper surface of the
oven. All air vents should be kept clear.
If all vents are covered during operation, the oven may
overheat and, eventually, lead to oven failure.
5. Keep away from radio and TV sets. If the oven is located close
to a TV, radio interference may result.
6. Keep away from heating appliances and water taps. Keep the
oven away from hot air, steam or splashes when choosing a
place to position it, or the insulation might be adversely
affected and breakdowns occur.
7. The minimum height of free space necessary above the top
surface of the oven is 170mm minimum if it is a purpose
counter-top cabinet model.
Prior to use (If your oven has a grill element)
In order to protect your oven during transportation and storage,
the grill element is covered with a protective coating. To remove
this coating the grill element must be heated for 10 minutes. This
procedure will produce some bad odours as the protective
coating on the element disappears.
To remove the coating, use the following procedures:
1. Place an ovenproof or microwave safe bowl, containing 200cc
of water or more, in the oven.
2. Press the convection button.
3. Set the time to 10 minutes.
4. Press the start button.
5. When the 10 minutes has elapsed, an acoustic signal sounds.
Note:
The protective coating has now been removed and the oven is
ready to use. Please be aware that your oven is now very hot.
6. Open the oven door and remove the bowl of water (use oven
gloves when removing the bowl).
CHILD LOCK
To prevent a child from operating the oven, install the childlock key.
1. Touch Stop/Clear button for 3 seconds.
Indicator lock is indicated and all buttons do not operate.
2. Touch Stop/Clear button for 3 seconds once again, then
childlock is canceled.
-WARNING: Only allow children to use the oven without
supervision when adequate instructions have been given so
that the child is able to use the oven in a safe way and
understands the hazards of improper use.
Electrical Connection
WARNING-THIS APPLIANCE MUST BE EARTHED.
REFER TO THE RATING PLATE FOR VOLTAGE AND
CHECK THAT THE APPLIANCE VOLTAGE CORRESPONDS
WITH THE SUPPLY VOLTAGE IN YOUR HOME.
The flexible mains lead must be correctly re-connected, as below,
to a three pin plug of not less than 13 AMP capacity. You must
use a 3 pin plug which should be marked with the number BS
1363 and it should be fitted with 13 AMP fuse marked with the
number BS 1362.
We recommend the use of good quality plugs and wall sockets
that can be switched off when the machine is not in use.
IMPORTANT-The wires in the mains lead fitted to this appliance
are coloured in accordance with the following code
GREEN AND YELLOW-EARTH
BLUE-NEUTRAL
BROWN-LIVE
As the colour of the wires in the mains lead of this appliance may
not correspond with the coloured markings identifying the
terminals in your plug, proceed as follows:
Power supply
• Check your local power source. This oven requires a current of
approximately 7amperes, 230V 50Hz.
• Power supply cord is about 1.0 meters long.
• The voltage used must be the same as specified on this oven.
Using a higher voltage may result in a fire or other accident
causing oven damage. Using low voltage will cause slow
cooking. We are not responsible for damage resulting from use
of this oven with a voltage of ampere fuse other than those
specified.
• If the supply cord is damaged, it must be replaced by the
manufacturer or its service agent or a similarly qualified person
in order to avoid a hazard.
The wire which is coloured GREEN AND YELLOW must be
connected to the terminal in the plug which is marked with the
letter "E" or the earth symbol or coloured GREEN AND
YELLOW, or GREEN.
The wire which is coloured BLUE must be connected to the
terminal which is marked with the letter "N" or coloured BLACK,
or BLUE.
The wire which is coloured BROWN must be connected to the
terminal which is marked with the letter "L" or coloured RED , or
BROWN.
If the terminals in the plug are unmarked or you are in any doubt
as to the correct connections, consult a qualified electrician.
If you do not make the proper electrical connections you will
damage your microwave oven and possibly injure yourself.
Neither the manufacturer nor the supplier are liable if this
happens.
MOULDED PLUGS
Should it be necessary to remove a moulded on plug from the
mains cable, it should be cut off and replaced with a suitable
replacement.
The moulded plug cannot be used for any other appliance,
therefore remove the fuse and dispose immediately and safely to
prevent anyone, especially children from plugging it in to a wall
socket, which will create a safety hazard.
Should the mains lead ever require replacement, it is essential
that this operation be carried out by a qualified electrician and
should only be replaced with a flexible cord obtained from the
manufacturer.
Applicable only if moulded plug is fitted.
After replacement of a fuse in the plug, the fuse cover must be
refitted. If the fuse cover is lost, a replacement cover must be
obtained. The colour of the correct replacement fuse cover is that
of the coloured insert in the base of the plug or the colour that is
embossed in words in the base of the plug recess or elsewhere
on the plug. Always state this colour when ordering a
replacement fuse cover.
Only 13 amp replacement fuses which are ASTA approved to BS
1362 should be fitted

3
IMPORTANT SAFETY INSTRUCTONS
READ CAREFULLY AND KEEP FOR FUTURE REFERENCE
11. Read all instructions before using the appliance.
12. Read and follow the specific “PRECAUTIONS TO AVOID
POSSIBLE EXPOSURE TO EXCESSIVE MICROWAVE
ENERGY” found on page 1.
13. This appliance must be earthed. Connect only to a properly
earthed outlet.
14. Install or locate this appliance only in accordance with the
provided installation instructions.
15. Some products such as whole eggs and sealed containers -
for example, closed glass jars-are liable to explode and
should not be heated in this oven.
16. Use this appliance only for its intended use as described in
this manual. Do not use corrosive chemicals or vapors in this
appliance. This type of oven is specifically designed to heat,
cook, or dry food. It is not designed for industrial or laboratory
use.
17. As with any appliance, close supervision is necessary when
used by children.
18. Do not operate this appliance if it has a damaged cord or
plug, if it is not working properly, or if it has been damaged or
dropped.
19. This appliance should be serviced only by qualified service
personnel.
Contact your nearest authorized service facility for
examination, repair or adjustment.
10. Do not cover or block any openings on the appliance.
11. Do not store this appliance outdoors. Do not use this product
near water — for example, near a kitchen sink, in a wet
basement, or near a swimming pool, or similar locations.
12. Do not immerse the cord or plug in water.
13. Keep the cord away from heated surfaces.
14. Do not let cord hang over edge of table or counter.
15. Either:
a) When cleaning surfaces of door and oven that comes
together on closing the door, use only mild, non-abrasive
soaps or detergents applied with a sponge or soft cloth , or
b) When separate cleaning instructions are provided, See
door surface cleaning instructions on.
16. To reduce the risk of fire in the oven cavity:
a) Do not overcook food. Carefully attend the appliance when
paper, plastic, or other com-bustible materials are placed
inside the oven to facilitate cooking.
b) Remove wire twist-ties from paper or plastic bags before
placing bag in the oven.
c) If materials inside the oven ignite, keep oven door closed,
turn oven off, and disconnect the power cord, or shut off
power at the fuse or circuit breaker panel.
d) Do not use the cavity for storage purposes. Do not leave
paper products, cooking utensils, or food in the cavity when
not in use.
17. Do not use this microwave oven to heat corrosive chemicals
(for example, sulfides and chlorides). Vapours from such
corrosive chemicals may interact with the contact and springs
of the safety interlock switches thereby rendering them
inoperable.
18. Keep the waveguide cover clean at all times. Wipe the oven
interior with a soft damp cloth after each use. If you leave
grease or fat anywhere in the cavity it may overheat, smoke
or even catch fire when next using the oven.
19. Never heat oil or fat for deep frying as you cannot control the
temperature and doing so may lead to overheating and fire.
20. Liquids, such as water, coffee, or tea are able to be
overheated beyond the boiling point without appearing to be
boiling due to surface tension of the liquid. Visible bubbling or
boiling when the container is removed from the microwave
oven is not always present. THIS COULD RESULT IN VERY
HOT LIQUIDS SUDDENLY BOILING OVER WHEN A
SPOON OR OTHER UTENSIL IS INSERTED INTO THE
LIQUID. To reduce the risk of injury to persons:
1 Do not overheat the liquid.
2 Stir the liquid both before and halfway through heating it
3 Do not use straight-sided containers with narrow necks.
4 After heating, allow the container to stand in the
microwave oven for a short time before removing the
container.
5 Use extreme care when inserting a spoon or other utensil
into the container.
21. The contents of feeding bottles and baby jars must be stirred
or shaken and check the temperature before consumption to
avoid burns.
22. The appliance must be positioned so that the plug is
accessible.
23. This appliance is not intended for use by a person (including
children) with reduced physical, sensory or mental
capabilities, or lack of experience and knowledge, unless they
have been given supervision or instruction concerning use of
the appliance by a person responsible for their safety.
24. Children should be supervised to ensure that they do not play
with the appliance.
25. Due to extremely high temperatures, do not touch the surface
of door and the Top heater of oven during and after running
the heater related cooking mode.
SAVE THESE INSTRUCTIONS
When using electrical apliances, basic safety precautions should be followed, including the following:
WARNING-To reduce the risk of burns, electric shock, fire, injury to persons or exposure to excessive microwave energy:

4
11. Do not use the oven for any reason other than food
preparation, such as for drying clothes, paper, or any
other nonfood items or for sterilizing purposes.
They may catch on fire.
12. Do not use the oven when empty, this could damage the
oven.
13. Do not use the oven cavity for any type of storage, such
as papers, cookbook, cookware, etc.
14. Do not operate the oven without the turntable tray in
place. Be sure it is properly sitting on the rotating base.
15. Be cautious when removing the turntable tray after
cooking meats that may have caused an accumulation of
grease in the tray.
16. Unlike microwave-only ovens, this oven may become hot
on the cabinet and oven door.
Always use hot pads or oven mitts when placing or
removing food and/or accessories from the oven.
Be cautious about touching parts other then the control
panel during or immediately following grill or combination
cooking.
17. If the oven is hot from combination cooking, do not then
use plastic or Styrofoam cookware for microwave
cooking. They may melt.
18. Do not use recycled paper products for cooking.
They may contain impurities which could cause sparks
and/or fires when used during cooking.
19. Do not continue to cook with metal utensils if sparking
appears. See "Accessories" section on page 8 for proper
use of cookware.
10. Do not leave the oven unattended during short cooking
times. Overcooking and fire may result.
11. Do not cook any food surrounded by a membrane, such
as egg yolks, potatoes, chicken livers, etc., without first
piercing them several times with a fork.
12. Do not pop popcorn unless popped in a microwave
approved popcorn popper or unless it's commercially
packaged and recommended especially for microwave
ovens. Microwave popped corn produces a lower yield
than conventional popping; there will be a number of
unpopped kernels. Do not use oil unless specified by the
manufacturer.
13. Do not attempt to operate this appliance with the door
open.
14. Do not attempt to remove covers, panels, etc.
15. Keep an eye on the oven from time to time when food is
heated or cooked in disposable containers of plastic,
paper or other combustible materials.
16. If smoke is observed, switch off or unplug the appliance
and keep the door closed in order to stifle any flames.
17. Microwave heating of berverages can result in delayed
eruptive boiling, therefore care must be taken when
handling the container.
18. Make sure you remove caps or lids prior to cooking when
you cook food sealed in bottles.
19. Do not put foreign material between the oven surface and
door. It could result in excessive leakage of microwave
energy.
20. Do not pop popcorn longer than the manufacturer's
directions. (popping time is generally below 3 minutes).
Longer cooking does not yield more popped corn, it can
cause scorchings and fire.
Also, the cooking tray can become too hot to handle or
may break.
21. When heating food in plastic or paper containers, keep an
eye on the oven due to the possibility of ignition.
22. Always test the temperature of food or drink which has
been heated in a microwave oven before you give it to
somebody, especially to children or elderly people. This is
important because things which have been heated in a
microwave oven carry on getting hotter even though the
microwave oven cooking has stopped.
23. Eggs in their shell and whole hard-boiled eggs should
not be heated in microwave ovens since they may
explode, even after microwave heating has ended;
24. Keep the waveguide cover clean at all times. Wipe the
oven interior with a soft damp cloth after each use. If you
leave grease or fat anywhere in the cavity it may
overheat, smoke or even catch fire when next using the
oven.
25. Never heat oil or fat for deep frying as you cannot control
the temperature and doing so may lead to overheating
and fire.
26. During use the appliance becomes hot. Care should be
taken to avoid touching heating elements inside the oven.
27. Do not use a steam cleaner in the oven.
General Use
Listed below are, as with all appliances, certain rules to follow and safeguards to assure top performance from this
oven:

5
Microwave function only
Utensils and cooking containers used in a microwave oven
should be of a material that does not act as a barrier to
microwave energy. Generally this means that you should cook
in either (paper), plastic, glass or ceramic. Metal pans reflect
microwave energy and inhibit cooking, and should not be used.
In addition to material, the shape of the container should also
be considered. Round oval shapes give the most even
cooking. Square or rectangular containers may over-cook
foods in the corners because more energy is absorbed there.
Shallow containers give more even cooking results.
Utensils made of china and ceramic are excellent to use in
your microwave oven. Most types of glass are also very
good.
Lead crystal glass can crack and should therefore, not be
used. Plastics and paper can also be used, provided they can
withstand the temperature of the heated food. For cooking
only use plastics, which will withstand a temperature of over
120˚C, e.g. polypropene and polyamide. Some plastic
materials, e.g. melamine, will be heated by the microwave,
and be damaged. To find out if a certain container is suitable,
the following simple test can be made:
Place the empty container and a glass of water inside the
microwave oven. The water is needed because the oven
must not be operated empty or with empty containers only.
Let the oven work on full power for one minute. A suitable
container will only be lukewarm.
Metal containers, e.g. saucepans or frying pans should not
be used in microwave ovens. Nor should plates or vessels
with decorations be used since metal e.g.
gold, might be part of the decoration and
such decorations will be damaged.
Small pieces of aluminiuum foil can be
used, but only to shield the areas that
would over-cook (e.g. for covering
chicken wings, leg tips and fish tails) but
the foil must not touch the side of the
oven as damage may occur.
TO AVOID EXPLOSION AND SUDDEN BOILIING
1. Eggs
Never cook eggs in their shells. Steam will build up inside
the shell during cooking and the egg will explode.
If you want to cook or reheat eggs which have not been
broken up by scrambling or mixing, you must always
pierce the yolks or these will also explode. You should
slice shelled hard boiled eggs before you reheat them in
your microwave oven.
2. Piercing
Always pierce food which has a skin or membrane, for
example, potatoes, tomatoes, apples, sausages etc. If you
don't pierce them, steam will build up inside and they may
explode.
3. Lids
Always remove the lids of jars and containers and take
away food containers, before you cook using your
microwave oven. If you don't, then steam and pressure
might build up inside and cause an explosion even after
the microwave cooking has stopped.
WHICH UTENSILS CAN BE USED IN THE OVEN?
WARNING
Liquids, such as water, coffee, or tea are able to be
overheated beyond the boiling point without appearing to be
boiling due to surface tension of the liquid. Visible bubbling
or boiling when the container is removed from the
microwave oven is not always present. this could result in
very hot liquids suddenly boiling over when a spoon or other
utensilis is inserted into the liquid.
To reduce the risk of injury to persons:
a) Do not overheat the liquid.
b) Stir the liquid both before and halfway through heating it
c) Do not use straight-sided containers with narrow necks.
d) After heating, allow the container to stand in the
microwave oven for a short time before removing the
container.
e) Use extreme care when inserting a spoon or other utensil
into the container.
Caution:
• There are a number of accessories available on the
market. Before you buy, make sure they are suitable
for microwave use.
• When you put food in the microwave oven, make sure
that food, food supports or covering do not come in
direct contact with any of the internal walls or the ceiling
of the cavity since discolouration may take place.
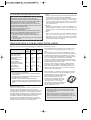
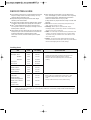
Only use utensils that are suitable for use in microwave ovens.
Before use, the user should check that utensils are suitable for use in microwave ovens.
Glass (general) No Yes (1) No
Glass (heat resistant) Yes Yes Yes
Glass-ceramic and
ceramic (heat resistant) Yes Yes (1) Yes (1)
Earthenware Yes Yes Yes
China (heat resistant) Yes Yes Yes
Plastic (general) No Yes (2) No
Plastic (heat resistant) Yes (2) Yes (2) Yes (2)
Aluminium foil containers
/aluminium foil Yes Yes (3) Yes
Metal baking tins Yes (4) No Yes (4)
Metal (pots.pans, etc) Yes No No
Paper No Yes No
1. Without metal parts or metal trims.
2. Some plastics are heat-proof only to certain temperatures.
Check carefully!
3. It is possible to use aluminium foil to shield deliate areas of
food (this prevents over-cooking).
4. Metal tins can be used in the combination methods,
however if these are very deep, they will greatly reduce the
efficiency, as metal shields the microwave energy from the
food.
Material
Grill &
Convection
cooking
Microwave
cooking
Combined
cooking

6
COOKING INSTRUCTIONS
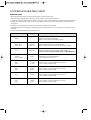
Only use utensils that are suitable for use in microwave ovens.
To cook food in the microwave oven, the microwaves must be able to penetrate the food, without being reflected or absorbed by
the dish used.
Care must therefore be taken choosing the utensil. If the utensil is marked microwave-safe, you do not need to worry.
The following table lists various utensil and indicates whether and how they should be used in a microwave oven.
● : Recommended use
▲ : Limited Use
✕ : Not Recommended
Utensil Safe Comments
Aluminium foil
Crust plate
China and earthenware
Disposable polyester
cardboard dishes
Fast-food packaging
• Polystyrene cups containers
• Paper bags or newspaper
• Recycled paper or metal trims
Glassware
• Oven-to-table ware
• Fine glassware
• Glass jars
Metal
• Dishes
• Freezer bag twist ties
Paper
• Plates, cups, napkins and
Kitchen paper
• Recycled paper
Plastic
• Containers
• Cling film
• Freezer bags
Wax or grease-proof paper
Can be used in small quantities to protect areas against
overcooking. Arcing can occur if the foil is too close to
the oven wall or if too much foil is used.
Do not preheat for more than 8minutes.
Porcelain, pottery, glazed earthenware and bone china
are usually suitable, unless deco-rated with a metal trim.
Some frozen foods are packaged in these dishes.
Can be used to warm food. Overheating may cause the
polystyrene to melt.
May catch fire.
May cause arcing.
Can be used, unless decorated with a metal trim.
Can be used to warm foods or liquids.
Delicate glass may break or crack if heated suddenly.
Must remove the lid. Suitable for warming only.
May cause arcing or fire.
For short cooking times and warming. Also to absorb
excess moisture.
May cause arcing.
Particularly if heat-resistant thermoplastic. Some other
plastics may warp or discolour at high temperatures. Do
not use Melamine plastic.
Can be used to retain moisture. Should not touch the
food.
Take care when removing the film as hot steam will
escape.
Only if boilable or oven-proof. Should not be airtight.
Prick with a fork, if necessary.
Can be used to retain moisture and prevent spattering.
▲
●
●
●
●
✕
✕
●
●
●
✕
✕
●
✕
●
●
▲
●

7
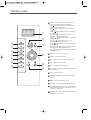
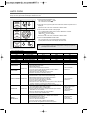
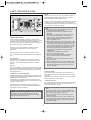
CONTROL PANEL
1
2
e
3
w
q
4
5
6
7
8
9
0
11
Display : Cooking time, power level, program
indicators and present time are displayed.
MW ( ): When blinking, the oven is operating in
MICROWAVE COOK mode.
Grill ( ): When blinking, the oven is operating in
GRILL mode.
Combi ( ): When blinking, the oven is operating
in COMBI mode.
Convection ( ): When blinking, the oven is
operating in CONVECTION mode.
Defrost ( ): When blinking, the oven is operating
in DEFROST mode.
Auto-cook ( ): When blinking, the oven is
operating in AUTO COOK mode.
Warm ( ): When blinking, the oven is operating
in WARM mode.
Steam Cleaning ( ): When blinking, the oven is
operating in STEAM CLEANING mode.
gram ( ): When blinking, the oven is operating in
weight input mode.
22
Auto cook : Used to cook or reheat.
33
Defrost : Used to defrost foods.
44
MW : Used to set power level of the microwave.
55
Grill : Used to select grill mode.
66
Combi : Used to select combi mode.
77
Convection : Used to select convection mode and
selected temp.
88
Clock : Used to set clock.
99
STEAM CLEANING : Used to clean the inside of
the oven
00
Warm : Used to keep the food warm.
qq
Dial knob : Used to set time, weight and quantity.
ww
START/SPEEDY COOK : Used to start a program
or a speedy start(each press adds 30 seconds of
microwave cooking time).
ee
STOP/CLEAR : Used to stop the oven operation or
to delete the cooking data.

8
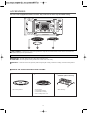
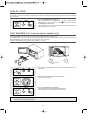
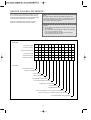
ACCESSORIES
This oven comes equipped with several accessories. They can be used in various ways to facilitate cooking.
11
Glass Turntable - Centre the tray on the roller guide when using the microwave features. Place food or microwave-safe
cookware directly on the glass turntable.
22
Roller Guide - The roller guide must be in place when using the oven.
IMPORTANT : The roller guide must be placed at the centre of the oven cavity.
33
Metal Rack - Centre the rack on the glass tray when using the grill cooking, convection cooking, and auto cooking menus.
NOTE : The Glass Turntable can be found attached to the left polystyrene packing material in the carton.
■ HOW TO USE THE ACCESSORIES FOR COOKING
■ Glass Turntable ■ Metal rack ■ Dish-Warm rack
(Premium option model only)
• All Cooking modes. • Grill cooking
• Convection cooking
• Combination cooking
• Auto cooking menu 1~4.
• Dish warming

9
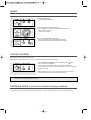
BEFORE OPERATION
When your oven is plugged in, the display will show “ :0” and a tone will sound. If the AC power goes off and comes back on, the display
will show “:0”.
Your oven has a multiple(12hr/24hr) clock system. To set the clock, follow the procedure below.
Example : To set 5:30 AM in a 24hr clock system.
1. Press Clock button once.
The display will show “ 12H ”. This is a 12 hour clock system.
2. Press Clock button once more, the display shows “24H”.
This is a 24hour clock system. If you want 12hour clock system, omit this step.
3. Turn the dial knob to set the hour number “5:”.
The hour digit starts blinking, the colon will light.
4. Press Clock button. “5:00” shows in display.
The minute digit starts blinking, the colon and hour number will light.
5. Turn the dial knob until “5:30” shows in the display window.
6. Press Clock button. The colon starts blinking.
If you selected the 12hour clock system, this digital clock allows you to set the
time from 1:00 to 12:59.
If you selected the 24hour clock system, this digital clock allows you to set the
time from 0:00 to 23:59.
SETTING THE CLOCK
Note : You can check the current time while cooking is in progress by
pressing the Clock button.

10
Child lock : The Child Lock function helps to prevent accidents from children operating the oven without being monitored by the parents.
Power save mode : This function is used for saving energy.
To set child lock
1. Press the STOP/CLEAR button.
“: 0” or clock appears in the display.
2. Press and hold the STOP/CLEAR button for 3 seconds.
A beep sounds and the display shows “ LOC ” for 3 seconds.
Now the oven cannot be operated.
3. To cancel child lock simply repeat procedure 2.
The oven will beep.
The oven is again available for normal use.
To set power save mode
1. Press the STOP/CLEAR button.
“: 0” or clock appears in the display.
2. Press and then hold the Clock button for 3 seconds.
The display will turn off and a beep sounds.
To operate the oven in power save mode, press any key or turn the knob.
Then “:0” or clock will be shown and the operation of all function keys will be
the same as in the normal mode.
But if there is no operation within 10 seconds in clear mode or while
manipulating the key, all the contents of display will disappear.
3. To cancel the power save mode, simply repeat the setting procedure.
The power save mode will be canceled and a beep sounds.
The oven is again available for normal use.
CHILD LOCK AND POWER SAVE MODE

11
Tips : Please read this OPERATION section for the proper safety information and the operating instructions before using the oven.
Prior to setting the controls, place one cup of water in the oven, in a heat-proof glass measuring cup, for testing purposes.
The oven could be damaged if you operate the oven in microwave mode without anything in the cavity.
Note : When the cooking time has elapsed the oven beeps three times and "End" appears on the display. The glass turntable
stops and the oven-light turns off. The oven will continue to beep every one-minute until either the STOP/CLEAR button
is pressed or the door is opened. Opening the door while cook is in progress will cause the oven to stop and any
displayed countdown will pause. If the START/SPEEDY COOK button is pressed, the countdown will resume. If the
STOP/CLEAR button is pressed, the cook will cancel. The oven can display the set cooking time in 10 second steps (up
to 5 minutes cooking time), in 30 second steps (up to 10 minutes cooking time), and in 1 minute steps (up to 60 minutes
cooking time).
When the door is opened after cooking, the cooling fan may start to operate for 5 minutes to cool down the inside of
oven. (Display shows "cool" and " :0 or clock")
Also note that when the Cooling mode operates, lamp, tray, and fan runs at the same time and “cool” shows on the
display.
Note : The oven will automatically work on 100% microwave power if a
cooking time is entered without the power level previously being
selected.
You can check the power level while cooking is in progress by
pressing the MW button.
Power level table
OPERATION
This microwave cooking method allows you to cook food for a desired time. In addition to the maximum power level(100%),
you can select different microwave power from 9 other levels, 10% to 90% for the foods that require slower cooking.
If you have used the appliance for grilling, convection or combination cooking, let the oven cool down before using again. Never switch
the microwave oven on when it is empty.
MICROWAVE COOKING
1. Press the MW button once. MW indicator ( ) lights.
“P-HI”(POWER HIGH) shows in display.
2. Select the appropriate power level by pressing the MW button again until the
corresponding percentage is displayed. Refer to the power level table below
for further details.
3. Turn the dial knob to set the cooking time.
For a cooking time of 5 minutes 30 seconds, turn the dial knob to set 5:30.
(up to 60 minutes can be set)
“5:30” shows in display.
4. Press the START/SPEEDY COOK button.
The oven light comes on and the turntable starts rotating.
Cooking starts and the time in the display will count down.
Power level
P-HI
P-90
P-80
P-70
P-60
percentage
100%
990%
980%
970%
960%
Output
900W
810W
720W
630W
540W
Power level
P-50
P-40
P-30
P-20
P-10
P-00
percentage
50%
40%
30%
20%
10%
90%
Output
450W
360W
270W
180W
090W
000W

12
The Grill enables you to heat and make food to turn brown quickly without using microwave.
GRILL COOKING
Note : When using the grill heater for the first time, smoke and odour will be
given off. To avoid this happening when food is being cooked, turn
the heater on with a microwave safe bowl containing 200cc of water
in the oven for 10 minutes and the odour will disappear from then on.
Grill food by placing it directly on the rack, in a flat dish or on a heat
resistant plate on the rack.
Note :
The heating element is located on the top surface of the oven.
1. Press the Grill button once. The GRILL indicator ( )lights.
2. Turn the dial knob to set the grilling time.
For a grilling time of 11 minutes, turn the dial knob to set 11:00.
(up to 60 minutes can be set)
“11:00” shows in display.
3. Press the START/SPEEDY COOK button.
The oven light comes on and the turntable starts rotating.
Cooking starts and the time in the display will count down.
WARNING :
The temperature inside the oven and window is very high.
Do not touch the oven window and metallic interior of the oven when taking
food in and out.
Use thick oven gloves while handling food or accessories.
This method is ideal for toasting bread or muffins.
Remember the oven will be hot.
Place all food on the metal rack.
Use oven-proof cookware.
As there is no microwave energy being used you can place
metal tins directly onto the metal rack with no danger of arcing.
Suggested use Cookware

13
For convection cooking, it is recommended to preheat the oven to the appropriate temperature (except for the 40C that displays only)
before placing food in the oven.
The maximum preheating time is 30 minutes.
If cooking is not started immediately after preheating, the convection indicator will continue to flash and the preheated oven temperature
will be displayed. It will be maintained for 15 minutes; then switch off automatically.
CONVECTION COOKING(With pre-heat)
1. Press the Convection button once. The CONVECTION indicator ( ) lights.
“180C” shows in display.
2. Select the convection cooking temperature by pressing the Convection
button again until the corresponding temperature is displayed.
3. Press START/SPEEDY COOK button. The CONVECTION indicator ( )
blinks.
The temperature of preheating and “PrE-” blink altematively in the display.
The oven will now preheat. When the oven reaches the preheated
temperature the oven will beep and the preheated oven temperature will
appear in the display.
Then open the door and place your food in the oven.
The oven temperature now shows in the display.
4. Turn the dial knob to set the cooking time.
For a cooking time of 11 minutes, turn the dial knob to set 11:00.
(up to 60 minutes can be set)
“11:00”shows in display.
5. Press the START/SPEEDY COOK button.
The oven light comes on and the turntable starts rotating.
Cooking starts and the time in the display will count down.
180C → 190C → 200C → 210C → 220C →
40C → 100C → 110C → 120C →
130C → 140C → 150C → 160C → 170C →
Temperature sequence

14
The convection mode enables you to cook food in the same way as in a traditional oven. Microwaves are not used.
Always use oven gloves when touching the utensils in the oven, as they will be very hot.
CONVECTION COOKING(Traditional cooking)
1. Press the Convection button once. The CONVECTION indicator ( ) lights.
“180C” shows in display.
2. Select the convection cooking temperature by pressing the Convection
button again until the corresponding temperature is displayed.
3. Turn the dial knob to set the cooking time.
For a cooking time of 11 minutes, turn the dial knob to set 11:00.
(up to 60 minutes can be set)
“11:00” shows in display.
4. Press START/SPEEDY COOK button.
The oven light comes on and the turntable starts rotating.
Cooking starts and the time in the display will count down.
Note: You can check the setting temperature while cooking is in progress by pressing the Convection button.
Fermentation
• 40C of convection cooking temperature is adequate for fermenting bread-like foods.
• High temperatures in the inside of oven may reduce the quality of fermentation. Cool it down to the room temperature before use.
Suggested use
This function is ideal for cooking meringues, cookies, biscuits,
scones, bread, puddings, large fruit cakes and all pastries.
Remember the oven will be hot.
Place all food on the metal rack.
Cookware
Use oven-proof cookware.
As there is no microwave energy being used you can place metal
tins directly onto the metal rack with no danger of arcing.
180C → 190C → 200C → 210C → 220C →
40C → 100C → 110C → 120C →
130C → 140C → 150C → 160C → 170C →
Temperature sequence

15
This function allows you to combine convection operation with microwave to produce traditional baked or roasted results in less time.
Always use microwave-safe and oven-proof cookware. Glass or ceramic dishes are ideal as they allow the microwaves to penetrate the
food evenly.
Always use oven gloves when touching the utensils in the oven, as they will be very hot.
COMBINATION COOKING
1. Press the Combi button once.
The COMBI indicator ( ) light and “C-0” will show in the display.
2. Press Convection button once.
“180˚C” shows in display.
Select the convection cooking temperature by pressing the Convection button
again until the corresponding temperature is displayed.
3. Turn the dial knob to set the cooking time.
For a cooking time of 11 minutes, turn the dial knob to set 11:00.
(up to 60 minutes can be set)
“11:00” shows in display.
4. Press the START/SPEEDY COOK button.
The oven light comes on and the turntable starts rotating.
Cooking starts and the time in the display will count down.
Note : You can check the cooking temperature while cooking is in progress by
pressing the Convection button.
You can check the power level while cooking is in progress by pressing
the Combi button.
180C → 190C → 200C → 210C → 220C →
100C → 110C → 120C →
130C → 140C → 150C → 160C → 170C →
Temperature sequence

16
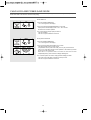
Weight Defrost automatically sets the defrosting times and power levels to give even defrosting results for frozen food.
During the defrosting process the oven will beep to remind you to check the food. When the oven beeps, open the door, turn the frozen
food over and close the door, and press the START/SPEEDY COOK button again.
(1) WEIGHT DEFROST MODE
1. Press the Defrost button once. The Defrost indicator ( ) lights and “0” is
displayed. The ( ) indicator blinks.
This is a weight defrost mode.
2. Turn the dial knob to set the weight.
Weight can be set up from 200g to 3000g.
The weight will change in 50g increments or decrements.
For a defrosting weight of 1000 grams, turn the dial knob to set 1000.
“1000” shows in display.
3. Press the START/SPEEDY COOK button.
The oven light comes on and the turntable starts rotating. The ( ) indicator
goes off.
Cooking starts and the time in the display will count down.
During the defrosting process the oven will beep to remind you to check the food.
When the oven beeps, open the door, turn the frozen food over and close the door, and press the START/SPEEDY COOK button
again.
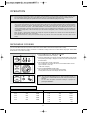
(2) TIME DEFROST MODE
1. Press the Defrost button twice. The Defrost indicator ( ) lights and
“: 0” is displayed.
This is a time defrost mode.
2. Turn the dial knob to set the defrosting time.
For a time of 11 minutes, turn the dial knob to set 11:00.
(up to 60 minutes can be set)
“11:00”shows in display.
3. Press START/SPEEDY COOK button.
The oven light comes on and the turntable starts rotating.
Cooking starts and the time in the display will count down.
Note : When Weight-Defrosting begins, the defrosting time is automatically
determined by the weight entered.

17
Auto Cook Menu Start Temp. Method Cookware
Glass Turntable +
Metal rack
Glass Turntable +
Metal rack
Micro and heat proof
shallow dish.
(e.g Pyrex.)
Glass Turntable +
Metal rack
Microproof dish.
(e.g Pyrex.)
Glass Turntable
ROAST PORK
ROAST BEEF
ROAST CHICKEN
BAKED FISH
FRESH
VEGETABLES
Chilled temp.
Chilled temp.
Chilled temp.
1. Tie the joint into a neat shape.
2. Place the meat on the dish.
3. Brush with a little oil.
4. Place roasts fat-side down on the dish.
5. Cook on "AUTO COOK-ROAST PORK or ROAST BEEF".
6. Turn over when hearing the beep.
7. Remove from oven. Drain off any excess juices.
8. Stand for 10 minutes in foil before serving.
1. Wash and dry chicken. Tie the legs loosely together with string.
2. Pierce the skin a couple of times just under the legs.
3. Brush butter mixture all over the chicken on the dish.
4. Place roasts breast-side down on the dish.
5. Cook on "AUTO COOK-ROAST CHICKEN".
6. Turn over when hearing the beep.
7. Remove from oven. Drain off any excess juices. Season with salt if
required. Stand for 10 minutes in foil before serving.
1. All types of fresh fish(except battered or breadcrumbed fish) can
be cooked whether whole, fillets or steaks.
2. Place the prepared fish in a buttered dish.
3. Season with salt and pepper, sprinkle with lemon juice and dot
with butter. Do not cover dish.
4. Place on dish on the metal rack on the turntable.
5. Cook on "AUTO COOK- BAKED FISH".
1. Wash and trim.
2. Place prepared vegetables into a suitable sized container.
3. Sprinkle with 4-5 tbs. of water.
4. Cover with pierced cling film or a lid.
5. Place on dish on the turntable.
6. Cook on "AUTO COOK- FRESH VEGETABLES.
* For best results cut vegetables into similar sized pieces.
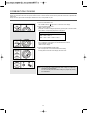
This function allows you to simply and automatically cook a range of popular foods.
Always use oven gloves when touching the utensils in the oven.
AUTO COOK
1. Press the Auto Cook button once.
The Auto Cook indicator ( ) lights.
“AC-1” will show in the display.
2. Select the menu by pressing the Auto Cook button until the required menu is
displayed.
Refer to the auto cook menu chart below for further details.
3. Turn the dial knob to set the cooking weight.
For a cooking weight of 1000 grams, turn the dial knob to set 1000.
(up to 2000 grams can be set)
“1000” and ( ) shows in display.
Refer to the auto cook menu chart below for further details.
4. Press the START/SPEEDY COOK button.
The oven light comes on and the turntable starts rotating.
Cooking starts and the time in the display will count down.
Auto Cook Menu Chart
Press auto cook key
Once
Twice
3 times
4 times
5 times
Auto Cook Menu
ROAST PORK
ROAST BEEF
ROAST CHICKEN
BAKED FISH
FRESH VEGETABLE
Minimum Weight
500 g
500 g
800 g
300 g
100 g
Maximum Weight
2000 g
2000 g
2000 g
900 g
900 g
Weight Step
100 g
100 g
100 g
100 g
150 g
Note : You can check the current cook setting while the cooking is in progress by
pressing the Auto Cook button.

18
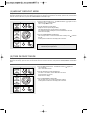
The Speedy Cook function allows the oven to cook immediately on microwave full power.
The Speedy Cook function has been pre-programmed to increase the cooking time in increments of 30 seconds up to the maximum
time of 5 minutes.
SPEEDY COOK
1. Press the START/SPEEDY COOK button.
The oven will display as “ :30”, MW indicator ( ) lights, and the oven starts
immediately. You may increase the cooking time by keep pressing the
START/SPEEDY COOK button.
The oven light comes on and the turn table starts rotating and the time in the
display will count down in seconds.
Note: Once the dish warmer mode ends, please do not grasp a dish or the rack with your bare hands as it may be hot. We
recommend wearing heat-resistant gloves.
The DISH WARMER mode allows the oven to Warm dining dishes/plates before serving the food.
The premium option model comes with the specially designed Dish-Warm Rack used for the dish warmer mode only. Please take out
the glass turntable and place the dish-warm rack at the centre of the oven cavity.
Then place dishes/plates (Size ranges from Ø150~Ø260mm) on the rack.
DISH WARMER (For Premium option model only)
1. Keep pressing the WARM button to select the desired temperature. (from
40ºC~80ºC)
2. Turn the dial knob to set the desired dish Warm time.
(from 10 sec.~ 60 minutes)
3. Press the START/SPEEDY COOK button.
The oven light comes on and the turntable starts rotating.
Warming starts and the time in the display counts down.
Heat-resistant
globe
Page is loading ...
Page is loading ...
Page is loading ...
Page is loading ...
Page is loading ...
Page is loading ...
Page is loading ...
Page is loading ...
Page is loading ...
Page is loading ...
Page is loading ...
Page is loading ...
Page is loading ...
Page is loading ...
-
 1
1
-
 2
2
-
 3
3
-
 4
4
-
 5
5
-
 6
6
-
 7
7
-
 8
8
-
 9
9
-
 10
10
-
 11
11
-
 12
12
-
 13
13
-
 14
14
-
 15
15
-
 16
16
-
 17
17
-
 18
18
-
 19
19
-
 20
20
-
 21
21
-
 22
22
-
 23
23
-
 24
24
-
 25
25
-
 26
26
-
 27
27
-
 28
28
-
 29
29
-
 30
30
-
 31
31
-
 32
32
-
 33
33
-
 34
34


Daewoo KOC-9Q4T Owner's manual
- Category
- Microwaves
- Type
- Owner's manual
- This manual is also suitable for
Ask a question and I''ll find the answer in the document
Finding information in a document is now easier with AI
Related papers
-
Daewoo KOC-923T Owner's manual
-
-
-
 DAEWOO ELECTRONICS KOC-873TSL User manual
-
 DAEWOO ELECTRONICS KOG-3C675S User manual
-
Daewoo QT1 Owner's manual
-
-
 DAEWOO ELECTRONICS KOG-8755 User manual
-
-


Other documents
-
De'Longhi D90N30ESLRIII-XC User manual
-
Zanussi ZNM21X User manual
-
Smeg Microwave Convection/Grill Oven User manual
-
Panasonic NNA720 Operating instructions
-
-
Defy DMO 381 Owner's manual
-
-
Electrolux EMC3060 User manual
-
Prestige SE28W/S User manual
-
Zanussi ZNM11X User manual