Ferm CDM1040 Owner's manual
- Category
- Cordless combi drills
- Type
- Owner's manual
This manual is also suitable for

www.ferm.com 0601-19.1
UK Subject to change
D Änderungen vorbehalten
NL Wijzigingen voorbehouden
F Sous réserve de modifications
E Reservado el derecho de
modificaciones técnicas
P Reservado o direito a modificações
I Con riserva di modifiche
S Ändringar förbehålles
SF Pidätämme oikeuden muutoksiin
N Rett till endringer forbeholdes
DK Ret til ændringer forbeholdes
Art.no. CDM1040
FDC-2400I
www.ferm.com
USERS MANUAL 04
GEBRAUCHSANWEISUNG 12
GEBRUIKSAANWIJZING 21
MODE D’EMPLOI 30
MANUAL DE INSTRUCCIONES 39
MANUAL DE INSTRUÇÕES 48
MANUALE UTILIZZATI 57
BRUKSANVISNING 66
KÄYTTÖOHJE 74
BRUKSANVISNING 82
BRUGERVEJLEDNING 90
UK
D
NL
F
E
P
I
S
SF
N
DK
Page is loading ...

98
Ferm Ferm 3
Spare parts list FCD-2400I
Position no. Description Ferm no.
3 Switch 406165
4 Battery CDA1032
10 Drill chuck 406516
11 Left bolt drill chuck 406403
38 Left/right button 406656
- Charger 406637
6
5
8
9
7
5
6
R
L
4
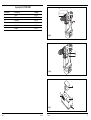
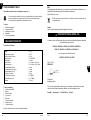
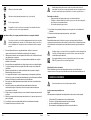
Fig. F
Fig. E
Fig. D

Ferm 97
Miljø
For at undgå transportbeskadigelse leveres maskinen i en solid emballage. Emballagen er så
vidt muligt lavet af genbrugsmateriale. Genbrug derfor emballagen.
NiCd celler kan genvindes.
Defekte og/eller kasserede elektriske eller elektroniske maskiner skal afleveres på
en genbrugsplads.
Garanti
Læs det separat vedlagte garantikort for garantibetingelserne.
CE
KONFORMITETSERKLÆRING (DK)
Vi erklærer herved, udelukkende på eget ansvar, at dette produkt opfylder følgende standarder
eller standardiserede dokumenter:
EN50260-1, EN50260-2-1, EN50260-2-2, EN55014-1, EN55014-2,
EN60335-1, EN60335-2-29, EN61000-3-2, EN61000-3-3.
i overenstemmelse med direktivreglerne
98/37/EEC, 73/23/EEC, 89/336/EEC
Fra 01-12-2005
ZWOLLE NL
W. Kamphof
Quality department
Det er vores hensigt til stadighed at forbedre vores produkter, og vi forbeholder os derfor til
enhver tid retten til at ændre produktspecifikationerne uden forudgående varsel.
Ferm BV • Lingenstraat 6 • 8028 PM Zwolle • Holland
DK
Ferm
CORDLESS IMPACT DRILL
The numbers in the text refer to the diagrams on pages 2 - 3.
For your own safety and that of others, we recommend that you read this instruction
manual carefully before using this saw. Keep this instruction manual and the
documentation provided with the saw for future reference.
Contents
1. Machine information
2. Safety instructions
3. Mounting accessories
4. Operation
5. Service & maintenance
1. MACHINE INFORMATION
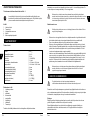
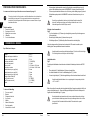
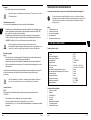
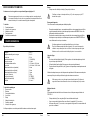
Technical specifications
Contents of packing
1 Cordless Impact drill
1 Battery
1 Battery charger
2 Accessories
1 Blow case
1 Instruction manual
1 Guarantee card
1 Safety instructions
Check the machine and accessories for transport damage.
Voltage | 24 V
—
---
Voltage battery charger | 230 V~
Frequency battery charger | 50 Hz
Capacity battery | 1.5 Ah (NiCd)
Charging time | 100 min
Speed, no load | 0-500/min / 0-1400/min
Impact frequency | 0-8000/min / 0-22400/min
Max. drill diameter (wood) | 30mm
Max. drill diameter (concrete) | 15mm
Max. drill diameter (steel) | 13mm
Weight (incl. 1 battery) | 2.5 kg
Lpa Sound pressure level | 87.7 dB(A)
Lwa Sound power level | 100.7 dB(A)
Vibration | 18.0 m/s
2
4
UK

Ferm
Afladning af batteriet
Det er nødvendigt at lade batterierne op, men det er mindst lige så vigtigt, at det
aflades.
• Når batteriet er blevet ladet op, skal maskinen bruges, indtil man opdager, at maskinens
effekt begynder at blive mindre, så den ikke kan nå op på den maksimale
omdrejningshastighed.
• Nu er batteriet næsten afladet. Først nu skal man begynde at lade batteriet op.
• Hvis batteriet oplades, mens det stadig har ca. en tredjedel af kapaciteten, kan det
resultere i den såkaldte ‘hukommelseseffekt’. Når batteriet nu oplades, oplades kun den
afladede del af batteriet, og den resterende tredjedel, der stadig er opladet, kan
krystallisere. Derefter kan denne del af batterikapaciteten ikke længere bruges.
• Batteriet må ikke aflades fuldstændigt. Så snart man opdager, at effekten eller den
maksimale omdrejningshastighed mindskes, skal batteriet lades op. Hvis man fortsætter
med at bruge boremaskinen, så batteriet aflades fuldstændigt, kan det resultere i den
såkaldte ‘polskift effekt’. Batteripolernes polaritet ombyttes: ‘+’bliver til ‘-‘, og ‘-‘ bliver til ‘+’.
Hvis det sker, vil polariteten være ombyttet under opladningen, og det beskadiger
batteriet, så det ikke kan repareres.
Hvis den batteridrevne boremaskine ikke skal bruges i længere tid, skal batteriet
først lades fuldstændigt op. Batteriet skal være ladet op, når det gemmes væk.
5. SERVICE & VEDLIGEHOLDELSE
Sørg for at maskinen ikke står under strøm, når der udføres
vedligeholdelsesarbejder på mekanikken.
Maskinerne fra Ferm er udviklet til at fungere længe uden problemer med et minimum af
vedligeholdelse. Ved at rengøre maskinen regelmæssigt og behandle den korrekt, bidrager De
til en længere levetid for maskinen.
Rengøring
Rengør regelmæssigt maskinkappen med en blød klud, helst efter hvert brug. Sørg for at
ventilationshullerne er fri for støv og snavs. Brug en blød klud, der er vædet i sæbevand til at
fjerne hårdnakket snavs. Brug ingen opløsningsmidler, så som benzin, alkohol, ammoniak,
osv. Den slags stoffer beskadiger kunststofdelene.
Smøring
Maskinen behøver ingen ekstra smøring.
Fejl
Skulle en fejl opstå, f.eks. pga. slidtage af en enhed, kontakt venligst serviceadressen på
garantibeviset. På bagsiden af denne manual finder du en tegning med alle dele, der kan bestilles.
96
DK
Ferm 5
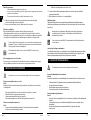
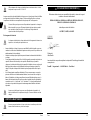
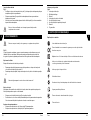
Product information
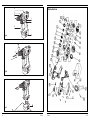
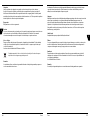
Fig. A
1. Direction switch
2. On/off switch
3. Battery
4. Speed selector switch
5. Torque setting ring
6. Impact/drill setting ring
7. Keyless chuck
8. Auxiliary handle
2. SAFETY INSTRUCTIONS
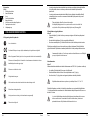
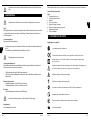
Explanation of the symbols
Read instructions carefully
In accordance with essential applicable safety standards of European directives
Class II machine – Double insulation – You don’t need any earthed plug.
Denotes risk of personal injury, loss of life or damage to the tool in case of non-
observance of the instructions in this manual.
Indicates electrical shock hazard.
Immediately unplug the plug from the mains electricity in the case that the cord gets
damaged and during maintenance
The number of revolution of the machine can be electronically set.
Indoor use only
In case of failure, the transformer is not dangerous
Thermic protector
UK

Ferm 95
• Når der skal bores i bløde materialer som træ eller plastic, drejes hammer/bor-knappen (6)
med uret, indtil indikatoren er ud for symbolet ‘BOR’. Brug et metalbor.
• Skal der bores i hårdt materiale som sten eller beton, drejes knappen mod uret, til
indikatoren er ud for symbolet ‘HAMMER’. Brug her et bor med hårdmetalskær.
Kontroller jævnligt borepatronen for beskadigelse.
Brug eventuelt kølemiddel. Når der bores i vægge, skal man passe på ikke at komme
til at bore i ledninger eller vandrør. Spørg forhandleren om råd vedrørende brug.
Tænd og sluk
Fig. E
• Tryk afbryderen (2) ind. Maskinens omdrejningshastighed kan reguleres ved at trykke
mere eller mindre på afbryderen.
• Når afbryderen (2) slippes, stopper maskinen straks.
• Sæt knappen til rotationsretning (1) i midterposition for at låse maskinen, så den ikke kan
tændes på afbryderen.
Læg ikke maskinen væk, før der er stoppet helt. Læg ikke maskinen på en støvet overflade.
Støvpartikler kan trænge ind i maskinen.
Brug kun maskinen, hvis knappen til rotationsretning (2) er helt i en af positionerne.
Brug ikke maskinen, hvis denne knap er i neutral position.
Opladning af batteri
Fig. F
Den medfølgende batterilader er kun beregnet til opladning af batterierne til FDC-2400 I.
• Sæt batteriet (3) i batteriladeren (9) som vist på illustrationen.
• Sæt stikket til batteriladeren i en stikkontakt. Den røde lampe for “lynopladning” (10) lyser.
• Når den grønne lampe (11) lyser, er batteriet ladet op og klar til brug.
Batteriladeren må kun bruges i tørre rum ved en temperatur på mellem 10°C og
40°C.
Batteriet til denne boremaskine er ikke ladet op. Før maskinen bruges første gang, skal
batteriet lades op i 1 til 2 timer, så det når op på fuld kapacitet. Batteriets maksimale kapacitet
nås først, når det er blevet ladet op 4 til 5 gange.
Hvis accu boremaskinen ikke skal bruges i længere tid, skal batteriet lades op, før
det gemmes væk. Fra tid til anden skal batteriet lades en smule op, så man undgår,
at det aflades helt. Batteriet skal opbevares særskilt i plastickufferten.
DK
Ferm
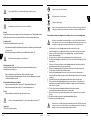
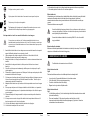
Wear ear and eye protection
Never throw batteries into open fire
Always recycle batteries
Faulty and/or discarded electrical or electronic apparatus have to be collected at
the appropriate recycling locations.
Important safety advice concerning the battery pack & battery charger
If you should come into contact with any acid from the Battery pack, wash the
affected parts with water immediately. If acid should come into contact with the eyes,
rinse them immediately with water and seek medical advice as soon as possible.
1. Before using both the battery pack and the battery charger, make sure you have read and
understood the operating instructions and safety information.
2. Only use the battery pack with the battery charger provided – using other chargers could
be dangerous.
3. Keep the battery pack, tool and battery charger away from damp and wet conditions.
4. Before using the battery charger, check all wires are properly connected.
5. If any wires on the charger are damaged, do not use it until these have been replaced.
6. When the charger is not in use it should not be plugged in. When unplugging, do not pull the
plug out by the cable.
7. If the charger breaks down or suffers from other technical problems, take it to a recognised
dealership to be checked before using it again. Any damaged parts must be replaced.
8. Take care when handling the battery pack, do not drop it or knock it against other things.
9. Never attempt to repair the battery charger or battery pack yourself; this can be extremely
dangerous. Repairs should always be carried out by a recognised dealership.
10. Always unplug the charger before cleaning or carrying out any other maintenance on it.
11. Do not attempt to charge the battery pack in temperatures of below 10 degrees or above 40
degrees centigrade.
12. The air vents on the battery charger must be kept unblocked.
13. The battery pack must not be short-circuited.
When an apparatus short-circuits, the strength of the electric current is increased.
This can cause the apparatus to over heat, catch fire or even explode, causing
damage and also endangering the operator.
To avoid this:
• Firstly do not connect any wires to the terminals of the battery pack;
• Ensure that no metal objects (nails, coins, paper-clips) are caught in the opening of the
battery pack;
• Do not expose the battery pack to water or rain.
6
UK

Ferm
Boremaskinen må kun bruges med knappen til rotationsretning helt i en af
positionerne.
4. FUNKTION
Iagttag altid sikkerhedsinstruktionerne og gældende bestemmelser.
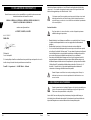
Fig. D
Hold maskinen godt fast og tryk boret i arbejdsemnet med et jævnt tryk. Der må ikke bruges
magt på maskinen.
Brug kun bor, der ikke viser tegn på slitage. Slidte bor påvirker maskinens effekt negativt.
Indstilling af omdrejningshastigheden
Maskinen kan indstilles på to omdrejningshastigheder.
• Til langsom boring eller, når der skal skrues skruer i eller ud, indstilles knappen til
omdrejningshastighed (4) på 'lo'.
• For hurtig boring sættes knappen på 'hi'.
Der må ikke skiftes om, mens motoren kører!
Indstilling af moment
Maskinen har forskellige momentindstillinger, så momentkraften kan justeres, når der skrues
skruer i og ud.
• Sæt ringen til momentindstilling (5) på det ønskede moment.
• Man bør vælge den laveste indstilling, når der skrues. Vælg en højere indstilling, hvis
motoren glider.
Sådan skrues skruer i og ud
• Sæt knappen til rotationsretning (1) i position 'R' for at skrue skruer i.
• Sæt knappen til rotationsretning (1) i position 'L' for at skrue skruer ud.
Boring
• Sæt ringen til momentindstilling (5) i position bor.
Sørg for, at knappen til rotationsretning (1) altid er i position 'R', når der skal bores.
Slagboring
Vælg et egnet bor til arbejdet.
94
DK
Ferm 7
14. If the battery pack is broken or can no longer be re-charged it must be properly disposed of.
15. Never throw the battery pack into water or a fire – it may explode.
Electrical safety
When using electric machines always observe the safety regulations applicable in your country
to reduce the risk of fire, electric shock and personal injury. Read the following safety
instructions and also the enclosed safety instructions.
Keep these instructions in a safe place!
Always check that the voltage on the batterypack corresponds to the voltage on the
rating plate. Also check that your mains voltage corresponds to the input voltage of
the battery charger.
The battery charger is double insulated in accordance with EN60335; therefore no
earth wire is required.
Replacing cables or plugs
Immediately throw away old cables or plugs when they have been replaced by new ones. It is
dangerous to insert the plug of a loose cable in the wall outlet.
3. MOUNTING ACCESSORIES
Prior to mounting an accessory always remove the battery.
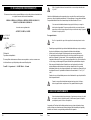
Inserting and removing the drill bits
Fig. B
In addition to bits the machine can also hold screw bits with a hexagonal shaft.
• Loosen the chuck (7) by holding one section and turning the other.
• Position the drill bit shaft in the take up of the chuck.
• Fasten the chuck until the drill bit is tight.
• Open the chuck again when you want to exchange the drill bit.
Inserting and removing of the battery
Fig. C
• Make sure that the direction switch (1) is in middle position to prevent the machine from
switching on unexpectedly.
• Place the accumulator (3) in the bottom of the machine, as shown in the diagram, until it
engages.
• Before removing the accumulator, depress the release buttons (A) and then take the
accumulator out from the bottom of the machine
UK

Ferm 93
• Batteriet må ikke udsættes for vand eller regn.
14. Hvis batteriet går i stykker eller ikke længere kan oplades, skal det bortskaffes korrekt.
15. Batteriet må ikke kastes i vand eller ild, da det herved kan eksplodere.
Elektrisk sikkerhed
Ved anvendelse af elektriske mas kiner skal man altid følge de lokalt gældende
sikkerhedsforskrifter i forbindelse med brandfare, fare for elektrisk stød og
legemensbeskadigelse. Læs udover de nedenstående instruktioner også sikkerheds-
forskrifterne i den separat vedlagte sikkerhedsfolder.
Kontroller altid, at spændingen på batteriet svarer til den angivne spænding på
mærkepladen. Kontroller også, at netspændingen svarer til indgangsspændingen
på batteriladeren.
Maskinen er dobbelt isoleret i overensstemmelse med EN60335; der kræves
således ingen jording.
Udskiftning af ledninger eller stik
Hvis netledningen er blevet beskadiget, skal den udskiftes med en speciel netledning, som kan
fås via fabrikanten eller fabrikantens kundeservice. Gamle ledninger og stik skal kasseres, når
de er blevet udskiftet med nye. Det er farligt at sætte stikket på en løs ledning i en stikkontakt.
3. MONTERING AF TILBEHØR
Før der monteres tilbehør, skal batteriet tages ud.
Isætning og udtagning af bor
Fig. B
Ud over bor kan der også sættes skruebits med sekskantet skaft i.
• Løsn borepatronen (7) ved at holde den ene del fast og dreje på den anden.
• Sæt boret i og stram patronen til.
• Stram indtil boret sidder godt fast.
• Når der skal skiftes bor, åbnes borepatronen igen.
Isætning og udtagning af batteriet
Fig. C
• Sørg for, at knappen til rotationsretning (1) er i midterposition, så maskinen ikke startes uventet.
• Sæt batteriet (3) ind i åbningen i bunden af maskinen, til det klikker fast, se illustrationen.
• Tryk på udløserknappen (A) for at tage batteriet ud af bunden af maskinen.
DK
Ferm
The drill must only be used with the forward / reverse switch fully enclosed
4. OPERATION
Always observe the safety instructions and applicable regulations.
Fig. D
Firmly hold the machine and push the bit with even pressure into the workpiece. Do not force
the machine.
Use only bits that do not yet show any signs of wear. Worn bits have a negative effect on the
efficiency of the machine.
Adjusting the speed
The appliance has two drill speeds.
• For slow drilling or for driving or removing screws, set the speed selection switch (4) to 'lo'.
• For fast drilling set the speed selection switch to 'hi'.
Never switch over when the motor is running!
Torque adjustment
The machine has different torque settings by means of which the force for fastening and
loosening screws can be determined.
• Put the torque setting ring (5) at the required torque.
• Preferably select the lowest possible setting to move the screw. Select a higher torque
setting when the motor is slipping.
Screwing screws in and out
• Set the direction switch (1) on position 'R' for putting in screws.
• Set the direction switch on position 'L' for removing screws.
Drilling
• Turn the torque setting ring (5) to drilling position.
Be sure that the direction switch (1) always in position 'R' during drilling.
Impact drilling
Select a suitable drill bit for the practice use.
8
UK

Ferm 9
• For drilling in soft material like wood or plastic rotate the impact sleeve (6) in clockwise until
the indicator points at the mark ‘DRILLBIT’In this case use a metal drill bit.
• For drilling in hard material like stone or concrete, rotate the impact sleeve (6) in anti-
clockwise until the indicator points at the mark ‘HAMMER’. In this case use a drill bit with
carbide tip.
Regular check the chuck for possible damage.
Possible use a coolant. In case of drilling in walls, watch out for drilling in electric
wires of water pipes. Get advice according to the use from your dealer.
Switching on and off
Fig. E
• Press the on/off switch (2) in. You regulate the speed of the machine by the degree to which
you keep the switch pressed in.
• Releasing the on/off switch (2) causes the drill to stop immediately
• Slide the direction switch (1) to the middle to lock the machine in switched off mode.
Do not put the machine away until the machine has completely stopped running. Do not store
the machine on a dusty surface. Dust particles can get into the mechanism.
Only operate the drill with the forward / reverse switch (2) fully engaged. Never
attend to use the drill with this switch in the neutral position.
Charging batteries
Fig. F
The enclosed battery charger has been exclusively designed for loading batteries of the FDC-
2400I.
• Position the battery (3) in the battery charger (9) as indicated in the illustration.
• Plug in the battery charger. The red “fast charging” light (10) is then illuminated
• As soon as the green light (11) is illuminated, charging has finished and the accumulator is
ready for use
Only use the battery charger in a dry environment at a temperature between 10 °C
and 40 °C.
The battery on the drilling machine you have purchased is not charged up. Before using it for
the first time leave it to charge for 1 - 2 hours in order for it to reach its full capacity. The total
capacity of the battery will be reached after it has been charged 4 – 5 times.
If the cordless drill is not going to be used for a long period of time, recharge the
battery before storing. From time to time recharge the battery for a short period of
time, to prevent it from running down. Store the battery separately in the plastic case.
UK
D
Ferm
Brug beskyttelsesbriller og høreværn
Defekte og/eller kasserede elektriske eller elektroniske maskiner skal afleveres på
en genbrugsplads.
Batteriet må ikke kastes i vand eller ild, da det herved kan eksplodere
Batterier skal altid afleveres til recirkulation
Sikkerhedssinstruktioner vedrørende batteriet og batteriladeren
Hvis man kommer i berøring med syren i batteriet, skal man straks skylle det
pågældende sted med vand. Hvis syren kommer i øjnene, skylles straks grundigt
med vand, og læge kontaktes hurtigst muligt.
1. Før brug af batteriet og batteriladeren skal man have læst og forstået betjenings-
instruktionerne og informationen vedrørende sikkerhed.
2. Batteriet må kun oplades i den medfølgende batterilader – det kan være farligt at bruge
andre ladere.
3. Hold batteriet, maskinen og batteriladeren væk fra damp og våde omgivelser.
4. Kontroller, at alle ledninger er korrekt tilsluttet, før batteriladeren bruges.
5. Hvis en ledning til batteriladeren er beskadiget, må den ikke bruges, før ledningen er blevet
udskiftet.
6. Ledningen må ikke være sat i en stikkontakt, hvis laderen ikke er i brug. Man må ikke
trække i ledningen for at tage stikket ud.
7. Hvis laderen går i stykker, eller der opstår tekniske problemer med den, skal den tages
med til forhandleren, så den kan blive efterset, inden den bruges igen. Beskadigede dele
skal udskiftes.
8. Vær forsigtig med batteriet, tab det ikke og udsæt det ikke for slag og stød.
9. Man må ikke selv forsøge at reparere batteriet eller batteriladeren; det kan være meget
farligt. Reparationer skal udføres af en autoriseret forhandler.
10. Stikket skal tages ud af stikkontakten, før batteriladeren rengøres eller vedligeholdes.
11. Man må ikke forsøge at oplade batteriet ved en temperatur på under 10°C eller over 40°C.
12. Ventilationsrillerne på batteriladeren må ikke tildækkes.
13. Batteriet må ikke kortsluttes.
Når et apparat kortsluttes, øges strømstyrken. Det kan resultere i, at apparatet
overophedes, antændes eller endog eksploderer, hvilket kan resultere i
beskadigelse af apparatet og personskade.
Følgende skal undgås:
• Der må ikke tilsluttes ledninger til batteriets poler.
• Sørg for, at der ikke kommer metalgenstande (søm, mønter, papirclips) i åbningen på
batteriladeren.
92
DK

Ferm 91
Produktinformation
Fig. A
1. Knap rotationsretning
2. Afbryder
3. Batteri
4. Knap til hastighed
5. Moment ring
6. Slag/bore ring til indstilling
7. Borepatron uden nøgle
8. Hjælpehåndtag
2. SIKKERHEDSINSTRUKTIONER
Symbolforklaring
Læs instruktionerne omhyggeligt
I overensstemmelse med grundlæggende sikkerhedsstandarder i de europæiske
direktiver.
Klasse II maskine – Dobbelt isolering – Du behøver ingen jordforbindelsestik.
Betegnelse for risiko for personskader, dødsfald eller beskadigelse af værktøjet i
tilfælde af at du er uopmærksom på instruktioner i denne manual.
Indikerer farer for elektrisk stød
Må ikke bruges i regn.
Maskinens omdrejningstal kan indstilles elektronisk.
Kun beregnet til indendørs brug
I tilfælde af defekt er transformeren ikke farlig
Termosikring
DK
Ferm
Discharging the battery
Not only charging batteries is important, discharging is of equal importance or even
greater importance.
• When the battery is charged the cordless drill has to be used until you start noticing that the
power of the drill is diminishing and that the maximum rotational speed is not reached.
• The battery is almost discharged now. Only now you can start charging the battery.
• Charging the battery while it is still charged for say one-third of capacity, the so-called
‘memory effect’can occur. Since during charging only the discharged part of the battery
capacity of the battery is being charged now, the battery can start crystallizing in the one-
third that is still charged. This part of the battery capacity can never be used afterwards.
• Do not discharge the battery to the minimum. As soon as you notice that the power or the
maximum rotational speed is diminishing, you have to charge the battery. When you
proceed using the drill and the battery becomes fully discharged, the so-called ‘switch of
poles effect’can occur. The polarity of the battery poles will be switched: the ‘+’will become
‘-‘ and the ‘-‘ will become the ‘+’. Once this has occurred the polarity will remain switched
during loading and this will damage the battery irreparable.
When the cordless drill is not being used over a longer period of time, the battery
has to be charged fully first. The battery has to be stored in charged condition.
5. SERVICE & MAINTENANCE
Make sure that the machine is not live when carrying out maintenance work on the
motor.
The Ferm machines have been designed to operate over a long period of time with a minimum
of maintenance. Continuous satisfactory operation depends upon proper machine care and
regular cleaning.
Cleaning
Keep the ventilation slots of the machine clean to prevent overheating of the engine.
Regularly clean the machine housing with a soft cloth, preferably after each use. Keep the
ventilation slots free from dust and dirt.
If the dirt does not come off use a soft cloth moistened with soapy water. Never use solvents
such as petrol, alcohol, ammonia water, etc. These solvents may damage the plastic parts.
Lubrication
The machine requiers no additional lubrication.
10
UK

Ferm 11
Faults
Should a fault occur, e.g. after wear of a part, please contact the service address on the
warranty card. In the back of this manual you find an exploded view showing the parts that can
be ordered.
Environment
To prevent damage during transport, the appliance is delivered in a solid packaging which
consists largely of reusable material. Therefore please make use of options for recycling the
packaging.
NiCd cells are recyclable.
Faulty and/or discarded electrical or electronic apparatus have to be collected at
the appropriate recycling locations.
Warranty
The guarantee conditions can be found on the separately enclosed guarantee card.
CE DECLARATION OF CONFORMITY (UK)
We declare under our sole responsibility that this product is in conformity
with the following standards or standardized documents:
EN50260-1, EN50260-2-1, EN50260-2-2, EN55014-1, EN55014-2,
EN60335-1, EN60335-2-29, EN61000-3-2, EN61000-3-3.
in accordance with the regulations:
98/37/EEC, 73/23/EEC, 89/336/EEC
from 01-12-2005
ZWOLLE NL
W. Kamphof
Quality department
It is our policy to continuously improve our products and we therefore reserve the right to
change the product specification without prior notice.
Ferm BV • Lingenstraat 6 • 8028 PM Zwolle • The Netherlands
UK
Ferm
ACCUSLAGBOREMASKINE
Numrene i den nedenstående tekst henviser til illustrationerne på side 2 - 3.
For din egen og andres sikkerhed anbefaler vi at du læser denne brugsanvisning
nøje igennem, før maskinen tages i brug. Opbevar denne brugsanvisning og den
øvrige dokumentation ved maskinen.
Indhold
1. Maskindata
2. Sikkerhedsinstruktioner
3. Montering af tilbehør
4. Funktion
5. Service & vedligeholdelse
1. MASKINDATA
Tekniske specifikationer
Pakkens indhold
1 Accu boremaskine
1 Batterie
1 Batterilader
2 Tilbehør
1 Kuffert
1 Brugsanvisning
1 Garantibevis
1 Sikkerhedsinstruktioner
Kontroller maskinen og tilbehør for transportskader.
Spænding | 24 V
—
---
Spænding akkulader | 230 V~
Frekvens akkulader | 50 Hz
Kapacitet akkumulator. | 1.5 Ah (NiCd)
Opladningstid | 100 min
Antal omdrejninger, ubelastet | 0-500/min / 0-1400/min
Antal slag, ubelastet | 0-8000/min / 0-22400/min
Max. borediameter (træ) | 30mm
Max. borediameter (beton) | 15mm
Max. borediameter (stål) | 13mm
Vægt (incl. 1 Akkumulator) | 2.5 kg
Lpa (lydtryk) | 87.7 dB(A)
Lwa (lydeffekt) | 100.7 dB(A)
Vibrationsværdi | 18.0 m/s
2
90
N
DK
Page is loading ...
Page is loading ...
Page is loading ...
Page is loading ...
Page is loading ...
Page is loading ...
Page is loading ...
Page is loading ...
Page is loading ...
Page is loading ...
Page is loading ...
Page is loading ...
Page is loading ...
Page is loading ...
Page is loading ...
Page is loading ...
Page is loading ...
Page is loading ...
Page is loading ...
Page is loading ...
Page is loading ...
Page is loading ...
Page is loading ...
Page is loading ...
Page is loading ...
Page is loading ...
Page is loading ...
Page is loading ...
Page is loading ...
Page is loading ...
Page is loading ...
Page is loading ...
Page is loading ...
Page is loading ...
Page is loading ...
Page is loading ...
Page is loading ...
Page is loading ...
Page is loading ...
-
 1
1
-
 2
2
-
 3
3
-
 4
4
-
 5
5
-
 6
6
-
 7
7
-
 8
8
-
 9
9
-
 10
10
-
 11
11
-
 12
12
-
 13
13
-
 14
14
-
 15
15
-
 16
16
-
 17
17
-
 18
18
-
 19
19
-
 20
20
-
 21
21
-
 22
22
-
 23
23
-
 24
24
-
 25
25
-
 26
26
-
 27
27
-
 28
28
-
 29
29
-
 30
30
-
 31
31
-
 32
32
-
 33
33
-
 34
34
-
 35
35
-
 36
36
-
 37
37
-
 38
38
-
 39
39
-
 40
40
-
 41
41
-
 42
42
-
 43
43
-
 44
44
-
 45
45
-
 46
46
-
 47
47
-
 48
48
-
 49
49
-
 50
50


Ferm CDM1040 Owner's manual
- Category
- Cordless combi drills
- Type
- Owner's manual
- This manual is also suitable for
Ask a question and I''ll find the answer in the document
Finding information in a document is now easier with AI
in other languages
- italiano: Ferm CDM1040 Manuale del proprietario
- français: Ferm CDM1040 Le manuel du propriétaire
- español: Ferm CDM1040 El manual del propietario
- Deutsch: Ferm CDM1040 Bedienungsanleitung
- Nederlands: Ferm CDM1040 de handleiding
- português: Ferm CDM1040 Manual do proprietário
- dansk: Ferm CDM1040 Brugervejledning
- svenska: Ferm CDM1040 Bruksanvisning
- suomi: Ferm CDM1040 Omistajan opas
Related papers
-
Ferm CDM1052 Owner's manual
-
-
Ferm CDM1054 - FCRH 24K2 Owner's manual
-
-
-
-
-
-
-
Other documents
-
Hitachi DB3DL2 User manual
-
-
-
-
-
Ferax FSB-650 User manual
-
-
-
-