Page is loading ...

17-561-01 rev. 02 07/24/18
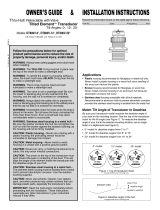
socket
serial number
nut assembly
sensor
captive
nut
connector
a.
b.
cable
slot for
cable exit
side-exit
mount base
sensor unit
lock washer (2)
machine screw (2)
adapter
(part C)
(part D)
(part A)
Figure 1. Pole/Rail mount
Copyright © 2008 Airmar Technology Corp.
INSTALLATION SUPPLEMENT
Pole Mounting Kit
for Heading Sensor
the side, screw the nut assembly onto the adaptor. Hand
tighten only. Do not over tighten.
NOTE: Use the adaptor supplied as it has smooth edges that
will not chafe the cable. Do not use a purchased part.
3. Screw the extension pole/rail bracket onto the nut assembly /
side-exit adaptor. Hand tighten only. Do not over tighten.
NOTE: If you use a thread locker, use teflon pipe-thread tape.
Liquid thread locker may weaken the plastic, causing it to swell
and crack.
4. Remove the protective cap from the sensor connector on the
cable. (Save the cap to protect the connector when the receiver
is removed.) Plug the cable firmly into the sensor.
5. With the alignment tab on the sensor facing forward and parallel
to the centerline of the boat, slide the captive nut upward and
screw it onto the mount base. Hand tighten only. Do not over
tighten.
Purchase Parts
Obtain parts from your instrument manufacturer or marine dealer.
Gemeco
USA
Tel: 803-693-0777
email: [email protected]
Airmar EMEA
Europe, Middle East, Africa
Tel: +33.(0)2.23.52.06.48
email: [email protected]
Copyright © 2011 - 2018 Airmar Technology Corporation. All rights reserved.
WARNING: These instructions are a supplement to your
Owner’s guide and Installation Instructions only. Please
read your Owner’s guide and Installation Instructions
before proceeding to reduce the risk of poor product
performance, property damage, personal injury, and/or
death.
WARNING: Always wear safety glasses, a dust mask,
and ear protection when installing.
CAUTION: Do not mount on a pole longer than 0.6m (2’).
The higher the sensor is mounted, the more force is
applied to it. The mounting hardware may break, causing
the sensor to fall off.
CAUTION: Vehicles/boats traveling above 30MPH—Do
not use the plastic, Cable Side-exit Adapter (part D)
supplied. Purchase a stainless steel part. At high speeds,
the plastic adapter may break, causing the sensor to fall off.
CAUTION: The word ‘FORWARD’ on the sensor must be
facing forward and parallel to the centerline of the boat for
accurate compass readings.
CAUTION: If you use a thread locker, use Teflon pipe
thread tape. Do not use a liquid thread locker, because it
may weaken the plastic, causing it to swell and crack.
IMPORTANT: Plan the cable route between the sensor
and the display and/or network before beginning the
installation.
Installing
The nut assembly supplied has standard marine 1"-14 threads
that can be screwed to a standard marine antenna mount,
extension pole, or rail-mount bracket. Before beginning the
installation, plan for securing the pole/rail bracket to the selected
mounting surface and purchase all the necessary hardware. It
may be helpful to fasten the pole/rail bracket in place before
proceeding.
1. Remove the label from the sensor unit’s socket (Figure 1).
Fasten the mount base (part C) to the sensor unit (part A) with
the two machine screws and lock washers supplied. The torque
for the screws is 1.35Nm.
2. Decide if you want the cable to exit through the center or along
the side of the pole/rail bracket. Slide the nut assembly onto the
end of the cable at the sensor connector. Do not connect the
sensor at this time.
a. Center exit—Pass the instrument connector end of the cable
through the center of the pole. Be sure to leave several
inches of cable extending beyond the nut assembly.
b. Side exit—Place the cable side-exit adaptor (part D) over
the cable. Being sure the cable is passing through the slot in
35 Meadowbrook Drive, Milford, New Hampshire 03055-4613, USA
•
www.airmar.com
/