Page is loading ...

OWENS 32”LED OVAL CEILING LT
ASSEMBLY/INSTALLATION INSTRUCTIONS
Item # 588863-BLK:OWENS 32" LED OVAL CEILING LT
Please read carefully and save these instructions, as you may need them at a later date..
CAUTION
WARNING:Risk of Fire.Min90℃ supply conductors.Consult a qualified electrician to ensure correct
branch circuit conductor.
Turn off the main power at the circuit breaker before installing the fixture, in order to prevent
possible shock.
GENERAL
All electrical connections must be in accordance with local and National Electrical Code (N.E.C.)
standards. If you are unfamiliar with proper electrical wiring connections obtain the services of a
qualified electrician.
Remove the fixture and the mounting package from the box and make sure that no parts are missing
by referencing the illustrations on the installation instructions.
DIMMING
This fixture features 0-10V dimming capabilities.It can compatible with the following electronic:
Lutron: DVSTV / NTSTV / MS-Z101,Leviton: IP710-LFZ
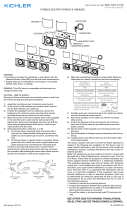
Note: Dimming wiring information (Fig.2)
To utilize 0-10V dimming: use purple wire (dim+), gray (dim-), black (hot),white (neutral) and bare
copper ground wire(ground).
Note: Make sure to connect 0-10V prior to powering up fixture in order to allow the 0-10V dimmer
to function properly.
If dimming is not used, use Wire Nut to screw dimming wire, tuck them carefully into the outlet box.
ASSEMBLY AND INSTALLATION
Turn off the power at fuse or circuit breaker.
1. Mounting the fixture(Fig. 1),position the backpan over the outlet box making sure the center of the backpan
is centered over the outlet box.
2. While holding the backpan in place, mark the location of the four keyhole slots of the backpan to the
wall.Be sure to mark only the narrow part of the keyhole slot. Remove the backpan from the wall. Drill the
holes using an appropriately sized drill bit. Insert the provided anchors into the holes.
3. Connect the input wires to outlet box wires as shown (Fig.3). Make sure that all wire connectors are secure.
If your OUTLET BOX has a green or bare copper ground wire, connect the fixture’s ground wire to
it.Otherwise, connect the fixture’s ground wire directly to the mounting plate using the green screw provided.
After wires are connected, tuck them carefully inside the OUTLET BOX.
4. Carefully push wire connections back into outlet box making sure all connections remain secure.
ASSEMBLY AND INSTALLATION (CONT.)
5. Anchor the backpan to the wall using the set of keyhole slots with provided wood screws and plastic
anchors.
6.Place diffuser in diffuser mounting ring and secure in place to backpan using lock-up knobs.
7.Warning: Four wood screws must be used with installation.
Turn on the power at fuse or circuit breaker
Fig.1
Fig.2 Fig3.
# 588863-BLK
Customer Service 1-800-558-8700
IF IN DOUBT ABOUT ELECTRICAL INSTALLATION,
CONSULT A LICENSED ELECTRICIAN.
/
![hykolityHykolity 16 Inch Flush mount LED Ceiling Light Fixture, 25W [200W Equivalent] 4000K 1600lm BN Finish Dimmable Saturn Ceiling Lights, ETL Listed for Hallway, Bathroom,Kitchen, Bedroom, Walk In Closet](http://vs1.manuzoid.com/store/data/000915426_2-0d75ac8f2a0c4976f6e3c18e8dfa221f-160x210.png)


