Page is loading ...

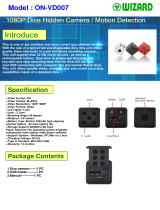
Dice Camera
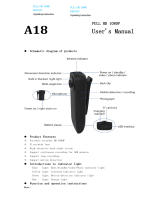
Full HD Mini DV Camera Manual
User’s Guide

Full HD Mini DV Camera Manual
PRODUCT FEATURES:
1920*1080P video resolution with 30fps, AVI Format;
Supports video recording, motion detection, and IR night
vision (Only Black item supports IR Night Vision)
Built-in 230mAh lithium battery, 40-60 minutes battery
life time;
Max support 32GB Class 10 micro SD card(FAT32
Format)
Note: Cover 2 is built in magnet.
PARTS & CONTROLS:
Note: Remove the cover by pushing the six towards the five, then take the cover off.
CHARGING:
Charge for 2 hours before using. Plug the mini-USB connector into the camera and the normal USB in your
computer, power bank, or use an external 5V charger. Charging time is 2-3 hours.
Note: Red led light is on while charging, once fully charged, red led light turns off. If green led lights flash 10 times
and the camera shuts down, this means the battery is low.
Video Recording:
Make sure an SD card is inserted. Press the power button for 3 seconds to turn on the camera. The blue led
will light up.
Note: In cases where no SD card is inserted, or you have a defective SD card, or the battery is low, the blue led will
light up for a few seconds, and then it will flash 10 times before the camera turns off. The blue led light will only
light up once turned ON and when an SD card is inserted. The capacity of the memory card is less than 400MB. The
system will automatically rewrite the previous video file if the SD card is full. Use this function with caution.

1080P Recording
When the blue led is light up, press the on/off button once to begin recording. The blue led will flash 3 times
before recording begins (The camera will continuously record 5 minutes sequences). During the recording,
led light is off. Press the on/off button again to stop recording. The led light returns to blue.
MOTION DETECTION:
To activate motion detection feature, make sure the blue led is light up. Quickly press the on/off button 3
times. The blue led light will flash 5 times to signal that the motion detection feature is ACTIVE. Once
movement is detected, the camera will begin to record (5 minutes sequences max). It will stop recording
when no movement is detected. The motion detection feature remains activated and the led light is still off
until a new movement is detected. To stop the motion detection mode, press the on/off button.
Note: When a first movement is detected, the blue led light will flash 3 times to report detection. The blue led light
will no longer flash when another movement is detected.
NIGHT VISION:
Night recording is possible by using the incorporated infrared led.
To activate night vision mode, make sure that the blue led is light up, then quickly press the on/off button
2 times. The blue led will flash once to signal that the night vision is on. Quickly press the on/off button 2
times, to turn it off. The green led light will flash once to signal that the night vision is off.
RESETTING THE CAMERA:
You can reset the camera when operation is not in order.
If the camera won’t turn on after full charging, you need to
reset the camera.
To reset, insert pin to the hole as shown in the picture and
press once. The led light will turn off and the reset is done.
Turn on the camera for normal operation.
TIME STAMP:
When a blank SD card is inserted, turn on the camera then connect the camera to computer by USB cable.
The camera will create a “txt” file (userconfig). Create a text document (txt) with “userconfig” to display
the time/date on your video/photo.
The format is:
2017-08-04-10:03:00=Y (Year-Month-Day-Hour:Minute:Second=Y) , Y for display
2017-08-04-10:03:00=N (Year-Month-Day-Hour:Minute:Second=N) , N for no display
Open the userconfig.txt in a text editor, set the correct date and time by choosing “N” or “Y” at the end to
display or not the time stamp in your video/photo.
Note: After setting is done, turn on the camera. The blue led light will flash while the time-stamp is upgrading.
Once upgrading is completed, the blue led light is turned off. If the battery is low, the system time will reset.
Note: Please do not insert the pin into the other hole!

VIDEO REPLAY:
Turn the camera on. When the blue led is light up, connect the camera to computer or laptop using the
provided cable. Plug the mini-USB connector into the camera and the normal USB plug into the computer
or laptop.
For more info email us at: info@enji-prime.com
OR visit our website: www.enji-prime.com
Troubleshooting:
1.
The device doesn’t boot or turn off after booting
Low battery possibly, please charge the device for 2 hours and then boot it
again.
2.
The device doesn’t record video after booting
Please check if there’s Micro SD card, or format the card in the computer, and
then insert it to the device.
3.
Video is not playing smoothly or blank screen after connecting to computer
Check the configuration of computer, check if it is the problem of player. It is
suggested to adopt Storm player, or take out the SD card, read the data with
card reader.
4.
The device doesn’t response when charging
Replace the USB data cable or charger, or directly connect it with computer.
Relevant Parameters:
Items
Relevant Parameters
Video Format
AVI
Video Coding
M-JPEG
Video Resolution
1920*1080P
Video Frames
30fps
Support System
Windows; XP; Mac OS; Linux
Battery Capacity
High capacity polymer lithium battery, 230mAh
Working Duration
About 60min, full charged within 2 hours
Charging Voltage
DC=5V
Type of Interface
Mini 8Pin USB
Storage
External Micro SD card
Components
1xCamera , 1xUSB Cable,1xManual,1xCard Reader,1xSling
/