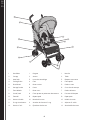
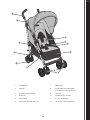
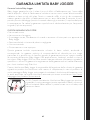
Baby Jogger VUE Assembly Instructions Manual
- Category
- Strollers
- Type
- Assembly Instructions Manual

EN 1888: 2012
babyjoer.com
Assembly InstructIons
InstructIons pour l'AssemblAge
InstruccIones Del ensAmblAJe
beDIenungsAnleItung
sAmleVeJleDnIng
ΟΔΗΓΙΕΣ
IstruZIonI DI montAggIo
beDIenIngsHAnDleIDIng
InstruÇÕes De montAgem
KoKoAmIsoHJeet
monterIngsAnVIsnIngAr
InstruKcJA montAŻu
náVoD K montážI
náVoD nA použItIe
ИнструкцИя по сборке

2
tAble oF contents
English
Français (French) / Español (Spanish)
Warnings . . . . . . . . . . . . . . . . . . . . . . . . . . . . . . . . . . . . . . . . . . . .3
Mise en Garde/Advertencia . . . . . . . . . . . . . . . . . . . . . . . . . . . . . . 4/5
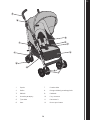
Features
Traits/Características . . . . . . . . . . . . . . . . . . . . . . . . . . . . . . . . . . . . 6
Frame
Cadre/Chasis . . . . . . . . . . . . . . . . . . . . . . . . . . . . . . . . . . . . . . . . 7
Front Wheels
Roues avant/Ruedas delanteras . . . . . . . . . . . . . . . . . . . . . . . . . . . . . 8
Brake
Frein/Freno. . . . . . . . . . . . . . . . . . . . . . . . . . . . . . . . . . . . . . . . . 10
Adjustable Footwell
Repose-pied adjustable/Reposapiés ajustable . . . . . . . . . . . . . . . . . . . . .11
Canopy
Auvent/Toldo . . . . . . . . . . . . . . . . . . . . . . . . . . . . . . . . . . . . . . . .11
Seat
Siège/Asiento . . . . . . . . . . . . . . . . . . . . . . . . . . . . . . . . . . . . . . . 12
Safety Harness
Harnais de sécurité/Arnés de seguridad. . . . . . . . . . . . . . . . . . . . . . . . 13
Cup Holder
Porte-gobelet/Portavasos . . . . . . . . . . . . . . . . . . . . . . . . . . . . . . . . 16
Basket Removal
Enlever le panier/Quitar la cesta . . . . . . . . . . . . . . . . . . . . . . . . . . . . 16
Folding
Pliage/Doblado . . . . . . . . . . . . . . . . . . . . . . . . . . . . . . . . . . . . . . 17
Care & Maintenance . . . . . . . . . . . . . . . . . . . . . . . . . . . . . . . . . . . . 18
Soin et entretien/Cuidado y mantenimiento . . . . . . . . . . . . . . . . . . . 19/20
Limited Warranty . . . . . . . . . . . . . . . . . . . . . . . . . . . . . . . . . . . . . . 21
Garantie Limitée/Guarantía limitada . . . . . . . . . . . . . . . . . . . . . . . . 22/23
Deutsch (German) . . . . . . . . . . . . . . . . . . . . . . . . . . . . . . . . . . . . . 24
Dansk (Danish) . . . . . . . . . . . . . . . . . . . . . . . . . . . . . . . . . . . . . . . 30
ελληνικά (Greek) . . . . . . . . . . . . . . . . . . . . . . . . . . . . . . . . . . . . . .36
Italiano (Italian) . . . . . . . . . . . . . . . . . . . . . . . . . . . . . . . . . . . . . . . 42
Nederlands (Dutch). . . . . . . . . . . . . . . . . . . . . . . . . . . . . . . . . . . . .48
Português (Portuguese) . . . . . . . . . . . . . . . . . . . . . . . . . . . . . . . . . . 54
Suomi (Finnish) . . . . . . . . . . . . . . . . . . . . . . . . . . . . . . . . . . . . . . .60
Svenska (Swedish) . . . . . . . . . . . . . . . . . . . . . . . . . . . . . . . . . . . . . 66
Polskie (Polish) . . . . . . . . . . . . . . . . . . . . . . . . . . . . . . . . . . . . . . . 72
Češky (Czech). . . . . . . . . . . . . . . . . . . . . . . . . . . . . . . . . . . . . . . .78
Slovenská (Slovak) . . . . . . . . . . . . . . . . . . . . . . . . . . . . . . . . . . . . . 84
Русский язык (Russian) . . . . . . . . . . . . . . . . . . . . . . . . . . . . . . . . . .90
EN
FR
ES

3
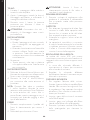
WArnIng
IMPORTANT- Keep these instructions for
future reference.
SINGLE STROLLER
• This stroller seats one passenger.
• This stroller is suitable for children from
birth up to a maximum weight of 15kg.
• Total weight load recommended for this
stroller is 19.5kg (15 kg in seat and 4.5 kg
in basket).
• WARNING: This stroller is not suitable for
running, jogging, skating or rollerblading.
• WARNING: Never leave child unattended.
• WARNING: Always use the restraint
system.
• WARNING: Child may slip into leg
openings and strangle. Never use in
reclined carriage position unless safety
harness is properly fastened.
• WARNING: Check that the seat unit or
carseat attachment devices are correctly
engaged before use.
• WARNING: To avoid injury, ensure that
your child is kept away when unfolding
and folding this product.
• WARNING: Do not let your child play with
this product.
• WARNING: Any load attached to the
handle and/or on the back of the backrest
and/or on the sides of the vehicle will
aect the stability of the vehicle.
• WARNING: Ensure that all locking devices
are engaged before use.
• WARNING: Engage the parking device
before loading and unloading a passenger.
• Recommended weight for the basket is 4.5 kg.
• This seat should be used in the most
reclined position until a child can sit up
unaided, rollover, or push itself up on it’s
hands and knees.
• Stroller is not meant to be used for
transporting children up or down stairs.
Damage resulting to stroller will not be
covered under warranty.
• This stroller does not replace a cot or a
bed. Should your child need to sleep, then
it should be placed in a suitable pram
body, cot, or bed.
• Accessories which are not approved by
the manufacturer or distributor shall not
be used.
• Watch out for cars - never assume that a
driver can see you and your child.
• The passenger shall remain seated (no
standing in the stroller).
• It may be unsafe to use replacement parts
other than those supplied or approved by
the manufacturer.
EN
Page is loading ...
Page is loading ...
Page is loading ...

7
1
2
3
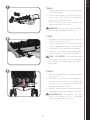
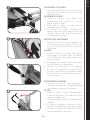
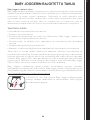
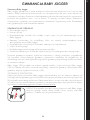
FRAME
1 Unpack the stroller from the box and set
the wheels aside.
2 Unfold the stroller by pulling the Auto-
lock Lever and lifting the handlebar
away from the lower frame.
3 Push down on the rear crossbar to
tighten and lock the frame.
WARNING: Ensure that all the locking
devices are engaged before use.
CADRE
1 Déballer la poussette de la boîte et
mettre les roues de côté.
2 Déplier la poussette en tirant le levier de
verrouillage automatique et en soulevant
la poignée, l’éloignant ainsi de la base.
3 Appuyer sur la barre transversale arrière
pour resserrer et verrouiller la base.
MISE EN GARDE: Assurez-vous que
la courroie de sécurité est attachée
fermement au cadre avant d’utiliser la
poussette!
CHASIS
1 Saque el cochecito de su caja y aparte
las ruedas.
2 Desdoble el cochecito presionando el
mecanismo de auto-cierre y tirando del
manillar de tal forma que se separe de
la parte inferior del chasis.
3 Apriete hacia abajo la barra posterior
traserapara apretar y asegurar el chasis.
ADVERTENCIA: Asegúrese de que
todos los dispositivos de seguridad
están activados antes del uso.
CliCk
EN
FR
ES

8
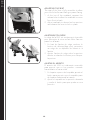
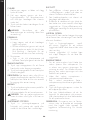
FRONT WHEELS
1 Installation
• Lay stroller on its back so the Handlebar
is resting on the floor.
• Attach the front wheel by sliding it into
the front wheel mount until it clicks.
Gently pull on the front wheel to make
sure it is properly attached.
2 Removal
• Squeeze the two plastic tabs on the
wheel mount. Pull wheel to remove.
ROUE AVANT
1 Installation
• Déposer la poussette pour que la
poignée soit sur le plancher.
• Insérer la roue avant en la glissant dans
le support pour la roue avant jusqu’à ce
qu’elle clique en place. Tirer doucement
sur la roue avant pour vous assurer qu’il
est correctement serré.
2 Enlevement
• Presser les deux languettes en plastique
situées sur le support de la roue. Tirer la
roue pour la détacher.
RUEDA DELANTERA
1 Instalar la rueda delantera
• Tumbe el cochecito de manera que el
manillar se apoye en el suelo.
• Introduzca el eje de la rueda delantera
en el chasis hasta que haga clic en su
lugar. Tire suavemente de la rueda para
asegurarse de que queda bloqueada en
su sitio.
2 Desmontar la rueda delantera
• Presione las dos lengüetas de plástico
del montaje de la rueda. Tire de la rueda
para desmontarla por completo.
1
2
EN
FR
ES

9
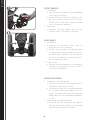
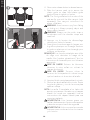
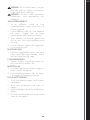
SWIVEL LOCK
1 Raise the swivel lock to lock the front
wheel assembly in a fixed position for long
distance strolling.
2 Press down on the swivel lock to allow the
front wheel assembly to swivel.
NO TE: When loading and unloading child,
lock the front wheels in a fixed position.
Although the front wheels of your Vue lock,
it is not intended for jogging or exercise
purposes.
PESTAÑA DE BLOQUEO DE LA RUEDA
DELANTERA
1 Suba la pestaña de bloqueo para bloquear
la rueda delantera en una posición fija para
recorridos de larga distancia.
2 Presione la pestaña de bloqueo para
permitir que la rueda delantera gire.
NO TA: Para subir y bajar al niño, baje la
palanca a la posición bloqueo de la rueda
delantera. Aunque la rueda delantera de su
Vue se bloquea, no es un coche diseñado
para correr con él.
TRAIT DE PIVOTER
1 Soulever le verrou du pivot pour verrouiller
l’assemblage de la roue avant en position
fixe pour une promenade longue distance.
2 Appuyer sur le verrou du pivot pour
permettre à l’assemblage de la roue avant
de pivoter.
RE MARQUE: En chargeant et en déchargeant
l’enfant, fermez toujours la roue en position
fixe. Bien que la roue avant de votre Vue se
serre, il ne soit pas destiné pour des buts
d’exercice ou de jogging.
1
2
EN
FR
ES

10
BRAKE
1 Simply push the parking brake pedals
down to engage the brakes.
2 Lift the parking brake pedals up to release
the brakes.
WARNING: Engage the parking device
before loading and unloading a passenger.
FREIN
1 Presser simplement la pédale de frein vers
le bas pour engager le frein.
2 Relever pour le relâcher.
MISE EN GARDE: Employer le dispositif de
stationnement lorsque vous embarquez et
débarquez un passager.
FRENO
1 Simplemente pise el freno pedal
hacia abajo para activar el freno de
estacionamiento.
2 Tire hacia arriba para desactivarlo.
ADVERTENCIA: Active siempre el sistema
de frenado al subir y bajar al niño.
1
2
EN
FR
ES

11
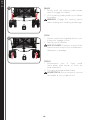
ADJUSTABLE FOOTWELL
1 Press the adjustment levers on the footwell
and move up or down until it clicks into the
desired position.
REVERSIBLE CANOPY
2 Attach the canopy to the frame: slide
canopy gear onto channels on side of
frame. Click into place.
3 Wrap Velcro® straps on each side to
handlebar area of frame.
4 To reverse the canopy: Un-Velcro the
canopy from the stroller frame. Push front
canopy frame under rear canopy frame
until canopy is reversed.
REPOSEPIED ADJUSTABLE
1 Appuyer sur les boutons de réglage situés
sur le repose-pied et déplacer vers le haut
ou vers le bas jusqu’à ce la position désirée
soit clipsée.
AUVENT
2 Attacher l’auvent à la base. Faire glisser
l’engrenage de l’auvent dans la rainure
sur le côté de la base. Faire claquer pour
mettre en place.
3 Envelopper les sangles Velcro de chaque
côté de la base vers la poignée.
4 L’auvent est réversible et vous permet
de couvrir le siège avec le dossier dans
n’importe quelle position. Déplacer la base
de l’auvent et le tissu en même temps pour
inverser l’auvent.
REPOSAPIÉS AJUSTABLE
1 Presione los botones del reposapiés y
muévalo hacia arriba o hacia abajo hasta
que quede en la posición deseada.
TOLDO
2 Sujete el toldo al chasis, deslizándolo a
través de las guías en los lados del chasis
hasta que hagan click.
3 Enrolle las tiras de Velcro en cada lado del
manillar.
4 El toldo es reversible y permite cubrir el
asiento en cualquier posición. Mueva tanto
el marco del toldo como la tela del toldo a
la vez para hacerlo reversible.
1
2
3
4
EN
FR
ES

12
ADJUSTING THE SEAT
The seat of the Vue is fully reversible to allow
your child to be forward facing or parent facing.
1 At the top of the seatback, squeeze the
release lever to allow the seatback to move
from front to back.
2 Adjust seatback to desired recline position
and release the lever to lock in place.
AJUSTEMENT DU SIÈGE
Le siège de la VUE est entièrement réversible
pour permettre à votre enfant d’être face au
parent ou à l’avant.
1 En haut de l’arrière du siège, soulever le
bouton de déverouillage pour permettre
au siège de se déplacer de l’avant et à
l’arrière.
2 Ajuster l’arrière du siège selon la position
désirée et relacher le bouton pour bloquer
la position.
AJUSTAR EL ASIENTO
El asiento del VUE es totalmente reversible
para permitir que su hijo pueda ir mirando
hacia delante o hacia usted.
1 En la parte superior del respaldo, apriete el
botón para permitir que el respaldo pase
de la parte delantera a la trasera.
2 Ajuste el respaldo en la posición deseada
y suelte el botón para que quede en esa
posición.
1
2
EN
FR
ES

13
SAFETY HARNESS
1 To adjust harness height: Unclip the
harness strap clip from the side strap clips.
Feed harness strap through the harness
adjustment opening. Feed back through
lower opening and pull down to secure.
2 Attach harness strap clip to side strap
buckle on both sides.
3 Insert connected harness and side strap
buckles into the sides of the crotch buckle.
HARNAIS DE SÉCURITÉ
1 Pour ajuster la hauteur du harnais: détacher
le clip de la sangle du harnais du clip de la
sangle sur le côté. Faire passer la sangle du
harnais à travers l’ouverture d’ajustement
du harnais. Re-passer à travers l’ouverture
inférieure et tirer vers le bas pour sécuriser.
2 Attacher le clip de la sangle du harnais à la
boucle de la sangle des deux côtés.
3 Insérer le harnais et les boucles de la
sangle aux côtés de la boucle de l’entre-
jambe.
CINTURÓN DE SEGURIDAD
1 Para ajustar la altura del arnés: Soltar el
clip de la correa del arnés de los ganchos
de las correas laterales. Inserte la correa
del arnés por la abertura de ajuste que
se encuentra en el respaldar del asiento.
Luego inserte la correa por la abertura
inferior y tire hacia abajo para asegurarla.
2 Conecte el cinturón de seguridad a las
hebillas de las correas en ambos lados.
3 Inserte el cinturón de seguridad y las
correas laterales en la hebilla de la
entrepierna.
2
1
3
EN
FR
ES
Page is loading ...

15
1
1
2
3
4
5
2
3
4
REMOVING THE SEAT FABRIC
1 Remove canopy. Unhook the four Velcro®
straps under the seat and on the seat back.
2 Remove fabric from the four hooks on the
stroller frame. Unsnap the two snaps from
the upright of the frame.
3 Remove fabric from footwell areas by
sliding o of the folding mechanisms.
4 Pull fabric upward o of seatback to
remove completely.
DÉTACHER LE TISSU DU SIÈGE
1 Enlever l’auvent. Décrocher les quatre
sangles velcro en-dessous du siège et sur
le dossier du siège.
2 Détacher le tissu des quatre crochets situés
sur la base de la poussette.
3 Détacher le tissu du repose-pieds en le faisant
glisser en-dehors des systêmes de réglage.
4 Soulever le tissu vers le haut pour l’enlever
complètement du dossier du siège.
QUITAR LA TELA DE LOS ASIENTOS
1 Quitar el techo. Desenganche las cuatro
correas de Velcro® debajo del asiento y en
la parte posterior.
2 Retire la tela de los cuatro ganchos de la
estructura de la carriola. Suelte los dos
broches de presión que se encuentran en
el marco de la carriona cerca del manillar.
3 Retire la tela de las áreas de los pies
deslizándolas hacia afuera.
4 Tire de la tela hacia arriba y afuera de
respaldo para removerla por completo del
marco de la carriola.
EN
FR
ES

16
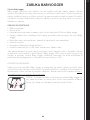
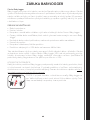
CUP HOLDER
1 Attach cup holder by connecting to the
attachment on the right handlebar. Click to
lock into place.
BASKET
2 Unzip the zippers on the front corners of
the basket for easy access to belongings.
REMOVAL
3 From the front of the stroller, unsnap the
straps connected to the stroller frame.
4 From the back of the stroller, unwrap
Velcro® straps from the bottom crossbars.
PORTEGOBELET
1 Attacher le porte-gobelet à l’attache sur
le côté droit du guidon. Faire claquer pour
verrouiller en place.
PANIER
2 Défaire la fermeture éclair aux coins de
l’avant du panier pour un accès facile aux
eets personnels.
RETRAIT
3 Ouvrir les sangles connectées à la base de
la poussette, au devant de la poussette.
4 Ouvrir les sangles Velcro des barres
transversales inférieures, de l’arrière de la
pousette.
PORTAVASOS
1 Fije el portavasos en la conexión que se
encuentra en el marco de la carriola al
lado derecho del manillar. Deslice hasta
escuchar el “clic.”
BANDEJA
2 Desabroche la cremallera en las esquinas de
la bandeja para acceder fácilmente a ella.
DESMONTAJE
3 Desde la parte delantera del cochecito,
desabroche las correas del cochecito.
4 Desde la parte trasera desabroche las tiras
de Velcro de las barras inferiores.
2
3
4
1
CliCk
EN
FR
ES

17
FOLDING
1 Push up on the locking rear crossbar.
2 Push down the secondary lock on the side
of the stroller.
3 Push handlebars forward to fold.
4 Make sure the auto lock is engaged before
carrying.
PLIAGE
1 Appuyer sur la barre transversale arrière
de verrouillage.
2 Appuyer sur le deuxième verrou sur le côté
de la poussette.
3 Pousser les poignées vers l’avant pour plier.
4 Vérifier que le verrou automatique est
enclenché avant de porter la poussette.
PLEGADO
1 Empuje hacia arriba el seguro de la barra
posterior trasera.
2 Empuje hacia abajo el otro seguro en el
lateral del cochecito.
3 Tire de los manillares hacia delante para
doblar.
4 Asegúrese de que el auto cierre está
correctamente puesto.
1
4
2
3
EN
FR
ES

18
cAre AnD mAIntenAnce
To preserve the longevity of your stroller,
it is important to perform simple, regular
maintenance. From time to time, make sure
that the joints and folding areas are still in
good condition. If you hear any squeaking
or feel tension, you can take your stroller
to a local bike shop for added lubrication.
All repairs should only be carried out by an
authorized dealer.
WASHING
Seat Fabric
• Machine wash seat fabric with cold water
and mild detergent.
• Do not use solvents, caustic or abrasive
cleaning materials.
• To minimize shrinkage, simply reattach to
the seat frame to dry.
• Do not press, iron, dry clean, tumble dry or
wring fabric.
• If the seat covers need to be replaced,
only use parts from a Baby Jogger
Authorized Dealer. They are the only ones
that are guaranteed to have been safety
tested and designed to fit this seat.
Plastic/Metal Parts
• Wipe clean using a mild soap and warm
water.
• You must not remove, dismantle or alter
any part of the seat folding mechanism
or brakes.
Wheel Care
• The wheels can be cleaned using a
damp cloth. They will need to be dried
completely with a soft towel or cloth.
STORING
• Sunshine can fade seat fabric and dry out
tires, so storing your stroller indoors will
prolong its good looks.
• DO NOT store outside.
• Ensure that the stroller is dry before
storing for prolonged periods.
• Always store the stroller in a dry
environment.
• Store the stroller in a safe place when
not in use (i.e. where children cannot play
with it).
• DO NOT place heavy objects on top of
the stroller.
• DO NOT store the stroller near a direct
heat source such as a radiator or fire.
EN
Page is loading ...
Page is loading ...

21
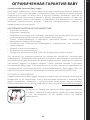
bAby Jogger lImIteD WArrAnty
Baby Jogger warrants that the frame is free of manufacturer defects for one year after
purchase of the product. Manufacturer’s defects include but are not limited to the breaking
of welds and frame tube damage. Textile or soft side materials and all other components
shall be warranted for one year from the date of purchase. Proof of purchase is required to
make a warranty claim and the warranty is only extended to the original purchaser.
THIS WARRANTY DOES NOT COVER:
• Normal wear and tear
• Corrosion or rust
• Incorrect assembly, or the installation of third party parts or accessories not compatible
with the original design.
• Accidental or intentional damage, abuse or neglect.
• Commercial Use
• Improper storage/care of the unit
This warranty specifically excludes claims for indirect, incidental, or consequential damages.
The implied warranties of merchantability and fitness for a particular purpose is according
to the specific warranty period for this model unit at time of purchase. Some states do
not allow the exclusion or limitation of incidental or consequential damages, so the above
limitations or exclusions may not apply to you. This warranty gives you specific legal rights,
and you may also have other rights which vary from state to state. To know what your legal
rights are in your state, consult your local or state consumer aairs oce or your state’s
Attorney General.
If your stroller was purchased outside of the United States, please contact the distributor in
the country nearest you. Their contact information can be found on our website at http://
http://www.babyjogger.com/retailers/#international. Claims for warranty outside of the
country in which the product was purchased may incure shipping charges.
NOTE: When contacting Baby Jogger regarding your stroller, please
have your stroller’s serial number and manufacturing date ready. It
can be found on the bottom crossbar.
EN
Page is loading ...
Page is loading ...
Page is loading ...
Page is loading ...
Page is loading ...
Page is loading ...
Page is loading ...
Page is loading ...
Page is loading ...
Page is loading ...
Page is loading ...
Page is loading ...
Page is loading ...
Page is loading ...
Page is loading ...
Page is loading ...
Page is loading ...
Page is loading ...
Page is loading ...
Page is loading ...
Page is loading ...
Page is loading ...
Page is loading ...
Page is loading ...
Page is loading ...
Page is loading ...
Page is loading ...
Page is loading ...
Page is loading ...
Page is loading ...
Page is loading ...
Page is loading ...
Page is loading ...
Page is loading ...
Page is loading ...
Page is loading ...
Page is loading ...
Page is loading ...
Page is loading ...
Page is loading ...
Page is loading ...
Page is loading ...
Page is loading ...
Page is loading ...
Page is loading ...
Page is loading ...
Page is loading ...
Page is loading ...
Page is loading ...
Page is loading ...
Page is loading ...
Page is loading ...
Page is loading ...
Page is loading ...
Page is loading ...
Page is loading ...
Page is loading ...
Page is loading ...
Page is loading ...
Page is loading ...
Page is loading ...
Page is loading ...
Page is loading ...
Page is loading ...
Page is loading ...
Page is loading ...
Page is loading ...
Page is loading ...
Page is loading ...
Page is loading ...
Page is loading ...
Page is loading ...
Page is loading ...
Page is loading ...

8575 Maellan Parkway, Suite 1000 • Richmond, VA 23227
T: 800.241.1848 • F: 804.262.6277 • www.babyjoer.com
Baby Joer, LLC
KoolTrade Ltd • Unit 3, Orbital Way
Denton, Manchester • United Kindom M34 3QA
Bichos Atrevidos S.L.U. • CIF:B82998949
Infante Don Luis 18, 28660 Boadilla-Madrid • Spain
Tel. (+34) 91 485 5550
Haas Handelsaentur• Esbachraben 4
94563 Bindlach • Germany
Kidscom SA • 71m Millerou str.
10436 Athens • Greece
Eleven Srl • Viale della naviazione interna 87/A
35027 Noventa Padovana • PD • Italy
Pro Support Scandinavia AB • Fransustavsatan 2
253 33 Velline • Sweden
Pattho GmbH• Bachwiesstrasse 3
9402 Morschwil • Switzerland
Imported for Baby Joer in Europe by:
Printed in China • 1403
Euro-Trade Spółka z oraniczoną odpowiedzialnością, Sp. K
ul. Łokietka 155 • 31-263 Kraków • Poland
Euro-Trade Oce, School & Baby Corporation
Čs. armády 360 • 735 51 Bohumín-Pudlov • Czech Republic
Euro-Trade Oce, School & Baby Corporation
Dolné Rudiny 8363/5 • 010 01 Žilina • Slovakia
Alisa Company • 408 oce • #26 Varshavskoye Shosse
Varshavskoye Plaza • Moscow, Russia
-
 1
1
-
 2
2
-
 3
3
-
 4
4
-
 5
5
-
 6
6
-
 7
7
-
 8
8
-
 9
9
-
 10
10
-
 11
11
-
 12
12
-
 13
13
-
 14
14
-
 15
15
-
 16
16
-
 17
17
-
 18
18
-
 19
19
-
 20
20
-
 21
21
-
 22
22
-
 23
23
-
 24
24
-
 25
25
-
 26
26
-
 27
27
-
 28
28
-
 29
29
-
 30
30
-
 31
31
-
 32
32
-
 33
33
-
 34
34
-
 35
35
-
 36
36
-
 37
37
-
 38
38
-
 39
39
-
 40
40
-
 41
41
-
 42
42
-
 43
43
-
 44
44
-
 45
45
-
 46
46
-
 47
47
-
 48
48
-
 49
49
-
 50
50
-
 51
51
-
 52
52
-
 53
53
-
 54
54
-
 55
55
-
 56
56
-
 57
57
-
 58
58
-
 59
59
-
 60
60
-
 61
61
-
 62
62
-
 63
63
-
 64
64
-
 65
65
-
 66
66
-
 67
67
-
 68
68
-
 69
69
-
 70
70
-
 71
71
-
 72
72
-
 73
73
-
 74
74
-
 75
75
-
 76
76
-
 77
77
-
 78
78
-
 79
79
-
 80
80
-
 81
81
-
 82
82
-
 83
83
-
 84
84
-
 85
85
-
 86
86
-
 87
87
-
 88
88
-
 89
89
-
 90
90
-
 91
91
-
 92
92
-
 93
93
-
 94
94
-
 95
95
-
 96
96


Baby Jogger VUE Assembly Instructions Manual
- Category
- Strollers
- Type
- Assembly Instructions Manual
Ask a question and I''ll find the answer in the document
Finding information in a document is now easier with AI
in other languages
- italiano: Baby Jogger VUE
- français: Baby Jogger VUE
- español: Baby Jogger VUE
- Deutsch: Baby Jogger VUE
- русский: Baby Jogger VUE
- Nederlands: Baby Jogger VUE
- português: Baby Jogger VUE
- slovenčina: Baby Jogger VUE
- dansk: Baby Jogger VUE
- polski: Baby Jogger VUE
- čeština: Baby Jogger VUE
- svenska: Baby Jogger VUE
- suomi: Baby Jogger VUE
Related papers
-
 Baby Jogger Summit X3 Double Assembly Instructions Manual
-
Baby Jogger City Mini Zip Assembly Instructions Manual
-
Baby Jogger City Versa Assembly Instructions Manual
-
-
 Baby Jogger city lite Assembly Instructions Manual
-
Baby Jogger CITY MINI DOUBLE Assembly Instructions Manual
-
Baby Jogger SUMMIT X3 Owner's manual
-
-
 Baby Jogger City Tour LUX Instructions For Use Manual
-
Baby Jogger city ELITE Assembly Instructions Manual


Other documents
-
Joovy ScooterX2 807X User manual
-
-
Britax B-AGILE Double User manual
-
-
Joovy Caboose Graphite User manual
-
-
-
Burley Solstice Owner's manual
-
 BABYTREND Tango Mini Stroller Owner's manual
-
