Page is loading ...

Kit Contents
Check the contents of the box with these instructions to verify all parts are
present. This will allow you to become familiar with the components of your
new handrail.
• Inspect all component parts for familiarity
• Layout recommended tools
QTY. PART
E
A.
(1) Round Handrail
(All components shown in these instructions
are sold separately) Call 800.248.1520 with
questions on purchasing additional
components.
Required Tools for
Handrail Installation
(not included)
1- Screw or Impact Gun
2- Tape Measure
3- Drill Bits:¼” wood5/32”metal/wood
1/2” & 5/16”
4- Hex Bit Driver
5- Pencil
6- Masking Tape (or painters tape)
7- Safety Glasses
8- Rubber Mallet
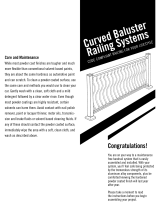
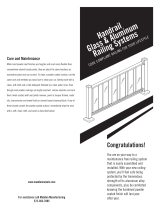
Care and Maintenance
Gently wash with a clean, soft cloth and a mild detergent (e.g. Dawn Liquid
Dish Soap) followed by a clean water rinse and dry with a clean towel.
Even though powder coatings are highly resistant, certain solvents can harm
them. Avoid contact with all harsh chemicals and salts. If any of these should
contact the powder coated surface, immediately wipe the area with a soft,
clean cloth, and wash as described above.
THANK YOU FOR YOUR BUSINESS!
For questions or comments contact Madden Industries:
573.552.6590
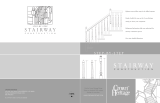
STRAIGHT ADA
HANDRAIL
INSTRUCTIONS
BUILDING STYLE & SAFETY FOR YOUR LIFE
Congratulations!
You are on your way to a
maintenance free handrail
system that is easily
assembled and installed.
Please take a moment to read
the instructions before you begin
assembling your handrail.
Contents
Handrail Wall Installation Inside
Kit Contents BC
Required Tools (not included) BC
Care and Maintenance BC
1 2
3 4
5 6
7 8
A

STUD
DRYWALL
Minimum 29”
STUDS
STUDS
Approximate
location of
handrail
29”
to
32”
Handrail Step-by-Step Installation
Note: Check local code requirements prior to installation
This handrail’s versatility allows for many different types of installations.
Therefore, these suggested steps may vary for your application.
Please note, you may install your handrail onto many different wall types
simply by obtaining the appropriate fasteners. If you have any questions on
recommended fasteners, please visit our website. www.maddenmetals.com
Handrail Interior Wall Installation
1. On the ground, layout handrail and wall brackets to ensure you will
achieve your desired look and symmetry once the handrail is installed.
2. Determine approximate
handrail installation
location.
3. Determine stud or secure
mounting location for the
wall brackets. For a safe
installation, handrail
brackets must be anchored
securely to the wood framing
behind the drywall or
plaster of an interior wall.
4. Using a pencil or masking tape
mark the center of stud locations along the
wall. (If unsure on how to locate a wall stud,
there are many references on the Internet).
5. At this point the handrail may be cut to your desired length
using a 60-80 tooth wood blade and chop saw. Metal cutting blades
ARE NOT recommended as they will melt the aluminum.
6. Install endcaps into the handrail using a
hammer and a protective barrier to protect
the caps’s finish (i.e. cardboard from package)
IMPORTANT!! THE ENDCAP MUST BE INSERTED EVENLY
INTO HANDRAIL, SHAVING OFF EXCESS PAINT MAY HELP.
7. Starting at the low end of handrail, measure
from the nose of your stair tread up the wall
33”. Holding the wall bracket in place,
make a pencil mark where the wall bracket
fastener is to be installed into the stud
(in the large bracket fastener hole).
8. When using the provided wood lag screw,
drill a 1/4” pilot hole into the wall and
CENTER OF STUD for the wall bracket
fastener. Important: Ensure your pilot hole is
hitting a solid mounting surface – i.e. the center of a stud.
9. Loosely secure the wall bracket
to the wall with the appropriate
included fastener.
10. Now repeat steps 5-7 for the
upper wall bracket.
11. Set the handrail on the wall
brackets and mark pilot hole
locations for the lower bracket
to attach to the handrail.
Tip: Use the drill (with bit
spinning) to make your
pilot hole mark
12. Place handrail on a gentle
surface (ie. carpet) and drill
5/32” pilot holes for the lower
bracket only.
13. Loosely fasten handrail to the
lower wall bracket with provided
fasteners and proceed to mark
pilot hole locations for upper
bracket.
14. Complete final assembly by
attaching wall brackets to the
handrail and then tighten
brackets to the wall.
15. Apply bolt caps over bolt heads.
We highly recommend using a
small amount of Super Glue or
caulk inside the bolt cap to
firmly secure the bolt cap to
the bolt head.
1
2
4
3
7
6
8
12
13
14
15
15
Installation complete!
Note: Additional fasteners may
be piloted and fastened into
the wall brackets for
additional support.
11
Support Line: 573.365.7085
7:00am to 5:00pm CST Mon-Fri
Support Line: 573.365.7085
7:00am to 5:00pm CST Mon-Fri
9
/