Brother Innov-is VM6200D Installation guide

Type
Installation guide

Brother Innov-is VM6200D: Unleash your creativity with this feature-packed sewing and embroidery machine. Embroider intricate designs with the large embroidery field (6" x 10") and enjoy precise positioning using the LED pointer. Create unique projects with 208 built-in embroidery designs, 10 styles of lettering, and 58 decorative stitches. Get professional results with the automatic needle threader and built-in tutorials.

Brother Innov-is VM6200D: Unleash your creativity with this feature-packed sewing and embroidery machine. Embroider intricate designs with the large embroidery field (6" x 10") and enjoy precise positioning using the LED pointer. Create unique projects with 208 built-in embroidery designs, 10 styles of lettering, and 58 decorative stitches. Get professional results with the automatic needle threader and built-in tutorials.

EN
Embroidery Foot with LED Pointer Installation Manual
DE
Stickfuß mit LED-Zeiger Installationsanleitung
FR
Manuel d’installation du pied de broderie avec pointeur lumineux
NL
Installatiegids borduurvoet met LED-aanwijzer
EN
By plugging in the connector of the embroidery foot with LED
pointer, the embroidering needle drop point will be indicated on the
fabric, allowing you to accurately position a pattern.
Press
on the LCD screen to lock all the keys and buttons
on the machine before installing the embroidery foot.
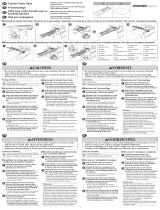
1 Use the included disc-shaped screwdriver to loosen 1 the
screw of 2 the presser foot holder, then remove the presser foot
holder.
2 Position the embroidery foot with LED pointer on the presser
foot bar by aligning 3 the notch of the embroidery foot to 1
the screw. Securely tighten the screw using the screwdriver with
your right hand holding the embroidery foot in place.
3 Plug the embroidery foot with LED pointer into 4 the
connector for the embroidery foot with LED pointer, and then
press
to unlock the keys and buttons.
4 Press
in the sewing screen to indicate the needle drop point
using the LED pointer.
The position of the LED pointer and its brightness can be
adjusted in the sewing settings screen of your machine. For
details, refer to the machine’s manual.
FR
Lorsque vous branchez le connecteur du pied de broderie avec pointeur
lumineux, le point de chute de l’aiguille pour broderie est indiqué sur
le tissu, ce qui vous permet de positionner le motif avec précision.
Appuyez sur
sur l’écran à cristaux liquides pour
verrouiller toutes les touches et boutons de la machine avant
d’installer le pied de broderie.
1
À l’aide du tournevis en forme de disque fourni avec la machine,
dévissez
1
la vis du
2
support du pied-de-biche et retirez celui-ci.
2 Positionnez le pied de broderie avec pointeur lumineux sur
la barre du pied-de-biche en alignant 3 l’encoche du pied
sur 1 la vis. Serrez fermement la vis à l’aide du tournevis en
maintenant en place le pied de broderie de la main droite.
3 Branchez le pied de broderie avec pointeur lumineux 4 au
connecteur correspondant, puis appuyez sur
pour
déverrouiller les touches et les boutons.
4 Appuyez sur
sur l’écran de couture pour indiquer le point
de chute de l’aiguille à l’aide du pointeur lumineux.
Vous pouvez régler la position du pointeur lumineux et sa
luminosité dans l’écran de réglages de couture de votre
machine. Pour plus de détails, consultez le manuel de la
machine.
DE
Nach Einstecken des Anschlusses für den Stickfuß mit LED-Zeiger
wird der Sticknadeleinstichpunkt auf dem Stoff angezeigt, so dass
Sie das Muster genau positionieren können.
Drücken Sie
auf dem LCD-Bildschirm, um alle Tasten am
Gerät zu sperren, bevor Sie den Stickfuß installieren.
1 Lösen Sie mit dem mitgelieferten scheibenförmigen
Schraubendreher 1 die Schraube des 2 Nähfußhalters und
nehmen Sie dann den Nähfußhalter ab.
2 Setzen Sie den Stickfuß mit LED-Zeiger in die Nähfußstange
durch Ausrichten 3 der Kerbe am Stickfuß mit 1 der
Schraube. Ziehen Sie die Schraube mit dem Schraubendreher
fest und fi xieren Sie dabei den Stickfuß mit der rechten Hand.
3 Stecken Sie den Stickfuß mit LED-Zeiger in 4 den Anschluss
für den Stickfuß mit LED-Zeiger und drücken Sie
,
um die Tasten zu entsperren.
4 Drücken Sie
im Nähbildschirm, um den Nadeleinstichpunkt
mit dem LED-Zeiger anzuzeigen.
Die Position des LED-Zeigers und seine Helligkeit kön-
nen im Bildschirm für die Näheinstellungen der Maschine
eingestellt werden. Weitere Informationen fi nden Sie in der
Anleitung der Maschine.
NL
Als u de stekker van de borduurvoet met LED-aanwijzer aansluit,
wordt de positie van de borduurnaald aangegeven op de stof, zodat u
nauwkeurig een patroon kunt plaatsen.
Druk op
op het LCD-scherm om alle toetsen op de
machine te vergrendelen voordat u de borduurvoet bevestigt.
1 Gebruik de bijgeleverde schijfvormige schroevendraaier om de
schroef 1 op de persvoethouder 2 los te draaien. Verwijder
vervolgens de persvoethouder.
2
Plaats de borduurvoet met LED-aanwijzer op de persvoetstang
door de inkeping
3
in de borduurvoet uit te lijnen met de schroef
1
. Draai de schroef stevig vast met de schroevendraaier terwijl u
de borduurvoet met uw rechterhand op zijn plaats houdt.
3 Steek de stekker van de borduurvoet met LED-aanwijzer 4
in de daarvoor bestemde aansluiting en druk vervolgens op
om alle toetsen te ontgrendelen.
4 Druk op
in het naaischerm om de naaldpositie aan te geven
met de LED-aanwijzer.
U kunt de positie en helderheid van de LED-aanwijzer aan-
passen in het naai-instellingenscherm van de machine. Raad-
pleeg de handleiding van de machine voor meer informatie.
123
IT
Manuale d’installazione del piedino da ricamo con puntatore LED
ES
Manual de instalación del pie de bordado con puntero LED
RU
Руководство по установке лапки для вышивания со светодиодным указателем
JA
123
XF4463-001
IT
Collegando il connettore del piedino da ricamo con puntatore LED,
il punto di discesa dell’ago da ricamo sarà indicato sul tessuto,
consentendo di posizionare un motivo con precisione.
Premere
sullo schermo LCD per bloccare tutti i tasti e i
pulsanti sulla macchina prima di installare il piedino da ricamo.
1 Utilizzare il cacciavite sagomato in dotazione per allentare 1 la
vite 2 del supporto del piedino premistoffa, quindi rimuovere il
supporto del piedino premistoffa.
2
Posizionare il piedino da ricamo con puntatore LED sulla barra del
piedino premistoffa allineando
3
la scanalatura del piedino da ricamo
1
alla vite. Serrare saldamente la vite utilizzando il cacciavite,
tenendo in posizione il piedino da ricamo con la mano destra.
3 Inserire il cavo del piedino da ricamo con puntatore LED nel 4
connettore per il piedino da ricamo con puntatore LED, quindi
premere per sbloccare i tasti e i pulsanti.
4 Premere
nella schermata di cucitura per indicare il punto di
discesa dell’ago tramite il puntatore LED.
È possibile regolare la posizione del puntatore LED e la sua lumi-
nosità nella schermata delle impostazioni di cucitura della macchi-
na. Per i dettagli, fare riferimento al manuale della macchina.
RU
Когда подключена лапка для вышивания со светодиодным
указателем, на материале будет показываться точка опускания иглы
для вышивания, что позволяет точно позиционировать рисунок.
Перед установкой лапки для вышивания нажмите кнопку
на ЖК-дисплее, чтобы заблокировать все кнопки и клавиши машины.
1
Прилагаемой дискообразной отверткой ослабьте винт
1
держателя
прижимной лапки
2
и снимите держатель прижимной лапки.
2 Расположите лапку для вышивания со светодиодным
указателем на стержне прижимной лапки, совместив
выемку 3 на лапке для вышивания с винтом 1.
Удерживая лапку для вышивания на месте, правой
рукой надежно затяните винт отверткой.
3
Подключите разъем лапки для вышивания со
светодиодным указателем к гнезду
4
для лапки для
вышивания со светодиодным указателем, и нажмите
кнопку , чтобы разблокировать кнопки и клавиши.
4
Нажмите кнопку на экране шитья, чтобы указать при
помощи светодиодного указателя точку опускания иглы.
Позицию и яркость светодиодного указателя можно
настроить на экране настроек шитья машины. Более
подробные сведения см. в руководстве для машины.
ES
Cuando conecte el pie de bordado con puntero LED se mostrará en
la tela el punto de entrada de la aguja de bordado, con lo que podrá
colocar el patrón con mayor precisión.
Pulse
en la pantalla LCD para bloquear todas las teclas y
botones de la máquina antes de instalar el pie de bordado.
1 Con el destornillador en forma de disco suministrado, afl oje
1 el tornillo del 2 soporte del pie prensatela para extraer el
soporte.
2 Coloque el pie de bordado con puntero LED en la barra del pie
prensatela alineando 3 la muesca del pie de bordado con 1
el tornillo. Con el destornillador, apriete bien el tornillo con la
mano derecha sujetando el pie de bordado en su posición.
3 Conecte el pie de bordado con puntero LED al 4 conector para
el pie, y luego pulse
para desbloquear las teclas y
botones.
4 Pulse
en la pantalla de costura para indicar, con el puntero
LED, el punto de entrada de la aguja.
La posición del puntero LED y su brillo se pueden defi nir en la
pantalla de ajustes de costura de la máquina. Para más detalles,
consulte el manual de la máquina.
JA
1
2 1
2
3 1
3
4
4
  • Page 1 1
  • Page 2 2

Brother Innov-is VM6200D Installation guide

Type
Installation guide

Brother Innov-is VM6200D: Unleash your creativity with this feature-packed sewing and embroidery machine. Embroider intricate designs with the large embroidery field (6" x 10") and enjoy precise positioning using the LED pointer. Create unique projects with 208 built-in embroidery designs, 10 styles of lettering, and 58 decorative stitches. Get professional results with the automatic needle threader and built-in tutorials.

Ask a question and I''ll find the answer in the document

Finding information in a document is now easier with AI