Page is loading ...

Instruction Manual
Please read all instructions carefully and retain for future reference.
Getting Started
Remove the appliance from the box.
Remove any packaging from the product.
Place the packaging inside the box and either store or dispose of safety.
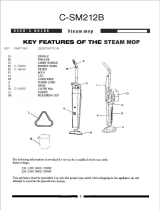
In the Box
Steam Mop Body (Hand-held unit)
Handle Tube
Handle
Squeegee Attachment
Metal Brush Tool
Nylon Brush Tool
Accessory Adaptor
Angled Nozzle
Brush Tool
Scraping Tool
Steamer Cloth
Steam shelf
Carpet Glider
Microfibre Cloths
Triangle Mop Head

Instruction Manual
Features
Steam cleaning freshens carpets and cleans tiles, vinyl and hardwood floors
Quick start
Lightweight
Transparent tank allows monitoring of water level
Safety Instructions
Please ensure that you read the full safety and operational instructions within the
manual included with your steam mop.
When using electrical appliances, basic safety precautions should always be followed.
Check that the voltage indicated on the rating plate corresponds with that of the local
network before connecting the appliance to the mains power supply.
This appliance is not intended for use by persons (including children) who are not
mentally able, physically capable, experienced or do not understand the product. They
should be given supervision and instruction in the use of the appliance by a person
responsible for their safety.
Do not direct steam at people, animals, electrical appliances or electrical outlets.
Keep this appliance and cord out of reach of children.
This appliance must not be used by children.
Warning: Danger of scalding. Please use caution when using the steam cleaner. The
steam emitted from the openings is very hot.
Do not immerse the appliance in water.
Do not leave the appliance unattended whilst connected to the mains power supply.
Do not leave the appliance connected to an electrical outlet when not in use.
Never pull the power cord to disconnect the appliance from the socket. Keep the
appliance cord away from heat sources and sharp edges.

Do not use the appliance with wet hands.
Do not pull or carry the appliance by the cord, pull the cord around sharp corners or
expose the cord to heated surfaces.
Do not use this appliance on leather, wax polished furniture or floors, synthetic fabrics,
velvet or other delicate, steam sensitive materials.
Do not use the appliance on any unsealed hard floor surfaces.
Note: Surfaces treated with wax and some non-wax floors may lose their sheen due to
the heat and steam action. It is recommended to test an isolated surface area before
proceeding.
Never add de-scaling, aromatic, alcoholic or detergent products into the steam mop as
this may cause damage and doing so will void your warranty.
This appliance gets very hot during use, exercise extreme caution.
Note: Always wear suitable shoes when using this appliance and when changing the
accessories; do not wear slippers or open-toed footwear.
This microfibre cleaning pad must be installed correctly before use.
This appliance contains no user serviceable parts. All repairs should be carried out by
a qualified engineer; improper repairs may place the user at serious risk of harm.
This appliance is intended for household use only. It should not be used for
commercial purposes.
Never leave the steam mop on a floor area stationary whilst on for longer than 15
seconds.
Leaving the mop in this position may cause a build up of a pale residue on the surface.
To increase the life of your appliance, it is recommended that you filter the water
using the jug and filter included or use de-mineralized water.
If using to clean hobs and ovens, you must not direct the steam towards any electrical
connections.
Ensure the device is disconnected from the mains before cleaning.
Please ensure hobs and ovens are fully cooled before attempting to clean.

Do not use this appliance for any purpose other than that for which it is designed.
Never force the steam unit onto the mop head as this could potentially damage the
steam mop.
Do not use the appliance after a malfunction or if it has been dropped or damaged in
any way.
If the supply cord or plug is damaged, it must be replaced by a qualified engineer in
order tot avoid a hazard.
Specification
Product Code: MB301A
Rated Voltage: 220-240V
Rated Frequency: 50Hz
Output Power: 1500W
Water Tank Capacity: 400ml
Waterproof Level: IPX4

Description of Parts
1.handle 2.up cord hook 3.down cord hook 4. Power switch
5.water tank cover 6.variable steam control 7.triangle mop head
8.cup 9.funnel 10.carpet glider 11. microfiber cloth 12.metal brush tool
13.nylon brush tool 14.scraper tool 15.Anged nozzle 16.brush tool
17.steamer shelf 18 steamer cloth 19. steamer brush
20..squeegee attachment

Assembly
Attaching the Handle
Slide the handle into the extension tube until it locks into position.
Slide the extension tube with the handle installed in to the steam mop body until it
locks into place.
The handle can be removed from the steam mop body for easy storage by pressing the
handle tube button.
Attaching the Steam Head
Slide the button end of the steam mop body onto the triangle mop head until the
triangle mop head spindle locks into place. Hold both parts of the unit and gently push
the clip into the handle. This will lock the two parts into position.
Warning: Never force the steam mop body onto the triangle mop head, as this could
potentially damage the steam mop. Always attach the triangle mop head using both
hands, ensuring it locks into place correctly.
The triangle steam head can be removed from the main body by pressing the button
on the triangle steam head spindle.
Attaching a Microfibre Cloth
Position the microfibre cloth onto the triangle steam head and secure it.
Attaching the Carpet Glider
Position the microfibre cloth into the triangle steam head and place the carpet glider
over and around the microfibre cloth. To remove, simply pull the carpet glider off.
Instructions for Use
Filling the Water Tank
Open the water tank cap by unscrewing in an anticlockwise direction; fill the tank
with 400ml of water.
Filling the Tank During Use
Turn off the switch and open the tank and pour in the water. Seal the tank and turn on

to activate the steam.
Warning: Never place de-scaling, aromatic, alcoholic or detergent products in the
steam mop tank, this will cause damage to the appliance and void your warranty.
Using the Steam Mop
Plug the appliance into the mains power supply and switch on. The indicator lights on
switch will illuminate red
It will take approximately 20 seconds for the appliance to preheat, the appliance is
ready for use.
Steam will run continuously until turn off or the unit runs out of water.
A full tank will supply approximately 20 minutes of steam. If the water tank is empty,
the pump will be little pumping noise and shake, switch must be turn off immediately. . and
refill the water tank following the instructions above.
Control the steam using the variable steam control; turn the control clockwise to
increase the steam or anticlockwise to reduce.
Using as a Hand-held Steamer
Press the handle tube button to remove the handle from the steam mop body.
Install the accessory adaptor at the top of the steam mop body until it locks into
position.
Choose the required accessories and install by aligning the arrow indicators and
turning clockwise.
Allow the water to heat up as above then adjust steam button to get ideal steam for
different floor surfaces.
Accessories
Accessory
Suggested Use
Squeegee Attachment/Accessory/Adaptor
Shower screens, mirrors and glass.
Remove creases from sofa, tablecloths

etc.
metal and Large nylon Brush Tools
WARNING: be careful of metal brush to
scratch the surface
Ovens, hobs, showers, bath tubs, tiles,
toys, refrigerators, etc.
Angled Nozzle
Stove tops, taps, sinks, hard to reach
areas etc.
Brush Tool
Cleaning grout lines, sanded or
non-sanded.
Scraper Tool
Scraping baked on food, grime and
grease.
Removing residue or other different
substances from surfaces such as hobs
and ovens.
Steamer Cloth
Steaming sofa, tablecloths etc.
Microfibre Cloth
For general cleaning of hard floors and
carpets.
Cleaning and Maintenance
Ensure the appliance is unplugged from the mains supply and has cooled sufficiently
before cleaning.
Drain any remaining water from the tank and clean after every use.
Clean the accessories in warm, soapy water and leave to dry.
Decalcify the Water Tank Interior
To clean calcium deposits that build up inside the water tank, add one or two

tablespoons of white vinegar to a full tank and then shake.
Note: Do not turn the steamer on.
Removing Limescale
If the appliance begins to produce steam more slowly than usual or stops producing
steam, you may need to remove limescale.
Limescale can develop over time on the metal parts of the appliance and greatly affect
its performance. It is recommended to remove limescale on a moment basis or after
every 25-50 uses.
The frequency of removal depends on the hardness of your tap water and how often
you use your steamer. If you live in an especially hard water area, you may need to
use de-mineralised water.
Using a Cleaning Solution
Prepare a solution of 1/3 white vinegar and 2/3 tap water and add to the water tank.
Secure and position the unit to ensure any steam released is aimed away from the
floor or surrounding objects and surfaces.
Plug the appliance into the mains power supply and turn on; allow the unit to produce
steam until all the solution is used.
Repeat the above procedures as often as necessary then fill the tank with fresh water
and rinse.
Fill the tank to the max. level with fresh water, twitch on and release steam through
the system until the water tank is empty.
Warning: Do not leave the steamer unattended during the limescale removal process
and/or during use.
Note: Perform a test on a suitable isolated surface after limescale removal to ensure
there is no debris left in the unit.
Note: Due to the mature of UK water suppliers, some areas of the country experience
large amounts of limescale build-up. If you live in one of these areas you may need to
decalcify the unit more often.
Cleaning Blocked Accessories

Due to the high mineral water content in certain areas, you may notice less steam
from the accessories; this may be caused by calcium build-up inside the nozzle:
Cleaning Calcium buildup
It is recommended to use the vinegar solution inside the affected accessory then fill
the water tank with water according to the directions and run a continuous jet of steam
through the affected accessory for several minutes to clear the pathway.
Aim the appliance at a neutral surface or cleaning cloth to ensure do debris is emitted.
Cleaning the Microfibre Cloths
The microfibre cloths are machine washable on a warm setting; always sue a mild
detergent. For best results, lay flat to dry.
Note: never use bleach or fabric softener when cleaning the microfibre cloths.
Storage
After use, turn the appliance off and unplug from the mains power supply.
Remove the water tank and empty out any residual water, then clean the outer surface
with a dry cloth.
Remove the cleaning pad and wash ready for the next use.
Store the appliance in a dry area out of reach of children.
Troubleshooting
Problem
Possible Reason
Possible Solution
Reduced Steam or No
Steam.
Water tank may be empty.
Steam nozzle may be
blocked.
There is no power to the
unit.
The steam button wasn’t
Fill the water tank.
Clean the steam nozzle.
Ensure the appliance is
plugged in.
Press the steam button.

pressed.
Steam control knob is set
to min.
Turn the steam control
knob clockwise to Max.
Unit Will Not Turn On.
Blown fuse or breaker.
Power cord not plugged in.
Internal fuse is blown.
Handle is not inserted
correctly.
Replace the fuse or reset
breaker.
Plug the cord into a
working circuit.
Contact customer services.
Check that the handle is
firmly connected to the
steam mop body.
/