Page is loading ...

User manual
(AEH2900, AEH2110, AEH2120, AEH2130, AEH2310)


1EN
Contents
1 Important safety instructions 3
Safety 3
Important Safety Instructions 3
Compliance 4
Care of the environment 5
Notice 5
Written Offer 6
2 Overview 7
Motion sensor 7
Door and window sensor 7
Temperature and humidity sensor 8
Intelligent switch 9
Status indicator 9
3 Setup 11
Join your Smart Home network 11
Install or replace batteries 12
Plug the Intelligent switch 14
Reset 15
Reset network connection 15
Restore factory settings 16
4 Place 18

2 EN
Place the Motion sensor 18
Find a right location 18
Use the mounting kit 18
Use the adhesive tape 19
Place the Door and window sensor 20
5 Use 23
Philips Smart Home app 23
Manage devices 24
Set the device 24
Check device status 24
Delete the device 25
Set the rules of home automation 26
Set the trigger 26
Set the action 26
Edit the rules 27
Access the devices remotely 28
6 Check for updates 29
7 Technical data 30
Sensors (for indoor use only) 30
Motion sensor 30
Door and window sensor 30
Temperature and humidity sensor 30
Intelligent switch 30

3EN
1 Important safety instructions
Safety
CAUTION: For INDOOR USE ONLY!
DO NOT use this Intelligent switch with non-resistive loads, such as motors,
compact uorescent light (CFL) bulbs or uorescent lighting.To reduce the risk
of electric shock, this Intelligent switch has a third (grounding) pin. As a grounding
type plug, this Intelligent switch only ts into a grounding type power outlet. Make
sure that you use this Intelligent switch with a grounding type power outlet that
has been properly installed by a qualied electrician.
Important Safety Instructions
a Read these instructions.
b Keep these instructions.
c Heed all warnings.
d Follow all instructions.
e Clean only with dry cloth.
f The batteries shall not be exposed to excessive heat such as sunshine, re
or the like.
• Perchlorate Material - special handling may apply. See www.dtsc.ca.gov/
hazardouswaste/perchlorate.
g This product shall not be exposed to dripping or splashing.

4 EN
Compliance
Changes or modications not expressly approved by the party responsible for
compliance could void the user’s authority to operate the equipment.
Notice for the USA
This equipment has been tested and found to comply with the limits for a Class
B digital device, pursuant to part 15 of the FCC Rules. These limits are designed
to provide reasonable protection against harmful interference in a residential
installation. This equipment generates, uses, and can radiate radio frequency energy
and, if not installed and used in accordance with the instruction manual, may cause
harmful interference to radio communications.
However, there is no guarantee that interference will not occur in a particular
installation. If this equipment does cause harmful interference to radio or television
reception, which can be determined by turning the equipment off and on, the user
is encouraged to try to correct the interference by one or more of the following
measures:
• Relocate the receiving antenna.
• Increase the separation between equipment and receiver.
• Connect the equipment into an outlet on a circuit different from that to
which the receiver is connected.
• Consult the dealer or an experienced radio/TV technician for help.
The set complies with the FCC-Rules, Part-15. Operation is subject to the
following two conditions:
• This device may not cause harmful interference, and
• This device must accept any interference received, including interference that
may cause undesired operation.
Notice for Canada
CAN ICES-3(B)/NMB-3(B)
This device complies with Industry Canada license-exempt RSS standard(s):
Operation is subject to the following Two conditions:(1) this device may not
cause interference, and (2) this device must accept any interference, including
interference that may cause undesired operation of the device.

5EN
Care of the environment
Environmental information
All unnecessary packaging has been omitted. We have tried to make the packaging
easy to separate into three materials: cardboard (box), polystyrene foam (buffer)
and polyethylene (bags, protective foam sheet.)
Your system consists of materials which can be recycled and reused if
disassembled by a specialized company. Please observe the local regulations
regarding the disposal of packaging materials, and old equipment.
Disposal of your old product and battery
Your product is designed and manufactured with high quality materials and
components, which can be recycled and reused.
This product may contain lead and mercury. Disposal of these materials may
be regulated due to environmental considerations. For disposal or recycling
information, please contact your local authorities or visit www.recycle.philips.com.
This product contains batteries:
• Dispose of batteries properly. Do not incinerate. Batteries may explode if
overheated.
• Do not wrap in metal or aluminum foil. Wrap in newspaper before
discarding.
• It is suggested that you contact your local town or city to determine proper
battery redemption site(s) in your area.
• Please visit www.call2recycle.org for additional information on a recycling
center in your area for rechargeable batteries.
Notice
Disclaimer
• Your use of Philips Smart Home is at your sole risk. Gibson Innovations and
its subsidiary companies (individually and collectively “Gibson Innovations”)
are not responsible for the operation of such Philips Smart Home or your
use thereof and Gibson Innovations shall have no liability to you related
thereto.

6 EN
• The sensors and/or Intelligent switch are intended as an aid. They are not
substitutes for home security supervision and should not be used as such.
Written Offer
Gibson Innovations hereby offers to deliver, upon request, a copy of the complete
corresponding source code for the copyrighted open source software packages
used in this product for which such offer is requested by the respective licenses.
This offer is valid up to three years after product purchase. To obtain source code,
please contact [email protected]. If you prefer not to use email or if you
do not receive conrmation receipt within a week after mailing to this email
address, please write to Open Source Team, Gibson Innovations Limited, 5/F, Philips
Electronics Building, 5 Science Park East Avenue, Hong Kong Science Park, Shatin,
New Territories, Hong Kong. If you do not receive timely conrmation of your
letter, please email to the email address above.
Specications are subject to change without notice. Philips and the Philips’ Shield
Emblem are registered trademarks of Koninklijke Philips N.V. and are used by
under license from Koninklijke Philips N.V.. Gibson Innovations reserves the right
to change products at any time without being obliged to adjust earlier supplies
accordingly.

7EN
2 Overview
With the Smart Home devices and Philips Smart Home app, you can have the
changes at your home monitored, and set rules to have the connected home
appliance powered on or off automatically according to the changes.
Motion sensor
The Motion sensor detects the movement of people at home.
a Status indicator
b Detection lens
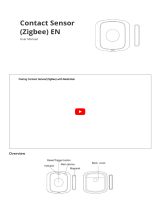
Door and window sensor
The Door and window sensor detects the opening/closing of door or window at
home.
a
b
AEH2110

8 EN
a Status indicator
b Alignment mark
Temperature and humidity sensor
The Temperature and humidity sensor detects the temperature and humidity at
home.
a Status indicator
a
b
AEH2120
a
AEH2130

9EN
Intelligent switch
The Intelligent switch powers on or off the connected appliance at home.
a Power on/off
b Power indicator
c Status indicator
d Setup button
Status indicator
Indicator Status of the device
Start-up
From amber to red Ready for pairing (for a device that has never
been paired with the Bridge, or a device that
has been restored to factory settings)
Flashing amber Ready for re-joining (for a device that has
been paired with the Bridge before)
Operation
d
b
a
c
AEH2310

10 EN
Solid green for less than
one second
An event that triggers notications happens.
Flashing red Disconnected
Flashing red and green
alternately
Firmware updating underway
Low battery
Solid red for three sec-
onds, and then, ashing red
Battery to be replaced

11EN
3 Setup
Join your Smart Home network
1 On your mobile device, download and install the Philips Smart Home app.
2 Follow the onscreen instructions to get connected to the Bridge.
3 Follow the onscreen instructions to add your Smart Home devices to the
Bridge. For setup, bring the Smart Home device as close to the Bridge as
possible.
a Install the batteries. Push to close the battery door. On the Intelligent
switch, press the power button to switch on.
b Don't release the battery door until the status indicator turns from
amber to red.On the Intelligent switch, press and hold the setup
button until the status indicator turns from amber to red.
c On the Philips Smart Home app, press the Search button.
» When the status indicator lights up in green, pairing starts.
iOS
Philips Smart Home
Smart Home
Smart Home
Get started
Demo
+

12 EN
Note
• The device exits the pairing mode after three minutes. To re-enter the pairing mode, open the
battery door and close it as described in Step 3.
Install or replace batteries
To install or replace batteries on your Smart Home devices, do the following:
1
2
Search
All devices
No device has connected
Add devices
Home
Settings
Rules
2
3

13EN
Motion sensor
Door and window sensor
Temperature and humidity sensor
1
2
3
1
2
3
1
2
3

14 EN
Plug the Intelligent switch
To add the Intelligent switch to the Bridge, do the following:
1 Insert the Intelligent switch into a power outlet properly.
2 Press and hold the Setup button until the status indicator turns from amber
to red.

15EN
Reset
Reset network connection
Reset the network connection when:
• a device re-joins the Smart Home network after the batteries are replaced.
• there are connection problems with the Smart Home network.
Indicator Status of the device
ashing red Network connection lost
On the sensor, do the following:
1 Open the battery door.
2 Push to close the battery door. Release the door when the status indicator
ashes in amber.
3 With the Philips Smart Home app, add the device to the Bridge (see 'Join
your Smart Home network' on page 11).
On the Intelligent switch, do the following:
1 Press and hold the Setup button until the status indicator ashes in amber.

16 EN
2 With the Philips Smart Home app, add the device to the Bridge (see 'Join
your Smart Home network' on page 11).
Restore factory settings
Restore factory settings when:
• you want to connect your device to another Bridge.
On the sensor, do the following:
1 Delete the device from the Bridge (see 'Delete the device' on page 25).
2 Open the battery door.
3 Push to close the battery door. Don't release the door until the status
indicator turns from amber to red.
4 With the Philips Smart Home app, add the device to the Bridge (see 'Join
your Smart Home network' on page 11).
On the Intelligent switch, do the following:
1 Delete the device from the Bridge (see 'Delete the device' on page 25).
2 Press and hold the Setup button until the status indicator turns from amber
to red.
3 With the Philips Smart Home app, add the device to the Bridge (see 'Join
your Smart Home network' on page 11).

17EN
Tip
• If you press and hold the setup button for more than six seconds, the status indicator turns off. To
restore factory settings, re-do Step 1.

18 EN
4 Place
• Use the Smart Home devices in an indoor environment.
• Keep such devices from exposure to moisture, direct sunlight, or excessive
heat.
• To ensure good connection, check the distance and obstacles, such as walls,
between the Bridge and devices.
Place the Motion sensor
Find a right location
• Select a location where a person is expected to cross the range of detection.
• To avoid false detection events, select a location where the height and angle
are right to keep non-people objects out of detection, such as pets.
• Avoid locations that are exposed to sources of heat, such as a heater or
radiator, or sources of strong air drafts, such as fans or air conditioners.
Use the mounting kit
With the supplied mounting kit for motion sensor, you can adjust the angle of view
through the ball joint.
To use the supplied mounting kit, do the following:
/