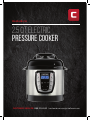
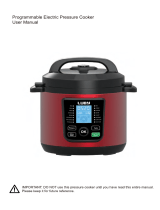
Chefman 2.5 Quart Electric Pressure Cooker User guide
- Category
- Pressure cookers
- Type
- User guide

2.5 QT Electric
PRESSURE COOKER
CUSTOMER SERVICE: 888.315.6553 | customerservice@chefman.com
RJ40-25-CH

2
MODEL: RJ40-25-CH
READ ALL INSTRUCTIONS BEFORE USE
For your safety and continued enjoyment of this product, always read the instruction manual before using.
Congratulations!
You have made an excellent choice purchasing this Chefman product. Rest assured that
your purchase is manufactured to the highest standards of performance and safety. We
are confident that you will be satisfied with your purchase and will think of Chefman as
the go to company for appliances that are: dependable, affordable, built with intuitive
features and the panache that will enhance your kitchen experience.
Customer satisfaction is a key element of our company’s philosophy. Each product is
backed by a comprehensive manufacturer’s 1-year warranty as well as outstanding
after-sales service support through our dedicated helpline team. We are confident that
you will enjoy your purchase for years to come.
In the unlikely event, that your product does not operate as described in the manual
please feel free to call or email our helpline for assistance. Products can malfunction and
we understand that they sometimes will. If you feel that your appliance is not operating
as it should; know that each appliance is backed by a 1-year warranty period. Warranty
claims can be made within one year from the date of purchase only when accompanied
by a dated receipt. This guarantee is in addition to your statutory rights. Your statutory
rights are not affected. This limited warranty does not apply in cases of damage caused
by accident improper use, abuse and force majeure.
This warranty gives you specific legal rights. Rights may vary depending on your state
or province of residence. Some locations do not allow limitations on implied warranties
or special incidental, or consequential damages, so the limitations may not apply to you.
This limited warranty will be invalidated if the appliance is tampered with in any way
whatsoever.
Our telephone helpline (888)-315-6553 is available for questions or technical assistance:
Monday-Friday 9am to 5 pm EST. Customers can also receive support via email:
customerservic[email protected].

1 Safety Instructions
3 Features
5 Operating Instructions
12 Cleaning, Maintenance and Troubleshooting
13 Troubleshooting
14 Notes
15 Terms and Conditions
16 Warranty Card
Contents

1
MODEL: RJ40-25-CH
THIS APPLIANCE IS FOR HOUSEHOLD USE ONLY.
WARNING: When using electrical appliances especially when children are present, basic
safety precautions should always be followed to reduce the risk of fire, electric shock,
and/or injury to persons, including the following:
1. This appliance is intended for indoor home use only.
2. Never use any accessories or parts from other manufactures. Your warranty will
become invalid if such accessories or parts have been used.
3. Check that your home power supply corresponds with this appliance’s intended
voltage.
4. Place this appliance on a stable, heat resistant surface. Make sure not to place near
or on a heat source such as gas or electric burner or oven.
5. Short power cords are attached to this item to prevent entanglement and tripping
hazards. Extension cords with corresponding voltage, electrical rating and
grounding wires can be used. Care should be taken so that any exposed cord is not
hanging down from a counter or table where it can be pulled on or tripped over by
any child or adult.
6. Before using this appliance inspect the plug and cord line for cuts and/or abrasion
marks if they are found. Do not use this appliance and contact our authorized
customer service representative.
7. Insert the plug by grasping it firmly and guiding it into your home’s grounded
electric outlet. Disconnect by grasping the plug and removing it from your home’s
grounded electric outlet. Never wrap the cord tightly around the appliance during
use or storage as this can cause the wire to fray and break.
8. During initial use, you may notice some smoke and or a slight odor. This is normal
and should quickly dissipate. It should not reoccur after the appliance has been used
a few more times.
9. This appliance should be used only by persons who are capable of understanding
the user manual or are supervised by those who have adequate understanding of
the appliances’ features, their use and the operating instructions. Children must be
supervised and should not be left alone with appliances during their operation.
10. During use appliances should not be left unattended.
11. Care should be taken not to move appliances that are in use.
12. Do not move appliances that are full of food or liquid whether hot or cold.
13. Never operate this appliance without food and liquid in the removable cooking bowl.
14. Do not exceed the ‘MAX’ fill level. When cooking foods that expand (such as dried
vegetables, beans, grains, rice, etc.) Do not fill past the ‘MAX’ rice fill level.
IMPORTANT SAFEGUARDS
SAFETY INSTRUCTIONS

2
MODEL: RJ40-25-CH
SAFETY INSTRUCTIONS
15. Appliances can emit heat or steam when in use therefore care should be taken
not to block inlets or outlets.
16. Always check the pressure release valve and safety locking pin for clogging or
obstruction and clean if necessary.
17. Appliance exteriors are designed to be cool to the touch. Portions do get HOT
during use. Burns can result from touching heating elements, air vents and
removable baskets or containers and - if any part is designed to be handled,
do so with care.
18. Do not use this appliance near an open flame or flammable materials.
19. Examine the silicone seal gasket to make sure it is without tears or damages.
Only use the gasket designed for this particular appliance. Should you notice
that the silicone sealing gasket has any damage please contact customer service.
20. Before using this appliance please read the caution sticker attached to the lid
of the pressure cooker. Review how to lock and unlock the lid as well as always
checking the setting of the float pressure release valve to make sure it is in the
right position (Airtight or Exhaust) for the function you have selected.
21. It is necessary to lock the lid of this appliance for safe cooking. Once the lid
is locked and the cooking process has begun do not attempt to open the lid.
Do not force the lid open once locked. Should you need to open the pot cancel
the function with the cancel button. If this is a function that requires the steam
to be released follow the instruction to turn the knob to exhaust and release the
steam. The pot will go to the keep warm setting and can then safely be opened.
22. Never place your hands, arms or face over the pressure release valve once this
appliance has started to function.
23. Do not use the appliance for frying. Oil can be used within the saute mode (this
is a quick, light fry mode) and as an ingredient in a frying cooking process.
24. Do not warm for more than ten hours.
25. Do not leave uncooked ingredients in this pot for more than a short period of
time. Raw meat, poultry, fish, fruits or vegetables can spoil.
26. Unplug unit when you have finished cooking.
27. Before cleaning, make sure that the pot is turned off, unplugged, cooled to
room temperature and all pressure has been released.
28. Do not clean the appliance until the unit is cool.
29. Do not immerse complete appliance in water or a dishwasher for cleaning.
30. Clean with a non-abrasive cleaner, soft pad or cloth.
31. Store unit in a cool, dry location.
32. In case of any electric emergency such as a fire call 911.
Take a minute to unwrap your appliance. Remove any packaging or labels that
may interfere with the use of your appliance. Locate your instruction manual. For
your safety and the continued enjoyment of this product, read all the directions
carefully and store this manual in a safe place for future reference.

3
MODEL: RJ40-25-CH
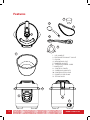
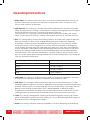
Features
1. LID HANDLE
2. PRESSURE EXHAUST VALVE
3. SPOON
4. MEASURING CUP
5. RUBBER GASKET
6. 3-PRONG POWER CORD
7. INNER POT
8. CONTROL PANEL
9. CARRYING HANDLES
10. CONDENSATION CUP
11. POWER CORD PLUG
12. STEAM RACK
1
4
7
8
5
6
12
9
10
11
2
3

4
MODEL: RJ40-25-CH
The Chefman pressure cooker can also function as a slow cooker. It can enable you to cook
a fast, fresh homemade meal on the pressure setting or a programmed slow cooked meal
that you have ready when you arrive home. Additionally, you can select cooking presets
that meet your personal cooking preferences including: saute, steam, chili/beans and beef/
poultry. We know you will enjoy your Chefman cooking experience. This is a multi-function
appliance so please take the time to look over the features of this device with its many
settings. There are safety and operating instructions that are unique to this appliance so
pay careful attention to these instructions this will insure that you maximize the benefits
of this purchase and that it functions safely and efficiently.
When the pressure cooker has been set up and plugged into an electrical outlet the user
interface will appear as pictured. An alert will sound notifying the user that it is powered
on. Four blue zeros will light up on the display. All the user functions can be accessed by
selecting them as pictured below.
PRESSURE COOKER PANEL
Features
Menu
Function
Default
Cooking Time
Adjustable
Cooking TIme
Cooking
Pressure
Adjustable
Cooking TIme
Rice 12 minutes 1 to 30 minutes 7-10 psi 230-237
˚
F
Soup/Stew 16 minutes 1 to 50 minutes 7-10 psi 230-237
˚
F
Beans/Chili 20 minutes 1 to 50 minutes 7-10 psi 230-237
˚
F
Beef/Poultry 25 minutes 1 to 99 minutes 7-10 psi 230-237
˚
F
High Pressure 1 minute 1 to 99 minutes 7-10 psi 230-237
˚
F
Low Pressure 1 minute 1 to 99 minutes 4-6 psi 223-226
˚
F
Steam 1 minute 1 to 99 minutes No Pressure 212
˚
F
Saute 10 minute 1 to 50 minutes No Pressure 329-356
˚
F
Slow Cooker 1 hour 1 to 9 hours
(.5 increments)
No Pressure 194-203
˚
F

5
MODEL: RJ40-25-CH
Operating Instructions
1. Delay Timer: This feature allows the user to set a timed cooking experience. You can set
the timer within the time frame one half-hour to twenty-four hours. The timer is set in
thirty minute increases or decreases.
2. High Pressure: This setting can only be started while cooking within the pressure cooker
mode. The high pressure setting is used for quick cooking. In the high pressure setting the
amount of pressure in the pot is raised to its maximum intensity.
Low Pressure: This setting can only be started while cooking with the pressure cooker
mode. The low pressure setting is used for with the pots pressure set for lower intensity.
3. Rice: This setting adjust the time and cooking features of the pressure cooker to optimize
pressure cooking rice. Rice will be cooked allowing the grains to be both separated
and tender. A measuring cup is provided for measuring the rice. This setting is suitable
for all types of rice such as long grain rice, jasmine, basmati and brown rice. Weigh dry
rice accurately and wash well with cold water until water runs clear. Drain well and place
into the removable cooking bowl. Add corresponding water amount. Water to rice ratio is
based on the table provided. Keep in mind that different grains of rice require different
time adjustments. Rice will foam and double in size after cooking. When you put in the
dry rice use the interior bowl markings and do not fill the bowl beyond the 1/2 marking for
your rice and water combination.
4. Soup/Stew: This setting is suitable to cook a variety of soups from light broths to hearty.
It can also be used to cook a variety of vegetable, meat or poultry stews.
5. Slow Cook: This setting has adjusted for long cook times at low temperatures. It is ideal
for breaking down tough cuts of meat or vegetables that would be accomplished with long
and slow cooking times. It is used paired with the timer and/or delay start mode. The user
determine the cooking time based on what is being prepared. A reference guide is
included in the user guide. The delay timer can be used to allow the cook to set the slow
cooking function to automatically for a period from a half hour to twenty- four hours.
6. Sauté: This setting is designed for softening and caramelizing garlic, onions and smaller
pieces of food prior to pressure or slow cooking. It can also be used to pre-heat the pot so
that other functions will begin more rapidly.
7. Steam: This setting is ideal for steaming vegetables, fish fillets, dumplings and reheating.
Grain (1 Cup) Water Required
Basmati
1 ½ cups (350mL)
Brown
1 ½ cups (350mL)
White
1 ¼ cups (330mL)
Wild 3 cups (700mL)

6
MODEL: RJ40-25-CH
Operating Instructions
8. Increase (+): This setting allows the user to increase the time for the functions of this
appliance. Slow increases are completed by tapping the button gently. Faster increases
are completed by holding down the button.
9. Decrease (-): This setting allows the user to decrease the time for the functions of this
appliance. Slow decreases are completed by tapping the button gently. Faster decreases
are completed by holding down the button.
10. Start/Cancel: This setting starts or cancels each appliance function. When a function is
started the initial display will show a moving LED image to show that the pot has started
the warming function this may take several minutes. The cancel function will stop a process.
If you then decide to start again you will have to restart all of the functions you require.
11. LED Display: This display allows the user to see if the appliance is turned on, whether a
function is in progress or whether the function has completed. When the unit is first
plugged in an alert will sound and the display will show four blue zeros.
12. Keep Warm: This setting is engaged when one of the menu functions such as pressure
cooking, slow cooking or steaming comes to an end. It can also be turned on its own to
keep food warm for up to six hours.
13. Low Pressure: This setting can only be started while cooking within the pressure cooker
mode. When set to low pressure the cooking time is increased because the level of
pressure in the pot is raised to its minimum intensity.
14. Chili/Beans: This setting is used for chili recipes that often will have beans as a key
ingredient. The setting assumes that you are cooking dried beans. To shorten the cook
time, soak beans in cold water overnight. Discard soaking water and cook with fresh cold
water for half the pre-set cooking time. Make sure to use a water ratio of 1 part beans to 3
parts water. Beans swell and double in size after cooking. For best results, do not overfill
the cooking bowl. The total volume of uncooked beans and water should not exceed the
marking inside the removable cooking bowl.
15. Beef/Poultry: This setting is used for cooking meat and poultry.
16. Pressure Valve: This valve has two settings exhaust and airtight. Airtight: Set when the
pressure cooker is in use. Exhaust: Set when the pressure cooking is complete to allow
steam to escape. Also set when the pot is set to steam to allow steam to escape. Care
must be taken not to put your hand, arm or face near the valve when steam is escaping.
Use a utensil (a long handled item such as a spatula, tong etc.) to turn the valve
distancing the user from the escaping steam. You can also use a dry or wet towel to
cover the vent as the steam is escaping.

7
MODEL: RJ40-25-CH
Operating Instructions
CLEAN THE APPLIANCE PARTS BEFORE USE
Remove the silicone gasket and the interior pot. Wash with water and a non-abrasive sponge
and cleaner. Dry the items. Reinstall the gasket and pot. Make sure the gasket is in tightly
installed in the interior of the lid (both behind and under the metal ring within the lid).
Look at the features diagram to guide you. Reattach the lid if it has been removed.
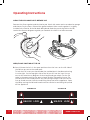
OPEN/CLOSE POSITION OF THE LID
B. You will know the lid is in the open position when the icons on the left side of
the lid line up next to the word open.
To lock the lid- insert your hand under the molded plastic handle and turning
it to the right. On the top right side of the lid you will see the icons line up
next to the word close (diagram of the triangle and gum drop). For the lid
to be in the open position the open triangle and the lid need to line up. For
the lid to be in the closed position the close triangle and the lid icon have to
line up. Knob counter clockwise and lifting lid up and off the appliance. Open
the lid by turning the lid knob handle counter clockwise and lifting lid up and
off the appliance.
OPENED LID CLOSED LID
UNLOCK UNLOCKLOCK LOCK

8
MODEL: RJ40-25-CH
Operating Instructions
INSTALLING THE SPOON HOLDER AND CONDENSATION CUP
C. Install the spoon holder on the side of the pot by installing it in the black slot
which is located on the bottom right side of the pressure cooker exterior.
D. The clear condensation cup is installed in the back of the lid in the opening
that corresponds with the size of the cup. This cup collects steam as it
condenses along the rim of the pot.
OPERATING INSTRUCTIONS
1. When plugging in the unit an alert will beep letting you know that the unit is
plugged in.
2. The display will show four blue zeros.
3. Open the lid by turning the unit to the left-counter-clockwise. You will hear a
clicking noise. (icons will be lined up)
4. Make sure the silicone gasket is fully installed in the lid and lies flat behind the
wire ring.
5. Insert the inner pot into the electric cooker base with your desired food to be
cooked. Pay careful attention to the maximum fill line for different types of food.
6. Close the lid by turning the lid to the right clockwise. You will hear a clicking
noise (icons will be lined up).
7. Insert the clear plastic condensation collection cup by holding it against the cooker
under the lid hinge and sliding to lock it into the gap space provided that is the size
of the top of this cup.
8. If you are using the pressure cooking setting make sure the pressure valve is in the
airtight position. Pressure cooking produces steam which is let out of the cooking
unit by allowing the unit to naturally cool down. This takes a long time. To cool
down the pot more quickly and to open the lid faster carefully turn the pressure
valve to exhaust. Follow the safety instructions to ensure that you do not burn
yourself with escaping steam.
9. Once you have selected the cooking feature the lid will need to be locked. Once
you have started the cooking cycle you will not be able to open the lid. Should you
need to open the lid you must cancel the cooking setting and wait for the keep
warm button to light up.
10. You can safely open the pot lid.

9
MODEL: RJ40-25-CH
Operating Instructions
HOW TO PREPARE FOOD IN THE INNER POT
1. Add the food and liquid of your choice to the inner pot. Make sure not to go higher than
the 2/3 marking line on the pot. If you are cooking rice or beans (food that will expand
more than is typical of other foods) do not go over the ½ line. This includes both the rice/
beans and water.
2. Make sure to put the inner pot into the electric cooker unit.
3. Close the lid.
4. Turn the lid counterclockwise until you hear a clicking noise and see the triangle and
gumdrop are lined up in the close position.
DELAY TIMER SETTING
1. Prepare the food in the inner pot and insert it in the cooking unit.
2. Close and lock the lid.
3. Set the delay start for a time within the default settings. The display screen will be shown
as (dl) with a time value. The display will show a delay time which will blink until you select
your cooking setting.
4. Select a cooking setting, then press start. The display will show your cook time in a
blinking set of digits.
5. The cooking time will blink until you press start. The display will show your delay cooking
time in solid not blinking digits.
DELAY SCREEN PRESSURE COOK SCREEN

10
MODEL: RJ40-25-CH
Operating Instructions
PRESSURE COOK
1. When using the pressure cooker setting you must make sure the pressure valve is
set to airtight. This will cause the cooker to build up the necessary pressure to
cook more quickly. When the cooking function has ended you can decide to allow
the pot to naturally depressurize (this can take a long period of time) or release
the pressure by turning the valve to exhaust. Caution must be take not be near the
releasing steam.
2. High Pressure: You can select to pressure cook at a high pressure setting. The
high pressure setting will allow the pot to cook your food within a quicker time
under a high pressure cooking condition. Use of this setting is determined by
what the food ingredients you have decided to cook.
3. Low Pressure: You can select to pressure cook at a low pressure setting. The low
pressure setting will allow the pot to cook your food within a less rapid cooking
time than under a high pressure cooking condition. Use of this setting is
determined by what the food ingredients you have decided to cook and how
rapidly you want to cook them.
Steps for Using the Pressure Cook Settings
1. Plug in the pressure cooker
2. Put the pressure valve on airtight
3. Lock the Lid
4. Press any of the pressure cooking setting: High, Low, Rice, Soup/Stew, Chili/
Beans, or Beef/Poultry
5. The display will show a circulating start up screen indicating the pot is
preheating. It may take in ten minutes or more for this to complete.
6. The display will now show the letters PC and a time value.
7. The display will count down until the cooking time is complete.
8. An alert will sound and the keep warm setting will blink.
9. You can either choose to wait for the natural cool down of the pot or use the
quicker method of turning the steam valve to exhaust.
10. The keep warm indicator light will change to a non-blinking continuous light.
11. You can now open the lid safely. Please be aware the contents of the pot are
hot and steam will escape from the open pot.
KEEP WARM SETTING
This setting is turned on following any of the cooking functions (High/Low Pressure,
Rice, Soup/Stew, Chili/Beans and Beef/Poultry) upon completion and will stay on for
up to six hours.
If you select keep warm as an initial setting the pot will keep your food warm for up
to six hours.

11
MODEL: RJ40-25-CH
Operating Instructions
SLOW COOK SETTING
This setting is a slow cooking option for food preparation.
1. Select this feature
2. The slow cook preset setting should be considered a low, slow, temperature cook
setting. When using this setting make a time adjustment should be made to account
for the temperature of this setting.
3. A circulating preheat display will start
4. When preheated you can choose a time value for how long you would like to cook
your food you can set the pot to cook for a period from 1-9 hours in increments of
half hours 1, 1.5, 2.0 etc.
5. After the preheat the display will indicate the time value.
6. When the cooking cycle is completed an alert will sound and the keep warm will
setting will light up.
SAUTE SETTING
This setting is used to quickly saute ingredients for your cooking experience.
1. The pot can be left open.
2. The saute setting can also be used as a way to preheat the pot.
3. Select this feature
4. The saute setting can be used for a cooking time from 1-50 minutes. The default
value is 10 minutes.
5. The preheat display of a moving blue rectangle will remain until the pot is preheated.
This can take approximately ten minutes if the pot is cool.
STEAM SETTING
This setting is used for steaming vegetables and fish.
1. The steam setting is a non-pressure setting.
2. It can be set in 1 minute increments from 1-99 minutes.
3. Select steam enter the amount of time for which you will be steaming by pressing
the + or - keys
4. The pressure cooker will preheat . The display will indicate the preheat screen cycling
blue display. This may take up to ten minutes.
5. The number will be displayed and begin to cook counting down to the end. Steam
may exit from the pressure valve. Opening on the top of the pot.
6. The pot will sound an alert when complete.
7. The keep warm setting will go on.

12
MODEL: RJ40-25-CH
Cleaning & Maintenance
PARTS HOW TO CLEAN
Pressure Valve Grab the pressure valve and pull it up
Wash it in warm water with a mild detergent
Allow the valve to dry put it back in place.
Main Unit Unplug the cord from the back
Wash the display and outside pot with a soft
damp sponge. Allow to dry completely before
using the cooker.
Pot
Rinse with warm water and mild detergent.
Use a non-abrasive mild detergent and sponge
or cloth.
Measuring Cup
Spoon and Holder
Condensation Cup
Silicone Gasket Wash with warm soapy water. Inspect after
each use for any tears or other damage.
Pressure Valve (Underside of the lid) This should be clean and free of food residue.
It can be removed if necessary.
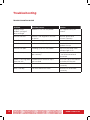
Troubleshooting
DISPLAY SHOWS THE FOLLOWING ERROR CODES
Record the code displays and contact Customer Service for how to resolve the problem.
In most cases, you will need to return the appliance.
Indicator Code Problems/Causes
E1 Open circuit of the sensor
E2 Short circuit of the sensor
E3 Overheating
E4 Signal switch malfunction

13
MODEL: RJ40-25-CH
Troubleshooting
TROUBLESHOOTING GUIDE
Problem Possible Reason Solution
Display shows
endless cycling of
blue rectangle
Preheat is still not completed Wait approximately 10
minutes.
Lid will not lock Gasket is not aligned in wire rim
in the lid
Remove gasket and
re-insert correctly
Lid will not lock Lid is not in aligned on the pot rod Remove lid and reposition
Lid will not lock Lid is not in the lock position Turn the lid until the close
symbols line up
Lid will not open Cooking cycle has not ended Wait until the keep warm
indicator light is on
Lid will not open Lid is not aligned on the
pot correctly
Carefully move the lid until
it can be removed and
reinstalled
Water is running down
from the unit
Condensation collector cup is
not installed
Put in the cup in the channel
on the back of the pot
Rice is too soft, mushy Too much water was used Measure rice and water
accurately
Rice is too dry Too little water was used Measure rice and water
accurately

14
MODEL: RJ40-25-CH
Notes

15
MODEL: RJ40-25-CH
CHEFMAN
®
LLC warrants, subject to the conditions stated below, that from the date of purchase, this product will
be free from mechanical defects for a period of ONE (1) year. CHEFMAN
®
LLC, at its option, will repair or replace
this product found to be defective during the warranty period. Should this product become defective by reason of
improper workmanship or material defect during the specified warranty period, CHEFMAN
®
LLC will repair or replace
the same effecting all necessary parts replacements for a period of one year from the date of purchase. If product
is no longer available we will replace it with a product of equal value. Transportation charges on parts, or products
in whole, submitted for repair or replacement, under this warranty, must be borne by the purchaser. This warranty
is void if the product is used for other than single-family household use or subjected to any voltage and waveform
other than as specified on the rating label (e.g., 120V ~ 60 Hz).
This warranty is available to consumers only. You are a consumer if you own a CHEFMAN
®
product that was
purchased at retail for personal, family or household use. Except as otherwise required under applicable law, this
warranty is not available to retailers or other commercial purchasers or owners.
CONDITIONS: This warranty is valid for the original USA and Canada retail purchaser from the date of initial retail
purchase and is not transferable. Keep the original sales receipt. Proof of purchase is required to obtain warranty
service or replacement. Dealers, service centers, or retail stores do not have the right to alter, modify or in any way,
change the terms and conditions of this warranty. Warranty registration is not necessary to obtain warranty on
CHEFMAN
®
LLC Products. Save your proof of purchase receipt.
ABOUT YOUR PRODUCT WARRANTY: Most warranty repairs are handled routinely, but sometimes requests for
warranty service may not be appropriate. For example, warranty service would NOT apply if the product damage
occurred because of misuse, lack of routine maintenance, shipping, handling, 3rd party warehousing or improper
installation. Similarly, the warranty is void if the manufacturing date or the serial number on the product has been
removed or the equipment has been altered or modified. During the warranty period, the authorized service dealer,
at its option, will repair or replace any part that, upon examination, is found to be defective under normal use and
service.
NORMAL WEAR: This warranty does not cover normal wear of parts or damage resulting from any of the following:
negligent use or misuse of the product; improper voltage or current; use contrary to the operation instructions;
deviation from instructions regarding storage and transportation; repair or alteration by anyone other than
CHEFMAN
®
LLC or an authorized service center. Further, the warranty does not cover Acts of God, such as fire, flood,
hurricanes and tornadoes. CHEFMAN
®
LLC shall not be liable for any incidental or consequential damages caused
by the breach of any express or implied warranty. Except to the extent prohibited by applicable law, any implied
warranty of merchantability or fitness for a particular purpose is limited in duration to the duration of the above
warranty. Some states, provinces or jurisdictions do not allow the exclusion or limitation of incidental of consequential
damages or limitations on how long an implied warranty lasts, so the above limitations or exclusion may not apply to
you. This warranty gives you specific legal rights, and you may also have other rights that vary from state to state or
province to province.
HOW TO OBTAIN WARRANTY SERVICE: If your CHEFMAN
®
product should prove to be defective within the
warranty period, we will repair it, or if we think necessary, replace it. To obtain warranty service, simply email
customerservic[email protected]om or call our toll-free number 1-888-315-6553 for additional information from our
Customer Service Representatives, or send the defective product to Customer Service at Chefman, 1 Sharp Plaza,
Mahwah, NJ 07495.
This warranty is effective for the time periods listed above and subject to the conditions provided for within this
policy.
CALIFORNIA RESIDENTS ONLY:
California law provides that for In-Warranty Service, California residents have the option of returning a nonconforming
product (A) to the store where it was purchased or (B) to another retail store which sells CHEFMAN
®
products
of the same type. The retail store shall then, at its discretion, either repair the product, refer the consumer to an
independent repair facility, replace the product, or refund the purchase price less the amount directly attributable
to the consumer’s prior usage of the product. If the above two options do not result in the appropriate relief to
the consumer, the consumer may then take the product to an independent repair facility if service or repair can be
economically accomplished. CHEFMAN
®
and not the consumer will be responsible for the reasonable cost of such
service, repair, replacement, or refund for nonconforming products under warranty.
CHEFMAN
®
is a registered trademark of RJ BRANDS, LLC.
Terms & Conditions
Limited Warranty

16
MODEL: RJ40-25-CH
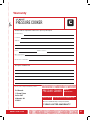
Warranty
Phone lines available Monday to Friday, 9am-5pm EST
1-YEAR LIMITED WARRANTY
Description of Malfunction:
Return your completed warranty card to:
RJ Brands
1 Sharp Plaza
Suite 207
Mahwah, NJ
07495
All data fields are required in order for us to process your request:
Model Number:
Full Name:
Address:
Phone:
Date of Purchase*:
Retail Store of Purchase:
*We recommend you keep the receipt with this warranty card
Email: (If applicable)
PRESSURE COOKER
PRESSURE COOKER
888.315.6553
customerservic[email protected]
MODEL:
RJ40-25-CH
2.5 QUART

®
To log-in to ClubChefman.com follow the below steps:
1. Enter www.clubchefman.com into your web browser.
2. Click on "Sign Up Now" .
3. Fill in the required information as prompted.
NOTE: "Place of Purchase" refers to the store at
which you purchased your product.
4. Sign in using your User Name and Password.
CLUB CHEFMAN ACCESS CODE:
2131497
RJBRANDS.COM | CLUBCHEFMAN.COM | CHEFMAN.COM
-
 1
1
-
 2
2
-
 3
3
-
 4
4
-
 5
5
-
 6
6
-
 7
7
-
 8
8
-
 9
9
-
 10
10
-
 11
11
-
 12
12
-
 13
13
-
 14
14
-
 15
15
-
 16
16
-
 17
17
-
 18
18
-
 19
19
-
 20
20


Chefman 2.5 Quart Electric Pressure Cooker User guide
- Category
- Pressure cookers
- Type
- User guide
Ask a question and I''ll find the answer in the document
Finding information in a document is now easier with AI
Related papers
-
Chefman 6 Quart Electric Pressure Cooker User guide
-
-
-
-
Chefman RJ13-4-AFC User manual
-
-
-
-
-
Other documents
-
 LUBY GT606 User manual
-
OXO SteeL 5-Piece POP Container Set User manual
-
Toastmaster tm-52rc User manual
-
 Cook's essentials K41143/EPC-678 User manual
-
Power Cooker PC WAL2 Pressure Cooker User guide
-
Elite Platinum EPC-1013 User manual
-
 Cook's essentials EPC-678SS User manual
-
 Cook's essentials K42027 User manual
-
 Vtopmart USVM02002 User manual
-
CrockPot CSC089X-DIM User manual


