QuietCool AFR SLR-40 Operating instructions

Type
Operating instructions

This manual is also suitable for

SEE // HEAR // FEEL
THE QUIETCOOL DIFFERENCE
THE NATURAL CHOICE FOR ENERGY SAVINGS!
OWNER’S GUIDE
SOLAR ATTIC FANS
DO NOT THROW AWAY! SERIAL NUMBER FOR FAN IS LOCATED ON
BACK COVER OF OWNER’S GUIDE. RETAIN IN A SAFE PLACE.
2
QUIETCOOLSYSTEMS.COM
GENERAL SAFETY INSTRUCTIONS
1. Read Instructions - All safety and operation instructions must be read. Failure to read and follow
instructions as stated in this guide may void applicable warranty.
2. Retain Instructions - The safety and operating instructions should be kept for future reference.
3. Heed Warnings - All warnings should be followed.
4. Follow Instructions - All installation and operating instructions should be followed.
5. Heat - The QuietCool system should be situated away from heat sources.
6. Damage Requiring Service - Only qualified service personnel should service the QuietCool system.
The user should not attempt to service the product.
7. Building Codes - Always follow Local Building Codes when installing appliances
CONTENTS
1. SYSTEM OVERVIEW ..............................................................1
1.1 Introduction ..............................................................1
1.2 Features .................................................................1
1.3 System Venting Requirements .............................................2
2. INSTALLATION ..................................................................3
2.1 Installing AFG SLR Model Fans .............................................3
2.2 Installing AFG SLR Solar Panel .............................................5
2.3 Installing AFR SLR Model Fans. . . . . . . . . . . . . . . . . . . . . . . . . . . . . . . . . . . . . . . . . . . . .6
3. WIRING .........................................................................8
3.1 Connecting the AC/DC Inverter ............................................8
4. SYSTEM OPERATING INSTRUCTIONS ............................................8
4.1 How to Operate ...........................................................8
WARRANTY ........................................................................9
QC Manufacturing, Inc.
26040 Ynez Rd.
Temecula, CA 92591
PH 951.325.6340
FX 951.325.6351
QuietCoolSystems.com
3
1-888-QUIETCOOL
1
1-888-QUIETCOOL
1. SYSTEM OVERVIEW
1.1 INTRODUCTION
Congratulations on the purchase of your new QuietCool Solar Attic Fan!
The QuietCool Specialty Series was designed for every application imaginable. QuietCool Specialty Series
fans dominate the market in energy efficiency. Our Specialty Series works great in practically all climate
zones and most homes, mobile homes, and even warehouse buildings!
Solar attic fans work by using sunlight to power the fans motor to help prevent any heat or moisture build up
in your attic. Your attic can reach temperatures of up to 150 degrees which can destroy the integrity of your
home as well as completely destroy your roof because of the humidity and moisture build up. Because of this,
solar attic fans can prolong the life of your roof structure and air conditioning while even helping you to save
up to 30% off A/C costs.
The QuietCool Solar Attic Fans are the best in the business. New for 2019, we offer a solar line of attic fans
including the AFG SLR-30 and AFG SLR-40 solar attic gable fans and the AFR SLR-30 and AFR SLR-40 solar
attic roof mount fans.
The best part of a QuietCool Solar Attic Fan is that an AC/DC Smart Inverter is included with the fan. This
allows the fan to run during the day from the sunlight, and at nighttime using traditional electricity. This
gives you the best of both worlds: free ventilation during the day and nighttime supercooling using the cooler
outdoor air.
1.2 Series Features
High Efficiency Design
Designed and Engineered in California
15 Year Warranty
Built-in thermostat
Included AC/DC Inverter
Adjustable high-precision mounting tabs
2
QUIETCOOLSYSTEMS.COM
1.3 System Venting Requirements
VERY IMPORTANT! - 1 SQUARE FOOT OF NET FREE VENT AREA PER 750 CFM
RECOMMENDED! - 2 TO 4 SQUARE FEET OF INLET VENTS PER FAN
Venting plays a very significant role in the performace of QuietCool fans. QuietCool recommends a minimum of
1 SQ. FT. of venting for every 750 CFM in the QuietCool system. If an attic has at least 1:750 attic venting, the
QuietCool system will operate efficiently and effectively. If an attic has less than 1:750 attic venting, the
system may not operate as efficiently, or effectively, as it could with 1:750 attic venting. But don’t worry, the
system will still operate if there is not enough venting.
Insufficient venting is a very simple problem to fix. Roofing contractors can add extra venting to most homes
simply and easily. The most common types of venting is shown in the chart below.
Vent Type Model Type Average Size Venting Sq. Ft.
Gable vent 12” x 19.5” 1.20
Dormer Vent 14” x 8” 0.70
Eave Vent
4”
5”
6”
0.03
0.04
0.07
Ridge Vent 4’ - 12’ 0.125 per ft
Soffit Vent
16” x 4”
16” x 6”
16” x 8”
0.19
0.29
0.39
O’Hagin Vent
Low/Medium Profile
Tapered Low Profile
Low Profile Flat
High Profile
0.5
0.6
0.68
0.68
Turbine Vent
8”
12”
14”
.35
.79
1.1
*Note: This table is only a guideline and is not a guarantee of venting capacity.
3
1-888-QUIETCOOL
2. INSTALLATION
2.1 Installing AFG SLR model fans
NOTE: The AFG SLR model fans are designed to mount behind existing vents. If no
vent exists, one must be installed. Vent should be installed in the upper
center section of the gable.
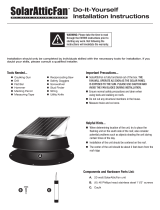
NOTE: The mounting brackets for the AFG SLR model fans are on sliding rails.
Simply loosen the 8 nuts on the 4 mounting brackets to slide the bracket
into the proper position for your installation. (as shown in Figure 2.1A)
The fan should be flush to the gable vent when installed.
Installing the QuietCool AFG SLR is very easy. To install the AFG SLR, simply mount the
gable fan to your gable vents as shown in the following steps:
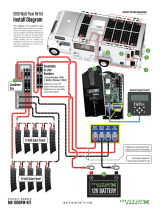
Flush Mount: The AFG SLR can be mounted flush to a rectangular type louver by fastening
through the mounting brackets to the frame of the louver (as shown in Figure 2.1B).
As stated in the note above, any area of the louver that is not covered by the AFG SLR must be
sealed off in order to prevent air leakage, which may hinder performance.
Fasten the fan to the vent frame studs. Once fastened, tighten the 8 mounting bracket nuts
to secure the fan flush to the gable vent.
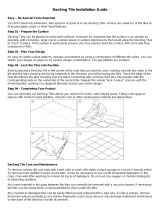
Wide Mount: The AFG SLR can be mounted on a wide louver, but additional mounting steps must
be taken in order for the fan to work properly. As shown in Figure 2.1C, two additional boards must
be fastened to the boards framing the gable vent so the AFG SLR can be mounted securely.
As stated in the note above, any area of the louver that is not covered by the AFG SLR must be
sealed off in order to prevent air leakage, which may hinder performance.
Fasten the fan to the vent frame studs. Once fastened, tighten the 8 mounting bracket nuts to
secure the fan flush to the gable vent.
Odd Mount: The AFG SLR can also be mounted off center for an odd shaped louver (as shown in Figure 2.1D).
As stated in the note above, any area of the louver that is not covered by the AFG SLR must be
sealed off in order to prevent air leakage, which may hinder performance.
While this is not the most ideal way to mount the gable fan, it is possible. However, since the fan
is not completely covering the vent, maximum airflow will not be achieved.
Fasten the fan to the vent frame studs. Once fastened, tighten the 8 mounting bracket nuts to
secure the fan flush to the gable vent.
Figure 2.1B
Figure 2.1C
Installation Video:
Watch the video by
scanning the QR
code or visit www.
QuietCoolSystems.com/
support
Figure 2.1D
Figure 2.1A
4
QUIETCOOLSYSTEMS.COM
Choosing the Right Location for Airflow
Choose a location to install your QuietCool AFR SLR roof mounted fan that allows for balanced airflow throughout
the attic space. We always recommend the fan to be installed centrally located on the roof three feet below the
ridge line. This will allow you to access the fan very easily. Your roof mount fan should not be installed any closer
than within 5 feet to an existing passive vent, ridge vent, or additional fan unit.
IMPORTANT: DO NOT CUT THROUGH ANY RAFTERS OR STRUCTURAL MEMBERS WHILE CUTTING THE VENT HOLE.
ONLY CUT OUT THE ROOF DECKING.
Choosing the Right Location for the Best Sunlight
Choose a location to install your QuietCool AFR SLR fan or AFG SLR solar panel is very important based on the suns
path during the day. The optimal adjustment is to have the panel 90 degrees to the midday path of the sun. Be sure
to consider potential obstructions such as trees and other homes which may shade the solar panel during certain
times of the day.
If a southern or western exposure is not possible, the fan can be installed on any other exposure and the solar
panel can be adjusted to capture maximum sunlight
There are many smartphone apps that can help in finding the best location for your solar panel based on the sun’s
location throughout the day.
READ BEFORE ATTEMPTING TO INSTALL AN
AFR SLR FAN OR THE AFG SLR SOLAR PANEL
Getting Started
Always follow Local Building Codes because the fan may require specific fasteners or anchoring systems
not discussed in this installation guide. Installation should be done by a licensed roofing contractor.
Safety Information
Safety precautions should be taken when performing the roofing work described in this installation
guide. You can significantly reduce your risk of danger by following the below recommendations:
Do not install the fan in wet or windy conditions
Tie-off both yourself and your equipment when working on steep pitched roofs to avoid falls
Wear safety glasses and protective gloves when using power tools
Always wear slip-resistant shoes when working on the roof
Do not cut through any rafters or structural members of the roof during installation
Materials Needed
Cordless Drill with Nut
Driver
Self-Tapping Screws with
Rubber Bonded Washers
Reciprocating Saw (for AFR)
Measuring Tape
Weatherproof Roofing
Grade Sealant
Roofing Knife (for AFR)
Ladder Marker or Carpenter
Pencil
5
1-888-QUIETCOOL
2.2 Installing AFG SLR Solar Panel
Once you have found a location for your AFG SLR solar panel, now it’s time to mount the panel. The wiring from the solar panel is 30 feet
long and must connect directly to the AFG SLR. Make sure the location you have chosen is within 30 feet of the AFG SLR.
1. Attach the provided screws and brackets to the solar panel. Install the angle adjustment brackets by securing one end to the
regulating plate and the other end to the solar panel frame.
2. Set up the panel at either 15° or 45° (see Adjusting the Solar Panel on page 7).
3. Find the best mounting location (see Choosing the Right Location on
page 4).
Shingle Roof: Using four 3” galvanized screws, fasten the panel to the roof.
Tile Roof: Find the contact points between the roof and the backside of
the solar panel. Apply roofing adhesive to these contact points and firmly
secure the panel to the surface.
4. To prevent leaking, make sure to apply weatherproof roofing grade
sealant on the screwheads.
5. Now it’s time to run the wire from the solar panel into the attic through
the gable vent. Be sure to include a drip curve in the wire to ensure no
water can run down the cord and enter the attic through the gable vent.
6. Now connect the wire to your AFG SLR. The AFG SLR will automatically
turn on if there is sunlight and the temperature is above 75° F
Adjusting the Solar Panel
The fan’s solar panel should be adjusted to maximize exposure to the sun’s path during the day. The optimal adjustment
is to have the panel 90 degrees to the midday path of the sun. You can readjust the panel during winter or summer
seasons if desired.
Adjusting Panel Tilt
This fan has two solar panel adjustments: 15° and 45°. Set the
angle properly to capture the most direct sunlight. Remove the
screw on both sides of the panel assembly. Lift the panel and
swing the panel braces up to the desired position and re-attach
the screw in the applicable holes.
Surface Mount on Shingle Roof
Surface Mount on Tile or Metal
Roof
Drip Curve Example
Connecting the Solar Panel
6
QUIETCOOLSYSTEMS.COM
2.3 Installing AFR SLR model fans
1. Determine in which area you would like to install your QuietCool Attic
Roof Mount Fan.
IMPORTANT: After choosing the location where your roof mount attic fan will be installed, find the closest
rafter to that location and determine if your roof has either 16” on center or 24” on center rafter spacing.
2. Find the center point between the two rafters and mark it as the center of the vent hole. Partially insert a screw
into the center point mark.
NOTE: If you have a tile roof, you will need to move the tiles out of the way before tracing and cutting. (See Figure
2.3A)
Figure 2.2A Figure 2.2B Figure 2.2C
Figure 2.2D
Figure 2.2E
Figure 2.2F
CAUTION
THE AFR SLR-30 AND AFR SLR-40 COME PRE-WIRED WITH THE SOLAR PANEL ATTACHED. THE FAN WILL TURN ON
AUTOMATICALLY WHENEVER THE SUN SHINES ON THE SOLAR PANEL.
DO NOT REMOVE PAPER COVER THAT IS LOCATED ON THE SOLAR PANEL UNTIL THE INSTALLATION IS FINISHED.
REMOVAL OF THE COVER CAN CAUSE UNINTENDED INJURIES IF THE FAN TURNS ON DURING INSTALLATION.
Installation Video:
Watch the video by
scanning the QR
code or visit www.
QuietCoolSystems.com/
support
7
1-888-QUIETCOOL
3. Go to the roof. Using the screw as a reference point, trace out a 14” diameter circle.
4. Use a reciprocating saw to cut out the traced hole pattern from the roof decking. Remove the cut out decking
material from around the hole as needed. (See Figure 2.3B)
5. If you have a shingle roof, insert the reciprocating saw sideways between the shingles and roof decking.
Starting at the 3 oclock position of the vent hole, begin cutting in a sweeping motion under the shingles,
cutting through any roofing nails or staples. Continue cutting counterclockwise around the vent hole until
reaching the 9 oclock position. Using a roofing knife, cut a 4 inch horizontal slit in the shingles at the 9 oclock
and 3 o’clock positions of the hole, allowing the fan’s flashing to slide underneath the shingles.
6. Apply weatherproof material to the roof. (See Figure 2.3C)
7. Position the fan so that it is centered with the vent hole. (See Figure 2.3D)
8. Lifting the fan unit up at an angle, apply weatherproof caulking to the bottom side of the fan unit. This will help
keep the fan in place and will seal nice and tight.
9. Slide the fan unit underneath the shingles until the fan reaches the top of the hole. Secure the fan flashing to
the roof. Finish caulking around the fan and flashing it into the roof to make a nice seal. (See Figure 2.3E)
Adjusting the Solar Panel
The fan’s solar panel should be adjusted to maximize exposure to the sun’s path during the day. The optimal
adjustment is to have the panel 90 degrees to the midday path of the sun. You can readjust the panel during
winter or summer seasons if desired.
Adjusting Panel Tilt
This fan has two solar panel adjustments: 15° and 45°. Set the angle properly to capture the most direct sunlight.
Remove the screw on both sides of the panel assembly. Lift the panel and swing the panel braces up to the
desired position and re-attach the screw in the applicable holes.
Adjusting Panel Rotation
The fan has a horizontal rotational adjustment that moves 180°. Simply loosen the 4 wing nuts to loosen the
solar panel and rotate for adjustment. If you need more adjustment than 180°, the assembly can be removed by
removing the 4 wing nuts and repositioning the panel. This gives a full 360° rotation ability.
Figure 2.3G Figure 2.3H Figure 2.3I Figure 2.3J
8
QUIETCOOLSYSTEMS.COM
3. WIRING
3.1 Connecting the AC/DC Smart Inverter
Your QuietCool Solar Attic Fan includes an AC/DC power inverter. This inverter is used to run the solar attic fan at
nighttime when there is no sunlight.
Simply plug the solar inverter from your fan into a 110v outlet in your attic. The Smart Inverter will automatically
switch between AC power and DC solar power depending on the level of sunlight present.
If you do not want to use the AC/DC Smart Inverter, simply leave the fan unplugged. The fan will still run anytime there
is sunlight and the temperature is above 75° F.
4. OPERATING INSTRUCTIONS
4.1 How to Operate
QuietCool Attic Fans work almost everywhere, almost anytime. During the summer, an attic can be 40-50 degrees
hotter than the outside temperature, which in turn heats up the house much faster. With an attic fan, you can cool the
attic to the same temperature as it is outside, greatly reducing the house from heating up as quickly.
The best part about a QuietCool Solar Attic fan is that you never have to think about it! Since it runs off solar power, it
will turn on whenever the attic temperature is above 75° F.
At nighttime, the fan will continue to run if you connected the QuietCool AC/DC Smart Inverter. This gives you cooling
capability 24/7.
9
1-888-QUIETCOOL
15 YEAR LIMITED WARRANTY
QuietCool Solar Attic Fans
SOLAR ATTIC FANS LIMITED WARRANTY
QC Manufacturing Inc. extends this warranty to the original purchaser of the following
QuietCool Solar Attic Fans - AFG SLR-30, AFG SLR-40, AFR SLR-30, and AFR SLR-40 -
installed and used in a residence under normal conditions within the United States:
A. Five year coverage applies to the QuietCool motor. At our option we will repair or
replace the motor should it fail to operate during the warranty period as measured from
the date of original purchase.
B. Fifteen year coverage applies to the QuietCool motor housing, fan blade, and solar
panel. At our option we will repair or replace any part which fails as a result of defective
material or workmanship during the warranty period as measured from the original date
of purchase.
C. This warranty does not cover any of the following:
1. Accidental or consequential damage resulting from the operation of
our equipment or any malfunction thereof.
2. Cost of service calls to diagnose the cause of problems or the labor
charge to un-install any components.
3. Product failure or damage due to faulty installation, abuse, misuse,
unauthorized alteration to factory specs, lack of maintenance, or
transportation damage.
4. Shipping or postage for warranty claims.
D. To obtain service under this warranty, first contact the dealer where you purchased
the equipment. If you are unable to find or reach your dealer, contact Customer Service
at QC Manufacturing, Inc. at the number below.
E. Registration is no longer required for QuietCool fans. If service is required under this
warranty, you must retain your proof or purchase.
This warranty is the only warranty extended by QC Manufacturing, Inc. to purchasers or suppliers of our equipment. QC Manufacturing Inc.
disclaims all other warranties, express or implied, that arise by operation of the law.
QC Manufacturing, Inc. Customer Service
26040 Ynez Rd.
Temecula, CA 92591
www.QuietCoolSystems.com
951-325-6340
Rev. 5.13.19
10
1-888-QUIETCOOL
QuietCool is Proudly Designed and Built in California
26040 Ynez Rd., Temecula, CA 92591 // PH 951.325.6340 // QUIETCOOLSYSTEMS.COM
Fan Serial Number Information
Retain for your records. Serial number is
required for warranty purposes.
  • Page 1 1
  • Page 2 2
  • Page 3 3
  • Page 4 4
  • Page 5 5
  • Page 6 6
  • Page 7 7
  • Page 8 8
  • Page 9 9
  • Page 10 10
  • Page 11 11
  • Page 12 12

QuietCool AFR SLR-40 Operating instructions

Type
Operating instructions
This manual is also suitable for

Ask a question and I''ll find the answer in the document

Finding information in a document is now easier with AI