
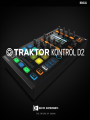
MANUAL

The information in this document is subject to change without notice and does not represent a
commitment on the part of Native Instruments GmbH. The software described by this docu-
ment is subject to a License Agreement and may not be copied to other media. No part of this
publication may be copied, reproduced or otherwise transmitted or recorded, for any purpose,
without prior written permission by Native Instruments GmbH, hereinafter referred to as Native
Instruments.
“Native Instruments”, “NI” and associated logos are (registered) trademarks of Native Instru-
ments GmbH.
Mac, macOS, GarageBand, Logic, iTunes and iPod are registered trademarks of Apple Inc.,
registered in the U.S. and other countries.
Windows, Windows Vista and DirectSound are registered trademarks of Microsoft Corporation
in the United States and/or other countries.
All other trademarks are the property of their respective owners and use of them does not imply
any affiliation with or endorsement by them.
Document authored by: Christian Schulz
Software version: 2.11 (10/2016)
Special thanks to the Beta Test Team, who were invaluable not just in tracking down bugs, but
in making this a better product.
Disclaimer

NATIVE INSTRUMENTS GmbH
Schlesische Str. 29-30
D-10997 Berlin
Germany
www.native-instruments.de
NATIVE INSTRUMENTS North America, Inc.
6725 Sunset Boulevard
5th Floor
Los Angeles, CA 90028
USA
www.native-instruments.com
NATIVE INSTRUMENTS K.K.
YO Building 3F
Jingumae 6-7-15, Shibuya-ku,
Tokyo 150-0001
Japan
www.native-instruments.co.jp
NATIVE INSTRUMENTS UK Limited
18 Phipp Street
London EC2A 4NU
UK
www.native-instruments.co.uk
© NATIVE INSTRUMENTS GmbH, 2016. All rights reserved.
Contact

Table of Contents
1 Welcome to the World of TRAKTOR KONTROL D2! ........................................................
10
1.1 Where to Start ............................................................................................................................. 10
1.2 Manual Conventions ................................................................................................................... 12
2 Using Your D2—Getting Started .................................................................................
16
2.1 Using the Browser ...................................................................................................................... 17
2.1.1 Opening the Browser ................................................................................................. 17
2.1.2 Scrolling through Music Folders ................................................................................ 18
2.1.3 Browsing using Touch Interactions ............................................................................ 20
2.1.4 Preview Tracks ........................................................................................................... 20
2.1.5 Sorting Tracks ........................................................................................................... 21
2.2 Loading and Playing a Track ...................................................................................................... 23
2.3 Switching Deck Focus ................................................................................................................. 25
2.4 Switching Deck View and Zooming ............................................................................................. 28
2.5 Using Cue Points ........................................................................................................................ 32
2.5.1 Setting and Deleting Cue Points (HotCues) ............................................................... 33
2.5.2 Aligning Tracks using HotCues .................................................................................. 35
2.6 Adjusting Deck-specific tempo ................................................................................................... 35
2.7 Using Keylock ............................................................................................................................. 37
3 Using Your D2—Getting Advanced .............................................................................
42
3.1 Using Touch Strip ....................................................................................................................... 42
3.1.1 Using Touch Strip to Seek .......................................................................................... 42
3.1.2 Using Touch Strip to Nudge/Pitchbend ...................................................................... 47
3.1.3 Using the Touch Strip to Scratch and Backspin ......................................................... 50
3.2 Playing with Loops in HOTCUE Mode ........................................................................................... 56
3.2.1 Engaging and Disengaging a Loop ............................................................................ 56
Table of Contents
TRAKTOR KONTROL D2 - Manual - 4

3.2.2 Moving a Loop ........................................................................................................... 59
3.2.3 Storing a Loop ........................................................................................................... 60
3.3 Playing with Loops in LOOP Mode ............................................................................................... 61
3.3.1 Looping with Pre-defined Sizes .................................................................................. 62
3.3.2 Beatjumping .............................................................................................................. 63
3.4 Using FREEZE Mode .................................................................................................................... 64
3.4.1 Engaging Freeze mode on a track .............................................................................. 65
3.4.2 Adjusting the Freeze Slice Size .................................................................................. 67
3.4.3 Slicer Mode ................................................................................................................ 69
3.5 Using FLUX Mode ........................................................................................................................ 73
3.6 Remixing with Remix Decks ........................................................................................................ 75
3.6.1 Loading a Remix Set .................................................................................................. 75
3.6.2 Triggering Samples ................................................................................................... 77
3.6.3 Triggering Samples using Different Quantize Sizes ................................................... 82
3.6.4 Adjusting Levels and using Filters of Remix Slots ..................................................... 84
3.6.5 Using the Touch Strip on a Remix Deck ..................................................................... 84
3.7 Capturing Samples from Track Decks (Using Remix Mode) ........................................................ 85
3.8 Adding FX ................................................................................................................................... 92
3.8.1 Assigning Decks to the FX Units ................................................................................ 92
3.8.2 Setting up an FX Unit to Group FX Mode .................................................................... 93
3.8.3 Exchanging effects in the Group FX ........................................................................... 96
3.8.4 Setting up an FX Unit in Single FX Mode .................................................................... 99
3.8.5 Storing a Snapshot .................................................................................................... 104
3.8.6 Routing FX ................................................................................................................. 104
3.9 Using Performance Modes on Remix Decks ................................................................................. 105
3.9.1 Selecting and applying a Performance Mode ............................................................. 105
Table of Contents
TRAKTOR KONTROL D2 - Manual - 5

3.9.2 Using Performance Mode Pitch .................................................................................. 106
3.9.3 Using Performance Mode Filter .................................................................................. 107
3.9.4 Using Performance Mode FX SEND ............................................................................. 109
3.10 Using Step Sequencer Mode on Remix Decks .............................................................................. 110
3.10.1 Activating Step Sequencer Mode ............................................................................... 112
3.10.2 Operating the Step Sequencer ................................................................................... 114
3.11 Mixing Stem Files using Stem Decks .......................................................................................... 122
3.11.1 Loading and Playing a Stem File ............................................................................... 123
3.11.2 Switching between Track View and Stem View .......................................................... 125
3.11.3 Performing with Stem Decks ...................................................................................... 127
3.11.4 Adding another Stem File to the Mix .......................................................................... 132
3.11.4.1 Loading a Stem File into Deck B ................................................................132
3.11.4.2 Combining Sounds of different Stem Decks ...............................................134
3.12 Working with Beatgrids .............................................................................................................. 135
3.12.1 Checking a Beatgrid .................................................................................................. 135
3.12.2 Correcting a Beatgrid Manually ................................................................................. 137
3.12.3 Additional Help Actions ............................................................................................. 141
4 Hardware Reference ..................................................................................................
145
4.1 Overview of the Controller ........................................................................................................... 145
4.2 The Deck ..................................................................................................................................... 147
4.2.1 DECK Button .............................................................................................................. 149
4.2.2 FLUX Button ............................................................................................................... 150
4.2.3 Mode Select Buttons .................................................................................................. 150
4.2.3.1 HOTCUE Button ..........................................................................................151
4.2.3.2 LOOP Button ..............................................................................................151
4.2.3.3 FREEZE Button ..........................................................................................153
Table of Contents
TRAKTOR KONTROL D2 - Manual - 6

4.2.3.4 REMIX Button ............................................................................................155
4.2.4 Loop Encoder ............................................................................................................. 156
4.2.5 EDIT Button ............................................................................................................... 156
4.2.6 CAPTURE Button ........................................................................................................ 157
4.2.7 Display Area and Controls ......................................................................................... 157
4.2.7.1 BACK Button ..............................................................................................159
4.2.7.2 BROWSE Encoder .......................................................................................159
4.2.7.3 Settings Button .........................................................................................160
4.2.7.4 Display Buttons .........................................................................................160
4.2.7.5 Display ......................................................................................................162
4.2.7.6 View Button ...............................................................................................165
4.2.7.7 Performance Mode Button .........................................................................165
4.2.8 Performance Controls ................................................................................................ 165
4.2.9 Slot Volume Faders .................................................................................................... 167
4.2.10 Pads .......................................................................................................................... 167
4.2.11 Touch Strip ................................................................................................................ 169
4.2.12 Transport Controls ..................................................................................................... 171
4.3 The FX Unit ................................................................................................................................. 173
4.3.1 FX SELECT Button ...................................................................................................... 174
4.3.2 FX Unit Assignment ................................................................................................... 175
4.4 The Rear Panel ........................................................................................................................... 175
4.4.1 Kensington Lock Slot ................................................................................................. 176
4.4.2 USB Connector ........................................................................................................... 177
4.4.3 POWER Section .......................................................................................................... 177
4.4.4 USB Hub .................................................................................................................... 178
4.5 The Deck ..................................................................................................................................... 178
Table of Contents
TRAKTOR KONTROL D2 - Manual - 7

4.5.1 DECK Button .............................................................................................................. 181
4.5.2 FLUX Button ............................................................................................................... 182
4.5.3 CAPTURE Button ........................................................................................................ 182
4.5.4 Display Area and Controls ......................................................................................... 183
4.5.4.1 BACK Button ..............................................................................................184
4.5.4.2 BROWSE Encoder .......................................................................................184
4.5.4.3 Settings Button .........................................................................................185
4.5.4.4 Display Buttons .........................................................................................186
4.5.4.5 Display ......................................................................................................187
4.5.4.6 View Button ...............................................................................................190
4.5.4.7 Performance Mode Button .........................................................................190
4.5.5 Performance Controls ................................................................................................ 190
4.5.6 Slot Volume Faders .................................................................................................... 192
4.5.7 Pads .......................................................................................................................... 192
4.5.8 Touch Strip ................................................................................................................ 194
4.5.9 Transport Controls ..................................................................................................... 196
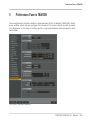
5 Preferences Pane in TRAKTOR ...................................................................................
199
5.1 Restore Default ........................................................................................................................... 200
5.2 Touch Controls ............................................................................................................................ 200
5.3 Touchstrip .................................................................................................................................. 200
5.4 Calibrate .................................................................................................................................... 201
5.5 LEDs ........................................................................................................................................... 201
5.6 Loop Mode Sizes ......................................................................................................................... 202
5.7 Enable MIDI Controls .................................................................................................................. 202
6 Troubleshooting - Getting Help ...................................................................................
209
6.1 Troubleshooting .......................................................................................................................... 209
Table of Contents
TRAKTOR KONTROL D2 - Manual - 8

6.1.1 TRAKTOR Won’t Start ................................................................................................. 209
6.1.2 TRAKTOR Crashes ...................................................................................................... 210
6.1.3 Updates ..................................................................................................................... 210
6.2 Getting Help ............................................................................................................................... 210
6.2.1 Knowledge Base ........................................................................................................ 210
6.2.2 Technical Support ...................................................................................................... 211
6.2.3 Registration Support ................................................................................................. 211
6.2.4 User Forum ................................................................................................................ 212
7 Technical Specification .............................................................................................
213
Table of Contents
TRAKTOR KONTROL D2 - Manual - 9

1 Welcome to the World of TRAKTOR KONTROL D2!
Thank you for choosing TRAKTOR KONTROL D2.
What is TRAKTOR KONTROL D2?
TRAKTOR KONTROL D2 provides a direct tactile interface to TRAKTOR PRO's features and al-
lows you to achieve more with the controller hardware so you have to do less on your computer
screen.
D2 enables performance in various live situations, combining the power of computer-based
DJing with the immediacy and flow you need to focus on your audience.
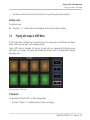
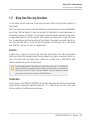
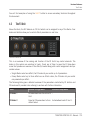
1.1 Where to Start
TRAKTOR KONTROL D2 installation provides you with many information sources. These are
intended to be read in the following sequence to ensure easy access for users of all skill levels:
▪ TRAKTOR Getting Started
▪ TRAKTOR Manual
▪ TRAKTOR KONTROL D2 Manual (this document)
Your First Stop: Getting Started
This document guides you through configuration of TRAKTOR to work with a hardware control-
ler by means of the Setup Wizard, as well as importing music into your Track Collection. After-
wards, it introduces you to TRAKTOR's basic concepts and workflows and helps you set up
your system correctly.
Welcome to the World of TRAKTOR KONTROL D2!
Where to Start
TRAKTOR KONTROL D2 - Manual - 10

TRAKTOR Manual
The Manual helps you learn all of the workflows which make TRAKTOR a unique DJing solu-
tion. In addition to learning to use TRAKTOR's core features, this document gives advice on
working in various configurations; from using TRAKTOR in the most basic setup on its own to
integrating turntables, external DJ mixers and audio interfaces, as well as the SCRATCH exten-
sion.
Access the TRAKTOR manual via TRAKTOR's Help menu. The 'Open Manual...' entry
will open the Documentation sub-folder inside TRAKTOR's application folder.
TRAKTOR KONTROL D2 Manual
The D2 Manual picks up where controlling TRAKTOR features from the D2 are concerned. A
detailed tutorial section guides you through accessing the basics like loading tracks, mixing,
setting cue points, looping, and using Remix Decks from D2.
Next, a comprehensive Hardware Reference details each and every component you will en-
counter on the TRAKTOR KONTROL D2 controller. The later chapters of this manual provide
additional information on solving common issues, and the device's full technical specification.
CONTROLLER EDITOR Manual
Besides using D2 with the dedicated TRAKTOR software, you can also use it as a powerful and
highly versatile MIDI controller with any other MIDI-capable application or device. This is
made possible by the CONTROLLER EDITOR software, an application which allows you to as-
sign MIDI controller messages to D2's pads, knobs, faders and encoders. The CONTROL-
LER EDITOR is usually automatically installed during TRAKTOR's installation. For more infor-
mation on this, please refer to the CONTROLLER EDITOR Manual available as a PDF file in
the Documentation subfolder of the CONTROLLER EDITOR installation folder on your hard
disk.
Other Online Resources
If you are experiencing problems related to your Native Instruments product that the supplied
documentation does not cover, there are several ways of getting help:
▪ Knowledge Base
▪ User Forum
Welcome to the World of TRAKTOR KONTROL D2!
Where to Start
TRAKTOR KONTROL D2 - Manual - 11

▪ Technical Support
▪ Registration Support
You will find more information on these in chapters ↑6.2, Getting Help and ↑6.1, Trouble-
shooting.
1.2 Manual Conventions
This section introduces you to the signage and text highlighting used in this manual. This man-
ual uses particular formatting to point out special facts and to warn you of potential issues.
The icons introducing these notes let you see what kind of information is to be expected:
Whenever this exclamation mark icon appears, you should read the corresponding note
carefully and follow the instructions and hints given there if applicable.
This light bulb icon indicates that a note contains useful extra information. This infor-
mation may often help you solve a task more efficiently, but does not necessarily apply
to the setup or operating system you are using; however, it's always worth a look.
Furthermore, the following formatting is used:
▪ Text appearing in (drop-down) menus (such as Open…, Save as… etc.) and paths to loca-
tions on your hard drive or other storage devices is printed in italics.
▪ Text appearing elsewhere (labels of buttons, controls, text next to checkboxes etc.) is print-
ed in blue. Whenever you see this formatting applied, you will find the same text appearing
somewhere on the screen.
▪ Text appearing on the display of the D2 controller is printed in light grey. Whenever you
see this formatting applied, you will find the same text on a controller display.
▪ Text appearing on labels of the hardware controller is printed in orange. Whenever you see
this formatting applied, you will find the same text on the controller.
▪ Important names and concepts are printed in bold.
▪ References to keys on your computer’s keyboard you’ll find put in square brackets (e.g.,
“Press [Shift] + [Enter]”).
Welcome to the World of TRAKTOR KONTROL D2!
Manual Conventions
TRAKTOR KONTROL D2 - Manual - 12

►
Single instructions are indicated by this play button type arrow.
→
Results of actions are indicated by this smaller arrow.
Naming Conventions
Throughout the documentation, we will refer to the TRAKTOR KONTROL D2 hardware control-
ler either as the controller or simply D2.
The TRAKTOR 2 software and TRAKTOR SCRATCH will be referred to as TRAKTOR.
Button Combinations and Shortcuts on Your Controller
Most instructions will use the “+” sign to indicate buttons (or buttons and pads) that must be
pressed simultaneously, starting with the button indicated first. E.g., an instruction such as:
“Press SHIFT + PLAY”
means:
1. Press and hold SHIFT.
2. While holding SHIFT, press PLAY and release it.
3. Release SHIFT.
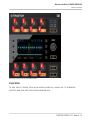
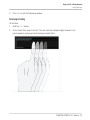
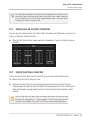
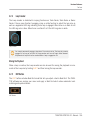
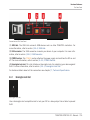
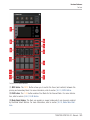
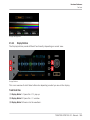
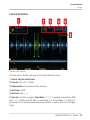
FX Knobs and Buttons
Above each of the Displays, there's a row of FX knobs and FX buttons which aren't labeled.
Similarly, the knobs below the display are unlabeled, the buttons are all labeled ON. To differ-
entiate them, we'll refer to them as FX knobs 1-4 and FX buttons 1-4 for the elements above the
display and Performance knobs 1-4 and Performance buttons 1-4 beneath the display.
Welcome to the World of TRAKTOR KONTROL D2!
Manual Conventions
TRAKTOR KONTROL D2 - Manual - 13

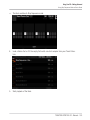
Numbering scheme for FX and Performance controls
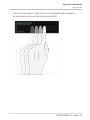
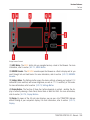
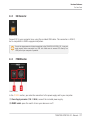
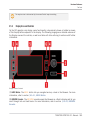
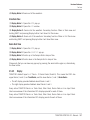
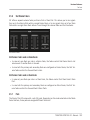
Display Buttons
On each side of a display, there are two buttons marked by a square icon. To differentiate
them from each other, we'll refer to them as depicted here:
Welcome to the World of TRAKTOR KONTROL D2!
Manual Conventions
TRAKTOR KONTROL D2 - Manual - 14

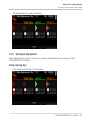
Numbering scheme for Display Buttons
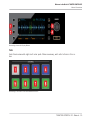
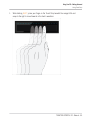
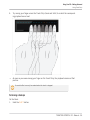
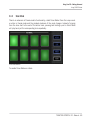
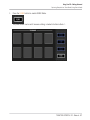
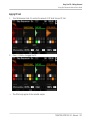
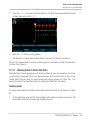
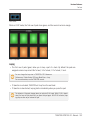
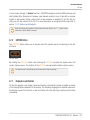
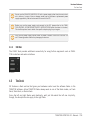
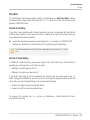
Pads
Each Deck comes with eight multi color pads. Where necessary, we'll refer to them in this or-
der:
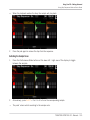
Numbering of the Pads in the PERFORMANCE section
Welcome to the World of TRAKTOR KONTROL D2!
Manual Conventions
TRAKTOR KONTROL D2 - Manual - 15

2 Using Your D2—Getting Started
This section will guide you through the most common tasks you will encounter during your
work with TRAKTOR KONTROL D2. Most of the tutorials included are workflow-oriented. They
start with the simplest tasks and progressively lead you to more complex operation, helping you
to become familiar with TRAKTOR KONTROL D2.
The tutorials presented here make use of the included demo tracks, which were automatically
copied to your hard disk during the TRAKTOR KONTROL D2 installation procedure. Therefore,
you can follow these tutorials even if you haven't imported your own music.
The tutorials here focus on using the device as the integrated controller for the TRAKTOR soft-
ware on your computer. By the end of this chapter you will be equipped with the fundamental
knowledge to enjoy using your TRAKTOR KONTROL D2, and begin to uncover the creative op-
portunities it presents to your DJ sessions.
General Prerequisites
We assume here that your TRAKTOR KONTROL D2 system is already up and running. If that's
not the case, please follow the instructions in the separate Setup Guide and return to this
chapter when you are ready.
In case you already changed some settings in TRAKTOR KONTROL D2 before you start with
these tutorials, we strongly recommend you to reset your TRAKTOR KONTROL D2 system to
the factory settings by doing the following:
1. In the TRAKTOR software, click the Help menu in the menu bar at the top of your screen
(on Mac OS X) or at the top of the window (on Windows), and select Help > Start Setup
Wizard.
2. In the window that opens, click Next to skip the setup screens.
3. On the YOUR TRAKTOR SETUP screen, click Finish at the bottom right corner without se-
lecting anything else.
→ Your TRAKTOR KONTROL D2 is now reset to the factory settings.
Using Your D2—Getting Started
TRAKTOR KONTROL D2 - Manual - 16

The tutorials presented here assume that TRAKTOR KONTROL D2 is in its default factory
state. If it’s not the case, we cannot guarantee that you will experience what is described here,
and as a result you might find it difficult to follow the instructions.
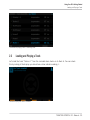
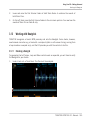
2.1 Using the Browser
This tutorial explains how to use the Browser to access your music library. You will learn how
to sort and preview your tracks in the Browser, and how to load tracks into Decks.
2.1.1 Opening the Browser
To open the Browser:
Using Your D2—Getting Started
Using the Browser
TRAKTOR KONTROL D2 - Manual - 17

►
Push the BROWSE encoder.
The Browser will be displayed in the display.
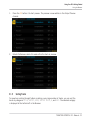
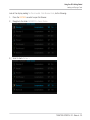
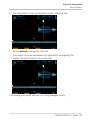
2.1.2 Scrolling through Music Folders
To scroll through music folders:
Using Your D2—Getting Started
Using the Browser
TRAKTOR KONTROL D2 - Manual - 18

►
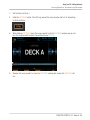
Rotate the BROWSE encoder. The selected entry will be highlighted in blue. The Browser
View shows your current location in the folder structure at the top of the display, e.g.
BROWSER>PLAYLIST>DEMO TRACKS.
To open folders and load tracks:
►
Press the BROWSE encoder to open a folder.
►
Press the BROWSE encoder to load a track.
To return to the previous folder:
►
Press the BACK button.
To exit the Browser:
►
Press the VIEW button. The display will return to Track view.
Using Your D2—Getting Started
Using the Browser
TRAKTOR KONTROL D2 - Manual - 19

2.1.3 Browsing using Touch Interactions
In addition to regular interactions with D2, you can perform touch interactions. However, to
use touch interactions when browsing, the touch sensitivity for the BROWSE encoder has to be
enabled:
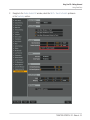
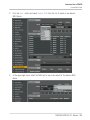
1. Open the TRAKTOR Preferences.
2. Select the tab TRAKTOR KONTROL D2.
3. Enable the Touch Control Auto Open Browser on Touch.
→
The touch sensitivity is now enabled on the BROWSE encoder.
With touch sensitivity enabled the following touch interactions can be performed:
To open the Browser:
►
Touch the BROWSE encoder. The Browser will be displayed in the respective display.
To exit the Browser:
►
Release the BROWSE encoder or stop interacting in the Browser. The display will return
to Track view.
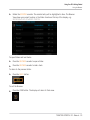
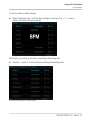
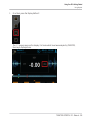
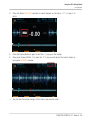
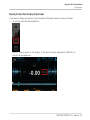
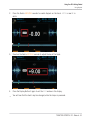
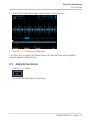
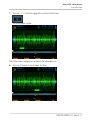
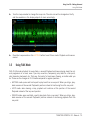
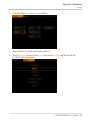
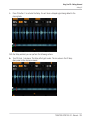
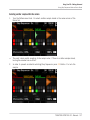
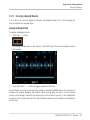
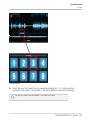
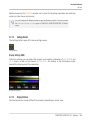
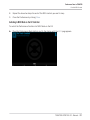
2.1.4 Preview Tracks
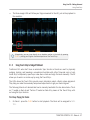
In the Browser of the TRAKTOR KONTROL D2 it is possible to preview tracks directly. The pre-
view will be audible in TRAKTOR's Output Review channel routing to an output channel on
your audio interface that is connected to your mixer.
For more information on how to route audio channels with TRAKTOR, refer to section
14.3 Output Routing in the TRAKTOR Manual.
To preview a selected track:
Using Your D2—Getting Started
Using the Browser
TRAKTOR KONTROL D2 - Manual - 20
Page is loading ...
Page is loading ...
Page is loading ...
Page is loading ...
Page is loading ...
Page is loading ...
Page is loading ...
Page is loading ...
Page is loading ...
Page is loading ...
Page is loading ...
Page is loading ...
Page is loading ...
Page is loading ...
Page is loading ...
Page is loading ...
Page is loading ...
Page is loading ...
Page is loading ...
Page is loading ...
Page is loading ...
Page is loading ...
Page is loading ...
Page is loading ...
Page is loading ...
Page is loading ...
Page is loading ...
Page is loading ...
Page is loading ...
Page is loading ...
Page is loading ...
Page is loading ...
Page is loading ...
Page is loading ...
Page is loading ...
Page is loading ...
Page is loading ...
Page is loading ...
Page is loading ...
Page is loading ...
Page is loading ...
Page is loading ...
Page is loading ...
Page is loading ...
Page is loading ...
Page is loading ...
Page is loading ...
Page is loading ...
Page is loading ...
Page is loading ...
Page is loading ...
Page is loading ...
Page is loading ...
Page is loading ...
Page is loading ...
Page is loading ...
Page is loading ...
Page is loading ...
Page is loading ...
Page is loading ...
Page is loading ...
Page is loading ...
Page is loading ...
Page is loading ...
Page is loading ...
Page is loading ...
Page is loading ...
Page is loading ...
Page is loading ...
Page is loading ...
Page is loading ...
Page is loading ...
Page is loading ...
Page is loading ...
Page is loading ...
Page is loading ...
Page is loading ...
Page is loading ...
Page is loading ...
Page is loading ...
Page is loading ...
Page is loading ...
Page is loading ...
Page is loading ...
Page is loading ...
Page is loading ...
Page is loading ...
Page is loading ...
Page is loading ...
Page is loading ...
Page is loading ...
Page is loading ...
Page is loading ...
Page is loading ...
Page is loading ...
Page is loading ...
Page is loading ...
Page is loading ...
Page is loading ...
Page is loading ...
Page is loading ...
Page is loading ...
Page is loading ...
Page is loading ...
Page is loading ...
Page is loading ...
Page is loading ...
Page is loading ...
Page is loading ...
Page is loading ...
Page is loading ...
Page is loading ...
Page is loading ...
Page is loading ...
Page is loading ...
Page is loading ...
Page is loading ...
Page is loading ...
Page is loading ...
Page is loading ...
Page is loading ...
Page is loading ...
Page is loading ...
Page is loading ...
Page is loading ...
Page is loading ...
Page is loading ...
Page is loading ...
Page is loading ...
Page is loading ...
Page is loading ...
Page is loading ...
Page is loading ...
Page is loading ...
Page is loading ...
Page is loading ...
Page is loading ...
Page is loading ...
Page is loading ...
Page is loading ...
Page is loading ...
Page is loading ...
Page is loading ...
Page is loading ...
Page is loading ...
Page is loading ...
Page is loading ...
Page is loading ...
Page is loading ...
Page is loading ...
Page is loading ...
Page is loading ...
Page is loading ...
Page is loading ...
Page is loading ...
Page is loading ...
Page is loading ...
Page is loading ...
Page is loading ...
Page is loading ...
Page is loading ...
Page is loading ...
Page is loading ...
Page is loading ...
Page is loading ...
Page is loading ...
Page is loading ...
Page is loading ...
Page is loading ...
Page is loading ...
Page is loading ...
Page is loading ...
Page is loading ...
Page is loading ...
Page is loading ...
Page is loading ...
Page is loading ...
Page is loading ...
Page is loading ...
Page is loading ...
Page is loading ...
Page is loading ...
Page is loading ...
Page is loading ...
Page is loading ...
Page is loading ...
Page is loading ...
Page is loading ...
Page is loading ...
Page is loading ...
Page is loading ...
Page is loading ...
Page is loading ...
-
 1
1
-
 2
2
-
 3
3
-
 4
4
-
 5
5
-
 6
6
-
 7
7
-
 8
8
-
 9
9
-
 10
10
-
 11
11
-
 12
12
-
 13
13
-
 14
14
-
 15
15
-
 16
16
-
 17
17
-
 18
18
-
 19
19
-
 20
20
-
 21
21
-
 22
22
-
 23
23
-
 24
24
-
 25
25
-
 26
26
-
 27
27
-
 28
28
-
 29
29
-
 30
30
-
 31
31
-
 32
32
-
 33
33
-
 34
34
-
 35
35
-
 36
36
-
 37
37
-
 38
38
-
 39
39
-
 40
40
-
 41
41
-
 42
42
-
 43
43
-
 44
44
-
 45
45
-
 46
46
-
 47
47
-
 48
48
-
 49
49
-
 50
50
-
 51
51
-
 52
52
-
 53
53
-
 54
54
-
 55
55
-
 56
56
-
 57
57
-
 58
58
-
 59
59
-
 60
60
-
 61
61
-
 62
62
-
 63
63
-
 64
64
-
 65
65
-
 66
66
-
 67
67
-
 68
68
-
 69
69
-
 70
70
-
 71
71
-
 72
72
-
 73
73
-
 74
74
-
 75
75
-
 76
76
-
 77
77
-
 78
78
-
 79
79
-
 80
80
-
 81
81
-
 82
82
-
 83
83
-
 84
84
-
 85
85
-
 86
86
-
 87
87
-
 88
88
-
 89
89
-
 90
90
-
 91
91
-
 92
92
-
 93
93
-
 94
94
-
 95
95
-
 96
96
-
 97
97
-
 98
98
-
 99
99
-
 100
100
-
 101
101
-
 102
102
-
 103
103
-
 104
104
-
 105
105
-
 106
106
-
 107
107
-
 108
108
-
 109
109
-
 110
110
-
 111
111
-
 112
112
-
 113
113
-
 114
114
-
 115
115
-
 116
116
-
 117
117
-
 118
118
-
 119
119
-
 120
120
-
 121
121
-
 122
122
-
 123
123
-
 124
124
-
 125
125
-
 126
126
-
 127
127
-
 128
128
-
 129
129
-
 130
130
-
 131
131
-
 132
132
-
 133
133
-
 134
134
-
 135
135
-
 136
136
-
 137
137
-
 138
138
-
 139
139
-
 140
140
-
 141
141
-
 142
142
-
 143
143
-
 144
144
-
 145
145
-
 146
146
-
 147
147
-
 148
148
-
 149
149
-
 150
150
-
 151
151
-
 152
152
-
 153
153
-
 154
154
-
 155
155
-
 156
156
-
 157
157
-
 158
158
-
 159
159
-
 160
160
-
 161
161
-
 162
162
-
 163
163
-
 164
164
-
 165
165
-
 166
166
-
 167
167
-
 168
168
-
 169
169
-
 170
170
-
 171
171
-
 172
172
-
 173
173
-
 174
174
-
 175
175
-
 176
176
-
 177
177
-
 178
178
-
 179
179
-
 180
180
-
 181
181
-
 182
182
-
 183
183
-
 184
184
-
 185
185
-
 186
186
-
 187
187
-
 188
188
-
 189
189
-
 190
190
-
 191
191
-
 192
192
-
 193
193
-
 194
194
-
 195
195
-
 196
196
-
 197
197
-
 198
198
-
 199
199
-
 200
200
-
 201
201
-
 202
202
-
 203
203
-
 204
204
-
 205
205
-
 206
206
-
 207
207
-
 208
208
-
 209
209
-
 210
210
-
 211
211
-
 212
212
-
 213
213


Ask a question and I''ll find the answer in the document
Finding information in a document is now easier with AI
Related papers

Other documents
-
Native Instruments TRAKTOR KONTROL S8 Owner's manual
-
-
 Native Instruments TRAKTOR S8 User manual
-
 Native Instruments TRAKTOR KONTROL F1 Owner's manual
-
Native Instruments TRAKTOR KONTROL S2 MK3 User manual
-
Native Instruments TRAKTOR KONTROL S4 MK3 User manual
-
-
 Native Instruments Traktor Kontrol S4 MK2 User manual
-
 Native Instruments 22320 User manual
-
Native Instruments TRAKTOR KONTROL S3 User manual


