Page is loading ...

ContemporaryTraditional
ContemporaryTraditional
Kwikset
1-800-327-5625
www.kwikset.com
A
B
Levers
P
H
Q
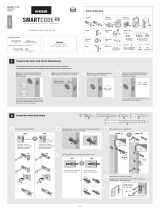
Parts in the box
Latch
Strike
Keys
Exterior Assembly
Fasteners
SmartKey™
Tool
Interior Assembly
C
L
K
G
E
D
J2
J1
N
Allen Wrench
R
M
26298
68221
G
L
K
J2
J1
Spindle
F
9V
Battery
26298
68574
Rev 01
Installation and User Guide
If drilling a new door, use the supplied template and the complete
door drilling instructions available at www.kwikset.com/doorprep.
backset
Measure to conirm that the hole in
the door is 21/8" (54 mm).
*If you are installing this lever below
an existing lock or you plan to install a
lock above this lever, make sure that the
distance between holes is at least 61/2"
(165 mm).
Measure to conirm that the backset is
either 23/8" or 23/4" (60 or 70 mm).
23/8" or 23/4"
60 or 70 mm
See
note
below*
13/8" – 13/4"
35 – 44 mm
Measure to conirm that the hole in
the door edge is 1" (25 mm).
Measure to conirm that the door
is between 13/8" and 13/4" (35 mm
and 44 mm) thick.
A B C D
1"
25 mm
ENGLISH
21/8"
54 mm
Required tools
Ruler
Hammer
Wood block
Phillips head screwdriver
Additional Tools (depending on application)
N P
actual
size
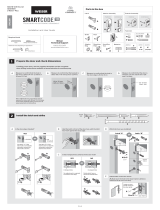
Install the latch and strike
P (2x)
C
A
slant of latch
bolt faces
door frame
slant of latch
bolt faces
door frame
A
B
C D
Are the latch holes centered in the door hole?
Is the door edge chiseled?
Install strike on the door frame.
Hold the latch in front of the door hole, with the
latch face lush against the door edge.
lush
YES NO
No adjustment is required.
Proceed to next step.
Move the pin to
extend the latch.
door frame
YES NO
A
A
B
N (2x)
or
or
chiseled not
chiseled
Install latch in door with
supplied screws.
Use a lathead screwdriver to
lift tabs on collar of rectangular
face to remove it from latch.
Install drive-in collar.
Align tabs with
holes in collar.
B
Ensure collar
snaps into place.
Pull collar to test
for tight it.
A
Install latch in door
with wood block
and hammer.
Flathead screwdriver
ContemporaryTraditional
1 / 4
1
Prepare the door and check dimensions
2

Connect and secure cable to interior assembly.
D
a
b
Connect cable.
Ensure tight cable connection.
Insert key and
turn 90° clockwise.
Secure exterior lever. Install interior lever. Secure interior lever.Install exterior lever.
The small bolt of the latch should not enter the strike
hole. If it enters the strike hole, reposition strike.
A B C D E
Tighten pre-
installed set
screw.
If latch is loose in the strike, adjust the strike tab so it
grips the latch bolt better when the door is closed.
tab
Lever handle
faces away
from the latch.
Close door, test latch operation and make adjustments as needed:
small bolt in
strike hole
small bolt NOT
in strike hole
J1 or J2
H
Lever handle
faces away
from the latch
and hole is on
the bottom.
1. Tighten pre-
installed set screw.
2. Turn key back to
vertical position
then remove it.
J1 or J2
H
K
Route cable through clips.
a
Install interior assembly
while holding the exterior
assembly. Make sure the
spindle fully engages with
the interior assembly.
b
Secure interior assembly
with mounting screws.
K
Q (2x)
Connect 9V battery. Secure battery into interior assembly.Remove interior cover.
A B C
L
Hold exterior assembly.
This step is necessary
to access the set screw on
the exterior lever.
M
Red side must face left.
Installing the security
set screw will lock
the interior cover and
prevent easy access
to the battery and
Program button.
R
If you installed the
security screw in step 3C,
you will need to remove
it to install the battery.
TIP: You may need to jiggle
the handle while pushing to
ensure it is fully engaged.
68221
Install exterior keypad. OPTIONAL: Install security set screw.
Install interior assembly and secure with mounting screws.
A C
E
cable goes
under latch
actual
size
Q
Ensure both interior and
exterior assemblies are
parallel to edge of door
before securing.
R
Interior assembly
Note:
Tighten screws evenly
and do not overtighten .
CAUTION:
Do not use
power tools
Install spindle.
B
rounded edge
faces latch
latch
F
2 / 4
G
3
4
Install the exterior keypad, spindle, and interior assembly
5
6
Install levers
Test latch operation
Install battery
Make sure to
keep your door
open until you
have programmed
a user code.

a b
c d
With the door open and turn piece set to the
auto-lock position, conirm that the code(s)
added in previous step can unlock the door.
Enter user code.
The lock will beep
twice to indicate
that it unlocked.
Tip: You can press
the Kwikset button
before entering
your user code
to light up the
keypad at night.
Re-key the lock (if needed)
1 IMPORTANT: Remove lever before re-keying.
2 Re-key the lock to work with your
existing key. See the supplied
SmartKey™ Re-key instructions for
more information.
3 / 4
Test the lock and review lock functionality
Add user codes
8
OPTIONAL: Enable / Disable Programming Code
Program
button
A Programming Code enables you to
make changes without needing to
access the Program button. This is ideal
for landlords to allow programming
from the outside, without access to the
interior Program button.
Please note that once a Programming
Code is enabled, the Program button
is disabled and can be used only to
factory reset the lock.
Make sure the door is open. If you have
not enabled a Programming Code,
press and release the Program button.
You will hear two beeps.
If you have enabled a Programming
Code, enter your Programming Code,
then press Kwikset. You will hear one
short beep and the keypad will lash
green.
Press
3
. You will hear one short beep
and the keypad will lash green.
A B C
Press Kwikset.
D
Enter a Programming Code. It must be
between 4 and 8 digits.
The Programming Code cannot
be the same as any user code.
Press Kwikset.
E F
Re-enter Programming Code.
G
Press Kwikset. You will hear one
long beep and the keypad will lash
green if successful. If you hear three
beeps and the keypad lashes red, it
was unsuccessful. Repeat from step A.
H
Make sure the door is open.
Press and release the Program button. You will hear two beeps.
Press
1
. You will hear one short beep and
the keypad will lash green once.
Press Kwikset.
A B C
Enter a User Code. It must be between 4 and 8 digits.
D
Press Kwikset.
E
You will hear one long beep and
the keypad will lash green if
successful. If you hear three beeps
and the keypad lashes red, it was
unsuccessful. Repeat from step A.
Reinstall battery cover.
F
Program
button
Key or code is needed for
entry from the outside.
Turnpiece Functions - Choosing a Mode
9
Auto-lock mode
Stays unlocked, allowing entry
without a key or code.
Passage mode
a b
Unlocking the Door with a Key
To unlock using a key,
turn the key clockwise
to the horizontal
position then turn the
lever to open the door.
To remove the key, turn
the key back to the
vertical position.
7
Move swiftly during programming. If no digit is pressed for 10 seconds, the system will time out and you will need to restart the procedure.
Lock will
beep once
when
turnpiece
is turned
to vertical
position.
Lock will
beep twice
when
turnpiece
is turned to
horizontal
position.
Vertical
Horizontal
For security reasons, the
irst 4 digits of each user code
must be unique. For example,
you are unable to program a
user code 12345 as well as a
user code 12346.
or
Unlocking the Door with a User Code
Emergency Egress
The interior lever of this lock will always open the door when turned, regardless of whether it is locked
or unlocked. This is to allow for a safe and easy exit in case of emergency.

© 2019 Spectrum Brands, Inc.
1. Read all instructions in their entirety.
2. Familiarize yourself with all warning and caution statements.
3. Remind all users of safety precautions.
4. Protect your user codes and programming code.
5. Dispose of used batteries according to local laws and regulations.
CAUTION: Prevent unauthorized entry. Since anyone with access to the back panel
can change the user codes, you must restrict access to the back panel and routinely
check the user codes to ensure they have not been altered without your knowledge.
The use of a program code can help protect your system’s settings.
WARNING: This Manufacturer advises that no lock can provide complete security
by itself. This lock may be defeated by forcible or technical means, or evaded by
entry elsewhere on the property. No lock can substitute for caution, awareness of
your environment, and common sense. Builder’s hardware is available in multiple
performance grades to suit the application. In order to enhance security and reduce
risk, you should consult a qualiied locksmith or other security professional.
This product complies with standards established by the following regulatory bodies:
• Federal Communications Commission (FCC)
• Industry Canada
FCC
This device complies with Part 15 of the FCC Rules. Operation is subject to the
following two conditions:
( 1 ) this device may not cause harmful interference, and
( 2 ) this device must accept any interference received, including interference that
may cause undesired operation.
This equipment has been tested and found to comply with the limits for a Class
B digital device, pursuant to Part 15 of the FCC Rules. These limits are designed
to provide reasonable protection against harmful interference in a residential
installation. This equipment generates, uses, and can radiate radio frequency
energy and, if not installed and used in accordance with the instructions, may cause
harmful interference to radio communications. However, there is no guarantee that
interference will not occur in a particular installation. If this equipment does cause
harmful interference to radio or television reception, which can be determined
by turning the equipment o and on, the user is encouraged to try to correct the
interference by one or more of the following measures:
• Reorient or relocate the receiving antenna.
• Increase the separation between the equipment and receiver.
• Connect the equipment into an outlet on a circuit dierent from that to which the
receiver is connected.
• Consult the dealer or an experienced radio/TV technician for help.
IMPORTANT! Changes or modiications not expressly approved by the manufacturer
could void the user’s authority to operate the equipment.
Industry Canada
This device complies with Industry Canada licence-exempt RSS standard(s). Operation
is subject to the following two conditions: ( 1 ) this device may not cause interference,
and ( 2 ) this device must accept any interference, including interference that may cause
undesired operation of the device.
How to add permanent or one-time User Codes
1. Make sure the door is open.
2. If you have not enabled a Programming Code, press and
release the Program button. You will hear two beeps.
If you have enabled a Programming Code, enter your
Programming Code, then press Kwikset. You will hear one
short beep and the keypad will lash green.
3. Press
1
to add a permanent user code that can be used for
entry at all times, until deleted.
Press
7
to add a one-time user code. A one-time user code
may be used only once, which will be deleted immediately
after use (typically used in emergency cases when you need
to give one-time access to a person).
You will hear one short beep and the keypad will lash green.
4. Press Kwikset .
5. Enter a new User Code. It must be between 4 and 8 digits.
For security reasons, the irst 4 digits of each user code
must be unique. For example, you are unable to program
a user code 48151 as well as a user code 48152.
6. Press Kwikset . You will hear one long beep and the keypad
will lash green if successful. If you hear three beeps and the
keypad lashes red, it was unsuccessful. Repeat from step 1.
How to enable/disable User Codes
1. Make sure the door is open.
2. If you have not enabled a Programming Code, press and
release the Program button. You will hear two beeps.
If you have enabled a Programming Code, enter your
Programming Code, then press Kwikset. You will
hear one short beep and the keypad will lash green.
3. Press
6
. You will hear one short beep
and the keypad will lash green.
4. Press Kwikset . You will hear one long beep
and the keypad will lash green if successful. If
you hear three beeps and the keypad lashes red,
it was unsuccessful. Repeat from step 1.
How to mute/unmute lock
If the lock is muted, you will not hear beeping during
programming, normal operation, or system signals.
You will still get a low battery alarm.
1. Make sure the door is open.
2. If you have not enabled a Programming Code, press and
release the Program button. You will hear two beeps.
If you have enabled a Programming Code, enter your
Programming Code, then press Kwikset. You will
hear one short beep and the keypad will lash green.
3. Press
5
. You will hear one short beep
and the keypad will lash green.
4. Press Kwikset . You will hear one long beep
and the keypad will lash green if successful. If
you hear three beeps and the keypad lashes red,
it was unsuccessful. Repeat from step 1.
How to delete all User Codes
1. Make sure the door is open.
2. If you have not enabled a Programming Code, press and
release the Program button. You will hear two beeps.
If you have enabled a Programming Code, enter your
Programming Code, then press Kwikset. You will
hear one short beep and the keypad will lash green.
3. Press
4
. You will hear one short beep
and the keypad will lash green.
4. Press Kwikset .
5. Enter
999999
.
6. Press Kwikset .
7. Enter
999999
.
8. Press Kwikset . You will hear one long beep and the keypad
will lash green if successful. If you hear three beeps and the
keypad lashes red, it was unsuccessful. Repeat from step 1.
How to change the auto-locking duration
1. Make sure the door is open.
2. If you have not enabled a Programming Code, press and
release the Program button. You will hear two beeps.
If you have enabled a Programming Code, enter your
Programming Code, then press Kwikset. You will
hear one short beep and the keypad will lash green.
3. Press
8
. You will hear one short beep
and the keypad will lash green.
4. Press Kwikset .
5. Enter delay time between 199 seconds.
6. Press Kwikset . You will hear one long beep and the keypad
will lash green if successful. If you hear three beeps and the
keypad lashes red, it was unsuccessful. Repeat from step 1.
Regulatory Compliance
Important Safeguards
How to delete individual User Codes
1. Make sure the door is open.
2. If you have not enabled a Programming Code, press and
release the Program button. You will hear two beeps.
If you have enabled a Programming Code, enter your
Programming Code, then press Kwikset. You will hear one
short beep and the keypad will lash green.
3. Press
2
to delete a user code.
You will hear one short beep and the keypad will lash green.
4. Press Kwikset .
5. Enter the User Code you wish to delete.
Press Kwikset .
6. Enter the User Code Again.
7. Press Kwikset . You will hear one long beep and the keypad
will lash green if successful. If you hear three beeps and the
keypad lashes red, it was unsuccessful. Repeat from step 1.
SmartCode 917 at a Glance
Reference Guide
Additional Programming Features
Factory Reset
Exterior
9V Battery
Program
button
Turnpiece
Interior (cover removed)
Keypad
Keyway
SmartKey
tool hole
A factory reset will delete all codes associated with the lock.
1. Make sure the door
is open and unlocked.
2. Press and hold the
Program button until
you hear one long beep
(approximately 30
seconds), then release
the Program button.
3. Press and release the
Program button again.
You will hear one
short beep.
4. Test with an existing
User Code, the lock
should not work.
Program
button
Troubleshooting
Keypad is not responding.
Change battery.
Desired user code cannot be programmed.
For security reasons, the irst 4 digits of each user code must
be unique. For example, you are unable to program a user
code 48151 as well as a user code 48152.
Key cannot be removed when unlocked.
This is a feature to ensure the door is always locked and the
key is removed (store room function). To remove the key,
return the key to vertical position to remove.
Emergency egress function
This lock has an emergency egress function which allows
you to exit by turning the lever on the inside, regardless of
whether it is in Auto-lock or Passage mode.
4 / 4
System Signals
Use Cases Sound Light
Correct user code entered to unlock door 2 short beeps 2 short green lashes
Lock auto-locks 1 long beep 1 long red lash
Turnpiece rotated to unlock position 2 short beeps None
Turnpiece rotated to locked position 1 long beep None
Low battery alarm 10 short beeps 10 short red lashes
3 incorrect user codes entered 15 long beeps 15 long red lashes
Entering factory reset mode after Program button is pressed and held for 30
seconds.
1 long beep None
Entering programming mode after pressing and releasing Program button 2 beeps None
Successful programming 1 long beep 1 long green lash
Unsuccessful programming 3 short beeps 3 short red lashes
If User Codes are disabled (example: when you go
on vacation), the lock can only be operated by the key.
How to enable/disable turnpiece functionality
1. Make sure the door is open.
2. If you have not enabled a Programming Code, press and
release the Program button. You will hear two beeps.
If you have enabled a Programming Code, enter your
Programming Code, then press Kwikset. You will
hear one short beep and the keypad will lash green.
3. Press
9
. You will hear one long beep
and the keypad will lash green.
4. Press Kwikset . You will hear one long beep
and the keypad will lash green if successful. If
you hear three beeps and the keypad lashes red,
it was unsuccessful. Repeat from step 1.
A feature for property managers
If the turnpiece is disabled, the lock will always auto-lock
after each entry. The turnpiece will rotate but will not
activate passage mode. User code or key will always be
required for entry.
/