Page is loading ...

THE RAINCATCHER 4000/6000
LE RAINCATCHER 4000/6000
Thank you for purchasing our product
www.fcmponline.com
Copyright © 2018 GRANDMARK Ltd.
Merci d'avoir acheté notre produit
www.fcmponline.com
Copyright © 2018 GRANDMARK Ltd.

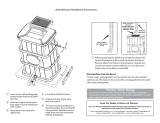
3. Next place the debris screen on the top of the
barrel. This strong aluminum mesh screen will keep
out leaves, shingle grit, sticks and other debris, as
well as safely protecting animals and pets from
entering the barrel. As needed, you may remove the
debris screen and rinse it off for easy cleaning.
Caution
Rain water can only be used for garden watering purposes. Do not use for consump-
tion (human or animal).
This rainbarrel is equipped with a debris screen which has sturdy spokes for the safety
of small children and pets. DO NOT modify or remove these spokes --doing so would
compromise the design of the barrel making it unsafe to use.
3. Placez ensuite le tamis à débris sur le dessus
du baril. Le tamis en mailles d’aluminium solide
empêchera les feuilles, les éclats de bardeau,
bâtonnets et autres débris, ainsi que les animaux
sauvages et familiers de pénétrer dans le baril.
Pour un nettoyage facile, vous pouvez enlever le
tamis à débris et le nettoyer si nécessaire.
Mise en garde
Vous ne pouvez utiliser l'eau de pluie qu'à des fins d'arrosage du jardin. Ne l'utilisez
pas pour la consommation (humaine ou animale).
Cette cuve pluviale est dotée d'un écran à débris qui a des rayons robustes assurant la
sécurité des enfants et des animaux. NE modifiez PAS ni ne retirez ces rayons – vous
pouvez compromettre la conception de la cuve et la rendre dangereuse à utiliser.
Assembly and Installation of RainCatcher 4000/6000
1. Take the garden hose that comes with your
barrel. It has a convenient thumb valve at one
end. Attach the other end of this hose to the
smaller outlet spigot (5/8" or 1.5 cm diameter) at
the front base of the barrel and secure it with the
small clamp provided. If you have any difficulty
attaching it just immerse the tube in hot water for
approximately 30 seconds. The tube should then
fit easily over the spigot and you can clamp it on.
Once it is secured, lift the valve end up to the top
of the barrel and place it in the slot on the top of
the barrel. This will keep the outlet hose off the
ground and easily accessible.
2 . Next take the plastic overflow tube that is included with
your barrel and attach it to the overflow spigot on the
back of the barrel (the center spigot, which faces down).
Secure this tubing with the tie strap provided. This
tubing will extend straight down and travel underneath
the barrel, to exit out the front of the barrel at the
bottom. When the barrel is full, excess water flows out
of this overflow tube, and can easily be diverted. Be
sure to direct this tubing away from building foundations
to avoid flooding when the barrel overflows. You may
want to place pieces of slate or a patch of pebbles at
the end of the overflow outlet tube to prevent water from
washing soil away.
Overflow Tube
Attach
garden hose
with
clamp
Debris Screen
Assemblage et installation du RainCatcher 4000/6000
1. Prenez le tuyau d'arrosage fourni avec votre
baril. Il est dote d'un clapet a ailettes à une
extrémité. Reliez l'autre extrémité du ce tuyau au
plus petit orifice de décharge (5/8 po ou 1,5 cm
de diamètre) a 1.1 base du devant du baril, et
vous attachez-le avec La petite attache
autocollante fournie. Si vous avez de la difficulté
a l'attacher, plongez simplement le tuyau dans
de l'eau chaude durant environ 30 secondes. Le
tuyau devrait alors s'adapter facilement a l'orifice
et vous pourrez l'y fixer. Une fois qu'il est fixe,
montez l'extrémité pourvue du clapet sur le dessus du
baril. Cela empêchera le tuyau de tomber sur le sol et vous
en facilitera l'accès.
2. Prenez ensuite le tube de trop-plein en plastique fourni
avec votre baril et attachez-le a l'orifice de trop-plein à
l'arrière du baril (l'orifice du centre, dirigé vers le bas).
Fixez ce tube a l'aide de la bride fournie. Ce tube
descend vers Ie bas et passe sous le baril, pour sortir a
l'avant au bas du baril. Lorsque le baril est plein, l'eau
supplémentaire sort par ce tube de trop-plein, et peut
facilement être dérivée. Assurez-vous de diriger ce tube
a l'écart des fondations d'immeubles pour éviter une
inondation lorsque Ie baril est trop plein. Il serait sage
de placer des pièces d'ardoise ou un carre de loches à
l'extrémité de l'orifice du tube de trop-plein pour
empêcher l'eau de raviner le sol.
tamis à débris
Tube de trop-plein
Attachez le
tuyau d'arrosage
avec l'attaché
autoblocante

5. Before positioning your barrel, you will also need to shorten your current
down spout so that the water will exit into the barrel. Begin by measuring
how much you will need to cut out of the spout so that the shortened spout
will be approximately 2 inches (5 cm) from the top of the barrel screen. First
remove the curved end portion of the existing spout and trim the straight
portion of the spout to the desired new length. Once you reattach the curved
end portion to the vertical spout portion you are ready to place your barrel
underneath it. The 2 inch (5 cm) clearance above the barrel is required to
allow you to remove the filter for cleaning.
Drawing Water from the Barrel:
To draw water, just use the outlet hose attachment. It is useful for filling watering
cans or buckets and it also connects easily to a longer piece of garden hose to
direct water to other sections of your lawn or gardens. The hose can also be used
to drain the barrel by removing the thumb valve.
Winter Storage:
If you live in a cold climate, drain the barrel and hoses completely. Hoses should
be stored inside. Place the barrel upside down to avoid water freezing and
cracking the barrel.
4. Please note that the barrel must be placed on as flat a surface as possible.
It is recommended that you use a leveled base of pressure treated wood or
a patio stone to prevent shifting or tipping.
Place on
level
ground or
Patio Stone
Remove this
section to
shorten spout
Shorter
Spout
Allow 2" clearance
between Spout
and Debris Screen
5. Avant de placer votre baril, vous devrez également raccourcir votre tuyau de
descente des eaux pluviales pour que l'eau tombe dans le baril.
Commencez par mesurer la dimension que vous devrez enlever du tuyau de
descente pour que le tuyau de descente raccourci arrive a environ 2 pouces
(5 cm) du des sus du tamis a débris du baril. Enlevez d'abord la partie
courbée du tuyau de descente des eaux pluviales et coupez la partie droite
du tuyau de descente a la nouvelle longueur désirée. Lorsque vous avez
remis la portion courbée du tuyau en place, vous pouvez placer votre baril
en-dessous. Le dégagement de 2 pouces (5 cm) au-dessus du baril est
nécessaire pour vous permettre d'enlever le tamis pour le nettoyer.
Prélevèrent de l' eau du baril :
Pour soutirer de l'eau, utilisez simplement le tuyau d'arrosage. Il est pratique pour
remplir les arrosoirs ou les seaux, et il se relie facilement a un tuyau d'arrosage
plus long pour diriger l'eau a d'autres sections de votre pelouse ou de votre jardin.
Le tuyau peut également être utilise pour vider le baril in enlevant le clapet a
ailettes.
Avertissement - Entreposage hivernal
Si vous vivez dans une région froide, videz le tonneau et les tuyaux
complètement. Entreposez les tuyaux a l'intérieur et posez le tonneau a l'envers
pour prévenir que l'eau ne gèle et que le tonneau ne fêle.
4. Veuillez noter que le baril doit être place sur une surface aussi égale que
possible. On recommande d'utiliser une base de bois traite sous pression ou
une pierre de patio mise de niveau pour empêcher le baril de se déplacer ou
de basculer.
Placez de
niveau sur
Ie sol ou
une pierre
à patio
Enlevez cette
section pour
raccourcir le
tuyau de descente
des eaux pluviales
Tuyau
raccourci
Assurez un
dégagement de
2 po entre Ie
tuyau de descente et
le tamis à débris

Dealing with Overflow Water:
The RainCatcher 4000/6000 has a capacity of 54 US gallons or 205 litres/75 US
gallons or 285 litres. This may seem like a lot of water but when you consider
that a Roof area of 1,000 square feet will capture 625 gallons from just a one
inch rain fall, you know that your barrel is going to fill quickly. This is why the
RainCatcher 4000/6000 is equipped with an external overflow tube and why we
have designed this product to also be linked in-series.
Linking RainCatcher 4000/6000
Barrels In-Series:
Please note that the RainCatcher 4000/6000
has two in-series spigots to the left and right
of the back of each barrel. This allows for
unlimited barrel arrangements.
1. To link two barrels, assemble each barrel as described in the
previous panels.
2. Cut off the end of the in-series overflow spigot on the right hand side of one
barrel and the left spigot on the other. This is best done with a small hacksaw
or sharp utility knife. You need only trim .25 inch (.6 cm) off of each spigot.
3. Set the two barrels side-by-side with the open spigots facing each other.
4. Take the small hose from your Hardware pack. Secure this hose La each
spigot with tie straps provided.
5. As the first barrel reaches capacity, the overflow water will automatically flow
to the adjacent barrel and store there until needed. Repeat this procedure to
add additional barrels.
Warning - Winter Storage
If you live in a cold climate, drain the barrel and hose completely.
Hoses should be stored inside. Place the barrle upsidedown to avoid
water freezing and cracking the barrel.
Forest City Models & Patterns Ltd.
157 Gerald Parkway
Thorndale, Ontario, Canada N0M 2P0
Phone: 519-858-5795
Fax: 519-858-9196
e-mail: [email protected]
Forest City Models & Patterns Ltd. Warranty
One (1) Year Warranty on Manufacturer Defects.
Warranty excludes cracking from improper use.
For warranty issues, please contact
Forest City Models & Patterns:
Gestion des trop-plein d'eau :
Le RainCatcher 4000/6000 a une capacité de 54 gallons US ou 205 litres/75
gallons US ou 285 titres. Cela peut sembler beaucoup, mais lorsque vous
considérez qu'une toiture de 1 000 pieds carrés capitule 625 gallons lors d'une
pluie d'un pouce seulement, vous savez. que votre baril se remplira rapidement.
C'est pourquoi le RainCatcher 4000 est équipé d'un tube externe de trop-plein,
et c'est pourquoi nous avons conçu ce produit pour pouvoir être relie en série.
Barils RainCatcher 4000/6000
relies en série :
Veuillez noteT que le RainCatcher
4000/6000 est doté de deux joints en séné
a la droite et à la gauche derrière chaque
baril. Cela permet un arrangement illimité
de barns.
1. Pour relier deux barils, assemblez chaque baril selon les directives.
contenues a l'intérieur de cette brochure.
2. Coupez l'extrémité du joint en séné du cote droit d'un des barils, et du cote
gauche de l'autre baril. Cette tache est plus facile si on utilise une petite
scie a métaux ou un couteau universel bien coupant. Vous n'avez besoin
de couper que 0.25 po (0,6 cm) de chaque joint.
3. Installez les deux barils hardware pack, les joints ouverts en face l'un
de l'autre.
4. Utilisez le petit tuyau fourni avec l'ensemble de raccordement. Fixez ce
tuyau a chaque joint a l'aide des attaches autobloquantes fournies.
5. Lorsque le premier baril est plein, l'eau de surplus coulera automatiquement
dans le baril adjacent et y restera jusqu'à ce qu'on l'utilise. Répétez cette
procédure pour ajouter d'autres barils.
Avertissement - Entreposage hivernal
Si vous vivez d'ans un climat froid, vidangez la cuve et les tuyaux
complètement. Rangez les tuyaux à l'intérieur. Placez la cuve sens
dessus dessous pour éviter que I'eau ne gèle et ne fissure Ia! cuve .
Forest City Models & Patterns Ltd.
157 Gerald Parkway
Thorndale, Ontario, Canada N0M 2P0
Phone: 519-858-5795
Fax: 519-858-9196
e-mail: [email protected]
Forest City Models and Patterns Ltd. Garantie
Une (1) Garantie d'Année sur les Défauts de Fabricant.
La garantie exclut Ie fait de faire craquer de l'utilisation
impropre. Pour les éditions de garantie, contactez s'll
vous plait Forest City Models and Patterns:
/