Pyle PS-WGM64 Owner's manual

Category
Watches
Type
Owner's manual

This manual is also suitable for

Front page
(Black)
Back page
(Black)
1.0 Introducti on
3.0 Major Functi on Modes
2.0 Button and its Functi on
+ Thank you for purchasing of this Watch.
+ hi s Watc h
chronograph,
+ In ad ditio n to no rmal t imeke eping fu nc tion, th is
Watch includes two special features, they are pacer
watch and multi-timer function.
+
multi-
timer which combines two or more timers together
to extend the time function to measure multi-phase
elapse time.
+ Be sure to carefully read this manual and keep it
on hand for later reference when necessary.
+ To get the most of your purchase, i
+ Watch
+ Watch
+ Watch
+ ccasional ly
+ Store the Watch in a dry place when it is not in use
for a long time.
T pr ovi de s cu rre nt t im e, d ai ly a la rm,
countdown timer, pacer and dual time
function.
t is advisable to
use this watch in conformity with the below notes:
Avoid exposing the to the extreme conditions
for an unreasonable time.
Avoid rough uses or severe impacts to the .
Do not open the case unless a certified
service agency.
Clean the Wa tch o with a sof t and
moistened cloth.
The Pacer Watch which combines the chronograph
and the pacer function together, hence two functions
can be activated at the same time. While the
Mode Button [M]
+ To select among the Current Time, Daily Alarm,
Pacer, Chronograph, Timer and Dual Time Mode.
+ To select setting display.
Start/Stop Button [S/S]
+ To select among the setting items during setting
display.
+ To switch between 12 and 24 hour format.
+ To activate the 'start' or 'stop' function during
Chronograph Mode and Timer Mode.
Lap/Reset Button [L/R]
+ To view and activate 'lap' or 'reset' function
during Chronograph Mode.
+ To select between different timer displays. To
load or clear the starting value for the timer(s).
+ To activate the 'start' or 'stop' Pacer function
during Pacer mode.
+ To set the hourly chime function ON or OFF.
+ To increase the digits during setting display.
EL Button [EL]
+ To turn on the EL back light for about 3 seconds.
NOTE: The major key operations are summarized
on the above paragraphs, however please read the
coming chapters for the detail operations.
4.0 Current Time Mode - Current Time Display
Current Time Display
+
When the Current Time Mode is selected, the
Watch will show the following items on the
display:
+
The day of week and date of the current time
are exhibited on the 1st row of the display.
+
The current time (hour, minute, second) is
exhibited on the 2nd row of the display.
How to Switch between 12 and 24 hour format
+
To switch between 12 and 24 hour format, press
the [S/S] button following the adjacent diagram.
How to Switch between Month-day and day-
month format
+
To switch between month-day and day-month
format, hold down the [S/S] button following the
adjacent diagram.
To Set the Hourly Chime ON/OFF
+
To set the hourly chime between ON or OFF,
press the [L/R] button following the adjacent
diagram.
+
When the chime indicator ' ' is appeared on the
display, the chime is ON. During the hourly
chime is ON, the Watch will sound 'beep beep'
every hour on the hour (e.g 1:00 00, 2:00 00,
3:00 00)
AM/PM
indicator
date
(month, day)
date
(day, month)
day of
week
current
time
[S/S]
hold [S/S]
[L/R]
24 hours Display
12 hours Display
Chime OFF
12 hours Display
Chime OFF
Hourly chime ON
hourly
chime
indicator
[EL ]
[S/ S]
[L/R]
[M]
DISP LAY
Current Time Mode
Daily Alarm Mode
Pacer Mode
Chronograph Mode
Countdown Timer Mode
Dual Time Mode
[M]
[M]
[M]
[M]
[M]
[M]
4.1 Current Time Mode - Setting the Current Time
5.0 Daily Alarm Mode - Daily Alarm Mode
How to Set the Current Time
+ To select the setting display, hold down the
[M] button for 2 seconds in the Current Time
Mode, and then the 'Second' digits will start
flashing.
+ In setting display, press the [S/S] button to
move the flashing following the adjacent
diagram to select among different settings.
+ During one of the settings (minute, hour,
year, month, day) is flashing, press the [L/R]
button to change the number (hold down the
button to change the number at a higher
speed).
+ When the second digits start flashing, press
the [L/R] button to reset them to zero.
+ When the setting is completed, press the [M]
button once to exit the setting display. The
Watch will also exit the setting display if NO
key-stoke has been activated for 1 minute.
Daily Alarm Mode
+ This Watch includes a daily alarm function
for the current time.
+ When the daily alarm is ON, the Watch will
beep for 20 seconds at the alarm time every
day.
Daily Alarm Display
+ When the Daily Alarm Mode is selected, the
Watch will show the following items on the
display:
+ T h e c u r r en t t i me ( h ou r, m i n u te ) i s
exhibited on the 1st row of the display.
+ The daily alarm time (hour, minute) is
exhibited on the 2nd row of the display.
To Set the Daily Alarm ON/OFF
+ To set the daily alarm between ON and OFF,
press the [L/R] button in the Daily Alarm
Display.
+ When the daily alarm indicator ' ' is
appeared, the daily alarm is ON.
To Test the Daily Alarm Sound
+ To test the alarm sound, hold down the [S/S]
button in the Daily Alarm Display. The Watch
will beep as long as the button is hold.
6.0 Pacer Mode - Pacer Display
5.1 Daily Alarm Mode - Setting the Daily Alarm
Pacer Mode
+ This Watch includes a pacer function which
generate regular beeps at a pre-defined rate.
That pre-defined rate can be set within in a
range from 40 to 180 beats per minute
(bpm).
+ The pacer will sound more beeps within a
minute for a higher bpm rate (e.g. 80) setting
than a lower bpm rate (e.g. 30) setting.
Pacer Display
+ When the Pacer Display is selected, the
beeping rate is exhibited on the 2nd row of
the display.
How to Use the Pacer
+ When the pacer has been set with a beeping
rate, for example 65 bpm, press the [L/R]
button once will start the beeping.
+ During the Watch is beeping, press the [L/R]
button once again to stop the beeping.
How to Set the Daily Alarm
+ To select the setting display, hold down
the [MODE] button for 2 seconds in the
Daily Alarm Mode, and then the 'minute'
digits will start flashing.
+ In setting display, press the [S/S] button
to move t h e f l ashing follow i n g t he
a d j a c ent d i agra m t o s e lec t a m o ng
different settings.
+ During one of the settings (minute, hour)
is flashing, press the [L/R] button to
change the number; hold down the [L/R]
button to change the number at a higher
speed.
+ When the setting is completed, press the
[M] but ton once to exit the setting
display. The Watch will also exit the
setting display if NO key-stoke has been
activated for 1 minute.
Pacer Display
pacer
beeping rate
(in beats
per minute)
1
1
0
0
2
2
3
3
minute(s)
minute(s)
Example 2: Set 80 as the Pacer Beeping Rate.
Example 1: Set 30 as the Pacer Beeping Rate .
start
start
30 beeps
80 beeps
30 beeps
80 beeps
30 beeps
80 beeps
Beep
Beep
Beep
Beep
Beep
Beep
Current Time Mode
second
Setting Sequence
hold [M]
[S/S]
[S/S] [S/S]
[S/S] [S/S]
[S/S]
[M]
Increase
the number
increase
the number
at a higher
speed
[L/R]
hold [L/R]
day
year
hour
minute month
Daily Alarm OFF
daily alarm
indicator
alarm time
(hour, minute)
current time
(hour, minute)
[L/R]
Daily Alarm ON
Daily Alarm Display
Daily Alarm Display
minute
hour
Setting Sequence
[S/S]
hold [M]
[M]
Increase
the number
increase
the number
at a higher
speed
[L/R]
hold [L/R]
6.1 Pacer Mode - Setting the Pacer Beeping Rate
6.2 Pacer Mode - Using the Watch as a Pacer Watch
To Set the Pacer Beeping Rate
+
To select the setting display, hold down the
[M] butto n for 2 seconds in the Pa cer
Display, and then the beeping rate digits will
start flashing.
+
In the setting display, press the [L/R] button
to change the number; hold down the button
to change the number at a higher speed.
+
When the setting is completed, press the [M]
button once to exit the setting display. The
Watch will also exit the setting display if NO
key-stoke has been activated for 1 minute.
How to Use the Watch as a Pacer Watch
+ To use the Watch as a pacer watch
following the below steps:
+ When the pacer Display is selected,
press the [L/R] to turn on the pacer
function.
+ When Pacer function is on, press the
[M] button to switch the display to
Chronograph Mode, and then press the
[S/S] button once will start the pacer
and chronograph function at the same
time.
+ Then the watch will became a Pacer
Wat c h w hi c h t he c h r on o g r ap h i s
counting and the pacer is beeping at
the pre-defined rate.
+ During the Pacer Watch is counting and
beeping, press the [S/S] button once
will stop the beeping and counting.
Pacer Display
40
180
Setting Sequence
5 bpm
per step
hold [M]
[M]
Increase
the number
increase
the number
at a higher
speed
[L/R]
hold [L/R]
7.1 Chronograph Mode - Using the Chronograph
7.0 Chronograph Mode - Chronograph Mode
How to Measure Elapse Time
+ During the 'All Zero' Display, press the [S/S]
button once will start the counting, and press
the [S/S] button again will stop the counting.
+ The elapsed time between the above 2 key-
stokes will be exhibited on the 1st row of the
display. Repeat the above key operations to get
the accumulative elapsed time.
How to Get a Lap Time
+ When the chronograph is counting, press the
[L/R] button to get and view the Lap Display for
5 seconds. In the Lap Display, the current lap
number and lap time will appear on the 1st and
2nd row of the display respectively.
+ After the 5 seconds, the Watch will return to
counting display automatically. Then the new
lap time and the accumulative elapsed time will
be exhibited on the 1st and 2nd row of the
display respectively. Repeat the above key
operations to get another lap time.
How to Recall/Reset the Lap Time
+ During the chronograph is stopped:
+
Press the [L/R] button one by one to review
the recorded lap times, or
+
Hold down the [L/R] but ton for about 2
seconds to clear the lap time, and reset the
display to 'All Zero' display.
Chronograph Mode
+ This Watch includes a stopwatch function which
measures:
+ El apsed ti me , a cc umula ti ve el ap se d t ime
(multi-phase elapsed time) and Lap time (get a
elapsed time without stopping the counting).
+ The measuring capacity of the chronograph:
+
Measuring unit: 1/100 second,
+
Measuring range: 9 hours, 59 minutes and
59.99 second,
+
Lap Memory: a maximum of 50 laps.
Chronograph Display
+ When the Chronograph Display is selected, the
Watch will show the following items on the
display:
+ During the chronograph is counting: The
current lap time and the accumulative elapsed
time is exhibited on the 1st and 2nd row
respectively. NOTE: The current lap time will
be the same as the accumulative elapsed time
for lap 1.
+ During the chronograph is stop ped: The
current lap time and lap number are exhibited
on the 1st row, and the accumulative elapsed
time is exhibited on the 2nd row.
+ During the Lap Display is displaying: The
cu rr en t la p nu mb er a nd t he l ap t im e is
exhibited on the 1st and 2nd row respectively.
3. Lap times
time
[S/S]
[S/S]
[S/S]
[S/S]
[L/R] [L/R] [L/R]
[S/S] [S/S]
[S/S]
0 10 20 30
300
20
10 10100
100 10
lap 1 lap 2 lap 3
2. Accumulative elapsed time
1. Elapsed time
Elapsed time, Accumulative
Elapsed time and Lap time
Pacer Mode
Pacer OFF
Pacer Mode
Pacer ON
Chronograph Mode
[L/R]
[M]
[S/S]
[S/S]
counting
stop
counting
Chronograph Mode
Pacer Watch Started
Chronograph Mode
Pacer Watch Stopped
Beep
65 beeps/
minute
Beep
65 beeps/
minute
Chron ogr aph Display
'All Ze ro'
accum ulative
runni ng time
(1/10 0 second)
accum ulate
runni ng time
(seco nd)
accum ulative
runni ng time
(minu te)
accum ulative
runni ng time
(hour )
curre nt lap
runni ng time
Counting Display
[L/R]
5 seconds
Lap Time Display
Stop Counting Display
hold [L/R]
elapsed
time
(counting)
elapsed
time
(stop
counting)
[S/S]
[S/S]
All Zero Display
lap time
lap
number
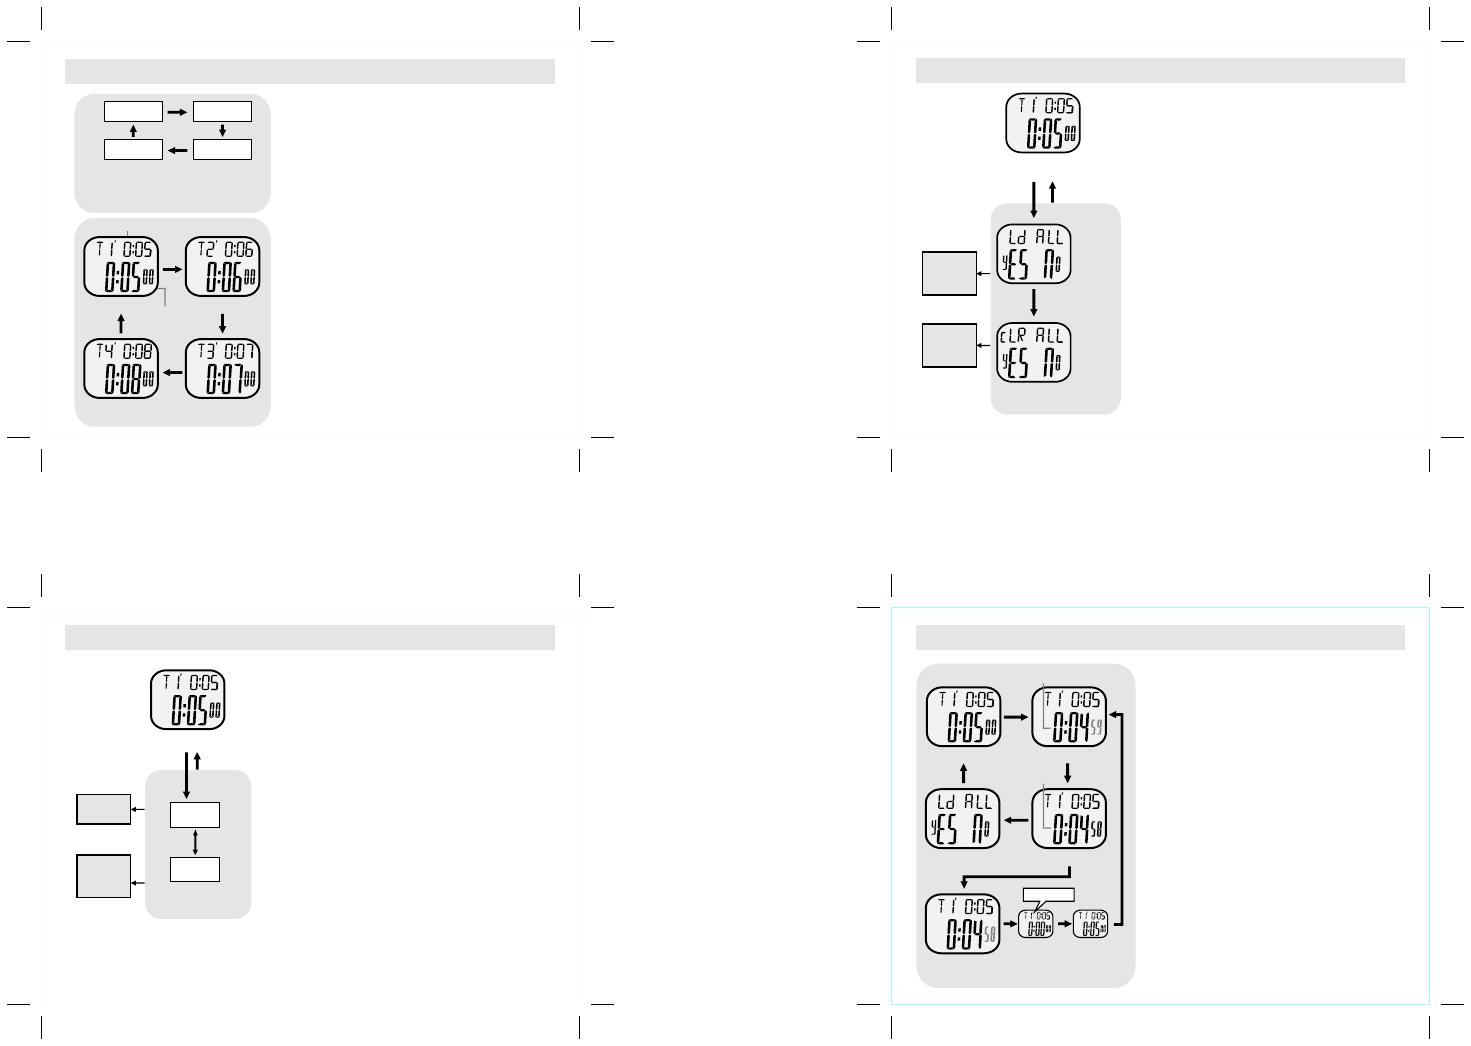
8.1 Countdown Timer Mode - Setting the Countdown Timer
8.2 Countdown Timer Mode - Loading and Resetting the Timer
How to Set the Countdown Timer
+ The following paragraphs will illustrate the
procedure for setting the timer 1. Even so,
setting the other timers will work on the
similar procedure.
+ To select the setting display, hold down the
[M] button for 2 seconds in the Timer 1
Display, and then the 'Minute' digits start
flashing on the display.
+ In setting display, press the [S/S] button to
move the flashing following the adjacent
diagram to select among different settings.
+ When one of the settings (minute, hour) is
flashing, press the [L/R] button to change
the number (hold down the button to change
the number at a higher speed).
+ When the setting is completed, press the [M]
button once to exit the setting display. The
Watch will also exit the setting display if NO
key-stoke has been activated for 1 minute.
How to Load the Timers
+ If the starting value has been set for the
timer(s), they must be loaded into the counting
sequence before it is ready for counting.
+ To load the timer(s) into counting sequence,
hold down the [L/R] button in Timer Display
(when the timer is stopped) until the 'Ld ALL'
in dicator appea re d fo ll owing the ad jacen t
diagram.
+ When the 'Ld ALL' indicator is appeared, press
the [M] or [L/R] to confirm or abort the loading.
+ If the Timer Display is returned after the
loading, the timer(s) is ready to count.
How to Reset the Timers
+ During the 'Ld ALL' indicator is appeared, hold
down the [L/R] button until the 'cLR ALL'
in dicator appea re d fo llowing the adjacen t
diagram.
+ When the 'cLR ALL' indicator is appeared,
press the [M] or [L/R] to confirm or abort the
resetting.
+ If the Timer has been reset, all starting values
will be reset to 0:00.
Countdown Timer Display
Stop Counting
counting
time
starting value (hour, mintue)
minute
hour
Setting Sequence
Setting Sequence
[S/S]
hold [M]
hold
[L/R]
hold
[L/R]
load the
timer(s)
into the
counting
sequence
reset all
starting
values
to zero
[M]
[L/R]
Increase
the number
Confirm
the loading
or
resetting
Abort
the loading
or
resetting
increase
the number
at a higher
speed
[L/R]
[M]
[L/R]
hold [L/R]
Timer 4 Display Timer 3 Display
Timer 1 Display Timer 2 Display
Countdown Timer Mode
[L/R]
[L/R][L/R]
[L/R]
8.3 Countdown Timer Mode - Using the Single Timer
How to Use the Single Timer
+ When using one timer only (Single Timer),
excludes other timers by setting their starting
values to 0:00.
+ Once the starting value has been set for the
la st t im er, it m us t be loa ded into t he
counting sequence before it is ready for
counting. Check previous chapter 8.2 for
more detail on how to load the starting value
into the counting sequence.
+ Press the [S/S] button to start the counting.
The counting will be restarted automatically
when it reaches zero unless the counting is
stopped by pressing the [S/S] button.
How to Re-load the Timer
+ To re-load the timer to its original starting
value during the timer is stopped, perform
the loading process following the previous
chapter 8.2.
Timer Alarm Sound
+ During the counting, the Watch will beep
once when a timer counts to the last 1 and 0
second.
Timer 1 Display
Counting Display
Counting
Display
Counting Display
Zero Display
[S/S]
[S/S]
[S/S]
[M]
hold
[L/R]
Stop Counting Display
stop
counting
counting
beep, beep
8.0 Countdown Timer Mode - Countdown Timer Display
Countdown Timer Mode
+
This Watch includes 4 countdown timers. They are
Timer 1, 2, 3 and 4. Using one timer (Single Timer)
which can run normal timer function. But combines
two or more timers (Multi-Timer) can extend the
timer function to measure multi-phase elapse time.
+
The measurement unit of these timers is 1 second,
and the starting value of these timers can be set up
to a maximum of 23 hours and 59 minutes.
+
When a timer which set 0:00 as the starting value,
that timer will be excluded from the counting
sequence.
+
When the timer is started, the Watch will count
repeatingly unless it is stopped by pressing the [S/S]
button. During the counting, the Watch will beep
once when a timer counts to the last 1 and 0 second
Single Timer and Multi-Timer
+
When using Single Timer (one timer), it must
excludes other timers from the counting sequence
by setting their starting value to 0:00.
+
When using Multi-Timer, it is counting on a
sequence which starts the counting from Timer 1 to
another timers following the adjacent diagram.
How to Select Different Timer Display
+
To select different countdown timer display during
the timer is stopped, press the [L/R] button one by
one following the adjacent diagram.
Timer 1*
Timer 3*
Multi-Timer Counting Sequence
Timer 2*
Timer 4*
D
If Timer 1, 2, 3 or 4 which set 0:00
as the starting value, that timer will
10.0 Specifications
9.1 Dual Time Mode - Setting the Dual Time
Pacer Mode
+ Setting Range: 40 bpm to 180 bpm
+ Setting step: 5 bpm
Dual Time Mode
+ Time System: A M , P M , H o u r, minute,
second
Back Light
+ Back Light Type: Elec t r o-L u m ines c e nt
(EL) back light
Current Time Mode
+ Time System: AM, PM, Hour, minute,
second
+ Time Format: 12-hour or 24-hour format
+ Calendar: Month, date and day of week
display (Auto-Calendar function for leap
year and day of week)
Alarm Mode
+ Daily alarm and hourly chime
+ Alarm sound: 20 seconds
Chronograph Mode
+ Resolution: 1/100 second
+ Measuring Range: 9 hours 59 minutes
59.99 seconds
+ Lap memory: 50 lap memories
Countdown Timer
+ Timer: 4 timers
+ Resolution: 1 second
+ Measuring Range: 23 hours 59 minutes
+ Timer Sounds: the Watch will beep once
when a timer counts to the last 1 and 0
second.
To Set the Dual Time
+ To select the setting display, hold down the [M]
button for 2 seconds in the Dual Time Mode,
and then the 'Minute' digits start flashing.
+ In the setting display, press the [S/S] button to
select the flashing (setting item) as shown in
the diagram.
+ When one of the settings (minute, hour) is
flashing, press the [L/R] button to change the
number; hold down the button to change the
number at a higher speed.
+ When the setting is completed, press the [M]
button once to exit the setting display. The
Watch will also exit the setting display if NO
key-stoke has been activated for 1 minute.
8.4 Countdown Timer Mode - Using the Multi-Tmer
How to Use the Multi-Timer
+ To use the Multi-Timer function which combines
two or more timers to measure multi-phases
elapse time, it must set the starting value for
each timer.
+ Once the starting value has been set for the
timer(s), they must be loaded into the counting
sequence before it is ready for counting. Check
the previous chapter 8.2 for more detail on how
to load the timer into the counting sequence.
+ Pressing the [S/S] button will start the counting
sequence . The Multi-Timers will starts the
cou nti ng fr om Ti m er 1 to an o the r tim ers
following the adjacent diagram. Pressing the
[S/S] button once again will stop the counting.
+ The Watch will count repeatingly unless it is
stopped by pressing the [S/S] button.
Timer Alarm Sound
+ During the counting, the Watch will beep once
when a timer counts to the last 1 and 0 second.
How to Re-load/Reset the Starting Values
+ To re-load or reset the Starting Values during
the timer is paused, perform the loading or
re setting proce ss whi ch men ti oned in the
adjacent diagram to re-load or reset the starting
Dual Time Mode
minute
hour
Setting Sequence
[S/S]
hold [M]
[M]
Increase
the number
increase
the number
at a higher
speed
[L/R]
hold [L/R]
hold [L/R]
hold
[L/R]
Reset the
Starting Values
Load the
Starting Values
Confirm
the loading
or
resetting
Abort
the loading
or
resetting
[M]
[L/R]
Timer 1*
Timer 3*
Multi-Timer Counting Sequence
The counting
is stopped
Timer 2*
Timer 4*
D
If timer 1, 2, 3 or 4 which set 0:00 as
the starting value, that timer will be
[S/S]
[S/S]
beep, beep
beep,
beep
beep,
beep
beep, beep
9.0 Dual Time Mode - Dual Time Mode
Dual Time Mode
+ This Watch includes a dual time which show
the current time of the second time zone.
+ The second digits are same as the one of
current time.
Dual Time Display
+ When the Dual Time Display is selected, the
dual time (hour, minute, second) is exhibited on
the 2nd row of the display.
Dual Time Mode
dual ti me
(seco nd)
dual ti me
(minu te)
dual ti me
(hour )
  • Page 1 1
  • Page 2 2
  • Page 3 3
  • Page 4 4
  • Page 5 5
  • Page 6 6

Pyle PS-WGM64 Owner's manual

Category
Watches
Type
Owner's manual
This manual is also suitable for

Ask a question and I''ll find the answer in the document

Finding information in a document is now easier with AI