Page is loading ...

MODEL H0610/H0611
HOSE REELS
INSTRUCTIONS
To reduce the risk of injury when using this
tool:
• Make sure the incoming air pressure
does not exceed the maximum rating
of 250 PSI. Otherwise the fittings could
crackorexplode.
• Protect your eyes by wearing safety
glassesorafaceshieldwhenmounting
andusingthishosereel.
• Pressurized air may cause injury to
exposed body parts. Never expose any
partofyourbodytopressurizedair.
• Makesurethehosereelisfirmlymounted
toastablesurfacebeforepressurizing.
Specifications
Max. Incoming Air Pressure ................... 250 PSI
Max. Hose Length on Reel for H0610 ......... 33 ft.
Max. Hose Length on Reel for H0611 ......... 50 ft.
Air Fitting Size ........................................
3
⁄8" NPT
Inventory
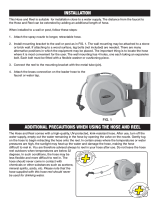
The hose reel assembly is shipped pre-assem-
bled, as shown in Figure 1.
Mounting
1. Choose a suitable location for mounting the
hose reel to a wall, floor, ceiling, etc.
— If you plan to install the hose reel on a celi-
ing, place it 10 feet above the floor.
2. Check that the hose guide roller bracket posi-
tion (see Figure 2) is suitable for the chosen
mounting position.
— If the roller bracket position is not in the
best position, refer to "Changing Hose
Roller Bracket Position" on Page2.
Figure 1. Model H0610/H0611.
Mounting Holes
(Two of Four)
3. Mark the location of the mounting holes on
the reel base (Figure 1) in the chosen loca-
tion, then secure with
1
⁄2" hardware.
4. Apply Teflon pipe tape or thread sealant to
the incoming air fitting threads and attach it
to the swivel joint (see Figure 1).
5. Apply Teflon pipe tape or thread sealant to
the outlet fitting threads, then attach the tool
or nozzle.
Figure 2. Roller bracket and main components.
Swivel Joint
Carriage Bolt,
Lock Washer,
Lock Nut
Bumper
Hose Guide
Roller
Bracket
Base
Outlet Fitting
Hose

-2-
H0610/H0611 Hose Reel
6. Turn the air pressure ON, then use soapy
water to test for leaks. If any are found, turn
the air pressure OFF, relieve the pressure
from the hose, then repair the leaks before
putting the hose reel into operation.
7. To adjust the hose bumper, pull some hose
out until it clicks in place, loosen the screws
on the bumper, slide it close to the hose
guide, then tighten the screws.
Note: The reel clicks after each half turn.
Changing Hose Roller Bracket
Position
1. To change the hose guide roller bracket
position, pull out some hose until you hear a
"click" to lock it.
2. Remove the four carriage bolts, lock wash-
ers, and lock nuts, (Figure 2) rotate the
bracket to the desired position, then re-install
the fasteners.
Operation
1. Slowly pull the hose out of the reel assembly
until you hear a "click."
2. To lock the hose, let it retract after you hear
the reel click.
3. To unlock the hose, slowly pull the hose out
until you hear no more clicking, then, while
holding onto the hose, let it draw back until
the bumper stops against the hose guide.
Adjusting Spring Tension
1. Pull about 6 feet of the hose out and lock it.
2. Remove the bumper from the hose, then
thread the hose back toward the reel and out
of the hose guide.
3. To increase tension on the hose, wrap it one
full turn around the drum; to decrease ten-
sion, unwrap the hose one full rotation.
NOTICE
To avoid damaging the hose reel, always
hold onto the hose while it is rewinding.
Replacing Hose
1. DISCONNECT THE AIR SUPPLY FROM
THE HOSE REEL!
2. Unwind the hose completely, then lock it in
place, making sure it will not rotate back-
ward.
3. Remove the two hose clamps (see Figure
3).
4. Disconnect the hose from the swivel joint,
then remove the hose through the spring and
the opening in the drum.
5. Feed the new hose through the hose guide,
and the opening in the drum, making sure to
re-position the spring, as shown in Figure 3.
6. Re-install the hose clamps, re-install the
bumper on the hose where it was previously,
release the hose and slowly allow it to wind
back onto the reel.
7. Re-adjust spring tension as needed (refer to
"Adjusting Spring Tension."
Figure 3. Hose clamps (inward clamp not
shown).
Outer Hose
Clamp
Inner Hose
Clamp
Swivel Joint
Spring
Drum Opening
4. Re-insert the hose through the guide, then
re-install the bumper on the hose.
5. Unlock the hose and check the tension.
Adjust the position of the bumper if needed.

H0610/H0611 Hose Reel
-3-
Model H0610/H0611 Breakdown
1
2
3
4
5
6
7
8
9
10
11
12
13
14
15
16
17
18
19
20
21
21
22
22
23
24
25
26
27
28
29
30
31
31
32
33
34
35
36
37
38
39
40
41
42
46
47
48
49
50
51
52
53
54
55
56
57
58
59
59
60
61
62
63
64
65

-4-
H0610/H0611 Hose Reel
COPYRIGHT © OCTOBER, 2009 BY GRIzzLY INDUSTRIAL, INC.
WARNING: NO PORTION OF THIS MANUAL MAY BE REPRODUCED IN ANY SHAPE
OR FORM WITHOUT THE WRITTEN APPROVAL OF GRIZZLY INDUSTRIAL, INC.
#BL12255 PRINTED IN CHINA
If you need help with your new hose reel, call our Tech Support at: (570) 546-9663.
Model H0610/H0611 Parts List
REF PART # DESCRIPTION REF PART # DESCRIPTION
1 PH0610001 COIL SPRING 33 PN06M HEX NUT M5-.8
2 PH0610002 OUTER SPRING DRUM 34 PCB26M CARRIAGE BOLT M6-1 X 40
3 PH0610003 INNER SPRING DRUM 35 PN01M HEX NUT M6-1
4 PH0610004 SPRINGSIDE DRUM 36 PSS73M SET SCREW M10-1.5 X 30
5 PH0610005 OUTER DRUM 37 PH0610037 SPACER WASHER 25.5 X 2.5MM
6 PH0610006 BASE 38 PLW10M LOCK WASHER 16MM
7 PH0610007 ARM 39 PN13M HEX NUT M16-2
8 PH0610008 GUIDE PLATE 40 PCB33M CARRIAGE BOLT M8-1.25 X 18
9 PH0610009 GUIDE SUB PLATE 41 PLW04M LOCK WASHER 8MM
10 PH0610010 AXLE 42 PLN04M LOCK NUT M8-1.25
11 PH0610011 TOOTHED LOCKING RING 46 PB85M HEX BOLT M8-1.25 X 18
12 PH0610012 ASSEMBLY HUB BEARING 47 PLW04M LOCK WASHER 8MM
13 PH0610013 SPRING CORE 48 PLN04M LOCK NUT M8-1.25
14 PH0610014 SHOULDER BOLT M10-1.5 X 35 49 PS09M PHLP HD SCR M5-.8 X 10
15 PH0610015 LOCKING CAM 50 PN06M HEX NUT M5-.8
16 PH0610016 SPRING DOG 51 PH0610051 PLASTIC ROLLER 19 X 36MM
17 PH0610017 SPACER WASHER 13.45 X 1.6MM 52 PH0610052 ROLLER AXLE 6 X 50MM
18 PH0610018 SPACER WASHER 13.5 X 6.6MM 53 PH0610053 HOSE GUARD
19 PLW06M LOCK WASHER 10MM 54 PH0611054 HOSE 3/8 IN X 50 FT
20 PN02M HEX NUT M10-1.5 54 PH0610054 HOSE 3/8 IN X 33 FT
21 PN06M HEX NUT M5-.8 55 PH0610055 RUBBER BUMPER
22 PH0610022 HOSE CLAMP 56 PS47M PHLP HD SCR M6-1 X 25
23 PS09M PHLP HD SCR M5-.8 X 10 57 PN01M HEX NUT M6-1
24 PH0610024 VALVE CORE 58 PH0610058 HOSE END COVER
24 PH0611024 VALVE CORE 59 PH0610059 VALVE COVER
25 PH0610025 O-RING 15.54 X 3.53 60 PH0610060 CAUTION LABEL
26 PH0610026 VALVE 61 PH0610061 H0610 MODEL # LABEL
27 PR06M EXT RETAINING RING 16MM 61 PH0611061 H0611 MODEL # LABEL
28 PR08M EXT RETAINING RING 19MM 62 PH0610062 HOSE ROTATION LABEL
29 PH0610029 SPACER WASHER 19.5 X 1.5MM 63 PH0610063 WARNING LABEL
30 PH0610030 SPACER WASHER 25.5 X 1.5MM 64 PH0610064 WOOD PLATE
31 PN06M HEX NUT M5-.8 65 PH0610065 CONNECTOR HOSE 3/8 IN.
32 PH0610032 DBL END THREAD AXLE M5 X 53MM
Parts information is provided for
service purposes only. Not all
parts are available for purchase.
/