Page is loading ...

ROUGH SERVICE PRODUCTS
GROUNDING NOTE These fixtures must be grounded in accordance with NEC and applicable
local codes and ordinances.
WARNING Recheck to be sure the proper fixture voltage lead has been selected to match the
supply voltage. Improper wiring may result in ballast failure and voids all warranties.
CAUTION Observe lamp manufacturer’s recommendations/restrictions on lamp operations,
ballast type, burning position, etc.
NOTE: To maintain optimum performance, periodically clean optical.
WARNING: NEVER perform maintenance or cleaning while fixture is energized.
TROUBLESHOOTING
If this fixture fails to operate properly, check to make sure:
•The correct lamp is installed. • The fixture is wired correctly.
•The lamp is not faulty. • The fixture is grounded correctly
•The line voltage at the fixture is proper.
If all these variables have been checked and the fixture still does not operate properly, contact
your local Lithonia Lighting distributor.
SAVE THESE INSTRUCTIONS
• This device must be wired in accordance
with the National Electrical Code and
applicable local codes and ordinances.
• Proper grounding is required to ensure
personal safety.
• Use approved connectors for all electrical
connections.
• ALL work should be done by a qualified
electrician.
• WARNING: NEVER disconnect any
component while power supply is engaged.
Be certain that all potential power sources
are disconnected.
IMPORTANT SAFETY
INSTRUCTIONS
(For Your Protection, Read Carefully)
Prior to Installation
Read carefully before installing light fixtures. If you do not understand these instructions,
please contact your local Lithonia distributor before installing.
Upon receipt of fixture and accessories
(packed separately) thoroughly inspect for
any freight damage which should be brought
to the attention of the delivery carrier.
Compare the catalog description listed on the
packing slip with the fixture label on the side
of the inside of the unit to be sure you have
received the correct merchandise.
INSTALLATION
INSTRUCTIONS
VGR1C Series
VGR2C Series
© 1999 Lithonia Lighting, 02/00
AJ520062
VGRCF.p65
GAGA
GAGA
GATEWTEW
TEWTEW
TEWAA
AA
AYY
YY
Y™
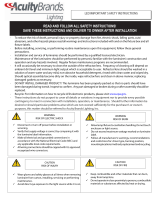
Pad
Gasket
(4) Mounting
Holes
Ballast
VGR2C BEZEL/LENS VGR1C BEZEL/LENS
Component
Cover
Set (2)
Screws
See NOTE #3
INSTALLATION: Gateway VGRC Series
1. Remove hex head shipping screws (2) to free bezel/lens assembly from housing.
(Discard screws).
2. Remove component cover by removing (2) screws.
3. For maximum vandal resistance, use (4) mounting holes provided. Use 9/32” drill
to clear mounting holes. May be mounted over outlet box or used with surface
conduit wire entry. NOTE:
150ºC wire must be used at 150º surface conduit entry
port as labeled.
Remove backing from pad gasket provided and place on back
square portion of housing. Place (4) small circular gaskets on mounting bosses.
4. Replace component cover and install appropriate lamp(s).
5. Start set screws (2 from bag assembly) into bezel with T-10 torx-head screwdriver.
6. Insert tab on bezel into slot on housing. CAUTION: For ceiling mount, support
bezel/lens when installing/removing. Apply forward pressure to bezel and turn set
screws until they enter retaining inserts in casting. Finish tightening set screws
until they are flush with bezel. NOTE: Do not over tighten or set screws may strip.
Housing
DISCONTINUED
/