Page is loading ...

Series 1000 Fuel Management System
Installation Manual
MDE-4344A
(formerly C08922)

Computer Programs and Documentation
All Gasboy computer programs (including software on diskettes and within memory chips) and documentation are copyrighted by, and shall remain the property of, Gasboy. Such
computer programs and documents may also contain trade secret information. The duplication, disclosure, modification, or unauthorized use of computer programs or
documentation is strictly prohibited, unless otherwise licensed by Gasboy.
Federal Communications Commission (FCC) Warning
This equipment has been tested and found to comply with the limits for a Class A digital device pursuant to Part 15 of the FCC Rules. These limits are designed to provide
reasonable protection against harmful interference when the equipment is operated in a commercial environment. This equipment generates, uses, and can radiate radio frequency
energy, and if not installed and used in accordance with the instruction manual, may cause harmful interference to radio communications. Operation of this equipment in a
residential area is likely to cause harmful interference in which case the user will be required to correct the interference at his own expense. Changes or modifications not expressly
approved by the manufacturer could void the user’s authority to operate this equipment.
Approvals
Patents
Gasboy products are manufactured or sold under one or more of the following US patents:
Dispensers
Point of Sale/Back Office Equipment
Trademarks
5,257,720
D335,673
Gasboy, Greensboro, is an ISO 9001:2000 registered facility.
Underwriters Laboratories (UL):
UL File# Products listed with UL
MH4314 All dispensers and self-contained pumping
units
MH6418 Power operated Transfer Pump Models 25,
25C, 26, 27, 28, 72, 72S, 72SP, 72X, 73 and
1820
MH7404 Hand operated Transfer Pump Models 1230
Series, 1243 Series, 1520 and 1720 Series
MH10581 Key control unit, Model GKE-B Series
Card reader terminals, Models 1000, 1000P
Site controller, Model 2000S CFN Series
Data entry terminals, Model TPK-900 Series
Fuel Point Reader System
National Conference of Weights and Measures (NCWM) - Certificate of Compliance (CoC):
Gasboy pumps and dispensers are evaluated by NCWM under the National Type Evaluation Program (NTEP). NCWM has issued the following CoC:
CoC# Product Model # CoC# Product Model # CoC# Product Model #
95-179 Dispenser 9100 Retail Series, 8700
Series, 9700 Series 91-019 Dispenser 9100 Commercial
Series 05-002 Atlas 8700K, 8800K,
9100K, 9200K, 9800K
95-136 Dispenser 9800 Series 91-057 Controller 1000 Series FMS,
2000S-CFN Series
New York City Fire Department (NYFD):
NYFD C of A # Product
4823 9100A, 9140A, 9152A, 9153A,
9800A, 9840A, 9850A, 9852A,
9853A, 9140
4997 9822A, 9823A
5046 9100Q, 9140Q, 9152Q, 9153Q,
9800Q, 9840Q, 9852Q, 9853Q
5087 8753K, 8853K, 9153K, 9853K
(restricted to diesel and non-
retail gasoline sales)
5091 8752K, 9152K
5129 9122K, 9123K, 9822K, 9823K
California Air Resources Board (CARB):
Executive Order # Product
G-70-52-AM Balance Vapor Recovery
G-70-150-AE VaporVac
Registered trademarks
ASTRA®
Fuel Point®
Gasboy®
Keytrol®
Slimline®
Additional US and foreign trademarks pending.
Other brand or product names shown may be
trademarks or registered trademarks of their
respective holders.
Non-registered trademarks
Atlas™
Consola™
Infinity™
This document is subject to change without notice. · For information regarding Gasboy Literature, call (336) 547-5661
E-mail: [email protected] · Internet: http://www.gasboy.com
© 2008 GASBOY · All Rights Reserved
Additional US and foreign patents pending.

MDE-4344A Series 1000 Fuel Management System Installation Manual · November 2008 Page i
Table of Contents
1 – Introduction 1
Purpose. . . . . . . . . . . . . . . . . . . . . . . . . . . . . . . . . . . . . . . . . . . . . . . . . . . . . . . . . . . . . . . . . . . . . . . . . .1
Abbreviations and Acronyms. . . . . . . . . . . . . . . . . . . . . . . . . . . . . . . . . . . . . . . . . . . . . . . . . . . . . . . . . .1
Hardware Description . . . . . . . . . . . . . . . . . . . . . . . . . . . . . . . . . . . . . . . . . . . . . . . . . . . . . . . . . . . . . . .1
Rules for Proper Installation . . . . . . . . . . . . . . . . . . . . . . . . . . . . . . . . . . . . . . . . . . . . . . . . . . . . . . . . . .3
Warranty . . . . . . . . . . . . . . . . . . . . . . . . . . . . . . . . . . . . . . . . . . . . . . . . . . . . . . . . . . . . . . . . . . . . . . . . .3
2 – Important Safety Information 5
3 – System Layout 9
Component Location . . . . . . . . . . . . . . . . . . . . . . . . . . . . . . . . . . . . . . . . . . . . . . . . . . . . . . . . . . . . . . . .9
System . . . . . . . . . . . . . . . . . . . . . . . . . . . . . . . . . . . . . . . . . . . . . . . . . . . .9
Data Terminal. . . . . . . . . . . . . . . . . . . . . . . . . . . . . . . . . . . . . . . . . . . . . . .9
External Modems . . . . . . . . . . . . . . . . . . . . . . . . . . . . . . . . . . . . . . . . . . . .9
Power Conditioner . . . . . . . . . . . . . . . . . . . . . . . . . . . . . . . . . . . . . . . . . . .9
Voltage Regulator/Backup Power Supply . . . . . . . . . . . . . . . . . . . . . . . .10
System Dimensions - Standard Unit . . . . . . . . . . . . . . . . . . . . . . . . . . . . . . . . . . . . . . . . . . . . . . . . . . .11
System Dimensions - Unit with Receipt Printer. . . . . . . . . . . . . . . . . . . . . . . . . . . . . . . . . . . . . . . . . . .12
Conduit Layout . . . . . . . . . . . . . . . . . . . . . . . . . . . . . . . . . . . . . . . . . . . . . . . . . . . . . . . . . . . . . . . . . . .13
Conduit Layout/Installation Specifications . . . . . . . . . . . . . . . . . . . . . . . .14
Conduit Requirements . . . . . . . . . . . . . . . . . . . . . . . . . . . . . . . . . . . . . . .14
4 – System and Pump/Dispenser Wiring 17
Wiring Precautions . . . . . . . . . . . . . . . . . . . . . . . . . . . . . . . . . . . . . . . . . . . . . . . . . . . . . . . . . . . . . . . .17
Power Requirements. . . . . . . . . . . . . . . . . . . . . . . . . . . . . . . . . . . . . . . . . . . . . . . . . . . . . . . . . . . . . . .18
System/Peripheral Equipment . . . . . . . . . . . . . . . . . . . . . . . . . . . . . . . . .18
Suction Pumps. . . . . . . . . . . . . . . . . . . . . . . . . . . . . . . . . . . . . . . . . . . . .18
Dispensers . . . . . . . . . . . . . . . . . . . . . . . . . . . . . . . . . . . . . . . . . . . . . . . .18
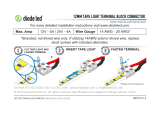
Terminal Block ID . . . . . . . . . . . . . . . . . . . . . . . . . . . . . . . . . . . . . . . . . . . . . . . . . . . . . . . . . . . . . . . . .18
Terminal Block ID Diagram . . . . . . . . . . . . . . . . . . . . . . . . . . . . . . . . . . .19
Wire Size. . . . . . . . . . . . . . . . . . . . . . . . . . . . . . . . . . . . . . . . . . . . . . . . . . . . . . . . . . . . . . . . . . . . . . . .20
Control Lines for Mechanical Pumps/Dispensers . . . . . . . . . . . . . . . . . . . . . . . . . . . . . . . . . . . . . . . . .21
Grounding . . . . . . . . . . . . . . . . . . . . . . . . . . . . . . . . . . . . . . . . . . . . . . . .21
Reset Motor Feed . . . . . . . . . . . . . . . . . . . . . . . . . . . . . . . . . . . . . . . . . .21
Pump Motor Feed . . . . . . . . . . . . . . . . . . . . . . . . . . . . . . . . . . . . . . . . . .22
Neutral Feed . . . . . . . . . . . . . . . . . . . . . . . . . . . . . . . . . . . . . . . . . . . . . .22
Submersible Feed, Submersible Drive. . . . . . . . . . . . . . . . . . . . . . . . . . .22
Reset Complete (Switch Detect) . . . . . . . . . . . . . . . . . . . . . . . . . . . . . . .22
Light Feed . . . . . . . . . . . . . . . . . . . . . . . . . . . . . . . . . . . . . . . . . . . . . . . .22
Light Neutral. . . . . . . . . . . . . . . . . . . . . . . . . . . . . . . . . . . . . . . . . . . . . . .22
Phase 2 Feed. . . . . . . . . . . . . . . . . . . . . . . . . . . . . . . . . . . . . . . . . . . . . .23
Pulser. . . . . . . . . . . . . . . . . . . . . . . . . . . . . . . . . . . . . . . . . . . . . . . . . . . .23
Control Lines for Gasboy 9800 or 9820 Electronic Pumps/Dispensers. . . . . . . . . . . . . . . . . . . . . . . . .23
Ground. . . . . . . . . . . . . . . . . . . . . . . . . . . . . . . . . . . . . . . . . . . . . . . . . . .23
Micro Feed . . . . . . . . . . . . . . . . . . . . . . . . . . . . . . . . . . . . . . . . . . . . . . . .23
Micro Neutral . . . . . . . . . . . . . . . . . . . . . . . . . . . . . . . . . . . . . . . . . . . . . .23
External Valve . . . . . . . . . . . . . . . . . . . . . . . . . . . . . . . . . . . . . . . . . . . . .24
Control/Pump Motor Feed . . . . . . . . . . . . . . . . . . . . . . . . . . . . . . . . . . . .24
Neutral Feed . . . . . . . . . . . . . . . . . . . . . . . . . . . . . . . . . . . . . . . . . . . . . .24

Page ii MDE-4344A Series 1000 Fuel Management System Installation Manual · November 2008
Control/Submersible Feed (Control/Subm Feed) . . . . . . . . . . . . . . . . . . 24
Submersible Starter Drive (Subm Starter Drive). . . . . . . . . . . . . . . . . . . 25
Submersible Drive (Subm Drive). . . . . . . . . . . . . . . . . . . . . . . . . . . . . . . 26
Reset Complete (Switch Detect)/Slow Flow . . . . . . . . . . . . . . . . . . . . . . 26
Fast Flow. . . . . . . . . . . . . . . . . . . . . . . . . . . . . . . . . . . . . . . . . . . . . . . . . 26
Phase 2 Feed . . . . . . . . . . . . . . . . . . . . . . . . . . . . . . . . . . . . . . . . . . . . . 26
Slow/Fast Satellite Returns. . . . . . . . . . . . . . . . . . . . . . . . . . . . . . . . . . . 26
Light Feed. . . . . . . . . . . . . . . . . . . . . . . . . . . . . . . . . . . . . . . . . . . . . . . . 26
Light Neutral . . . . . . . . . . . . . . . . . . . . . . . . . . . . . . . . . . . . . . . . . . . . . . 26
Pulser . . . . . . . . . . . . . . . . . . . . . . . . . . . . . . . . . . . . . . . . . . . . . . . . . . . 27
Pulser Wiring Diagrams . . . . . . . . . . . . . . . . . . . . . . . . . . . . . . . . . . . . . . . . . . . . . . . . . . . . . . . . . . . . 28
Pulser Wiring Notes . . . . . . . . . . . . . . . . . . . . . . . . . . . . . . . . . . . . . . . . 29
Single Suction Pump 115 VAC/230 VAC, V-R Reset. . . . . . . . . . . . . . . . . . . . . . . . . . . . . . . . . . . . . . 30
Twin Suction Pump 115 VAC/230 VAC, V-R Reset. . . . . . . . . . . . . . . . . . . . . . . . . . . . . . . . . . . . . . . 31
Twin Suction Pump, Single Motor 115 VAC/230 VAC, V-R Reset. . . . . . . . . . . . . . . . . . . . . . . . . . . . 32
Single Dispenser, V-R Reset . . . . . . . . . . . . . . . . . . . . . . . . . . . . . . . . . . . . . . . . . . . . . . . . . . . . . . . . 33
Twin Dispenser, V-R Reset . . . . . . . . . . . . . . . . . . . . . . . . . . . . . . . . . . . . . . . . . . . . . . . . . . . . . . . . . 34
Single Suction Pump 115 VAC/230 VAC, Gasboy Reset. . . . . . . . . . . . . . . . . . . . . . . . . . . . . . . . . . . 35
Twin Suction Pump 115 VAC/230 VAC, Gasboy Reset. . . . . . . . . . . . . . . . . . . . . . . . . . . . . . . . . . . . 36
Twin Suction Pump, Single Motor 115 VAC/230 VAC, Gasboy Reset. . . . . . . . . . . . . . . . . . . . . . . . . 37
Single Dispenser, Gasboy Reset . . . . . . . . . . . . . . . . . . . . . . . . . . . . . . . . . . . . . . . . . . . . . . . . . . . . . 38
Twin Dispenser, Gasboy Reset . . . . . . . . . . . . . . . . . . . . . . . . . . . . . . . . . . . . . . . . . . . . . . . . . . . . . . 39
9850A, 9852Q, 9853Q Pumps . . . . . . . . . . . . . . . . . . . . . . . . . . . . . . . . . . . . . . . . . . . . . . . . . . . . . . . 40
9852QTW2, 9853QTW2, 9853QTW1M Pumps . . . . . . . . . . . . . . . . . . . . . . . . . . . . . . . . . . . . . . . . . . 41
9853AHC, 9840Q Pumps. . . . . . . . . . . . . . . . . . . . . . . . . . . . . . . . . . . . . . . . . . . . . . . . . . . . . . . . . . . 42
9852QTW1 Pump. . . . . . . . . . . . . . . . . . . . . . . . . . . . . . . . . . . . . . . . . . . . . . . . . . . . . . . . . . . . . . . . . 43
9852QX, 9853QX, 9840QX, 9850AX, 9850AXS Dispensers. . . . . . . . . . . . . . . . . . . . . . . . . . . . . . . . 44
9850AXTW1, 9850AXTW2, 9852QXTW1, 9852QXTW2, 9853QXTW1, 9853QXTW2 Dispensers. . . 45
9820, 115/230 VAC Domestic Dispensers . . . . . . . . . . . . . . . . . . . . . . . . . . . . . . . . . . . . . . . . . . . . . . 47
9820, 230 VAC International Dispensers . . . . . . . . . . . . . . . . . . . . . . . . . . . . . . . . . . . . . . . . . . . . . . . 48
Gasboy Gate System Control Wiring . . . . . . . . . . . . . . . . . . . . . . . . . . . . . . . . . . . . . . . . . . . . . . . . . . 49
5 – Communication Wiring 51
Requirements. . . . . . . . . . . . . . . . . . . . . . . . . . . . . . . . . . . . . . . . . . . . . . . . . . . . . . . . . . . . . . . . . . . . 51
Installation Notes . . . . . . . . . . . . . . . . . . . . . . . . . . . . . . . . . . . . . . . . . . . . . . . . . . . . . . . . . . . . . . . . . 51
Cables . . . . . . . . . . . . . . . . . . . . . . . . . . . . . . . . . . . . . . . . . . . . . . . . . . . . . . . . . . . . . . . . . . . . . . . . . 52
RS-232 Termination Box. . . . . . . . . . . . . . . . . . . . . . . . . . . . . . . . . . . . . 52
EIA 1:1 Cable . . . . . . . . . . . . . . . . . . . . . . . . . . . . . . . . . . . . . . . . . . . . . 53
Modem Cable . . . . . . . . . . . . . . . . . . . . . . . . . . . . . . . . . . . . . . . . . . . . . 53
RS-232 Cable Assembly. . . . . . . . . . . . . . . . . . . . . . . . . . . . . . . . . . . . . 54
Field Wiring Schemes for Ports 1 and 2. . . . . . . . . . . . . . . . . . . . . . . . . . . . . . . . . . . . . . . . . . . . . . . . 54
Auxiliary Port Wiring. . . . . . . . . . . . . . . . . . . . . . . . . . . . . . . . . . . . . . . . . . . . . . . . . . . . . . . . . . . . . . . 56
Wiring for Link CRT Terminal and Okidata Printer. . . . . . . . . . . . . . . . . . . . . . . . . . . . . . . . . . . . . . . . 57
Internal Modem. . . . . . . . . . . . . . . . . . . . . . . . . . . . . . . . . . . . . . . . . . . . . . . . . . . . . . . . . . . . . . . . . . . 57
Short Haul Modem - RS-422 . . . . . . . . . . . . . . . . . . . . . . . . . . . . . . . . . . . . . . . . . . . . . . . . . . . . . . . . 58
Installation Requirements . . . . . . . . . . . . . . . . . . . . . . . . . . . . . . . . . . . . 58
Shared Printer Switch. . . . . . . . . . . . . . . . . . . . . . . . . . . . . . . . . . . . . . . . . . . . . . . . . . . . . . . . . . . . . . 59
SPS Connections . . . . . . . . . . . . . . . . . . . . . . . . . . . . . . . . . . . . . . . . . . . . . . . . . . . . . . . . . . . . . . . . . 59
SPS Cabling. . . . . . . . . . . . . . . . . . . . . . . . . . . . . . . . . . . . . . . . . . . . . . . . . . . . . . . . . . . . . . . . . . . . . 60
6 – Testing 63
Completion Checklist . . . . . . . . . . . . . . . . . . . . . . . . . . . . . . . . . . . . . . . . . . . . . . . . . . . . . . . . . . . . . . 63
Manual Override Test. . . . . . . . . . . . . . . . . . . . . . . . . . . . . . . . . . . . . . . . . . . . . . . . . . . . . . . . . . . . . . 64

MDE-4344A Series 1000 Fuel Management System Installation Manual · November 2008 Page 1
Purpose Introduction
1 – Introduction
Purpose
The Gasboy® Series 1000 Installation Manual is provided to assist you in installing your Series
1000 System. This manual should be supplied to the electrician prior to the installation of
conduit and wiring to ensure your Series 1000 System is installed properly. Faulty installations
are the major cause of system malfunctions. The Series 1000 system must be installed exactly
as described in this manual to ensure its reliability and proper operation.
Note: Gasboy provides a toll-free number for customers and installers having questions
pertaining to the installation: 1-800-444-5529.
Abbreviations and Acronyms
Term Description
CFN Cash Flow Network
CRT Cathode Ray Tube
EIA Electronics Industrial Association
LCD Liquid Crystal Display
PCB Printer Circuit Board
PIN Personal Identification Number
SPS Shared Printer Switch
UL®Underwriters Laboratories
Hardware Description
The Gasboy Series 1000 Fuel Management System is a microprocessor-based fuel control and
data acquisition system. It is available in three types:
• Card - where access to the system is controlled by magnetic or optical cards.
• Cardless - where access to the system is attained by entering a valid vehicle number.
• FleetKey - where access to the system is controlled by encoded data keys.
The system is totally self-contained in an attractive, weatherized cabinet and pedestal
assembly. The system is Underwriter’s Laboratories (UL) and FCC-Listed, and is designed to
be located on the fueling island convenient to the user.

Introduction Hardware Description
Page 2 MDE-4344A Series 1000 Fuel Management System Installation Manual · November 2008
The cabinet head measures approximately 15” W x 12” H x 20” D and is mounted on top of
the 48” high pedestal. The cabinet face is protected by a clear acrylic shield for weather
protection. A combination of side extensions and top overhang reduces sun glare, and a
fluorescent light provides lighting for around-the-clock user operation. Visual prompting
messages, displayed on an eye-level 20-character Liquid Crystal Display (LCD), guide the
user through the steps required to operate the system. A list of operating instructions is also
printed on the cabinet face for reference.
A 12-position membrane keypad, containing the keys 0-9, CLEAR and ENTER, is provided
on the center of the face for entering data (for example, personal identification number (PIN),
odometer readings, pump selections, and so on). All entries, except PIN, are displayed on the
LCD for verification. The card-activated system is equipped with a mag stripe insertion
reader. The FleetKey system is equipped with one or two key receptacles. A red stop button on
the cabinet face allows the dispensing equipment to be shut down quickly in case of
emergency.
The rear of the cabinet is a hinged door secured with a lock to prohibit unauthorized access.
The one-piece hood can be removed for total accessibility during servicing. Servicing is
facilitated by interior LED indicators which help diagnose system problems.
Solid state relays and manual override switches, which control power to the fuel dispensing
equipment, are located in the pedestal. If ordered, an optional, high-speed bi-directional serial
impact receipt printer is also housed within the pedestal. The wiring for all equipment
connected to the Series 1000 is terminated in the pedestal. The standard Series 1000 System
controls two hose outlets, and can be expanded in two hose increments to control a maximum
of eight hoses. The unit can be expanded in the field. The system can handle pulsing rates of
dollar (penny per pulse) or quantity (1, 10, 100, 250, 500, or 1000 pulses per unit of product).
The pulse rate selection switch is located in an area sealable by Weights and Measures for
retail applications.
The Series 1000 System contains two asynchronous ports for terminal and/or computer
communications. An optional auxiliary port PCB (two ports) is available for tank monitor
interfacing. The ports can be set for either RS-232 or RS-422 communications to meet
individual requirements.
A CRT or data terminal with an ASCII character set, or a computer with the proper interface,
is required to communicate with the Series 1000. The data terminal (or computer) is connected
to the system through one of the two asynchronous communication ports located in the system
cabinet. A tank monitor may be connected to the system through the optional auxiliary
asynchronous communication port which would also be located in the system cabinet.
Communication is through direct wire, or by dial-up phone lines using an optional built-in
modem. Refer to “Communication Wiring” on page 51 for specific communications
requirements and distance limitations.

MDE-4344A Series 1000 Fuel Management System Installation Manual · November 2008 Page 3
Rules for Proper Installation Introduction
Rules for Proper Installation
For proper installation, proceed as follows:
• Please read this entire manual before starting installation.
• All wiring is to be installed and used in accordance with local building/fire codes, all
Federal, State, and Local codes, the National Electrical Code (NFPA 70), NFPA 30, and
the Automotive and Marine Service Station Code (NFPA 30A) codes and regulations.
Canadian users must also comply with the Canadian Electrical Code.
• All wiring must be in threaded, rigid, metal conduit to provide the necessary shielding. Do
not use PVC conduit.
• High-voltage (AC) and low-voltage (DC) must not be combined in a common conduit,
junction box, or wire trough unless cable is used as specified in “System and Pump/
Dispenser Wiring” on page 17 or “Communication Wiring” on page 51.
• Power for the Series 1000 System, data terminal, and external modem must come from a
separate, dedicated, circuit breaker.
• Properly ground the Series 1000 System and peripheral equipment.
• Use terminal connectors on stranded wire.
• Test pumps in the manual override position prior to system start-up.
• Do not turn on the system power switch located in the head assembly. Power will be
applied to the system by the person performing the system start-up.
Turning on this switch prematurely may result in damage to the system and may void your
warranty.
WARNING
• Check through all boxes and cartons before disposing of them for manuals, cables,
connectors, and so on.
Warranty
For information on warranty, refer to MDE-4255 Gasboy’s Warranty Policy Statement. If you
have any warranty-related questions, contact Gasboy’s Warranty Department at its
Greensboro location.

Introduction Warranty
Page 4 MDE-4344A Series 1000 Fuel Management System Installation Manual · November 2008
This page is intentionally left blank.

MDE-4344A Series 1000 Fuel Management System Installation Manual · November 2008 Page 5
2 – Important Safety Information
This section introduces the hazards and safety precautions
associated with installing, inspecting, maintaining or servicing
this product. Before performing any task on this product, read
this safety information and the applicable sections in this
manual, where additional hazards and safety precautions for
your task will be found. Fire, explosion, electrical shock or
pressure release could occur and cause death or serious
injury, if these safe service procedures are not followed.
Preliminary Precautions
You are working in a potentially dangerous environment of
flammable fuels, vapors, and high voltage or pressures. Only
trained or authorized individuals knowledgeable in the related
procedures should install, inspect, maintain or service this
equipment.
Emergency Total Electrical Shut-Off
The first and most important information you must know is
how to stop all fuel flow to the pump/dispenser and island.
Locate the switch or circuit breakers that shut off all power to
all fueling equipment, dispensing devices, and Submerged
Turbine Pumps (STPs).
The EMERGENCY STOP, ALL STOP, and
PUMP STOP buttons at the cashier’s station
WILL NOT shut off electrical power to the pump/
dispenser. This means that even if you activate
these stops, fuel may continue to flow
uncontrolled.
You must use the TOTAL ELECTRICAL SHUT-
OFF in the case of an emergency and not the
console’s ALL STOP and PUMP STOP or
similar keys.
!
WARNING
!
Total Electrical Shut-Off Before Access
Any procedure that requires access to electrical components
or the electronics of the dispenser requires total electrical
shut off of that unit. Understand the function and location of
this switch or circuit breaker before inspecting, installing,
maintaining, or servicing Gasboy equipment.
Evacuating, Barricading and Shutting Off
Any procedure that requires access to the pump/dispenser or
STPs requires the following actions:
• An evacuation of all unauthorized persons and vehicles
from the work area
• Use of safety tape, cones or barricades at the affected
unit (s)
• A total electrical shut-off of the affected unit (s)
Read the Manual
Read, understand and follow this manual and any other
labels or related materials supplied with this equipment. If you
do not understand a procedure, call a Gasboy Authorized
Service Contractor or call the Gasboy Service Center at 1-
800-444-5529. It is imperative to your safety and the safety of
others to understand the procedures before beginning work.
Follow the Regulations
Applicable information is available in National Fire Protection
Association (NFPA) 30A; Code for Motor Fuel Dispensing
Facilities and Repair Garages, NFPA 70; National Electrical
Code (NEC), Occupational Safety and Hazard Association
(OSHA) regulations and federal, state, and local codes. All
these regulations must be followed. Failure to install, inspect,
maintain or service this equipment in accordance with these
codes, regulations and standards may lead to legal citations
with penalties or affect the safe use and operation of the
equipment.
Replacement Parts
Use only genuine Gasboy replacement parts and retrofit kits
on your pump/dispenser. Using parts other than genuine
Gasboy replacement parts could create a safety hazard and
violate local regulations.
Safety Symbols and Warning Words
This section provides important information about warning
symbols and boxes.
Alert Symbol
This safety alert symbol is used in this manual and
on warning labels to alert you to a precaution which must be
followed to prevent potential personal safety hazards. Obey
safety directives that follow this symbol to avoid possible
injury or death.
Signal Words
These signal words used in this manual and on warning
labels tell you the seriousness of particular safety hazards.
The precautions below must be followed to prevent death,
injury or damage to the equipment:
DANGER: Alerts you to a hazard or unsafe practice
which will result in death or serious injury.
WARNING: Alerts you to a hazard or unsafe practice
that could result in death or serious injury.
CAUTION with Alert symbol: Designates a hazard or
unsafe practice which may result in minor injury.
CAUTION without Alert symbol: Designates a hazard
or unsafe practice which may result in property or
equipment damage
Working With Fuels and Electrical Energy
Prevent Explosions and Fires
Fuels and their vapors will explode or burn, if ignited. Spilled
or leaking fuels cause vapors. Even filling customer tanks will
cause potentially dangerous vapors in the vicinity of the
dispenser or island.
!
!
!

Page 6 MDE-4344A Series 1000 Fuel Management System Installation Manual · November 2008
No Open Fire
Open flames from matches, lighters, welding torches
or other sources can ignite fuels and their vapors.
No Sparks - No Smoking
Sparks from starting vehicles, starting or using power tools,
burning cigarettes, cigars or pipes can also ignite fuels and
their vapors. Static electricity, including an electrostatic
charge on your body, can cause a spark sufficient to ignite
fuel vapors. Every time you get out of a vehicle, touch the
metal of your vehicle, to discharge any electrostatic charge
before you approach the dispenser island.
Working Alone
It is highly recommended that someone who is capable of
rendering first aid be present during servicing. Familiarize
yourself with Cardiopulmonary Resuscitation (CPR) methods,
if you work with or around high voltages. This information is
available from the American Red Cross. Always advise the
station personnel about where you will be working, and
caution them not to activate power while you are working on
the equipment. Use the OSHA Lockout/ Tagout procedures. If
you are not familiar with this requirement, refer to this
information in the service manual and OSHA documentation.
Working With Electricity Safely
Ensure that you use safe and established practices in working
with electrical devices. Poorly wired devices may cause a fire,
explosion or electrical shock. Ensure that grounding
connections are properly made. Take care that sealing
devices and compounds are in place. Ensure that you do not
pinch wires when replacing covers. Follow OSHA Lockout/
Tagout requirements. Station employees and service
contractors need to understand and comply with this program
completely to ensure safety while the equipment is down.
Hazardous Materials
Some materials present inside electronic enclosures may
present a health hazard if not handled correctly. Ensure that
you clean hands after handling equipment. Do not place any
equipment in the mouth.
The pump/dispenser contains a chemical known to the
State of California to cause cancer.
WARNING
!
The pump/dispenser contains a chemical known to the
State of California to cause birth defects or other
reproductive harm.
WARNING
!
In an Emergency
Inform Emergency Personnel
Compile the following information and inform emergency
personnel:
• Location of accident (for example, address, front/back of
building, and so on)
• Nature of accident (for example, possible heart attack, run
over by car, burns, and so on)
• Age of victim (for example, baby, teenager, middle-age,
elderly)
• Whether or not victim has received first aid (for example,
stopped bleeding by pressure, and so on)
• Whether or not a victim has vomited (for example, if
swallowed or inhaled something, and so on)
Gasoline ingested may cause unconsciousness
and burns to internal organs.
Do not induce vomiting.
Keep airway open.
Oxygen may be needed at scene.
Seek medical advice immediately.
WARNING
!
Gasoline inhaled may cause unconsciousness
and burns to lips, mouth and lungs.
Keep airway open.
Seek medical advice immediately.
WARNING
!
Gasoline spilled in eyes may cause burns to eye
tissue.
Irrigate eyes with water for approximately 15
minutes.
Seek medical advice immediately.
!
WARNING
!
Gasoline spilled on skin may cause burns.
Wash area thoroughly with clear water.
Seek medical advice immediately.
WARNING
!
IMPORTANT: Oxygen may be needed at scene if gasoline
has been ingested or inhaled. Seek medical advice
immediately.
Lockout/Tagout
Lockout/Tagout covers servicing and maintenance of
machines and equipment in which the unexpected
energization or start-up of the machine(s) or equipment or
release of stored energy could cause injury to employees or
personnel. Lockout/Tagout applies to all mechanical,
hydraulic, chemical or other energy, but does not cover
electrical hazards. Subpart S of 29 CFR Part 1910 - Electrical
Hazards, 29 CFR Part 1910.333 contains specific Lockout/
Tagout provision for electrical hazards.

MDE-4344A Series 1000 Fuel Management System Installation Manual · November 2008 Page 7
Hazards and Actions
WARNING
Spilled fuels, accidents involving pumps/dispensers, or uncontrolled fuel flow create a
serious hazard.
Fire or explosion may result, causing serious injury or death.
Follow established emergency procedures.
!
The following actions are recommended regarding these hazards:
Collision of a Vehicle with Unit Fire at Island Fuel Spill
• Do not go near a fuel spill or allow anyone else in the area.
• Use station EMERGENCY CUTOFF immediately. Turn off all system circuit breakers to the island(s).
• Do not use console E-STOP, ALL STOP and PUMP STOP to shut off power. These keys do not
remove AC power and do not always stop product flow.
• Take precautions to avoid igniting fuel. Do not allow starting of vehicles in the area. Do not allow
open flames, smoking or power tools in the area.
• Do not expose yourself to hazardous conditions such as fire, spilled fuel or exposed wiring.
• Call emergency numbers.

Page 8 MDE-4344A Series 1000 Fuel Management System Installation Manual · November 2008
This page is intentionally left blank.

MDE-4344A Series 1000 Fuel Management System Installation Manual · November 2008 Page 9
Component Location System Layout
3 – System Layout
Component Location
Careful planning for the layout of the site will help eliminate possible problems with the start-
up of your system and will ensure continued, reliable system operation.
System The Series 1000 System should be located on the fuel island. The unit has been designed to
withstand an environment of -30° C to 40° C, 95% relative humidity, non-condensing. When
mounting the unit, a minimum clearance of 18 inches must be maintained between the post
and any of the pumps or dispensers. This clearance meets the NFPA 30A and NFPA 70
requirements and allows room for wiring and maintenance of the system. Adequate clearance
around the head of the unit is important to provide room for maintenance of the system. A
minimum of 14 inches of clearance from the rear of the unit must be provided to allow the rear
door to open.
Data TerminalWhen a data terminal is used with the system it should be located in a clean, office-type
environment. Do not install over a hazardous location. Data terminals supplied by Gasboy
have an operative temperature range of 0° C to 40° C. Locating the terminal in a dirty
environment may cause premature failure.
External Modems
When an external modem is used with the system it is recommended the modem be located in
an office type environment. However, if this is not possible, it should be housed in a protective
enclosure. Do not install over a hazardous location. External modems supplied by Gasboy
have an operative temperature range of 0° C to 40° C.
Power Conditioner
When used, a power conditioner helps provide clean power to the Series 1000 System. Poor
power conditions are a key cause to system malfunction or failure. The power conditioner
provides transient and common mode protection for the Series 1000, although it cannot totally
compensate for extremely poor power conditions. The power conditioner must be located in an
area protected from direct contact with weather (typically near the system circuit breakers) and
should be no further than 50 feet from the Series 1000 for optimum protection. The unit is
designed for an operating temperature range of -20° C to 40° C.

System Layout Component Location
Page 10 MDE-4344A Series 1000 Fuel Management System Installation Manual · November 2008
Voltage Regulator/Backup Power Supply
When the Series 1000 is being used for the resale of fuel, Weights and Measures regulations
require a backup power supply. The voltage regulator/backup power supply protects line-
operated equipment from low line voltage (brownout) and total line power failure by
providing virtually instant emergency power. The voltage regulator/backup power supply also
protects line-operated equipment from potentially dangerous voltage spikes coming in on the
commercial AC power. Although it does help to condition the power to the Series 1000, it
cannot totally compensate for extremely poor power conditions. The voltage regulator/backup
power supply must be located in an area protected from direct contact with weather (typically
near the system circuit breakers) and should be no further than 50 feet from the Series 1000
System for optimum protection. The unit is designed for an operating temperature range of
0° C to 40° C.

MDE-4344A Series 1000 Fuel Management System Installation Manual · November 2008 Page 11
System Dimensions - Standard Unit System Layout
System Dimensions - Standard Unit
Figure 3-1: System Dimensions - Series 1000 Fuel Management System

System Layout System Dimensions - Unit with Receipt Printer
Page 12 MDE-4344A Series 1000 Fuel Management System Installation Manual · November 2008
System Dimensions - Unit with Receipt Printer
Figure 3-2: System Dimensions for Units with a Receipt Printer

MDE-4344A Series 1000 Fuel Management System Installation Manual · November 2008 Page 13
Conduit Layout System Layout
Conduit Layout
Figure 3-3: Conduit Layout

System Layout Conduit Layout
Page 14 MDE-4344A Series 1000 Fuel Management System Installation Manual · November 2008
Conduit Layout/Installation Specifications
• All wiring is to be installed and used in accordance with local building/fire codes, all
Federal, State, and Local codes, the National Electrical Code (NFPA 70), NFPA 30, and
the Automotive and Marine Service Station Code (NFPA 30A) codes and regulations.
Canadian users must also comply with the Canadian Electrical Code.
• All peripheral equipment connected to the RS-232 ports must be UL-listed, have an
Electronics Industrial Association (EIA) standard RS-232 communications protocol and
not be installed over a hazardous location.
• Power for the system, printer and modem must come from a separate circuit breaker rated
at no less than 10 AMPS.
• All conduit must be metal to provide the necessary shielding.
• High-voltage (AC) and low-voltage (DC) must not be combined in a common conduit,
junction box, or wire trough unless cable is used as specified in “System and Pump/
Dispenser Wiring” on page 17 or “Communication Wiring” on page 51.
• Use the Wire Size chart (see Figure 4-2 on page 21) to determine the proper wire gauge.
• Use the Conduit Size chart (see Figure 3-3 on page 13) to determine the proper conduit
size.
• RS-232 communication must not exceed 100 feet. RS-232 communication wires must be
in a separate metal conduit from any AC wires.
• For communication distances exceeding 100 feet, you must use a Gasboy RS-422 Short
Haul Modem.
• DC pulser and DC RS-422 communication wires can be combined in the same conduit.
• Suction pumps over 3/4 HP at 115/230 VAC must use a starter relay. Wire the starter relay
in place of the motor in the applicable pump wiring drawing.
• A minimum of 18 inches must be maintained between the Series 1000 post and any of the
pumps/dispensers.
• Disregard submersible pump in drawing if hose outlets are suction pumps.
Conduit Requirements
All wiring (AC and DC) connecting the different components of the Gasboy Fuel Management
System must be installed in threaded, rigid, metal conduit except as noted in “Installation
Notes” on page 51 and “Short Haul Modem - RS-422” on page 58. PVC IS NOT
ACCEPTABLE. Components of the system include pumps, dispensers, submersible pumps,
submersible starter relays, the circuit breaker panels and the Series 1000 system.
Communications equipment signal wires must also be run in metal conduit, except for RS-422
wiring as noted in “Communication Wiring” on page 51.
Communication equipment signal wires must also be run in metal conduit. High-voltage (AC)
and low-voltage (DC) must not be combined in a common conduit, junction box, or wire
trough unless cable is used as specified in “System and Pump/Dispenser Wiring” on page 17
or “Communication Wiring” on page 51.
All conduits must be connected to the Series 1000 pedestal through the holes and knockouts
provided by the factory. Do not make any other holes in this unit. If you must make holes at
locations other than those provided, contact Gasboy for approval first.

MDE-4344A Series 1000 Fuel Management System Installation Manual · November 2008 Page 15
Conduit Layout System Layout
All wiring and conduit runs must conform with all building/fire codes, all Federal, State, and
Local codes, the National Electrical Code (NFPA 70), NFPA30, and the Automotive and
Marine Service Stations Code (NFPA 30A). Canadian users must also comply with the
Canadian Electrical Code.
Use the charts in Figure 3-4 as a guideline to determine the proper conduit sizes for the
Gasboy Series 1000 fuel management system. When planning the orientation of the wiring
runs, follow the applicable Gasboy wiring diagram and consider the layout of the components
at the site. Long runs or a large number of bends may require you to increase conduit size over
what is listed.
To determine conduit size needed, use the THHN/THWN Wire Areas table (left) to find the
area for each wire gauge. Add up all wire areas. Use the Areas of Trade Size Conduit Table
(right) to select the smallest number in the 25% fill area (based on NEC 501-1) that comes
closest without exceeding the total wire area.
Figure 3-4: Conduit Size

System Layout Conduit Layout
Page 16 MDE-4344A Series 1000 Fuel Management System Installation Manual · November 2008
This page is intentionally left blank.
/