Page is loading ...

™
Plug-in & Portable
Wire Free Chime Kit
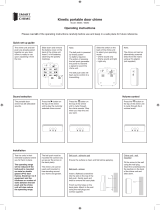
1: Place a small flat screwdriver
into the locking clip on the
base of the Bell Push
2: Gently twist
3: The backing plate will unclip
1
Functions:
6:
7:
1: Push Button 5: Portable Chime
2: Melody Selector 6: Speaker
3: Bell Push Battery 7: Plug-in Chime
4: Signal Sent LED
BY112
1:
2:
4:
:3
6:
5:
34
1: plug Chime into a UK 3pin
socket, 220 – 240V ~ 50Hz.
2: Switch the socket on.
5
Beep
Beep
Beep
Beep
1: The Chime will ‘Beep Beep’.
2: Press the Bell Push within
60 seconds to learn the
Bell Push to the chime.
3: The Chime Will Ring to
confirm setup, wait 60
seconds for the Chimes
to exit the learn mode
before repressing the Bell
Push.
4: Replace the battery cover.
Note: Maximum of 2 Bell
Pushes can be learnt to a
single Chime for Front/Back
Door use.
To select a melody for the Door Chime
1: Remove the Back Plate from the Bell
Push
2: Press the Melody Select button.
3:The chime will play the newly selected
sound
4: Press again to select the next melody.
Note: For Front/Back door setup, select a
different melody in one of the Bell Pushes.
CR2032
New Chime
Adding Additional Chime/Bell Push:
Additional Chime
To add an additional Chime unit to the Door Chime kit
1: Remove the batteries or unplug your NEW Door Chime and wait
for 10 seconds.
2: Replace the batteries, making sure the Positive/Negative
terminals match the internal markings or plug the Door Chime into
the Socket and switch the socket on.
3: The Chime will ‘Beep Beep’ to indicate that it has entered
the Learn mode.
4: Press the Bell Push within 60 seconds, to pair the additional
Chime to the Bell Push.
5: Chime will ring to confirm setup, wait 60 seconds for the Chime
to exit the learn mode before repressing the Bell Push.
Additional Bell Push
To add an additional Bell Push to the Door Chime kit
1: Remove the batteries or unplug your new Door
Chime and wait for 10 seconds.
2: Replace the batteries, making sure the
Positive/Negative terminals match the internal
markings or plug the Door Chime into the Socket
and switch the socket.
3: The Chime will ‘Beep Beep’ to indicate that it has
entered the Learn mode.
4: Press both Bell Pushes within 60 seconds, to pair the additional
Bell Push to the Chime.
5: Chime will ring to confirm setup, wait 60 seconds for Chime to exit
the learn mode before repressing the Bell Push. For Front/Back
door setup, select a different melody in one of the Bell Pushes -
See Melody Selection.
Note: Maximum of 2 Bell Pushes can be learnt to a single
Door Chime.
Beep
Beep
Front Door
Back Door
3
1: Remove the battery cover of
the Door Chime.
2: Insert 3 X 1.5V Size ‘AA’
batteries (Not Supplied).
3: Make sure the
Positive/Negative terminals
match the internal markings.
3 x 1.5V ‘AA’
4 Selectable Melodies
1: Ding Dong (Repeat) 3: Alarm
2: Westminster 4: Ding Dong Ding
1: Insert CR2032 battery
(Supplied) into the battery
holder.
2: Make sure the positive side
is facing upwards.
3: Replace back plate.
2
Warning: Make sure that the batteries are
replaced correctly to avoid battery failure.
Only replace with same or equivalent type.

433.92MHz
R&TTE
APPROVED
CH Byron Electrical United Kingdom. www.chbyron.com
A
B
DK
FIN
F
D
GR
LT
IRL
I
L
NL
P
E
S
UK
BG
CZ
EST
H
IS
LV
M
N
SK
SLO
CH
PL
RO
Project Manager
Mr G Hunter
GB: CH Byron
Byron House, Sherwood Rd
Astonfields, Bromsgrove
B60 3DR
UK
9-5 Mon-Fri, Local call charges apply
V1.0
Tel: 0845 2301231 (UK)
www.chbyron.com
Portable Door Chime: BY101
Power: 3 x ‘AA’/LR6 1.5V Batteries
(Not supplied)
Range: 50 Metres
Indoor Use Only
Bell Push: BYT
Power: 1 x CR2032 3V DC Battery
(Included)
IP44 Weather Resistant
Type R2 Device - device where the sound output is created by the initial operation
of the control and where the period of sound output continues for the
designed duration irrespective of condition of the control.
IMPORTANT: There are no serviceable parts, do not repair.
Specification
Plug-in Door Chime: BY102
Power: 220-240V ~50Hz
Range: 50 Metres
Indoor Use Only
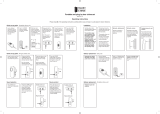
Installation Guide:
1
3
Installation Guide:
Installation Guide: Bell Push
Installation Guide: Chime
Avoid locating the Bell Push/Chime on or directly near
metallic surfaces as this may reduce the operation
range.
UPVC Door Frames:
When locating the bell push onto a UPVC door, always
check the operating performance before final
installation, internal metal frame may affect
performance
.
Note: Try adjusting the location of the Bell Push to the Left/Right or
place on external wall.
Range Guide
Place the door Chime within the operating range, transmis-
sion of the wire free signal through
Walls, Doors and Ceilings etc, may reduce the operating
range. Chime unit for INDOOR use only.
Diagram for illustration purposes only
2
‘CLICK’
1: Using back plate as a
template
2: Making sure UP arrows
points UP.
2: Mark and drill holes.
3: Insert wall plugs and attach
to wall using screws
provided.
4: Clip the Bell Push on to the
back plate making sure the
Bell Push ‘Clicks’ in to
place.
Note: The Bell Push can be
installed using a suitable
double sided adhesive tab or
tape when drilling is not
sutiable.
User Hints:
In case of the door chime does not sound, please check the
followings:
a) Flat batteries in either Push Button or Door Chime.
b) Wrong battery polarity in either Push Button or Door Chime.
c) For Plug-in Door Chimes make sure the socket is switched on.
d) Bell Push and Door Chime are not paired together, see setup
guide.
e) Materials in between the Bell Push & Chime will reduce the
operating range, move the Door Chime closer to the Bell Push
f) Wire free devices can be affected by external sources e.g. wire
free home alarms or power transformers/adapter
Chime Unit
1: Remove Batteries.
2: Insert new batteries, 3 X 1.5V
size ‘AA’
3: Make sure Positive/Negative
match the internal markings
4: Wait 60 seconds before
testing the Chime Kit.
Changing Batteries:
Bell Push:
1: Remove back plate from the
Bell Push
2: Remove old battery from the
holder
3: Replace with new ‘CR2032’ 3V
battery
4: Insert into holder making sure
‘+’ is facing up
5: Test Chime Kit
Always dispose of old batteries in an
environmentally friendly way.
/