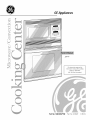
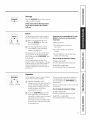
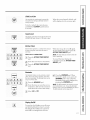
GE JTP95BA4BB Owner's manual
- Category
- Microwaves
- Type
- Owner's manual
This manual is also suitable for

0
GEAppliances
JTP95
microwave oven in this cooking
The electrical output of the
center is 7000 watts.
(IEC-705 Test Procedure)
Part No. 184D3333P158 Pub.No. 49-8924 77-98C6

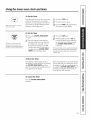
IMPORTANTSAFETYINFORMATION.
READALLINSTRUCTIONSBEFOREUSING.
A WARNING!
Foryour safety, the information in this manual must be followed to minimize the Hskof fire or
explosion, electric shock, or to prevent property damage, personal injury, or loss of life.
PRECAUtiONSTOAVOIDPOSSIBLEEXPOSURETOEXCESSIVE
MICROWAVEENERGY
iiiiiiiiiii_iii
Do not attempt to operate this oven with
the door open since open-door operation
can result in harmfhl exposure to
microwave enerDT./t is importantnot to
defeat or tamper with thesafety interlocks.
Do not place any ob,ject between the oven
fiont face and the door or allow soil or
cleaner residue to accumulate on sealing
s!lrf_/ces.
The oven should not be adjusted or
repaired by anyone except properly
qualified service personnel.
Do not operate the oven if it isdamaged. It
is particularly important that the oven door
dose properly and that there is no damage
to the:
[_ door (bent)
[] hinges and latches (broken or
loosened)
[_] door seals and sealing surfaces.
IMPORTANTSAFETYNOtiCE
TheCalifornia Safe Drinking Water and Toxic Enforcement Act requires the Governor of California to
publish a list of substances known to the state to cause cancer, birth defects or other reproductive
harm, and requires businesses to warn customers of potential exposure to such substances.
Thefiberglass insulation in self-clean ovens gives off a very small amount of carbon monoxide during
the cleaning cycle. Exposure can be minimized by venting with an open window or using a ventilation
fan or hood.
2

SAFETYPRECAUtiONS
When using electrical appliances, basic safety precautions should be followed, including the following:
WARN/NG--To reduce therisk ofburns,
e/ectric shock,fire, injury topersons or
exposure toexcessive microwave energy:
....Use this appliance only for its intended use
as described in this manual. Do not use
corrosive chemicals or vapors in this
appliance. This cooking center is specifically
desi_md to heat or cook food, and is not
inmnded for laborato U or industrial use.
Be sure your appliance is properly installed
and _ounded by a qualified technician in
accordance with the provided Installation
Instructions.
Have the installer show you the location of
the circuit breaker or fllse. Mark it for easy
reference.
....Be sure the cooking center issecurely
installed in a cabinet that is firmly attached
to the house structure. Weight on the oven
door could cause the oven to tip and result
in in,juU. Never allow awone to climb, sit,
or hang on the oven door.
....This appliance must be connected to a
grounded, metallic, permanent wiring
system, or an equipment _ounding
conductor should be run with the circuit
conductors and connected to the
equipment grounding mrminal or lead
on the appliance.
....This appliance should be serviced only by
qualified service personnel. Contact
nearest authorized service facilit 7 for
examination, repair or adjustment. Do not
repair or replace aW part of this appliance
unless specifically recommended in this
manual. All other servicing should be
referred to a qualified technician.
Do not store this appliance outdoors.
Do not use this product near water--for
example, in a wet basement, or near a
swimming pool.
Before performing aW service, disconnect
the cooking center power supply at the
household distribution panel t)}7removing
the fuse or switching offthe circuit
breaker.
iiiiiiiiiii_iii
iiiiiiiiiii_iii
iiiiiiiiiii_iii
Do not operate this appliance if it has a
damaged cord or plug, if it is not working
properly, or if it has been damaged or
dropped.
Do not leave children alone-children
should not be left alone or unattended in
an area where appliance is in use. They
should never be allowed to sit or stand on
any part of the appliance.
Don't allow awone to climb, stand or
hang on the door. They could damage
the cooking cenmr and cause severe
personal injury.
CAUTION: Items of interest to children
should not be stored in cabinets above an
oven; children climbing on the oven to
reach items could be seriously in,jured.
Teach children not to play with the
controls or any other part of the
cooking center.
....Wear proper clothing. Loose fitting or
hanging garments should never be worn
while using the appliance. Flammable
mamrial could be ignited if brought in
contact with hot heating elements and
may cause severe burns.
3

IMPORTANTSAFETYINFORMATION.
READALl.INSTRUCTIONSBEFOREUSING.
WARNING!
SAFETYPRECAUTIONS
Do not use water on grease fires. Never pick up a flaming pan. Smother flaming pan by covering
pan completely with well-fitting lid, cookie sheet or flat tray. Flaming grease outside a pan can be
put out by covering with baking soda or, if available, a multi-purpose dry chemical or foam-type
fire extinguisher.
....Use only dry pot holders-moist or damp
pot holders on hot surfaces may result in
burns from steam. Do not let pot holders
touch hot heating elements. Do not use a
towel or other bulky ck)th. Such cloths can
catch fire on a hot element.
....Always keep dish towels, dish cloths, pot
holders, and other linens a sate distance
flom your oven.
....AMWs keep wooden spoons and plastic
utensils and canned %od a safe distance
away from your oven.
....AMWs keep combustible wall coverings,
curtains or drapes a safe distance flom
your oven.
....Do not store flammable material in an
oven or near the cooking cenmr.
....Do not cover or block aW openings on the
appliance.
....For your safer7, never use your appliance
tot warming or heating the room.
....Do not leave paper products, cooking
utensils, or fbod in the oven when not
in use.
....Do not store or use combustible materials,
gasoline or other flammable vapors and
liquids in the vicinity of this or aW other
appliance.
....Do not let cooking _ease or other
flammable materials accumulate in or
near the cooking center.
....Do not touch heating elements or interior
surface of the oven. These surfaces may be
hot enough to burn even though they are
dark in color. During and after use, do not
touch, or let ck)thing or other flammable
materials contact aW interior area of the
oven; allow sufficient time for cooling/hst.
Potentially hot surfaces include oven vent
openings, surfaces near the openings, and
crevices around the oven door.
REMEMBER: The inside surface of the oven
may be hot when the door is opened.
COOKMEATANDPOULTRYTHOROUGH/Y,..
Cookmeat andpoultry thoroughly--meat toat leastan INTERNALtemperatureof 760T andpoultry
toat least an INTERNALtemperatureof 180°ECookingto thesetemperaturesusuallyprotects against
foodbomeillness.
4

MICROWAVEOVEN
Read and follow the specific "Precautions to Avoid Possible Exposure ToExcessive Microwave
Energy" section in this manual.
Toreduce therisk of fire in theoven cavity:
....Do not over-cook fbod. Careflllly attend
appliance it paper, plastic or other
combustible materials are placed inside
the oven to facilitate cooking.
Remove wire twist-ties flom paper or
plastic containers betbre placing bags
in oven.
Do not use your microwave oven to d_T
newspapers.
....Do not pop popcorn in your microwave
oven unless in a special microwave
popcorn accessory or unless you use
popcon_ labeled R)r use in microwave
ovens.
Do not over-cook potatoes. They could
dehydrate and catch fire, causing damage
to yo!lr oven.
....Do not operate the oven while erupt T to
avoid damage to the oven and the danger
of fire. K t)}7accident the oven should run
erupt T a mimlte or two, no harm is done.
However, UT to avoid operating the oven
erupt T at any time-it saves ener_r and
prolongs the litc of the oven.
Do not use the oven for storage purposes.
Do not leave paper products, cooking
utensils or food in the oven when not
in use.
....If materials inside the oven should i_fite,
keep oven door closed, turn oven off,
and shut off power at the fllse or circuit
breaker panel. If the door isopened, the
fire mW spread.
This microwave oven is not approved or
tested tbr marine use.
Some products such as whole eggs and
sealed containers-fbr example, closed
,jars-will explode and should not be
heated in this microwave oven. Such use of
the microwave oven could result in injury.
Do not operate the microwave oven
without the turntable and support in place.
....Avoid heating baby fbod in glass jars, even
with the lid off. Make sure all i,ffant fbod is
thoroughly cooked. Stir fbod to distribute
the heat evenly. Be careflll to prevent
scalding when warming fbrmula or breast
milk. The container may feel cooler than
the milk really is. Always test the milk
befbre feeding the baby.
Do not boil eggs in a microwave oven.
Pressure will build up inside the egg
yolk and will cause it to burst, possibly
resulting in injury.
....Foods with unbroken outer "skin" such as
potatoes, sausages, tomatoes, apples,
chicken livers and other _blets, and egg
yolks should be pierced to allow steam to
escape during cooking.
Don't deflost flozen beverages in narrow-
necked bottles (especially carbonated
beverages). Even itthe container is
opened, pressure can build up. This can
cause the container to burst, possibly
resulting in injury.
Hot fi)ods and steam can cause burns.
Be careflfl when opening aW containers
of hot fbod, including popcorn bags,
cooking pouches and boxes. To prevent
possible i_jury, direct steam away flom
hands and face.
iiiiiiii_Aswithany appliance, close supervision is
necessarywhen used bychildren.
5

IMPORTANTSAFETYINFORMATION.
READALLINSTRUCTIONSBEFOREUSING.
6
A WARNING!
MICROWAVE-SAFECOOKWARE
Make sure all cookware used in your microwave oven is suitable for microwaving. Most glass
casseroles, cooking dishes, measuring cups, custard cups, pottery or china dinnerware which does
not have metallic trim or glaze with a metallic sheen can be used. Some cookware is labeled
"suitable for microwa ving."
....If you are not sure if a dish is microwave-
safe, use this test: Place in the oven both
the dish you are testing and a glass
measuring cup filled with 1 cup (ffwater-
set the measuring cup either in or next to
the dish. Microwave 1 minute at high.
Kthe dish heats, it should not be used
for microwaving.
g the dish remains cool and only the water
in the cup heats, then the dish is microwave-
sate.
....Kyou use a meat thermometer while
cooking, make sure it is sate for use in
microwave ovens.
....Do not use recTcled paper products.
RecTcled paper towels, napkins and waxed
paper can contain metal flecks which may
cause arcing or ignite. Paper products
containing wlon or wlon filaments should
be avoided, as they may also ignite.
....Some sWoIbam trays (like those that meat
is packaged on) have a thin strip (ff metal
embedded in the bottom. When
microwaved, the metal can burn the floor
of the oven or ignite a paper towel.
....Not all plastic wrap is suitable for use in
microwave ovens. Check the package/or
proper use.
....Paper towels, waxed paper and plastic
wrap can be used to cover dishes in order
to retain moisture and prevent spattering.
Be sure to vent plastic wrap so steam
can escape.
....Oversized food or oversized metal
cookware should not be used in a
microwave oven. Electrical shock or
fire could occur.
....While paper plates may be used/or timed
cooking and deflosting, do not use them
with Auto Sensor cooking. Use microwave-
sa/e plates or bowls/br reheating. Cover
with plastic wrap.
....Cookware may become hot because
of heat transferred flom the heated
food. Pot holders m W be needed to
handle the cookware.
...."goilable" cooking pouches and tightly
dosed plastic bags should be slit, pierced
or vented as directed by package, g they
are not, plastic could burst during or
immediately after cooking, possibly
resulting in i,_iury. Also, plastic storage
containers should be at least parually
uncovered because they/brm a tight seal.
When cooking with containers tightly
covered with plastic wrap, remove
covering careflflly and direct steam
away flom hands and/ace.
....Use foil only as directed in this manual. TV
dinners may be microwaved in foil trays le_s
than 3/4" high; remove the top foil cover
and return the tr W to the box. When using
/oil in the microwave oven, keep the foil at
least 1 inch awWfiom the sides of the oven.
....Plastic cookware-Plastic cookware
designed/or microwave cooking is very
useflfl, but should be used careflflly.
Even microwave-safe plastic may not
be as tolerant of over-cooking conditions
as are glass or ceramic materials and
may soften or char it subjected to short
periods of over-cooking. In kruger
exposures to over-cooking, the/ood
and cookware could i_fite.
Follow theseguidelines:
[77 Use microwave-safe plastics only and
use them in strict compliance with the
cookware manufacturer's
recommendations.
_] Do not microwave empty containers.
[_] Do not permit children to use
plastic cookware without complete
superviskm.

ARCING
Ifyou see arcing, press the CLEAR/OFFpad and correct the problem.
Arcing is the microwave term for sparks in the
oven. Arcing iscaused by:
....Metal or foil toudfing tile side of the oven.
....Foil not molded to food (upturned edges
act like antennas).
....Metal, such as twist-ties, poult U pins, or
geM-rimmed dishes, in the microwave.
....Recycled paper towels containing small
metal pieces being used in the microwave.
SUPERHEATEDWATER
Microwaved water and other liquids do not always bubble when they reach the boiling point.
They can actually get super heated and not bubble at all.
Super heated liquid will bubble up out of the
cup when it is moved or when something like
a spoon or tea bag is put into it.
To prevent this fiom happening and causing
i_ju U, do not heat aW liquid for more than 2
ufinutes per cup.
Mter heating, let tile cup stand in the
microwave for 30 seconds before moving it or
putting awthing into it.
Spontaneousboiling
Under certain special circumstances, liquids
may start to boil during or shortly after removal
from the microwave oven.
To prevent burns from splashing liquid, we
recommend the folk_wing before removing
the container fiom the oven:
Mlow the container to stand in the oven ff)r
30 to 40 seconds after the oven has shut or1:
Do not boil liquids in narrow-necked
containers such as soft drink bottles, wine
flasks and especially narrow-necked cottce
cups. Even it the container is opened,
excessive steam can build up and cause it
to burst or overflow.
ALLTHESETHINGSARENORMALWITHYOURMICROWAVE
Steam or vapor escaping from around
the door.
Light reflection around the door or the
outer case.
Dimming of the oven light and change
in the blower sound may occur while
operating at power levels other than high.
The microwave tan may operate with both
ovens off. It is cooling the control and will
turn itself off.
Some TV-radio interference might be
noticed while using your microwave oven.
It's similar to the interference caused by
other small appliances and does not
indicate a problem with your oven.
A dull thumping sound while the oven
is operating.

IMPORTANTSAFETYINFORMATION.
READALL.INSTRUCTIONSBEFOREUSING.
WARNING!
SELF-CLEANINGLOWEROVEN
Do not use aluminum foil to line oven bottoms, except as suggested in this manual. Improper
installation of aluminum foil may result in a risk of electric shock or fire.
Stand awayflom the ovenwhen opening iiiiiiii_
the oven door. Hotair or steamwhich
escapes can cause burns to hands, face iiiiiiii_
and/or eyes.
Do not heat unopened fbod containers.
Pressure could build up and the container
could burst, causing an injury.
Keep the oven vent unobstructed.
Keep the oven flee flom _ease buildup.
Keep the cooking center clean and flee of
accumulations of grease or spillovers,
which may ignite.
Never leave the oven door open when you
are not watching the cooking center.
Place the oven shelf in the desired position
while the oven is cool. If shelves must be
handled when hot, do not let pot holder
contact the heating elements.
When using cooking or roasting bags in
r
the o_en, follow the mamffacturer s
directions.
Pulling out the shelf to the stop-lock is a
convenience in lilting hea_ T ff_ods. It is also
a precautkm against burns flom touching
hot surfaces of the door or oven walls.
Do not use the oven fbr a storage area.
Items stored in an oven can ignite.
Do not leave paper products, cooking
utensils or tbod in the oven when not in use.
iiiiiiiiiii_iii
iiiiiiiiiii_iii
iiiiiiiiiii_iii
{{{iifii;iiii
iiiiiiiiiii_iii
iiiiiiiiiii_iii
iiiiiiiiiii_iii
Do not use the oven to d_T newspapers.
If overheated, they can catch on fire.
Never leave,jars or cans of fat drippings
in or near your oven.
Clean only parts listed in this Use and
rCa e Manual.
Do not clean the door gasket. The door
gasket is essential fbr a good seal. Care
should be taken not to rub, damage or
move the gasket.
Do not use oven cleaners. No commercial
oven cleaner or oven liner protective
coating of aW kind should be used in or
around aW part of the oven. Residue flom
oven cleaners will damage the inside of the
oven when the sell:dean cTde is used.
Before self cleaning the oven, remove
the probe, broiler pan, grid and other
cookware.
Be sure to wipe up excess spillage beff_re
starting a self cleaning cycle.
If the self cleaning mode malflmcuons,
turn the oven off and disconnect the
power suppb,. Have it serviced by a
qualified technician.
Listen for a fan-- a fan noise should be
heard sometime during the cleaning
cycle. If not, call for service befbre sell:
cleaning again.
After broiling, always take the broiler pan
out of the oven and clean it. Lefk)ver
_ease in the broiler pan can catch fire
next time you use the oven.
Readandfollow thisSafetyInformationcarefully.
SAVETHESEINSTRUCTIONS
8

Congratulations!
YouAre Now PartoftheGEFamily.
Welcome to tt_e GE family. We're proud of our quality products and we are
committed m pro_4ding dependable service. You'll see it in fl_is eas)_to-use Owner's
Manual and you'll hear it in t|_e friendly voices of our customer sel_ice depamnent.
Best of all, you'll experience these values each time you use your cooking center.
That's important, because your new cooking cenmr will be part of your f:amilyfbr
ma W years. And we hope you will be part of ours for a long time to come.
We thank you %r buying GE. We appreciam your purchase, and hope you will
continue to rely on us whenever you need quality appliances for your home.
GE& You,A Service Partnership.
IMPORTANT!
It is important that we, the mam.lfhcmrer, know the location ofyour
responsible fbr registering you as t|_e owner. Please check Mfl_ your
supplier m be sure he has clone so. This appliance must be re_stered.
Please be certain that it is. Fill out and remm the Consumer Pro&mr
Registration Card that is packed wit|_this product.
Ifyoumove,orifyouarenottheoriginaIpurchaserpleasewritetous,stating
modelands_rialnumbers.Writeto;GEAppliances,RangeProductService,
AppMncePark,Louisville,KY40225.
FORYOURRECORDS
Write themodel and serial numbershere:
#
#
You can find them on a label inside the upper oven on t|_e left side.
Staple sales slip or cancelled check here.
Proof oftt_e original purchase date is needed to obtain sel_ice under
the wamm V.
Safety information
SafetyPrecautions ....... 2-4
Microwave Oven...... 2, 5-7
Self-CleaningLowerOven.... 8
Operating instructions
MicrowaveControlPanel,. 70,77
UsinatheMicrowave ... 10-22
SensorControls....... 76- t8
LowerOvenControlPanel... 23
UsingtheLowerOven... 23-38
UsinotheProbe ........ 31,34
LowerOvenThermostat .... 36
Care and Cleaning
Self-CleaningLowerOven..37,38
Microwave Oven......... 39
Shelves ................. 40
BroilerPanand Grid ...... 41
Probe ................... 41
OvenLightBulb .......... 42
Troubleshooting Tips
BeforeYouCarl
ForService........... 43-46
READTHISMANUAL
Inside you will find ma W helpfifl hints on how to use and maintain
your cooking cenmr properly.Just a little preventive care on your
part can save you a great deal of time and money over tim life of your
cooking center.
You'll find mmly answers to common problems in the Before YouCall
ForService section. If you review our chart of Troubleshootingtips
first, you may not need to call for sel_ice at all.
IFYOUNEEDSERVICE
If you do need ser_4ce, you can relax knowing help is only a phone
call away. A list of toll-flee customer ser_4ce numbers is included in
tl_eback section of this manual. Or you can always call the GE
Answer Center ®at 800.626.2000, 24 hours a day, 7 days a week.
Customer Service
Warranty .............. 47
ServiceTelephone
Numbers ........ BackCover
9

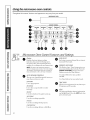
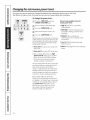
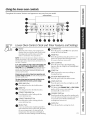
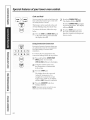
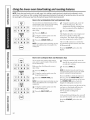
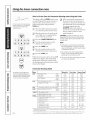
Usingthemicrowaveovencontrols.
Throughout this manual, features and appearance may vary from your model.
0
[
[
MICROWAVE OVEN
]
SENSOR COOKING
MIN/SEC
0 . ',%_
O
Microwave OvenControl Features and Settings
0 Display
Displays file time during cooking
flmctions, tt_epower level being used,
tim Auto Codes, the Aura Defl'ost fbod
weights, the cooking mode and instructions.
NOTE:Thetimeonthemicrowavedisplayis
shownin minutesandseconds(1:30isoneminute,
30seconds),Ontheloweroven,timeisshownin
hoursandminutes(1,30isonehour,30minutes),
ADD 30 SEC
Each time you press this pad the set time is
increased 30 seconds.
O
DEFROSTAUTO/TIME
The Defrost Auto/Time feature givesyou
two ways to defrost fl'ozen foods. Press the
OEFROSTAUTO/TIMEpad once for Aura
Defrost or twice for Time Defl'ost.
O
AUTO SENSORCONTROLS
The top row of pads lists specific items you
may choose to heat or cook.
POPCORN
Use to pop popcorn.
BEVERAGE
Use to heat a cup of coffee or other
beverage.
REHEAT
Use when foods need a quick wam_ up.
VEGETABLE
Use when cooking vegetables.
POTATO
Use when cooking whole potatoes.
CHICKEN/FISH
Use when cooking chicken or fish fillets.
Use Auto Defrost ff_rmeat, pouhD_
and fish.
Use Time Defrost ff_r most other ff_ods.
TIME COOK
Allows you to microwave for any time up to
99 minutes and 99 seconds.
O
HELP
The help pad displays feature infbrmafion
and helpflfl hints. Press tl_e HELPpad, then
press a feature pad.
10

Microwave OvenControl Features and Settings
POWER LEVEL
Press to choose the power level you want to
set. Watch tile displ Wwhile pressing this
pad m select tile power level you want to
set. You will also see a defi'ost level. This
setting will allow you m choose your own
defrost time by using tile number pads.
O
Number Pads
After pressing a fimction pad, press tile
number pads to set tlle exact amount of
time you want to cook for. For example; if
you press tile 1,2 and 5 pads, you have set 1
rmnute and 25 seconds.
CLEAR/OFF
Press once to inten'upt or change a
fimction. Press tMce to clear tlle display.
0
SOUND LEVEL
Tile beeper sound level can be adjusted.
Press tlle SOUNDLEVELpad Choose 0-3
for mute to loud.
REMINDER
Tile REMINDERfeature can be used like an
alarm clock, and it can be used at any time,
even when tlle oven is operating. Tile
reminder can be set up m 24 hours later.
DELAYSTART
Allows you to set tile microwave to delay
cooking up to 24 hours.
AM/PM
Allows you to set tlle microwave for AM or
PM during timed cooking operations.
CLOCK/SCROLLSPEED
Press this pad before setting tile clock.
Tile scroll speed of the display can be
changed. Press and heM the CLOCK/SCROLL
SPEEDpad about 3 seconds to bring up tlle
display. Select 1-5 for slow m f_tstscroll
speed.
O
0
START/PAUSE
After all selections are made, press this pad
m start tile oven. Tile START/PAUSEpad
must be pressed m mm on any traction.
In addition to starting ma W fimctions,
START/PAUSEallows you to stop cooking
without opening tile microwave oven door
or clearing tile display.
KITCHEN TIMER MIN/SEC
Press to set tile timer tlp tO 99 minutes
and 99 seconds. Press tile number pads m
set tile time. Press tile KITCHENTIMER
MIN/SECpad. Press tile KITCHENTIMER
MIN/SECpad t_dce to clear tlle display.
Doesnotturnonmicrowaveenerg_
This timer cannot be used while tile
microwave is being used. Use the lower
oven tinier.
11

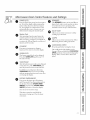
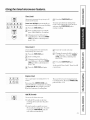
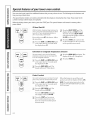
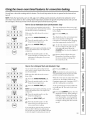
Changingthemicrowave power/eve/.
Thepower level may be entered or changed immediately after entering the feature time for TimeCook,
TimeDefrost or Express Cook. Thepower level may also be changed during time countdown.
4 hI
To change the power level...
[] Press the TIMECOOKp'ador tt_e
DEFROSTAUTO/TIMEpad.
[] Enter cooking or defi'osting time.
[_ Press the POWER tEgEL pad.
[_ Select desired power level 1-10.
[] Press the START/PAUSEpad.
Variablepowerlevelsaddflexibilitytomicrowave
cooking,Thepowerlevelsonthemicrowaveoven
canbecomparedtothes_/rfaceunitsonarange,
Eachpowerlevelgivesyoumicrowaveenergya
certainpercentof thetime,
Power level7 ismicrowave energT 70%
of the time.
Herearesome examplesofusesfor
variouspower levels:
Highl& Fish, bacon, vegetables,
boiling liquids.
Me&High 7: Gentle cooking of meat
and poultu; baking casseroles and
reheating.
Medium & Slow cooking and
tenderizing for stews and less tender
CIItS of meat.
Low2 or& Defrosting; simmering;
delicate sauces.
Warm 1:Keeping fbod warm; softening
butter.
Power level 3 is ener_ 30% of the time.
Most cooking will be clone on High
(power level 10)which gives you 100%
power. Power level 10 will cook fhster
but fbod may need more frequent
sorting, rotating or turning over.
A lower setting will cook more evenly and
need less stin'ing or rotating of the %o(t.
Some foods may have bettor flavor,
texture or appearance ifone of tim lower
settings isused. Use a lower power level
when cooking fbods that have a tenden(y
to boil over, such as scalloped potatoes.
Rest periods (when the microwave
energy (ycles off) give time for the food
to "equalize" or transfer heat to the inside
of the food. An example of this is shown
with powerlevel 3-the defi'ost (ycle.
If microwave ener_ did not (ycle off;
the outside of tt_e food woukt cook
before t|_e inside was defi'osmd.
12

Usingthetimedmicrowave features.
Time Cook I
AIIowsyoutomicrowaveforanytimeupto99
minutesand99seconds,
Power level 10(High)is automatically set,
but you may change it for more flexibilibT.
[_] Press tile TIME COOKpad.
[_ Enter cooking time. For example,
press 1, 5, 0 and 0 for 15 minutes.
[] Change power level if you don't
want fhll power. (Press the POWER
LEVEL.pad Select a desired power
level 1-10.)
_] Press tile START/PAUSEpad.
You may open tile door during Time
Cook to check tile ff)od. (;lose the door
and press tile SNRT/PAUSEpad to
resume cooking.
Time CookII
Letsyouchangepowerlevelsautomatically
duringcooking,Here'showtodoit;
%
%
Press tile TIMEgOOKpad.
Enter cooking time.
Change power level ifyou don't
want fifll power. (Press the POWER
LEVELpad. Select a desired power
level 1-10.)
Press tile TIMECOOgpad again.
Enter tile second cook time.
[_] Change tile power level if you don't
want fifll power. (Press the POWER
LEVELpad. Select a desired power
level 1-10.)
_-] Press tile START/PAUSEpad.
At the end of Time Cook I, Time Cook II
CoIInts down.
Express Cook
Thisisa quickwaytosetcookingtimefor 7-6
minutes,
Press one of tile EXPRESSCOOKpads
(from lto 6) %r 1 to 6minums of cooking
at power level 10. For example, press file
2 pad fbr 2minutes of cooking time.
Tile power level can be changed as time
is counting (tox,m.Press tile POWERLEVEL
pad and enter 1-10.
Add 30Seconds
Youcanusethisfeaturetwo ways;
It will add 30 seconds to tile dine
counting down each time tile pad is
pressed.
It can be used as a quick way to set
30 seconds of cooking time. No need
m press tile START/PAUSEpad, tile
oven will start immediamly.
13

Using thetimedmicrowave features.
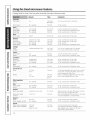
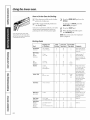
Cooking Guide For Time Cook. Use power level High (10) unless otherwise noted.
Amount Time Comments
Asparagus
freshspears) 1Ib.
7to 10min.
Med-High(7)
InlYz-qt,casserole,place1/4 cupwater.
frozenspears, lO-oz,package 5to 8 min. In1-qt.casserole.
Beans
(freshgreen 1Ib.cut inhalf 12to 17min. In1Vz-qt.casserole,place1/2 cupwater.
(frozengreen lO-oz,package 6to 9 min. In1-qt.casserole,place2tablespoonswater.
frozenlima: lO-oz,package 6to 9 min. In1-qt.casserole,place1/4 cupwater.
Beets
fresh,whole) 1bunch 18to 25min. In2-qt.casserole,place1/2 cupwater.
Broccoli
freshcur. 1bunch(1V4to lY2Ibs.) 7to 10min. In2-qt.casserole,place1/2 cupwater.
(freshspears. 1bunch(I_Ato lY2Ibs.) 9to 13min. In2-qt.casserole,place1/4 cupwater.
(frozen,chopped,, lO-oz,package 5to 8 min. In1-qt.casserole.
frozenspears, lO-oz,package 5to 8 min. In1-qt.casserole,place3tablespoonswater.
Cabbage
(fresh) 1mediumhead(about2 Ibs.) 8to 11min.
weages, 7to 10min.
Carrots
(fresh.s/iceo/ 1 Ib. 6 to 9 min.
frozen lO-oz, package 5 to 8 rain.
InlYz-or 2-qt.casserole,place1/4 cupwater.
In2- or3-qt. casserole,place1/4cupwater.
InlY_-qt,casserole,place1/4 cupwater.
In1-qt.casserole,place2tablespoonswater.
Cauliflower
flowerets, 1 mediumhead 9to 14min. In2-qt.
(fresh,wholeJ 1mediumhead 9 to 17min. In2-qt.
frozen lO-oz,package 5Y,to 8 min. In1-qt.
casserole, place 1/2 cup water.
casserole, place 1/2 cup water.
casserole, place 2 tablespoons water.
Corn
frozenkeme,. 10-oz.package 4to 8 min. In1-qt.casserole,place2tablespoonswater.
Cornon the cob
fresh) 1to 3 ears 3to 5 min.
perear
frozen 1ear 5to 7 min.
2to 3 ears 2to 4min.
perear
In2-qt.glassbakingdish,placecorn.Ifcornis inhusk,
usenowater;if cornhasbeenhusked,add1/4 cup
water.Rearrangeafter halfof time.
Placein aroundglassbakingdish.Coverwith vented
plasticwrap.Rearrangeafter halfof time.
lO-oz,package 4to 8 min. In1-qt.casserole,place3tablespoonswater.
2Ibs.unshelled 9to 12min. In1-qt.casserole,place1/4 cupwater.
lO-oz,package 4to 8 min. In1-qt.casserole,place2tablespoonswater.
Mixed vegetables
frozen
Peas
,fresh. she!led'
frozen
Potatoes
fresh, cubed white,
4potatoes(6to 8oz.each) 11to 14min.
1(6to 8 oz.) 2to 5 min.
Peelandcut into1-inchcubes.Placein 2-qt.casserole
with 1/2 cupwater.Stir afterhalf of time.
Piercewith cookingfork.Placeinthe oven,1inchapart,
in circulararrangement.Letstand5 minutes.
fresh,i/vho/esweet
or white.
Spinach
(fresh) 10to 1607. 5to 8 min. In2-qt.casserole,placewashedspinach.
frozen,chopped,and !ear, lO-oz,package 5to 8min. In1-qt.casserole,place3tablespoonswater.
Squash
fresh, summer, ana yet/ow)
twin[eL acorn OFbutteFnUt)
InlY,-qt, casserole,place1/4 cupwater.
Cutin half andremovefibrousmembranes,ln2-qt.
glassbakingdish,placesquashcut-side-down.
Turncut-side-upafter4 minutes.
1Ib.sliced 4to 7min.
1squash 7to 11min.
(about1Ib.each)
14

A duff thumping noise may be heard during defrosting. This is normal when oven is not operating at High power.
At one half of selecteddefrosting
time,the ovensignals TURN,At
this time,turn foodoverand
breakapart or rearrangepieces
formore evendefrosting,Shield
any warmareas with smaflpieces
of foil,
Time Defrost
Allowsyoutodefrostforaselectedlengthof
time.SeetheDefrostingGuideforsuggested
times.(AutoDefrostexplainedintheAboutthe
autofeaturesection.)
[] Press the DEFROSTAUTOff/MEpad
twice.
[] Enter defl'osting time.
[_ Press the START/PAUSEpad.
[_] Turn food over when the oven
si_lals.
[_ Press the START/PAUSEpad.
Power level is m.ltomadcally set at 3, but
can be changed. You can defi'ost small
items quickly by raising the power level
after entering tim time. Power level 7 cuts
the total defi'osting time in about half:,
powerlevel 10cuts the total rime to
approximately 1/3. However, food will
need more fi'equent auention than usual.
DefrostingTips
Foodsfrozeninpaperorplastic"canbe
defrostedin thepackage.Closedpackages
sfTouldbeslit,piercedorventedAFTERfood
haspartiallydefrostec_Plasticstorage
containerssfTouldbepartiallyuncovered.
llliiiiii;i
Family-size,prepackagedfrozendinnerscanbe
defrostedandmicrowaved.If thefoodisina
foilcontainer,transferit toa microwave-safe
dish.
llliiiiii;i
Foodsthatspoileasilyshouldnotbeallowedto
sit outformornthanonehouraftd defrosting.
Roomtemperaturepromotesthegrowthof
harmfulbacteria.
llliiiiii;i
llliiiiii;i
Formornevendefrostingoflargerfoods,such
asroasts,useAutoDefrost.Besurelarge
meatsamcompletelydefrostedbeforecooking.
Whendefrosted,foodshouldbecoolbut
softenedinallareas.Ifstill slightlyicy,return
tothemicrowaveverybriefly,orletitstanda
fewminutes.
Defrosting Guide
Time Comments
Breads, Cakes
Bread.bunsorroflsfl piece,
Sweetrolls rapprox.72oz.i
Fishand Seafood
Fillets.frozen(7lb,
Shellfish.smallpiecesfl lb ,
Fruit
Plasticpouch ! or 2 (lO-oz packagm
Meat
Bacon 7 It).)
FranKsfl lb,)
Groundmeat(1Ib.)
Roast:beef.lamb,veal pork
SteaKs,chopsandcutlets
Poultry
Chicken.broiler-fryer,cut up
(2'/_to 3ires,
Chicken, whole f2V2to 3 lbs.)
Cornishhen
Turke_breast(4to 6lbs./
1/2 min,
3 to 6 min,
9 to 12 min,
3 to 7 min,
3 to 7 min,
3 to 6 min,
3 to 6 min,
5 to 8 min, per Ib,
11 to 16 min, per Ib,
5 to 10 min, per Ib,
15 to 22 min,
20 to 28 min,
9to 16min,perIb,
5to 10min,perIb,
Rearrange after half the time,
Placeblockincasserole,Turnoverand breakupafter halfthe time,
Placeunopenedpackagein oven,Letstand5 minutesafterdefrosting,
Placeunopenedpackagein oven,Microwavejust untilfrankscanbe
separated,Letstand5 minutes,if necessary,to completedefrosting,
Turnmeatoverafterfirst halfof time,
[Jsepower level 1.
Placeunwrappedmeatin cookingdish,Turnoverafter first half oftimeand
shieldwarmareaswith foil, After secondhalfof time, separatepieceswith
tableknife,Letstandto completedefrosting,
Placewrappedchickenindish,Unwrapandturn overafter first halfof time,
Aftersecondhalfoftime, separatepiecesandplaceincookingdish,Microwave
2to 4 minutesmore,if necessary,Letstandafew minutestofinishdefrosting,
Placewrappedchickenindish,After halfthe time,unwrapandturnchicken
over,Shieldwarmareaswith foil, Tocompletedefrosting,runcoldwaterin
thecavityuntilgibletscan beremoved,
Placeunwrappedheninthe ovenbreast-side-up,Turnoverafter first half of
time,Runcoolwater inthecavityuntil gibletscanberemoved,
Placeunwrappedbreastin microwave-safedishbreast-side-down,After first
halfof time, turnbreast-side-upandshieldwarm areaswith foil, Defrostfor
secondhalfoftime,Letstand1 to 2 hoursinrefrigeratorto completedefrosting,
15

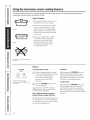
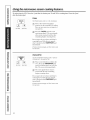
Usingthemicrowave sensorcookingfeatures.
The Sensor Features detect the increasing humidity released during cooking. Theoven automatically adjusts the
cooking time to various types and amounts of food.
Covered
Sensor Cooking
The proper containers and covers are
essential for best sensor cooking.
Always use microwave-s_ffe containers
and cover them with lids or vented
plasuc x,_'ap. Never use tight sealing
plastic containers-they can prevent
steam from escaping and cause K)od
to overcook.
Vented
Be sure the outside of dm cooking
containers and the inside of the
microwave oven are (hTbe%re
placing %o(t in the oven. Beads
of moisture mining into steam
can mislead the sensor.
Dry off dishes so they don't mislead
the senso_
POPCORN
iless time) trnore time)
Use only with prepackaged
microwave popcorn weighing 1.75
to 3.5 ounces.
Popcorn
TousethePopcorn feature:
[77 Follow package instructions, using
Time Cook if the package is less than
1.75 ounces or larger than 3.5
ounces. Place the package of
popcorn in tim center of tim
microwave.
Press the POPCORNpad. The oven
starts immediately.
IfyouopenthedoorwhilePOPisdisplayed,
ERRORwillappearClosethedoor,pressthe
CLEAR/OFFpadandbeginagain,
How toAdjust the Popcorn Program to
Provide a Shorter or Longer Cook Time:
If you find that the brand of popcorn you
use underpops or overcooks consistently,
you can add or subu'act 20-30 seconds to
the mltomatic popping time.
Toadd time:
After pressing the POPCORN pad, press
the 9 pad immediately after the oven
starts for an extra 20 seconds. Press the
9 pad again m add anod_er l0 seconds
(total 30 seconds additional time).
Tosubtract time:
After pressing the POPCORNpad, press
the lpad immediately after the oven
starts for 20 seconds less cooking time.
Press the I pad again m reduce cooking
time another 10 seconds (mm130 seconds
less time).
16

[ ];ii!i iiilliii ii(iBEVERAGE
A
Beverage
Press tile BEVERAGEpad to heat a cup of
coffee or error beverage.
Drinks heatedwiththeBeveragefeature
maybe veryhot.Removethe container
with care.
ii i
(lesstime) (m0mtime)
Reheat
TheReheatfeaturereheatssingleservingsof
previouslycookedfoodsoraplateofkftovers,
[_ Place covered food in tile oven.
Press tile REHEATpad. Tile oven
starts immediately.
[] Tile oven si_lals when steam is
sensed and tile time remaining
begins counung down.
Do not open tile oven door until rime is
coundng down. If file door is opened,
close it and press t|le START/PAUSEpad
immediately.
Afterremovingfoodfromtheoven,stir,if
possible,toevenoutthetemperature,If thefood
isnothotenough,useTimeCooktoreheatfor
moretime,Reheatedfoodsmayhavewide
variationsintemperature,Someareasmaybe
extremelyhot,
Some foods not recommended for use with
REHEAT_It is best to use Time Cook for
these foods:
Bread products.
Foods that must be reheated
uncovered.
Foods tiler need t() be stirred or
rotated.
Foods calling fbr a dl7 look or crisp
surf_meafter reheating.
Howto ChangetheAutomatic Settings:
Toreducetime by 10%:
Press file 1pad after tile feature pad.
Toadd 10%tocooking time:
Press t|le 9 pad _d_ertile feature pad.
Vegetables
UsetheVegetablesfeaturetocook4-16ounces
offresh,frozenor cannedvegetables,
For flesh vegetables, add 2
tablespoons of water per serving. For
frozen vegetables, follow package
insu'ucdons for adding wamr. Cover
with M or plastic wrap. Place
vegetables in the oven.
Press tile VEGErABLEpad once for
flesh vegetables, tMce for fi'ozen
vegetables, or fllree times for canned
vegetables. Tile oven starts
immediately. The oven signals when
steam is sensed and time remaining
is counting down.
Do not open tile oven door until time is
counung down. If tile door is opened,
close it and press t|le START/PAUSEpad
immediately.
If foodisnotdoneenough,useTimeCooktocook
formoretime,
Flowto ChangetheAutomatic Settings:
Toreducetime by 10%:
Press file 1pad _dter tile feature pad.
Toadd 10%tocooking time:
Press the 9 pad after the feature pad.
17

Usingthemicrowave sensorcookingfeatures.
Toreduce time by 10%:Press the 1pad aRer the feature pad. Toadd 10%to cooking time: Press the 9pad
after the feature pad.
POTATO]
iless _lmel tmore !:lmet
Potato
ThePotato featurecooks 7/2-2 Ibs,of:potatoes,
%
Pierce skin with fbrk and place
potatoes on the rotatable. If cooking
d_ree or more potatoes, ammge in a
star pattern.
[]
Press dm POTATOpad. The oven
starts immediately. The oven signals
when steam is sensed and the time
remaining begins counting down.
Do not open the oven door until time is
counung down. If the door is opened,
close it and press tt_e START/PAUSEpad
immediately.
If toedisnotdoneenough,useTimeCooktocook
formoretime,
[ CHICKEN/1
/ FISH ]
k ,_- )
(lesstime) (mOie{ime)
Chicken/Fish
UsetheChicken/Fishfeaturetocook1-8pieces
ofchickenor4-16 ouncesoffish,
[_ Place covered chicken or fish in the
oven. Press the CHICKEN/F/SHpad
once fbr chicken pieces or tMce fbr
fish. The oven starts immediately.
_-] The oven signals when steam is
sensed and the time remaining
begins counting down.
Do not open the oven door until time is
counung down. If the door is opened,
close it and press the START/PAUSEpad
immediately.
If toedisnotdoneenough,useTimeCooktocook
formoretime,
18

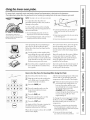
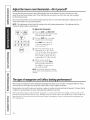
Using themicrowave auto feature.
The Defrost Auto/Time feature gives you two ways to defrost frozen foods. Press Defrost Auto/Time once for
Auto Defrost or twice for TimeDefrost.
I _
PAUSE,
Defrost Auto/Time
UseAutoDefrostformeat,poultryandfishup
to6pounds.UseTimeDefrostformostothd
frozenfoods.
Auto Defrost automatically sets the
defrosting times and power levels to give
even defi'osting results fbr meats, poulu)7
and fish.
[-_ Press the DEFROSTAUTO/T/MEpad
once.
[] Using tile Conversion Guide at right,
enter fbod weight. For exmnple,
press pads land 2 fbr 1.2 pounds
(1 pound, 3 ounces).
[j] Press START/PAUSE.
Time Defrost is explained in the Using the
timedmicrowavefeatures secdon.
ConversionGuide
If the weight of fbod isstatedin pounds
and ounces, tile ounces l_lUS[ be
c()nverted to tenths (.1) of a pound.
Weight ofFood EnterFoodWeight
in Ounces (tenthsofapound)
1-2 .l
3 .2
4-5 .3
6-7 .4
8 .5
9-10 .6
11 .7
12-13 .8
14-15 .9
Remove meat from package and place
on microwm,e-safe dish.
Twice during defrost, tile oven signals
TURN.At each TURNsi_ml, turn the
food over. Remove defrosted meat or
shield warm areas with small pieces
offbil.
After defrosting, most meats need to
stand 5minutes to complete defi'osdng.
Large roasts should stand fbr about
30 minutes.
19

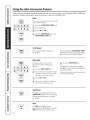
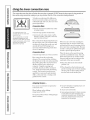
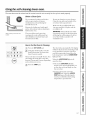
Using the other microwave features.
Cooking Complete Reminder: Toremind you thatyou have food in the oven, the oven will display FOODIS READYand
bee/) once a minute until you either open the oven door or press the CLEAR/OFFpad.
Clock
7
i__i71i_iiiiii_ii_ii_i@_i__ii_i_i_i__iiiliiiliiiililI
Presstoenterthetimeofdayortocheckthetime
ofdaywhilemicrowaving,
[_1 Pressthe CLOCK/SCROLLSPEEDpad.
_] Enter time of day.
_] Select AM or PM.
[] Press the START/PAUSEpad or the
CLOCK/SCROLLSPEEDpad.
$croll Speed
Thebechange_t.scr°llspeed1ofthe_isplarcan
Press and hoM the CLOCK/SCROLLSPEED
pad about 3 seconds to bring up the display.
Select 1-5 for slow to fblstscroll speed.
!ii;iiiii_ i_i__!_ !_
DelayStart
Delay Start allows you to set the
microwm_e to delay cooking up to
24 hours.
%
ii_i_i_ _ii_ii_ j iiii: : : : : :i I F27
i__ iii_ii !_!_ii !_!_!_!_!_!_!_!_
Press the DELAYSTARTpad.
Enter the time you want the oven to
start. (Be sure the microwave clock
shows the correct time of day.)
Select AM or PM.
Select any combination of Defrost
Auto/Time and Time Cook.
_-_ Press the START/PAUSEpad.
The Delay Start time will be displayed
plus DS. The oven will automadcally start
at the delayed time.
Thetimeofdaymaybedisplayedbypressingthe
CLOCK/SCROLLSPEEDpad,
Sta_/Pause
In addition to smrdng mmly flmcuons,
START/PAUSEallows you to stop cooking
wffhout opening the door or clearing
the display.
iiliii;i_ _iii__i_!iiiii_ii
Help
The HELPpad displays feature
infbrmation and helpfifl hints. Press the
HELPpad, then select a feature pad.
20
Page is loading ...
Page is loading ...
Page is loading ...
Page is loading ...
Page is loading ...
Page is loading ...
Page is loading ...
Page is loading ...
Page is loading ...
Page is loading ...
Page is loading ...
Page is loading ...
Page is loading ...
Page is loading ...
Page is loading ...
Page is loading ...
Page is loading ...
Page is loading ...
Page is loading ...
Page is loading ...
Page is loading ...
Page is loading ...
Page is loading ...
Page is loading ...
Page is loading ...
Page is loading ...
Page is loading ...
Page is loading ...
-
 1
1
-
 2
2
-
 3
3
-
 4
4
-
 5
5
-
 6
6
-
 7
7
-
 8
8
-
 9
9
-
 10
10
-
 11
11
-
 12
12
-
 13
13
-
 14
14
-
 15
15
-
 16
16
-
 17
17
-
 18
18
-
 19
19
-
 20
20
-
 21
21
-
 22
22
-
 23
23
-
 24
24
-
 25
25
-
 26
26
-
 27
27
-
 28
28
-
 29
29
-
 30
30
-
 31
31
-
 32
32
-
 33
33
-
 34
34
-
 35
35
-
 36
36
-
 37
37
-
 38
38
-
 39
39
-
 40
40
-
 41
41
-
 42
42
-
 43
43
-
 44
44
-
 45
45
-
 46
46
-
 47
47
-
 48
48


GE JTP95BA4BB Owner's manual
- Category
- Microwaves
- Type
- Owner's manual
- This manual is also suitable for
Ask a question and I''ll find the answer in the document
Finding information in a document is now easier with AI
Related papers
Other documents
-
Kenmore 91147862100 Owner's manual
-
-
-
 GE Monogram JET343G User manual
-
 GE Monogram Microwave Oven ZMC1090 Series User manual
-
-
mothercare 100 Disposable Breast Pads User guide
-
-
 Cafe CEB1599ELDS Owner's manual
-


