Page is loading ...

INSTRUCTION MANUAL
INFLATION
•
Congratulations on your purchase of the Splash Runner® Motorized Pool Lounger from
PoolCandy. You and your friends will enjoy hours of outdoor fun with this innovative
product. Your Splash Runner features two propellers which enable you to drive and turn in
all directions!
The Splash Runner is easy to use, but be sure to use it safely. Before starting, please read this
manual thoroughly, especially noting the safety and care. Keep this manual for reference.
Your Splash Runner requires some assembly. This package includes one pool lounger. For
each side of the pool lounger, it includes a battery case, a battery cover and handle, a
control arm sleeve, and a motor assembly that encloses the propeller. Your Splash Runner
also includes a repair kit, and this instruction manual.
For easy to follow video
instructions, go to
www.poolcandy.net/pages/support
and click on Support or scan
the QR code below:
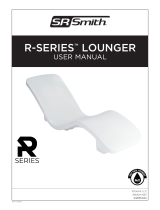
Your Splash Runner has three separate air chambers to inflate. The nozzles for the air chambers are located on the underside of
the back rest, behind the headrest, and at the bottom of the lounger near the feet. The Splash Runner can be inflated by mouth,
with a foot pump, or with an electric pump.
To inflate the Splash Runner with an electric pump, insert the pump nozzle into the air valve. The valves include a flap to prevent
air from flowing back out of the chamber, so make sure to push the pump nozzle past the flap, to ensure that air flows freely. Be
careful not to over-inflate.
Be sure to securely close each valve cover after completing each section.
SPLASHRUNNER
MOTORIZED LUXURY POOL LOUNGER
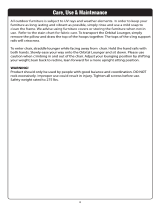
ASSEMBLY
Step 1.
Once the lounger has been inflated, repeat the following steps on both sides of your Motorized Pool Lounger. Be sure to
assemble it on a raised surface to prevent the motor assembly from being damaged.
Insert the control arm sleeves into the openings
in the armrest on the inflatable. Be sure to push
the sleeve in until the top area is level with the
top of the inflated armrest.
Step 2.
Slide the battery assembly into the control arm
sleeve. Be careful not to damage the wire inside the
battery assembly when sliding it into the sleeve.
Please read the User's Guide carefully before operating the product.
• Children under 14 years of age should not operate this product without parental supervision.
• This product is designed for pool and lake use only. It may be used in ponds or small lakes only within the range of the user’s
comfortable ability to swim to shore. Do not use in areas where there are strong currents, waves, or watercraft present which could
create wakes. Do not use in any other body of water or salt water.
• This product is designed to hold one person not exceeding 300 lbs/135 kg.
• Keep hands, hair, and loose objects such as clothing away from the propeller.
• If an object becomes lodged in the propeller, make sure that this product is turned o before attempting to dislodge.
• Always inspect the pool area before use to ensure it is free of hazards and/or obstacles, such as pool toys and swimmers.
• Never ride into or over swimmers.
• Keep this product away from hot or sharp objects.
• Always use caution and common sense.
• Never jump or dive o this product.
WARNING
• Avoid rough handling such as bumping or dropping.
• Avoid extreme temperatures. For best results use between the temperatures of 39° F and 120° F (4° C and 38° C).
• Clean using only a slightly damp cloth. Do not use cleaners with chemical agents.
SPECIAL CARE & HANDLING
• Your Motorized Pool Lounger uses 12 D batteries (6
per propeller), not included.
• Do not mix alkaline, standard (carbon-zinc) or
rechargeable nickel-cadmium) batteries.
• Do not mix old and new batteries.
• Do not use rechargeable batteries.
• Remove exhausted batteries from the unit.
• Do not short circuit battery terminals.
• Remove batteries and store them in a cool, dry place
when not in use.
• To avoid explosion or leakage, do not dispose of
batteries in a fire or attempt to recharge alkaline or
other non-rechargeable batteries.
BATTERY INFORMATION
If you have any questions or would like additional
information on PoolCandy products, please contact
us at service@banddgroup.com.
This device complies with Part 15 of the FCC Rules. Operation is subject to the following
two conditions: (1) this device may not cause harmful interference, and (2) this device
must accept any interference received, including interference that may cause undesired
operation.
NOTE: This equipment has been tested and found to comply with the limits for a Class B
digital device, pursuant to Part 15 of the FCC Rules. These limits are designed to provide
reasonable interference in a residential installation. This equipment generates, uses
and can radiate radio frequency energy and, if not installed and used in accordance with
the instructions, may cause harmful interference to radio communications. However,
there is no guarantee that interference will not occur in a particular installation. If this
equipment does cause harmful interference to radio or television reception, which can
be determined by turning the equipment off and on, the user is encouraged to try to
correct the interference by one or more of the following measures:
• Reorient or relocate the receiving antenna.
• Increase the separation between the equipment and receiver.
• Connect the equipment into an outlet on a circuit different from that to which the
receiver is connected.
• Consult the dealer or an experienced radio/ TV technician for help.
THE MOTORIZED POOL LOUNGER IS NEITHER A
PERSONAL-FLOTATION NOR A LIFESAVING DEVICE.
ALL USERS SHOULD KNOW HOW TO SWIM.
@PoolCandy
www.PoolCandy.net
CONTENTS:
•ONE INFLATABLE POOL LOUNGER
• 2 x BATTERY-OPERATED MOTORS
• PATCH KIT
• INSTRUCTION MANUAL
Model No. PC4000SR

ASSEMBLY (cont.)
TESTING the SPLASH RUNNER
Step 3.
Unscrew the cap from the battery assembly and to open the battery
compartment. Insert 6 D-cell batteries (not included) into the
compartment, making sure to follow the polarity (+/-) as marked
inside the compartment. When all batteries are inserted, replace the
cover on the battery compartment, and secure the cover with the
cap by pressing down and tightening clockwise.
Step 4.
Connect the wires from the bottom of the battery compartment (which
should now be underneath your inflatable) to the propeller assembly by
inserting the male power plug from the battery into the female outlet on
the propeller. Be careful not to damage the wires.
Step 5.
Align the tabs on the propeller assembly with the openings in the
downrod of the battery compartment. Slide the top stem from the
propeller into the battery compartment downrod. Squeeze the tabs on
the sides of the top stem of the propeller to allow the stem to fully insert.
The propeller assembly and the battery compartment assembly should
‘click’ into place.
Step 6.
Repeat the steps above on the other side of the raft. Be careful not to damage the propeller when moving your Splash
Runner during assembly.
After completing the previous assembly steps, press the button on the handle to test the propeller. If the propeller doesn’t
move, check to make sure that all electrical connections are complete, and that the battery cover is correctly aligned and
completely closed.
DISASSEMBLY
To disassemble your Splash Runner, please follow these instructions:
First, unscrew the cap from the battery compartment and remove the cover. Remove all batteries. It is a good idea to
immediately replace the battery cover and cap so that you don’t lose them.
Next, separate the propeller from the battery compartment assembly by squeezing the tabs where they are connected.
Squeeze both tabs and pull the propeller down. Be careful not to pull the propeller out too fast or far, as this may damage
the electrical wires.
Finally, separate the electrical connection between the propeller and the wires from the battery compartment by pressing
the small tab on the male plug and pulling it away from the female connection. Once the propeller is disconnected from
the wiring on the battery compartment assembly, you can remove all parts from the inflatable.
Note: Be sure to disconnect the electrical by pulling the plastic plugs, not the wires themselves. Pulling on the wires can
damage the assembly.
REPAIRING the SPLASH RUNNER
Rough surfaces may puncture the Splash Runner. If the lounger gets punctured, use the glue and PVC from the repair kit to
seal the punctured surface. Apply the glue on the damaged area and apply the supplementary PVC sheet. Wait
approximately one minute after applying the PVC sheet for the glue to dry before handling your Splash Runner. You should
wait 24 hours before using the Splash Runner in the water again.
To move, press the buttons on both handles. These buttons will
operate your propellers.
To drive forward, turn both handles so they are facing forward and
press both buttons at the same time.
To drive in reverse, turn both handles so they are facing backward
and press both buttons.
To turn right, turn either handle to the right. The angle of your turn
will depend on how much you turn the handles to the right.
To turn left, turn either handle to the left. The angle of your turn will
depend on how much you turn the handles to the left.
To move laterally towards the right, turn both handles right and
press both buttons.
To move laterally towards the left, turn both handles left and press
both buttons.
To rotate in a circle, face one propeller forward and the other
backward and press the buttons.
•
•
•
•
•
•
•
•
Note: Make sure the cover is properly aligned with the battery compartment as you close the compartment. The cover and
compartment are designed with notches to ensure correct alignment. Rotate the cover until the notches in the cover fit into the
notches in the compartment itself.
HOW to USE YOUR SPLASH RUNNER
CONTROLLING the SPLASH RUNNER
Your Splash Runner is perfect for your backyard pool or a small lake. Because it contains propellers on either side, it enables
you to move in all directions.
/