Page is loading ...

AE402 Owner’s Manual
1 360399_-_HI
AERATOR Owner's Manual
AE402V
Beginning Serial #: 100515001
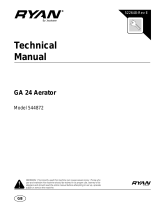
Replacement Parts and Accessories
Original Instructions
IMPORTANT- READ CAREFULLY BEFORE USE AND KEEP FOR FUTURE REFERENCE.
SOLID SPIKE TINE
Complete set of spike
tines for the AE’s reel.
P/N 360394-S
TINE KIT
Individual coring tine for
replacement of worn or
broken tines.
P/N 360100
TINE REEL KIT
Replacement reel with
tines for your aerator.
P/N 360352
NOT FOR REPRODUCTION

AE402 Owner’s Manual
360399_-_HI
2
CONTENTS
SPECIFICATIONS AND SAFETY 3
INSTRUCTION LABELS 4
PACKING CHECKLIST & ASSEMBLY 5
OPERATION 6
MAINTENANCE AND TROUBLESHOOTING 7-8
ILLUSTRATED PARTS & PARTS LIST 10-13
Go to http://www.billygoat.com for translations of the product manuals.
Visitez http://www.billygoat.com pour la version canadienne-française des manuels de produits
NOT FOR REPRODUCTION

AE402 Owner’s Manual
360399_-_HI
3
SPECIFICATIONS
AE402V
Engine: HP
6.5 HP (4.8 kW)
Engine: Model
12V3
Engine: Type
B&S VANGUARD
Engine: Fuel Capacity
3.3 qt. (3.1L)
Engine: Oil Capacity
0.63 qt. (0.58 L)
Total Unit Weight:
252 lb. (114.3 kg)
Max. operating slope
20⁰
SAFETY
WARNING
This product can expose you to chemicals including gasoline engine exhaust, which is known to the State
of California to cause cancer, and carbon monoxide, which is known to the State of California to cause
birth defects or other reproductive harm. For more information go to www.P65Warnings.ca.gov.
Read the safety rules and follow them closely. Failure to obey these rules could result in loss of control of
the unit, severe personal injury or death to you, or bystanders, or damage to property or equipment.
NOT FOR REPRODUCTION

AE402 Owner’s Manual
360399_-_HI
4
INSTRUCTION LABELS
The labels shown below were installed on your BILLY GOAT
®
Aerator. If any labels are damaged or missing, replace them
before operating this equipment. Part numbers from the Illustrated Parts List are provided for convenience in ordering
replacement labels. The correct position for each label may be determined by referring to the part numbers shown.
LABEL WARNING GUARDS LABEL EXPLOSIVE FUEL LABEL PATENT LABEL WARNING UNIT WEIGHT
P/N 900327 P/N 400268 P/N 360286 P/N 360188
LABEL LIFT HERE LABEL INSTRUCTIONS AE
P/N 360187 P/N 360025
THROTTLE CONTROLS
Honda
Fuel valve
Throttle
Choke
Briggs
Set lever to choke when starting cold
Set lever to desired engine speed.
Move lever completely to the left to
stop engine
NOT FOR REPRODUCTION

AE402 Owner’s Manual
360399_-_HI
5
PACKING CHECKLIST
Your Billy Goat is shipped from the factory in one carton, completely assembled.
PUT OIL IN ENGINE BEFORE STARTING
ASSEMBLY
READ all safety instructions before assembling unit.
TAKE CAUTION when removing the unit from the box.
NOTE: Items in ( ) can be referenced in the Parts Illustrations and Parts Lists on pages 10-13.
1. UNFOLD the upper handle (item 48) and slide handle lock loops (item 118) into place to secure the upper handle to the
lower handle (item 82 & 83).
2. ASSEMBLE the water tank to the unit and secure with the two carriage bolts, two locknuts and washers (items 137, 105
and 111) that can be found in the parts bag.
3. FILL the water tank (item 2) to desired weight with water ONLY.
4. CHECK engine oil level and fill to proper level. Also check oil in gear reduction reservoir and fill if necessary. See engine
owner’s manual for type and amount of oil to use. Move the tine engagement lever to the down position, to level engine
during checking.
5. CONNECT spark plug wire. Set the engine stop switch to the ON position. You will use the stop switch on the handle
during operation.
Boxing Parts
Checklist
Owner’s Manual
AE 360399
Engine Manual Per
Model
Vanguard 6.5 HP
PARTS BAG & LITERATURE ASSY
Warranty card P/N- 400972, Owner’s Manual P/N-360399, General Safety and Warnings Manual Renovation-
100295, Declaration of Conformity P/N-100500.
FILL WITH WATER
ONLY!
NOT FOR REPRODUCTION

AE402 Owner’s Manual
360399_-_HI
6
OPERATION
AERATING OPERATION
NOTE: NEVER PARK THIS UNIT ON A SLOPE OF ANY KIND. Always keep tines
in the up position when parking the unit.
TINES RAISING/LOWERING: The tines are raised or lowered into the ground by
operating the tine engagement lever on the upper handle. Tine penetration is very
dependent on surface preparation. READ the entire operation section before aerating.
(See Fig. 1)
SET SPEED: The ground speed of your aerator varies with the engine speed. Set the
engine at approximately half throttle to start. Speed may be increased based on the turf
conditions (i.e. large flat areas) and operator experience. Speed should be lowered when
operating under adverse turf conditions (i.e. fenced areas, hills, or slopes).
ENGAGE TINES: With the aerator in the work area, release the clutch bail and push
forward on the tine engagement lever, lowering the tines into the dirt.
AERATE: Engage the operators clutch bail by pulling it backwards from the handle, and
start aerating.
MOVE: Be sure the tine engagement control is in the up position (tines out of the ground)
and engage the wheel drive by squeezing the operators clutch bail against the handle.
Transport the aerator to the work area.
NOTE: For maximum tine penetration apply downward pressure on the handle.
TURNING: At the end of an aerating run, release the clutch bail and lift up on the tine
engagement control to lift the tines out of the ground. Using the handle lift the front of the
unit to pivot it around and line up for the next pass.
TRANSPORT: Be sure to lift the tine engagement lever (tines out of the ground) before
transporting away from the work area. (See Fig. 2)
Tines down
aerating
Tines up
transport
FOLDING HANDLE
This unit is equipped with a folding upper handle for easier storage.
TO FOLD THE HANDLE (See Fig. 3 and Fig. 4):
1. Slide handle lock loops (item 118) up on both sides.
2. Fold the upper handle (item 48).
Fig 3
Fig 4
*****TIPS*****
MOW
Mow the lawn to its normal cut height.
WATER
For the best performance and maximum tine penetration the lawn should be thoroughly watered the day before aeration.
INSPECT
Check the lawn before beginning work. Remove all rocks, wire, string, or other objects that can present a hazard during work prior
to starting.
IDENTIFY
Mark all fixed objects to be avoided during work, such as sprinkler heads, water valves, buried cables, or clothes line anchors, etc.
SLOPES
Do not operate the aerator on steep slopes. Use extreme caution when operating on any sloped surface. For lesser sloped areas
operate the unit, traversing up and down at a 45 degree angle to the slope rather than straight across. Extended operation on
steep slopes can cause engine damage. NOTE: DO NOT release the operators clutch bail when operating on a slope. This will
allow the unit to free wheel and allow the unit to roll down the slope. NOTE: Honda engines are equipped with a low oil sensor to
prevent engine damage. When it senses a low oil condition (i.e. unit is operating or sitting on a steep slope) the engine shuts
down. The maximum operating slope for the engine is 20
0
. The low oil condition must be corrected before the engine can be
restarted. See the engine owner’s manual for more information.
Fig. 1
Fig. 2
NOT FOR REPRODUCTION

AE402 Owner’s Manual
360399_-_HI
7
MAINTENANCE
PERIODIC MAINTENANCE
Periodic maintenance should be performed at the following intervals:
Maintenance Operation
Every Use
(daily)
Every 25 hrs
Every 50 Hours
Inspect for loose, worn or damaged parts.
Check engine oil.
Inspect belt for wear.
Engine (See Engine Manual)
Oil chains (see lubrication).
Thoroughly clean all debris from unit and tine reel
Check tine reel nut torque. Torque to min. 100 ft.lbs.
Check gear reduction oil level
Grease bearings (see lubrication).
ENGINE MUST BE LEVEL WHEN CHECKING OR FILLING OIL
NOTE: Items in ( ) can be referenced in the Parts Illustrations and Parts Lists on pages 10-13.
TINE REEL REMOVAL (See pages 12 and 13 for Parts Illustration and Parts List)
NOTE: Tine reel removal is only necessary to replace an entire tine row or for other major unit maintenance. Individual tines
can be replaced by following the INDIVIDUAL TINE REPLACEMENT instructions.
1. Wait for engine to cool and disconnect spark plug.
2. Remove the top guard by removing the four nuts, two on each side that secures it to the frame.
3. Release the tension on the chain. See CHAIN TENSION ADJUSTMENT in this manual.
4. Remove the four bolts and nuts, two on each side, holding the tine reel bearings in place. BE CAREFUL the tine reel is
heavy and sharp. Take precautions to not allow it to fall when the bearing bolts are removed.
5. Lift the reel up and to the side to remove it from the drive chain.
6. Replace the reel with a new one.
7. To reinstall the reel follow the above steps in reverse. Make sure all hardware is tightened securely
8. Replace the guard and reinstall the four nuts that secure it in place.
INDIVIDUAL TINES REPLACEMENT (See pages 12 and 13 for Parts Illustration and Parts List)
1. Wait for engine to cool and disconnect spark plug.
2. Remove the bolt and nut holding the tine to the plate.
3. Replace the tine with a new one along with a new bolt and nut.
NOTE: Tines are a normal wear item and should be inspected regularly for signs of wear or damage.
BELT AND CHAIN TENSION ADJUSTMENT
ADJUSTING BELT TENSION (See pages 12 and 13 for Parts Illustration and Parts List)
1. Remove the top guard (item 3) by removing the four nuts (item 87), two on each side, that secure it to the frame.
2. Locate the top of the belt idler assembly where the clutch cable (item 55) is secured in place. A properly tensioned belt
should stretch the idler spring (located next to the idler pulley) between 1/4" - 3/8" when the clutch bail (item 54) is held in
the drive position.
3. Using a 1/2" wrench loosen the two nuts that secure the cable (item 55) in place.
Continued next page.
NOT FOR REPRODUCTION

AE402 Owner’s Manual
360399_-_HI
8
4. TO INCREASE belt tension adjust these two nuts so that the cable (item 55) is secured in place with an additional 1/4" of
the threaded adjuster at the top of the assembly.
TO DECREASE belt tension, adjust these two nuts so that the cable (item 55) is secured in place with 1/4" less of the
threaded adjuster at the top of the assembly.
5. Replace the guard (item 3) and reinstall the four nuts (item 87) that secure it in place.
6. Run the unit to test your adjustment. Repeat as necessary to achieve proper adjustment. A properly adjusted belt will pull
the unit up a 15 degree slope when clutched without any belt slip, and will declutch and stop the unit completely when the
clutch is released.
NOTE: Never release the clutch on a slope. The unit is heavy and will free wheel downhill.
NOTE: A worn belt will not allow for proper adjustment and must be replaced.
ADJUSTING CHAIN TENSION (See pages 12 and 13 for Parts Illustration and Parts List)
1. Remove the top guard (item 3) by removing the four nuts (item 87), two on each side, that secure it to the frame.
2. Locate the bolt (item 31, 33) and nut (item 80) that hold each idler sprocket to the frame of the unit. One idler sprocket sets
tension on the wheel drive chain and one sets tension on the tine drive chain.
3. Loosen the bolt and nut and slide the idler sprocket (item 29) in the desired direction.
INCREASED TENSION: Slide the sprocket to the rear.
DECREASED TENSION: Slide the idler sprocket to the front.
4. Tighten the bolt and nut to secure the sprocket in place.
5. Replace the guard and reinstall the four nuts that secure it in place.
NOTE: Over tensioning the chain will cause premature chain and sprocket wear. DO NOT OVER TENSION THE CHAIN. A
properly tensioned chain will have slack of 1/4"-3/8" when moved by hand.
DRIVE BELT REPLACEMENT (See pages 12 and 13 for Parts Illustration and Parts List)
1. Wait for engine to cool and disconnect spark plug.
2. Remove the top guard by removing the four nuts, two on each side, that secure it to the frame.
3. Slide the belt off of the engine drive pulley, and off of the jackshaft drive pulley.
4. Continue sliding the belt along the jackshaft to the right jackshaft bearing away from the pulley and sprockets.
5. Using a 9/16" wrench, remove the two bolts and nuts that hold the jackshaft bearing in place.
6. Carefully lift the jackshaft up until the belt can be slid out underneath the bearing.
7. Slide the new belt in place over the jackshaft.
8. Replace and tighten the bolts and nuts holding the jackshaft bearing in place. Be sure that the jackshaft is aligned straight
across between both bearings.
9. Slide the belt along the jackshaft and over both engine and jackshaft pulleys. Be sure the idler pulley is positioned on the
flat side of the belt.
10. Check proper belt tension. See BELT TENSION ADJUSTMENT in this manual.
CHAIN REPLACEMENT (See pages 12 and 13 for Parts Illustration and Parts List)
NOTE: This procedure will work to change the wheel drive chain or the tine drive chain.
1. Wait for engine to cool and disconnect spark plug.
2. Remove the top guard by removing the four nuts, two on each side, that secure it to the frame.
3. Roll the unit until the master link of the chain that you want to replace is exposed near the jackshaft sprocket.
4. Release the tension on the chain. See CHAIN TENSION ADJUSTMENT in this manual.
5. Using a screwdriver or similar device, remove the spring clip that secures the master link in the chain.
6. With the master link removed unwind the chain from the two sprockets that it connects.
7. Carefully string the replacement chain around the same two sprockets and reconnect it with the new master link provided
with your replacement chain.
8. Reset the tension on the chain.
9. Replace the guard and reinstall the four nuts that secure it in place.
NOT FOR REPRODUCTION

AE402 Owner’s Manual
360399_-_HI
9
TROUBLESHOOTING
LUBRICATION
BEARINGS (See pages 12 and 13 for Parts Illustration and Parts List)
1. Remove the top guard by removing the four nuts, two on each side that secures it to the frame. NOTE: Guard must be
removed to lubricate the jackshaft bearings only. All other bearings can be lubed without removing the guard.
2. Lubricate all 6 bearings using a pressurized grease gun with standard lithium based grease.
3. Wipe any excess grease off of all bearings and fittings after each lubrication.
4. Replace the guard and reinstall the four screws that secure it in place.
CHAINS (See pages 12 and 13 for Parts Illustration and Parts List)
1. Remove the top guard by removing the four nuts, two on each side that secures it to the frame.
2. Apply a light coat of No. 30 Oil or a penetrating chain lubricant to keep the chain clean and in good running order.
3. Replace the guard and reinstall the four screws that secure it in place.
NOTE: If machine is cleaned with a pressure washer the chains and bearings should be lubricated after each cleaning.
Problem Possible Cause Solution
Engine will not start
Throttle in off position. Engine not in full
choke position. Out of gasoline. Bad or old
gasoline. Spark plug wire disconnected. Dirty
air cleaner.
Check stop switches, throttle, choke
position and gasoline. Connect spark
plug wire. Clean or replace air cleaner.
Or contact a qualified service person.
Check and fill engine oil.
Abnormal vibration
Damaged or missing tines. Loose handle
bolts. Loose engine bolts.
Stop work immediately. Replace any
damaged or missing tines. Tighten all
loose bolts and nuts.
Engine is making loud
noise or squealing
Gear reduction oil level is low
Check and add oil according to engine
owner's manual
Engine stalls or labors
when aerating
Working on too steep of a slope. Not enough
oil in the engine.
Work at 45 degrees to the slope moving
up and down instead of across. Check
and add engine oil.
Engine is locked, will not
pull over
Debris locked against reel, or drive pulleys.
Engine problem.
Pull spark plug wire and remove debris.
Contact an engine servicing dealer for
engine problems.
Unit does not move when
clutch is engaged
Belt drive out of adjustment. Worn drive belt.
Loose or damaged chain or sprockets. Loose
or damaged pulleys. Damaged or broken
clutch cable.
See maintenance on pg. 7 of this
manual. Contact a qualified servicing
dealer.
NOT FOR REPRODUCTION

AE402 Owner’s Manual
360399_-_HI
10
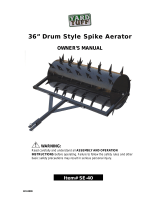
AE402 HANDLE PARTS DRAWING
NOT FOR REPRODUCTION

AE402 Owner’s Manual
360399_-_HI
11
AE402 HANDLE PARTS LIST
ITEM AE402V
NO.
Part No.
1 FRAME ASSEMBLY WA AE402
360324
1
2 WATER TANK 5.5 GAL 360238 1
3 COVER, DRIVE UNIVERSAL AE401 360398 1
9 WASHER 5/16 FENDER 8172020 2
16 NUT-HEX-NYLK, FLG .375"-16 ZP 8165003 8
34 TUBE FRONT BUMPER 360329 1
35 BOLT SHOULDER 3/4 x 2.5 360146 2
36 NUT LOCK 5/8-11 THIN 8161046 2
37 BUSHING PIVOT 360183 4
38 BOLT CARRIAGE 3/8-16 x 1.75" 8024061 8
39 COTTER PIN 8197031 4
40 BRACKET LIFT LINK 360246 2
41 PLATE LINKAGE RH LONG WA AE 360328 1
42 PLATE LINKAGE LH LONG WA AE 360327 1
43 WASHER FLAT 3/8 SAE 8172009 12
45 SPRING EXTENSION 360154 2
46 ROD LIFT 360330 2
48 HANDLE UPPER AE 350375 1
50 NUT-HEX-NYLK, FLG .3125"-18 ZP 8165002 8
52 HANDLE LIFT 360296 1
53 CLEVIS PIN 3/8" X 1.625 520119 2
54 BAIL CLUTCH 350374 1
55 CABLE CLUTCH ASSY 360313 1
58 BUMPER RECESS 360298 2
68 TY-WRAP 900407 8
72 CARRIAGE BOLT 5/16-18X1.75 8024043 2
78 WASHER 1/4 SAE 8172007 4
79 LABEL TANK INSTRUCTIONS AE 360025 1
82 HANDLE LOWER WA 360321 2
360279 2
LOOP FOLDING HANDLE 350138 2
BOLT SHOULDER 3/8 x 1 1/4" 360284 2
124 LABEL AE BADGING 360395 1
125 LABEL LOGO CIRCLE 3.5" 100387 1
126 GRIP 400570 2
127 1/4 WASHER FLAT FENDER 8172019 1
135 LABEL MADE IN U.S.A. 520116 1
136 SCREWCAP 1/4"-20 X 1 1/2" HCS ZP 8041008 1
137 BOLT CARRIAGE 5/16"-18 X 2" ZP 8024044 2
QTY
DESCRIPTION
NOT FOR REPRODUCTION

AE402 Owner’s Manual
360399_-_HI
12
AE402 ENGINE PARTS DRAWING
NOT FOR REPRODUCTION

AE402 Owner’s Manual
360399_-_HI
13
AE402 ENGINE PARTS LIST
WASHER 1.062" ID X 1.75 OD 8172021 3 OR 4
CHAIN MASTER LINK 360205 2
WASHER 1/4" FC 8171002 3
NOT FOR REPRODUCTION
/