Thermo Fisher Scientific BioCAD® 700E Workstation Quick start guide
- Category
- Software manuals
- Type
- Quick start guide

BioCAD® 700E Workstation for
Perfusion Chromatography®
Version 3 Series Software
Getting Started Guide

© Copyright 2000, 2011 Applied Biosystems
All rights reserved
For Research Use Only. Not for use in diagnostic procedures.
Information in this document is subject to change without notice. Applied Biosystems assumes no responsibility for any errors that
may appear in this document. This document is believed to be complete and accurate at the time of publication. In no event shall
Applied Biosystems be liable for incidental, special, multiple, or consequential damages in connection with or arising from the use
of this document.
Applied Biosystems, Perfusion Chromatography, POROS, the fractal icon, BioCAD, SCOUT, and RPM are registered trademarks
of Applied Biosystems or its subsidiaries in the U.S. and certain other countries.
AB (Design), ABI, Applera, ChromatoCAD, ID, ImmunoDetection, SPRINT, Supervisor, and VISION are trademarks of
Applied Biosystems or its subsidiaries in the U.S. and certain other countries.
Advantec is a registered trademark of Toyo Roshi International, Inc.
Eppendorf is a registered trademark of Eppendorf-Netheler-Hinz GMBH.
EZ is a trademark of Scientific Software, Inc.
Gilson is a registered trademark of Gilson, Inc.
Kel F is a registered trademark of 3M Company.
Kynar is a registered trademark of Union Carbide.
Microsoft and Windows are registered trademarks of Microsoft Corporation.
Pentium is a registered trademark of Intel Corporation.
RheFlex is a registered trademark and Rheodyne is a trademark of Rheodyne, L.P.
SLO-BLO is a trademark of Littlefuse, Inc.
SpectraSYSTEM and PushLoop are registered trademarks of Thermo Separation Products.
Swagelok is a registered trademark of Crawford Fitting Co.
Teflon and Tefzel are registered trademarks of E.I. Du Pont de Nemours and Co.
Tygon is a registered trademark of Norton Company.
Zip is a trademark and Iomega is a registered trademark of Iomega Corporation.
All other trademarks are the sole property of their respective owners.
Printed in the USA, 04/2011
Part Number 602478-01 Rev. B

WARNINGWARNING
Before handling any chemicals, refer to the Material Safety Data Sheet
provided by the manufacturer, and observe all relevant precautions.
AVERTISSEMENT
Avant de manipuler des produits chimiques, veuillez consulter la fiche de
sécurité du matériel fournie par le fabricant, et observer les mesures de
précaution qui s’imposent.


Table of Contents
BioCAD® 700E Workstation Getting Started Guide v
Table of Contents
Chapter 1 Before You Begin ............................................................1-1
Chapter 2 Starting Up and Connecting ....................................2-1
Chapter 3 Configuring, Plumbing, and Priming the
Workstation ....................................................................... 3-1
3.1 Configuring ........................................................................... 3-2
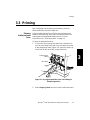
3.2 Plumbing .............................................................................. 3-8
3.3 Priming................................................................................. 3-9
Chapter 4 Creating and Running a Method ...........................4-1
4.1 Creating a Method .................................................................. 4-1
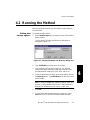
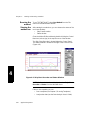
4.2 Running the Method ................................................................ 4-9
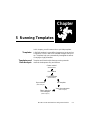
Chapter 5 Running Templates ........................................................5-1
Chapter 6 Shutting Down ..................................................................6-1
Index

Table of Contents
vi Applied Biosystems

1
Chapter
BioCAD® 700E Workstation Getting Started Guide 1-1
1 Before You Begin
Running your first
experiment The BioCAD® 700E Workstation Getting Started Guide is
designed to help you quickly learn how to use the BioCAD
700E Workstation for Perfusion Chromatography®.
This guide contains brief procedures. For more detailed
procedures and reference information, refer to the BioCAD
700E Workstation User’s Guide.
In the following chapters, you will:
•Start up and connect
•Configure and prime the workstation
•Create and run a method
•Run a template
•Shut down
NOTE: This guide assumes that your BioCAD 700E
Workstation has been properly installed by a Applied
Biosystems technical representative, that the workstation is
plumbed in Tandem Column configuration, and that the
0.5 ml syringe is installed.
A quick
introduction
to Windows
If you are unfamiliar with the Microsoft® Windows®
environment, take a minute to read Section 1.6, A Quick
Introduction to Microsoft Windows, in the BioCAD 700E
Workstation User’s Guide.

Chapter 1 Before You Begin
1-2 Applied Biosystems
1What you need To run the experiment in this guide, you need:
•Standard protein mix containing myoglobin, alpha
chymotrypsinogen A, cytochrome C, and lysozyme
•MES, HEPES, Sodium acetate, HCl, NaOH, NaCl, and
HPLC-grade water for buffer preparation
•POROS® HS M-series 4.6 mmD/100 mmL strong
cation exchange column
Conditions The experiment shown in this guide is run using the following
conditions:
Sample Standard protein mix
Buffer 20 mM cation buffers, pH range 4.5 to 7.5
Eluent
Gradient 10 column volume gradient from 0 to
1,000 mM NaCl
Column POROS® HS M-series 4.6 mmD/100 mmL
strong cation exchange column
Plumbing Tandem Column
Flow Rate 10 ml/min
Injection
Mode Autoloader
Syringe 0.5 ml
Sample Loop 100 µl

BioCAD® 700E Workstation Getting Started Guide 1-3
1
Preparation Prepare the following and filter through a 0.22 or 0.45 µm filter
before use:
Sample 1 ml of a 5 mg/ml solution of myoglobin, alpha
chymotrypsinogen A, cytochrome C, and
lysozyme
Buffers 1. pH 4.5 buffer (500 ml)
33.3 mM MES + 33.3 mM HEPES + 33.3 mM
Na acetate (adjust to pH 4.5 with HCl)
2. pH 7.5 buffer (500 ml)
33.3 mM MES + 33.3 mM HEPES + 33.3 mM
Na acetate (adjust to pH 7.5 with NaOH)
3. HPLC-grade water (1 liter)
4. 3.0 M NaCl (500 ml)
For more information, see Section 3.2.2,
Preparing pH Blend Mode Buffers, in the
BioCAD 700E Workstation User’s Guide.

Chapter 1 Before You Begin
1-4 Applied Biosystems
1

2
Chapter
BioCAD® 700E Workstation Getting Started Guide 2-1
2 Starting Up
and Connecting
In this chapter, you will:
•Power up the workstation
•Start the BioCAD software
•Connect buffers
•Sparge buffers
•Connect the sample
Powering up
the workstation Power up the BioCAD 700E Workstation and external
components in the following order:
•Turn on the compressed dry gas source (air or nitrogen)
and regulate to 80 to 100 psi
•Turn on the helium source and regulate to 5 psi
•Power up the monitor and printer
•Power up the BioCAD 700E Workstation by turning on
the power switch, located on the right side of the
workstation, near the top of the panel

Chapter 2 Starting Up and Connecting
2-2 Applied Biosystems
2
Starting the
BioCAD
software
NOTE: If nothing appears on the monitor screen, check that
the monitor is powered on, that the cable is connected
between the monitor and the workstation, and adjust the
contrast of the monitor display.
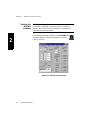
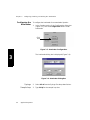
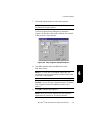
From Windows desktop, double-click the BioCAD icon
to start the BioCAD software and display the Control
Panel (Figure 2-1).
Figure 2-1 BioCAD Control Panel

Sparging buffers
BioCAD® 700E Workstation Getting Started Guide 2-3
2
Connecting
buffers Place the buffer/solvent lines in the following solutions:
Sparging buffers Sparge the buffers/solvents to prevent outgassing and ensure
pump flow rate precision and gradient accuracy:
1. Insert a buffer/solvent line and the corresponding sparge
line through a bottle cap insert and into the sparge element
(provided in the startup kit).
2. Submerge the sparge element and attached lines in the
appropriate buffer/solvent or filtered deionized water.
3. Screw the bottle cap onto the bottle. Make sure the cap
insert is vented.
4. Place the buffer/solvent reservoirs to the right of the
workstation.
5. On the right side of the workstation, set the Helium On/Off
switch to the On position.
6. Open the sparge valves for the reservoirs in use by turning
the gas flow control knobs on the right side of the
workstation. Open the valves until you see a steady stream
of bubbles in the reservoir.
NOTE: For more information on sparging buffers,
see Section 2.3.3, Connecting the Buffer/Solvent and Sparge
Lines, in the BioCAD 700E Workstation User’s Guide.
Buffer/Solvent Line Solution
A pH 4.5 Buffer
B pH 7.5 Buffer
C Water
D 3.0 M NaCl
E and F Filtered deionized water
NOTE: Do not leave these lines dry.

Chapter 2 Starting Up and Connecting
2-4 Applied Biosystems
2
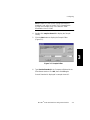
Connecting
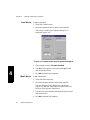
the sample In this experiment, you will make an autoloader injection.
To connect the sample for an autoloader injection:
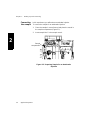
1. Place the sample in a small vessel and place the vessel in
the sample compartment (Figure 2-2).
2. Insert sample line 1 in the sample vessel.
Figure 2-2 Preparing Sample for an Autoloader
Injection
PB100519
Sample
compartment

3
Chapter
BioCAD® 700E Workstation Getting Started Guide 3-1
3 Configuring,
Plumbing, and
Priming the
Workstation
In this chapter, you will:
•Configure buffers, Autoloader, column, and data
collection
•Plumb columns, tubing, and sample loop
•Prime buffer/solvent lines and sample line

Chapter 3 Configuring, Plumbing, and Priming the Workstation
3-2 Applied Biosystems
3
3.1 Configuring
Configuration
definition A configuration specifies the physical setup of the BioCAD 700E
Workstation, including buffers/solvents, samples, columns, and
optional external devices.
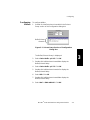
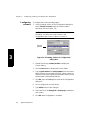
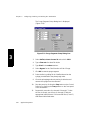
Displaying
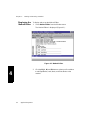
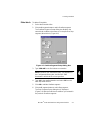
Configuration From the Control Panel, select Edit Config from the Config
menu. The Configuration dialog box is displayed (Figure 3-1).
Figure 3-1 Configuration Dialog Box

Configuring
BioCAD® 700E Workstation Getting Started Guide 3-3
3
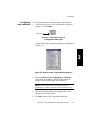
Configuring
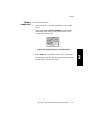
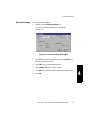
buffers To configure buffers:
1. Double-click buffer/solvent channel A in the Solvent
Pump section of the Configuration dialog box.
Figure 3-2 Solvent Pump Section of Configuration
Dialog Box
The Buffer/Solvent Library is displayed.
2. Select Cation Buffer - pH 4.5. Click OK.
3. Double-click buffer/solvent channel B to display the
Buffer/Solvent Library.
4. Select Cation Buffer - pH 7.5. Click OK.
5. Double-click buffer/solvent channel C to display the
Buffer/Solvent Library.
6. Select H20. Click OK.
7. Double-click buffer/solvent channel D to display the
Buffer/Solvent Library.
8. Select NaCl + 3000 mM NaCl. Click OK.
Buffer/Solvent
channels

Chapter 3 Configuring, Plumbing, and Priming the Workstation
3-4 Applied Biosystems
3
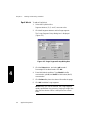
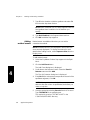
Configuring the
Autoloader To configure the Autoloader for an autoloader injection:
1. In the Sample section of the Configuration dialog box
(Figure 3-3), click the Configuration button under
Autoloader.
Figure 3-3 Autoloader Configuration
The Autoloader dialog box is displayed (Figure 3-4).
Figure 3-4 Autoloader Dialog Box
Syringe 2. Select 0.5 ml from the Syringe Size drop-down list box.
Sample loop 3. Type 100 µl for the sample loop size.
Click
here

Configuring
BioCAD® 700E Workstation Getting Started Guide 3-5
3
NOTE: Make sure the correct syringe and loop are
installed. If not, refer to Section 3.1.4, Changing the
Syringe and Sample Loop, in the BioCAD 700E
Workstation User’s Guide.
4. Double-click sample channel 1 to display the Sample
Library.
5. Click the New button to display the Sample Editor
(Figure 3-5).
Figure 3-5 Sample Editor
6. Type Protein Standard in the Component field and in the
Short Name text box. Click OK, then click OK again.
Protein Standard is displayed in sample channel 1.

Chapter 3 Configuring, Plumbing, and Priming the Workstation
3-6 Applied Biosystems
3
Configuring
columns To configure the column plumbing option:
1. In the Plumbing section of the Configuration dialog box,
select Tandem Columns from the Column Option
drop-down list box (Figure 3-6).
NOTE: You will connect the column in Section 3.2,
Plumbing. You will use a single column in this
configuration with a union in place of column 2.
Figure 3-6 Plumbing Section of Configuration
Dialog Box
2. Double-click the top column position to display the
Column Library.
3. Click the New button to display the Column Editor.
4. Type the part number and serial number (from the column
label). Because you are using a POROS column, when you
enter the column part number, all information other than the
serial number is automatically filled in.
5. Click OK, then click OK again to return to the Configuration
dialog box.
6. Do not configure the second column.
7. Type 0.020 inches for the Tubing ID.
8. Select the Flow Cell (Analytical or Semi-prep) installed on
your system.
9. Click OK when configuration is complete.
Column
position
Page is loading ...
Page is loading ...
Page is loading ...
Page is loading ...
Page is loading ...
Page is loading ...
Page is loading ...
Page is loading ...
Page is loading ...
Page is loading ...
Page is loading ...
Page is loading ...
Page is loading ...
Page is loading ...
Page is loading ...
Page is loading ...
Page is loading ...
Page is loading ...
Page is loading ...
Page is loading ...
Page is loading ...
Page is loading ...
Page is loading ...
Page is loading ...
Page is loading ...
Page is loading ...
Page is loading ...
-
 1
1
-
 2
2
-
 3
3
-
 4
4
-
 5
5
-
 6
6
-
 7
7
-
 8
8
-
 9
9
-
 10
10
-
 11
11
-
 12
12
-
 13
13
-
 14
14
-
 15
15
-
 16
16
-
 17
17
-
 18
18
-
 19
19
-
 20
20
-
 21
21
-
 22
22
-
 23
23
-
 24
24
-
 25
25
-
 26
26
-
 27
27
-
 28
28
-
 29
29
-
 30
30
-
 31
31
-
 32
32
-
 33
33
-
 34
34
-
 35
35
-
 36
36
-
 37
37
-
 38
38
-
 39
39
-
 40
40
-
 41
41
-
 42
42
-
 43
43
-
 44
44
-
 45
45
-
 46
46
-
 47
47


Thermo Fisher Scientific BioCAD® 700E Workstation Quick start guide
- Category
- Software manuals
- Type
- Quick start guide
Ask a question and I''ll find the answer in the document
Finding information in a document is now easier with AI
Related papers
-
 Thermo Fisher Scientific BioCAD® 700E Workstation User guide
-
 Thermo Fisher Scientific COBRA AFC 2000 Robotic Sample Handling User guide
-
 Thermo Fisher Scientific POROS® 50 HE Perfusion Chromatography® Columns Operating instructions
-
 Thermo Fisher Scientific POROS® HQ and PI Perfusion Chromatography® Columns Operating instructions
-
 Thermo Fisher Scientific Data Analysis Software Owner's manual
-
 Thermo Fisher Scientific SCOUT® Column Selector User guide
-
 Thermo Fisher Scientific POROS® 20 HE Perfusion Chromatography® Bulk Media Operating instructions
-
 Thermo Fisher Scientific POROS® HP2 Perfusion Chromatography® Columns Operating instructions
-
 Thermo Fisher Scientific Packing and Testing Conditions Instruction Sheet
-
 Thermo Fisher Scientific Packing and Testing Conditions Instruction Sheet


