Dell S520 Owner's manual

Category
Data projectors
Type
Owner's manual

This manual is also suitable for

Dell™ | Interactive Projector
S520
Laser Touch Setup Guide
レー プガ
激光触控设置指南
雷射觸控設定指南
레이저 터치 설치 설명서
Panduan Konfigurasi Sentuhan Laser
คูมือการตดตั้ง Laser Touch
S520 Laser Touch QSC_A02-APCC.book Page 1 Thursday, May 8, 2014 4:54 PM
S520 Laser Touch QSC_A02-APCC.book Page 2 Thursday, May 8, 2014 4:54 PM
Dell™ | Interactive Projector
S520
Laser Touch Setup Guide
S520 Laser Touch QSC_A02-APCC.book Page 1 Thursday, May 8, 2014 4:54 PM
About Notes
NOTE: A NOTE indicates important information that helps you make better use of your
projector.
______________ ____
Information in this document is subject to change without notice.
© 2014 Dell Inc. All rights reserved.
Reproduction of these materials in any manner whatsoever without the written permission of
Dell Inc. is strictly forbidden.
Trademarks used in this text: Dell and the DELL logo are trademarks of Dell Inc.; Microsoft,
Windows 7, and Windows Vista are trademarks or registered trademarks of Microsoft Corporation
in the United States and/or other countries.
Other trademarks and trade names may be used in this document to refer to either the entities
claiming the marks and names or their products. Dell Inc. disclaims any proprietary interest in
trademarks and trade names other than its own.
June 2014 P/N 05PF0 Rev. A02
S520 Laser Touch QSC_A02-APCC.book Page 2 Thursday, May 8, 2014 4:54 PM
Set Up Laser Touch on Your Projector
3
NOTE: You computer must have the
following minimum system requirements:
Operating System:
Windows XP Professional service pack 3
32-bit, Windows 7 32-bit/64-bit, and
Windows 8 32-bit/64-bit
Windows .NET Framework 4.0
installation is required (You can
download it from the Microsoft site)
MacOS 10.6 and above
Minimum Hardware:
Windows processor type: Intel Core i3
or above
MAC processor type: Intel Core i2 duo
or above
Windows/MAC RAM: 2 GB of RAM
required or more are recommended
Windows/MAC Min. HDD space: 110 MB
of available hard-disk space
Part A: Install the Whiteboard
1 Install the whiteboard.
NOTE: Refer to "whiteboard installation
instructions".
Set Up Laser Touch on Your Projector
S520 Laser Touch QSC_A02-APCC.book Page 3 Thursday, May 8, 2014 4:54 PM
Set Up Laser Touch on Your Projector
4
Part B: Mount the Projector
2 Install the wall mount and the projector.
NOTE: The wall mount is shipped with your
projector. Please refer "wall mount
installation instructions".
NOTE: Project at 87" for a maximum image
size projection or ~84" if you would like to
leave a border around the projector image
for optimal touch experience.
Part C: Attach Laser Curtain Kit
3 Attach the laser curtain kit onto the
whiteboard.
NOTES:
a Attachment is aided with locating pin
and magnets.
b You can also lock the kit in place with a
security screw.
c There is a cover for the laser curtain kit.
(b) Screw
(a)
S520 Laser Touch QSC_A02-APCC.book Page 4 Thursday, May 8, 2014 4:54 PM
Set Up Laser Touch on Your Projector
5
Part D: Connect Necessary
Cables
4 Connect power, video, Mini USB, and DC-
to-DC cables to the projector.
5 Connect the power cable to the power
outlet.
6 Connect the DC-to-DC cable to the laser
curtain kit.
2m DC-to-DC cable
S520 Laser Touch QSC_A02-APCC.book Page 5 Thursday, May 8, 2014 4:54 PM
Set Up Laser Touch on Your Projector
6
7 Connect the VGA cable to your computer.
NOTE: You can also project the image
through VGA-B and HDMI. Press the left
button on your control panel for auto
searching and selecting the correct input
source.
8 Connect the Mini USB cable to your
computer.
9 Power on the projector by pressing the
power button on the remote control.
MOLEX
5 m Mini USB cable
S520 Laser Touch QSC_A02-APCC.book Page 6 Thursday, May 8, 2014 4:54 PM
Set Up Laser Touch on Your Projector
7
Part E: Install the Touch Driver
on Your Computer
10 The TouchDriver install message will pop-
up automatically after you plug in the USB
cable to your computer. Follow the on-
screen instruction to complete setup.
The driver icon will appear in your
computer's notification area if the driver has
installed successfully.
If the Touch driver is not automatically installed,
go to My Computer and run "TouchDriver.exe".
NOTE: You may require administrator-level
access to install the driver. Contact your
network administrator for support.
Part F: Initialize the Touch
Control Function: Auto Adjust
Touch
This is recommended for first-time use, and
necessary when touch screen responds
inaccurately or erratically.
NOTE: You have to project in duplicate or
projector only modes.
11 When executing driver, click the icon.
The following menu appears on-screen.
S520 Laser Touch QSC_A02-APCC.book Page 7 Thursday, May 8, 2014 4:54 PM
Set Up Laser Touch on Your Projector
8
Select "Auto adjust touch for this computer"
option to execute the auto "calibration and
touch area" procedure.
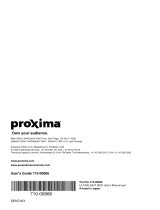
If the "auto adjust touch failed" message
prompts, please take the steps below for
troubleshooting, then do auto adjust touch
again.
a Turn lights off or reduce stray light to
whiteboard
b Do not walk in front of or move the
projector
c Adjust focus to sharpen the projected
image
If the "auto adjust touch still failed" message
appears on screen, please change to manual
calibrate touch and manual touch area.
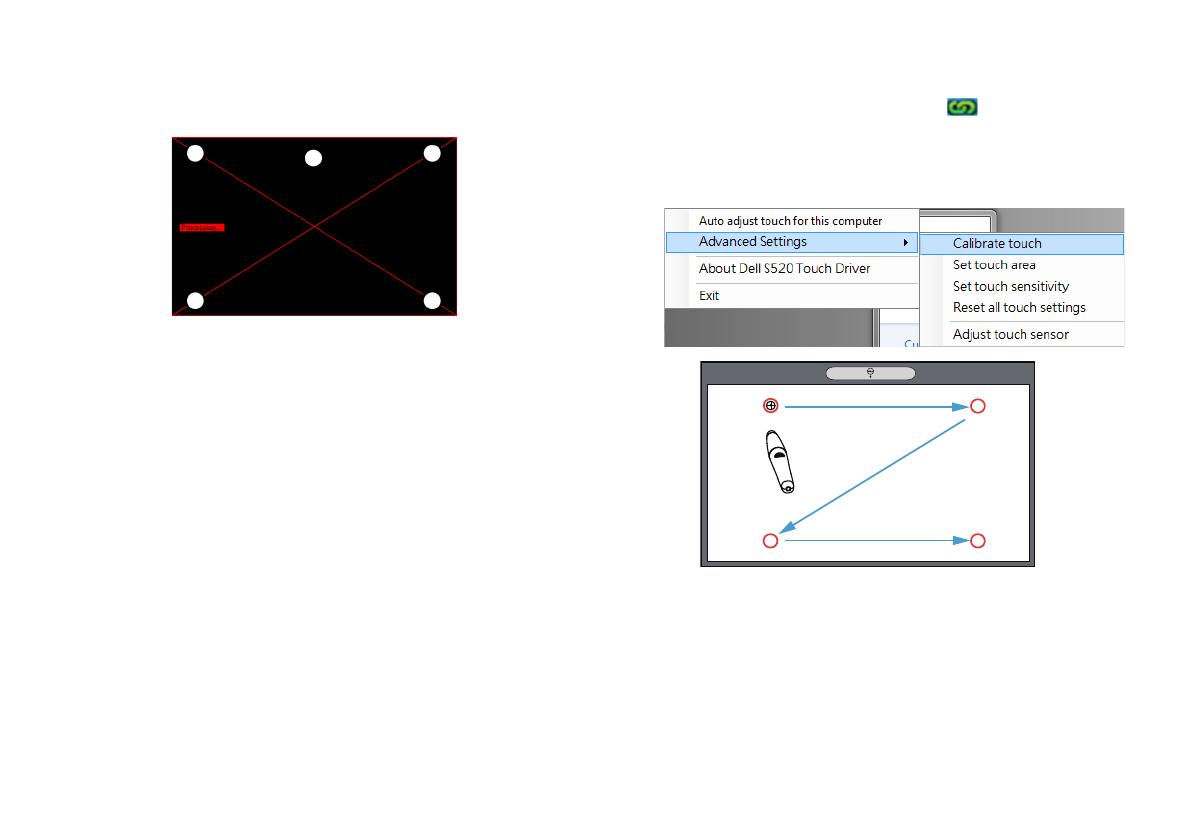
Calibrate Touch by Manual:
Executing driver, click the icon, and go
to Advanced Settings menu, click the
Calibrate touch option to execute the
manual calibrate touch mode.
Touch the target marks on the screen.
(Press the "ESC" key to exit the calibration
process). After the 4
th
point of calibration
is finished, please wait for 2 seconds while
the calibration data is saved.
1
3
4
2
S520 Laser Touch QSC_A02-APCC.book Page 8 Thursday, May 8, 2014 4:54 PM
Set Up Laser Touch on Your Projector
9
Touch Area by Manual:
Executing driver, click the icon, and go
to Advanced Settings menu, click the Set
touch area option to execute the manual
calibrate touch mode.
Touch area window will pop up.
Drag the 4 points, in the order of P1 to P4.
The green frame should lie slightly outside
the projected image area and there should
not be any reflected light spot within this
frame. Once you have completed this task,
click "Exit".
S520 Laser Touch QSC_A02-APCC.book Page 9 Thursday, May 8, 2014 4:54 PM
Set Up Laser Touch on Your Projector
10
Part G: Touch Sensitivity
Adjust
When laser curtain has been operative for a
long period of time, the sensitivity might be
slightly reduced. Touch sensitivity functions to
re-sensitize the laser curtain by restoring the
initial setting.
Executing driver, click the icon, and go to
Advanced Settings menu, click the Set touch
Sensitivity option to re-sensitize laser curtain
by restoring the initial setting.
Default value for Touch Sensitivity is 4.
Increasing the value increases the Touch
Sensitivity and Decreasing the Touch Sensitivity
values reduces it.
S520 Laser Touch QSC_A02-APCC.book Page 10 Thursday, May 8, 2014 4:54 PM
Set Up Laser Touch on Your Projector
11
Part H: Reset All Touch
Settings
When auto or manual "calibrate touch and
touch area" settings still are incorrect, you can
to execute the Reset all touch settings option
to reset all settings to its factory default.
Executing driver, click the icon, and go to
Advanced Settings menu, click the Reset all
touch settings option to re-sensitize laser
curtain by restoring the initial setting.
Part I: Touch Sensor Adjust
When your touch sensor setting is incorrect,
you can to execute the Adjust touch sensor
option to manual adjust touch sensor area.
Executing driver, click the icon, and go to
Advanced Settings menu, click the Adjust
touch sensor option to manual adjust touch
sensor area.
S520 Laser Touch QSC_A02-APCC.book Page 11 Thursday, May 8, 2014 4:54 PM
Set Up Laser Touch on Your Projector
12
Touch sensor adjustment instruction screen
shown below appears, and follow the on-
screen instruction to complete settings.
Part J: Install the Workspace
Application Software on Your
Computer
The WorkSpace Application software is
bundled along with the CD that shipped with
your projector. Install the WorkSpace
Application Software and follow the on-screen
instructions to complete the setup. For more
instructions, refer to "WorkSpace Getting
Started Guide".
S520 Laser Touch QSC_A02-APCC.book Page 12 Thursday, May 8, 2014 4:54 PM
Troubleshooting
13
Troubleshooting
If you experience problems with Touch, see the following troubleshooting tips. If the problem
persists, contact Dell (see Projector User's Guide Contacting Dell on page 122).
Problem Possible Solution
The touch functionality on the edge or
corner of image is not working.
Please refer to Part F to execute the auto adjust
touch or touch area by manual or project at ~84" if
whiteboard bezel is affecting touch functionality on
the edge of the image.
If there is a big gap between the cursor
and touch point.
Please refer to Part F to execute the auto adjust
touch.
S520 Laser Touch QSC_A02-APCC.book Page 13 Thursday, May 8, 2014 4:54 PM
Troubleshooting
14
If the line drawn is not continuos, broken,
or if you encounter problems with the
Touch function in other areas of the
projected image.
1 Check for presence of foreign objects on the
whiteboard.
2 Please refer to Part I to execute the Adjust
touch sensor area.
3 If there is halogen lamp near the projector and
whiteboard, light from the halogen lamp may
affect touch performance. If so,
a Turn off the halogen lamp.
b Shielding the halogen lamp light to
whiteboard or camera.
c Reduce Touch Sensitivity in driver. Doing so
may however affect touch performance at
whiteboard corners.
Problem (continued) Possible Solution (continued)
S520 Laser Touch QSC_A02-APCC.book Page 14 Thursday, May 8, 2014 4:54 PM
Dell™ | タラククタ
S520
レー チセ プガ
S520 Laser Touch QSC_A02-APCC.book Page 1 Thursday, May 8, 2014 4:54 PM
Dell™ | 交互式投影仪
S520
激光触控设置指南
S520 Laser Touch QSC_A02-APCC.book Page 1 Thursday, May 8, 2014 4:54 PM
关于
注: 表示重要信息,可以帮助您更好地使用投影机。
______________ ____
本文档所含信息如有更改,恕不通知。
© 2014 Dell Inc. 版权所有。
未经 Dell Inc. 的书面许可,严禁任何人以任何方式复制这些资料。
本文所用商标:Dell DELL 标志是 Dell Inc. 的商标; Microsoft Windows 7 Windows Vista
Microsoft Corporation 在美国和 / 或其他国家 (地区)的商标或注册商标。
本文档中可能用到的其它商标和品牌名称是指拥有该商标或名称的实体或其产品。除其自身的商
标和品牌名称之外, Dell Inc. 对其它商标和品牌名称不拥有任何权益。
2014 6 P/N 05PF0 Rev. A02
S520 Laser Touch QSC_A02-APCC.book Page 2 Thursday, May 8, 2014 4:54 PM
在投影仪上设置激光触控
3
注: 您的计算机必须满足下列最低系统要求
操作系统:
Windows XP Professional service pack 3
32-bit Windows 7 32-bit/64-bit
Windows 8 32-bit/64-bit
需要安装 Windows .NET Framework 4.0
(您可以从微软网站下载)
•MacOS 10.6及更高版本
最低硬件:
•Windows处理器类型:Intel Core i3
或以上
•MAC处理器类型:Intel Core i2 duo
或以上
Windows/MAC RAM:2 GB RAM,建议
使用更大容量
Windows/MAC 最小硬盘空间:110 MB
可用硬盘空间
A 部分:安装白板
1 安装白板。
注: 参见 白板安装说明
在投影仪上设置激光触控
S520 Laser Touch QSC_A02-APCC.book Page 3 Thursday, May 8, 2014 4:54 PM
  • Page 1 1
  • Page 2 2
  • Page 3 3
  • Page 4 4
  • Page 5 5
  • Page 6 6
  • Page 7 7
  • Page 8 8
  • Page 9 9
  • Page 10 10
  • Page 11 11
  • Page 12 12
  • Page 13 13
  • Page 14 14
  • Page 15 15
  • Page 16 16
  • Page 17 17
  • Page 18 18
  • Page 19 19
  • Page 20 20
  • Page 21 21
  • Page 22 22
  • Page 23 23
  • Page 24 24
  • Page 25 25
  • Page 26 26
  • Page 27 27
  • Page 28 28
  • Page 29 29
  • Page 30 30
  • Page 31 31
  • Page 32 32
  • Page 33 33
  • Page 34 34
  • Page 35 35
  • Page 36 36
  • Page 37 37
  • Page 38 38
  • Page 39 39
  • Page 40 40
  • Page 41 41
  • Page 42 42
  • Page 43 43
  • Page 44 44
  • Page 45 45
  • Page 46 46
  • Page 47 47
  • Page 48 48
  • Page 49 49
  • Page 50 50
  • Page 51 51
  • Page 52 52
  • Page 53 53
  • Page 54 54
  • Page 55 55
  • Page 56 56
  • Page 57 57
  • Page 58 58
  • Page 59 59
  • Page 60 60
  • Page 61 61
  • Page 62 62
  • Page 63 63
  • Page 64 64
  • Page 65 65
  • Page 66 66
  • Page 67 67
  • Page 68 68
  • Page 69 69
  • Page 70 70
  • Page 71 71
  • Page 72 72
  • Page 73 73
  • Page 74 74
  • Page 75 75
  • Page 76 76
  • Page 77 77
  • Page 78 78
  • Page 79 79
  • Page 80 80
  • Page 81 81
  • Page 82 82
  • Page 83 83
  • Page 84 84
  • Page 85 85
  • Page 86 86
  • Page 87 87
  • Page 88 88
  • Page 89 89
  • Page 90 90
  • Page 91 91
  • Page 92 92
  • Page 93 93
  • Page 94 94
  • Page 95 95
  • Page 96 96
  • Page 97 97
  • Page 98 98
  • Page 99 99
  • Page 100 100
  • Page 101 101
  • Page 102 102

Dell S520 Owner's manual

Category
Data projectors
Type
Owner's manual
This manual is also suitable for

Ask a question and I''ll find the answer in the document

Finding information in a document is now easier with AI

in other languages