Smart UF70 (i6 systems) User guide

Category
PC/workstation barebones
Type
User guide

This manual is also suitable for

SMARTBoar M600i6
interactive whiteboard systems
CONFIGURATION AND USER’S GUIDE
FOR MODELS M680i6 AND M685i6
smarttech.com/kb/170549
FCC warning
This equipment has been tested and found to comply with the limits for a Class A digital device, pursuant to Part 15 of the FCC Rules. These limits are designed to
provide reasonable protection against harmful interference when the equipment is operated in a commercial environment. This equipment generates, uses and
can radiate radio frequency energy and, if not installed and used in accordance with the manufacturer’s instructions, may cause harmful interference to radio
communications. Operation of this equipment in a residential area is likely to cause harmful interference in which case the user will be required to correct the
interference at his own expense.
Trademark notice
SMARTBoard, SMARTNotebook, SMARTMeetingPro, DViT, smarttech, the SMART logo and all SMART taglines are trademarks or registered trademarks of
SMARTTechnologiesULC in the U.S. and/or other countries. Microsoft, Windows and InternetExplorer are either registered trademarks or trademarks of
Microsoft Corporation in the U.S. and/or other countries. All other third-party product and company names may be trademarks of their respective owners.
Copyright notice
© 2013–2015 SMARTTechnologiesULC. All rights reserved. No part of this publication may be reproduced, transmitted, transcribed, stored in a retrieval system
or translated into any language in any form by any means without the prior written consent of SMARTTechnologiesULC. Information in this manual is subject to
change without notice and does not represent a commitment on the part of SMART.
This product and/or use thereof covered by one or more of the following U.S. patents: smarttech.com/patents.
01/2015
i smarttech.com/kb/170549
Important information
Before you install and use your SMARTBoard interactive whiteboard system, read and understand
the safety warnings and precautions in this user’s guide and the included important information
document. These safety warnings and precautions describe the safe and correct operation of your
interactive whiteboard system and its accessories, helping you to prevent injuries and equipment
damage. Ensure that your interactive whiteboard system is always being used correctly.
In this document, “interactive whiteboard system refers to the following:
l SMARTBoard M685 series interactive whiteboard
l SMARTUF70 or SMARTUF70w projector
l Accessories and optional equipment
The projector included with your system is designed to work only with certain SMARTBoard
interactive whiteboard models. Contact your authorized SMART reseller (smarttech.com/where) for
more information.
Safety warnings, cautions and important
information
Installation
WARNING
l Failure to follow the installation instructions shipped with your SMART product could result in
personal injury and damage to the product.
l To reduce the risk of fire or electric shock, do not expose the SMART product to rain or
moisture.
l Two people are required to mount your SMART product because it may be too heavy for
one person to safely maneuver.
When you lift your interactive whiteboard, you and your assistant should stand on either side
of the screen, supporting its weight at the bottom while balancing the top with your other
hands.
IMPORTANT INFORMATION
ii smarttech.com/kb/170549
l When mounting the projector boom on a framed or hollow wall, attach the mounting bracket
to a stud to safely support the projector’s weight. If you use only drywall anchors, the drywall
can fail, resulting in possible personal injury, and damage to the product which may not be
covered by your warranty.
l Do not leave cables on the floor where they can be a tripping hazard. If you must run a cable
over the floor, lay it in a flat, straight line and secure it to the floor with tape or a cable
management strip of a contrasting color. Handle cables carefully and avoid excessive
bending.
CAUTION
l Do not operate this unit immediately after moving it from a cold location to a warm location.
When the unit is exposed to such a change in temperature, moisture can condense on the
lens and crucial internal parts. Allow the system to stabilize to room temperature before
operation to prevent possible damage to the unit.
l Do not place the unit in hot locations, such as near heating equipment. Doing so could cause
a malfunction and shorten the life of the projector.
l Avoid setting up and using the SMART product in an area with excessive levels of dust,
humidity and smoke.
l Do not place your SMART product in direct sunlight or near any appliance that generates a
strong magnetic field.
l You must connect the USB cable that came with your SMARTBoard interactive whiteboard
to a computer that has a USB compliant interface and that bears the USB logo. In addition,
the USB source computer must be compliant with CSA/UL/EN 60950 and bear the CE mark
and CSA and/or UL Mark(s) for CSA/UL 60950. This is for operating safety and to avoid
damage to the SMARTBoard interactive whiteboard.
IMPORTANT
l Make sure an electrical socket is near your SMART product and remains easily accessible
during use.
l Using your SMART product near a TV or radio could cause interference to the images or
sound. If this happens, move the TV or radio away from the projector.
IMPORTANT INFORMATION
iii smarttech.com/kb/170549
Operation
WARNING
l If you are using an external audio system, use only the power supply included with that
product. Using the wrong power supply might create a safety hazard or damage the
equipment. If in doubt, refer to the specification sheet for your product to verify the power
supply type.
l Do not climb (or allow children to climb) on a wall- or stand-mounted SMARTBoard
interactive whiteboard.
Do not climb on, hang from or suspend objects from the projector boom.
Climbing on the interactive whiteboard or projector boom could result in
personal injury or product damage.
CAUTION
l Do not block the projector’s ventilation slots and openings.
IMPORTANT
l Keep your remote control in a safe place because there is no other way to access menu
options.
l Disconnect the product from its power source when it’s not used for a long period.
Other precautions
If you own a SMARTproduct other than a SMARTBoard interactive whiteboard system, refer to the
installation manual for your product for relevant warnings and maintenance instructions.
Environmental requirements
Before you install your SMARTBoard interactive whiteboard system, review the following
environmental requirements.
Environmental
requirement
Parameter
Operating temperature
l
41°F to 95°F (5°C to 35°C) from 0' to 6000' (0 m to 1800 m)
l
41°F to 86°F (5°C to 30°C) from 6000' to 9800' (1800 m to 3000 m)
Storage temperature
l
-4°F to 122°F (-20°C to 50°C)
IMPORTANT INFORMATION
iv smarttech.com/kb/170549
Environmental
requirement
Parameter
Humidity
l
5% to 95% storage relative humidity, non-condensing
5% to 85% operating relative humidity, non-condensing
Water and fluid
resistance
l
Intended for indoor use only. Doesn’t meet any salt-spray or water
ingress requirements.
l
Don’t pour or spray liquids directly onto your interactive whiteboard,
the projector or any of its sub-components.
Dust
l
Intended for use in office and classroom environments. Not for
industrial use where heavy dust and pollutants can cause
malfunctions or impaired operation. Periodic cleaning is required in
areas with heavier dust. See
Cleaning the projector
on page24 for
information on cleaning the projector.
Electrostatic discharge
(ESD)
l
EN61000-4-2 severity level 4 for direct and indirect ESD
l
No malfunction or damage up to 8kV (both polarities) with a
330ohm, 150 pF probe (air discharge)
l
Unmated connectors meet no malfunction or damage up to 4kV
(both polarities) for direct (contact) discharge
Cables
l
All SMARTBoard interactive whiteboard system cables should be
shielded to prevent potential accidents and degraded video and
audio quality.
Conducted and
radiated emissions
l
EN55022/CISPR 22, Class A
v smarttech.com/kb/170549
Contents
Important information i
Safety warnings, cautions and important information i
Environmental requirements iii
Chapter 1: About your interactive whiteboard system 1
SMARTBoard interactive whiteboard system features 2
Included accessories 4
Chapter 2: Installing your interactive whiteboard system 5
Choosing a location 5
Choosing a height 6
Securing the projector to the boom 6
Routing the cables 6
Installing SMART software 7
Chapter 3: Using your interactive whiteboard system 9
Using your projector 9
Using your interactive whiteboard 21
Chapter 4: Maintaining your interactive whiteboard system 23
Maintaining your interactive whiteboard 23
Cleaning the projector 24
Focusing and adjusting the projector image 25
Replacing the projector lamp 26
Chapter 5: Troubleshooting your interactive whiteboard system 31
Before you start 32
Determining you interactive whiteboard system’s status 33
Resolving interactive whiteboard issues 34
Resolving projector issues 35
Accessing the service menu 42
Transporting your interactive whiteboard system 43
Appendix A: Remotely managing your system through a network interface 45
Web page management 45
Simple Network Management Protocol (SNMP) 52
Appendix B: Remotely managing your system through an RS-232 serial interface 53
Serial interface settings 54
Projector programming commands 55
CONTENTS
vi smarttech.com/kb/170549
Appendix C: Integrating other devices 77
Video format 77
Connecting peripheral sources and outputs 83
Appendix D: Remote control code definitions 85
Appendix E: Hardware environmental compliance 87
Waste Electrical and Electronic Equipment and Battery regulations (WEEE and
BatteryDirectives) 87
Batteries 87
Mercury 87
More information 87
Index 89
Chapter 1
1 smarttech.com/kb/170549
Chapter 1: About your interactive whiteboard
system
SMARTBoard interactive whiteboard system features 2
SMARTBoard M600 series interactive whiteboard 2
SMARTUF70 or SMARTUF70w projector 3
Included accessories 4
Remote control 4
Pens 4
Optional accessories 4
Your SMARTBoard interactive whiteboard system combines the following components:
l SMARTBoard M600 series interactive whiteboard
l Wall-mounted, short-throw SMARTUF70 or SMARTUF70w projector
l Accessories and optional equipment
This chapter describes the features of your interactive whiteboard and provides information about
product parts and accessories.
CHAPTER 1
ABOUT YOUR INTERACTIVE WHITEBOARD SYSTEM
2 smarttech.com/kb/170549
SMARTBoard interactive whiteboard system
features
Your SMARTBoard interactive whiteboard system
uses the short-throw, high-offset SMARTUF70 or
SMARTUF70w projector. The throw distance of the
SMARTUF70 and SMARTUF70w projectors is half
that of the SMARTUF65 projector, resulting in a
shorter boom and reduced shadows on the
projected image.
When the projector displays an image from your
computer on the touch-sensitive interactive
whiteboard, you can do everything that you can do at
your computer—open and close applications, scroll
through files, conference with others, create new
documents or edit existing ones, visit websites, play
video clips and more—by touching the screen. You
can use an array of gestures within applications.
This projector also supports video and audio connections from a variety of devices, including
DVD/Blu-ray™ players, VCRs, document cameras and digital cameras, and can project media from
these sources onto the interactive screen.
When you use SMART software with your SMARTBoard interactive whiteboard system, you can
write or draw over the projected computer image in digital ink using a pen tray pen or your finger,
and then save these notes to a .notebook file or directly into any Ink Aware application.
SMARTBoard M600 series interactive whiteboard
Your SMARTBoard M600 series interactive whiteboard, featuring SMART’s proprietary DViT®
(DigitalVisionTouch) technology, is the most intuitive touch-sensitive front projection interactive
whiteboard in the world.
CHAPTER 1
ABOUT YOUR INTERACTIVE WHITEBOARD SYSTEM
3 smarttech.com/kb/170549
Other features of your interactive whiteboard include
the following:
l Pen tray buttons that activate the pens’ colors
and the on-screen keyboard, as well as right-
click and Orientation functions
l A durable hard-coated surface that is optimized
for projection and is easily cleaned
For more information about your SMARTBoard
interactive whiteboard, see the
SMARTBoard M600
series interactive whiteboard user’s guide
(smarttech.com/kb/170410).
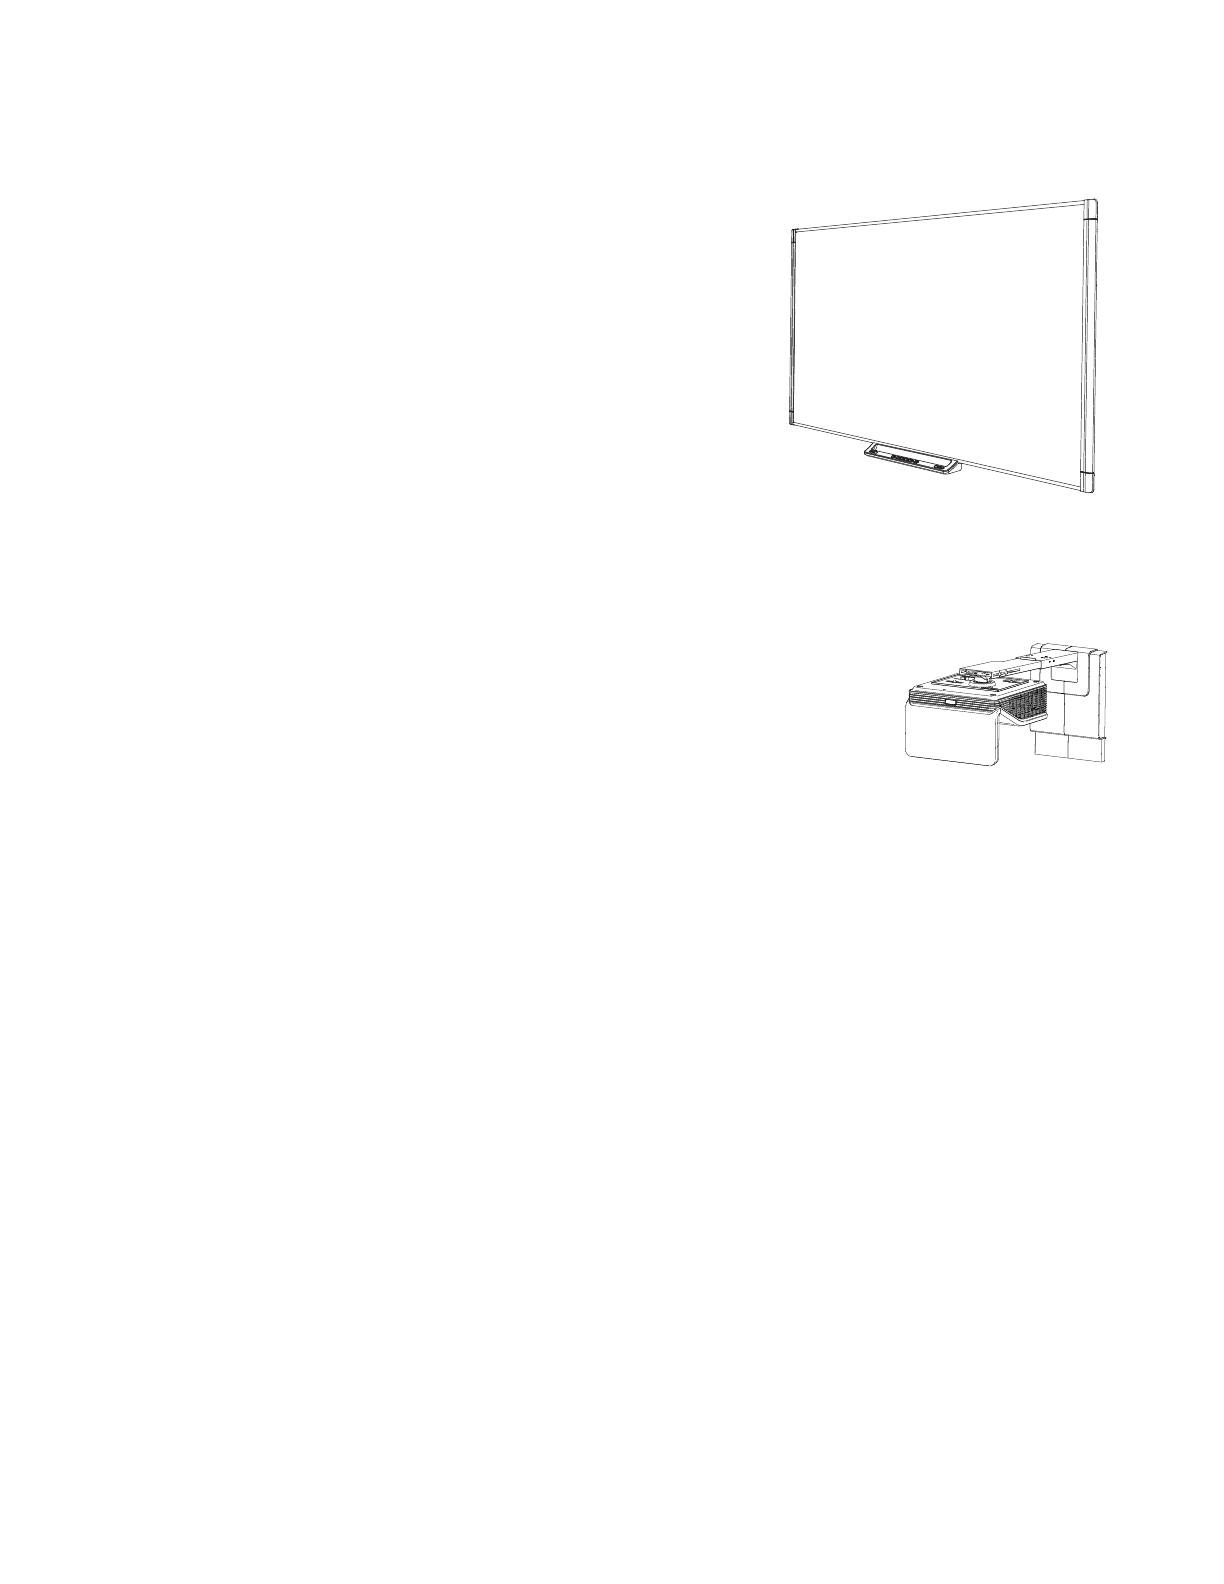
SMARTUF70 or SMARTUF70w projector
The SMARTUF70 or SMARTUF70w projector system includes a
short-throw projector for use with SMARTBoard interactive
whiteboards and a sturdy support system suitable for many different
environments.
Other features of your projector system include the following:
l A wall-mounted, high-offset projector engine that uses DLP® technology by
TexasInstruments™, providing BrilliantColor™ performance and Gamma 2.2 correction with
SMART Presentation, Bright Room, Dark Room, sRGB and User modes
l PAL, PAL-N, PAL-M, SECAM, NTSC and NTSC 4.43 video system compatibility
l HDMI, Composite,and VES RGB video inputs (not included)
l WXGA, QVGA, VGA, SVGA, XGA, SXGA, SXGA+ and UXGA video format compatibility
l Native 1024 × 768 resolution (SMARTUF70 projector)
OR
Native 1280 × 800 resolution (SMARTUF70w projector in 16:10 aspect ratio mode)
l Remote management via a serial RS-232 interface, web page or SNMP
l An alert broadcast feature that enables administrators to send notification messages to
network-connected projector systems for immediate on-screen display
l Protected cable routing through a cable cover that limits tampering and clutter
CHAPTER 1
ABOUT YOUR INTERACTIVE WHITEBOARD SYSTEM
4 smarttech.com/kb/170549
l A secure mounting and installation system that includes the following:
o
An optional projector padlock ring to prevent removal of the projector from the boom
o
Accessory mounting hardware for solid masonry or framed wall installations kit (Part
Number 1007416)
o
Templates and instructions for positioning the system safely
Included accessories
The following accessories are included with your interactive whiteboard system.
Remote control
The remote control enables you to control the system and set up your projector. Use
the remote control to access menu options, system information and input selection
options.
Pens
There are two pens included with your interactive whiteboard.
Pick up a pen and press one of the four color buttons on the
pen tray (black, red, green or blue) to select the color of digital
ink you write on the interactive whiteboard.
Optional accessories
You can add a variety of accessories to your interactive whiteboard to best meet your specific
needs. Purchase these items from your authorized SMART reseller (smarttech.com/where).
For more information on accessories, go to smarttech.com/accessories.
Chapter 2
5 smarttech.com/kb/170549
Chapter 2: Installing your interactive
whiteboard system
Choosing a location 5
Choosing a height 6
Securing the projector to the boom 6
Routing the cables 6
Installing SMART software 7
IMPORTANT
Use the
SMARTBoard M600i6 interactive whiteboard system installation guide
(smarttech.com/kb/170555) to install your interactive whiteboard and projector.
This chapter provides additional considerations and details for installing your interactive
whiteboard system.
Choosing a location
Choose a location for your interactive whiteboard system that’s far from bright light sources, such
as windows and strong overhead lighting. IR lighting can cause issues with the performance of the
cameras and can lead to unintentional or missed touches.
Select a wall with a flat, regular surface and sufficient clearance to accommodate your interactive
whiteboard system. Install the projector and your interactive whiteboard on the same flat surface.
For best presentation alignment, mount your interactive whiteboard system in a location that’s
central to your audience’s viewing direction.
For mobile or adjustable installation options, contact your authorized SMART reseller.
WARNING
CHAPTER 2
INSTALLING YOUR INTERACTIVE WHITEBOARD SYSTEM
6 smarttech.com/kb/170549
Refer to your interactive whiteboard system’s specifications (available at smarttech.com/support)
for its weight. Check your local building codes to ensure that your wall can support this weight,
and use appropriate mounting hardware for your wall type.
Choosing a height
SMART includes a mounting template with each interactive whiteboard system. If you lose this
template, contact your authorized SMART reseller. Using this template ensures that you can do the
following:
l Mount the projector at a safe height for head space clearance, while maintaining enough
space for airflow and installation access above the unit.
l Position the projector at the correct height above your interactive whiteboard to align the
projected image with the touch screen.
Dimensions on the template recommend a distance from the floor suitable for adults of average
height. You should consider the general height of your user community when you choose a
location for your interactive whiteboard.
Securing the projector to the boom
To learn how to secure the SMARTUF70 or SMARTUF70w projector to the boom, see the
included
SMARTBoard M600i6 interactive whiteboard system installation guide
(smarttech.com/kb/170555).
Routing the cables
If your interactive whiteboard uses one mounting bracket, make sure that all projector cables pass
along the top of the bracket and then down the side of the interactive whiteboard.
If your interactive whiteboard uses two mounting brackets, make sure that all projector cables pass
between the brackets. Space your wall-mounting brackets 4" (10.2 cm) apart to provide full support
for the weight of your interactive whiteboard.
CHAPTER 2
INSTALLING YOUR INTERACTIVE WHITEBOARD SYSTEM
7 smarttech.com/kb/170549
IMPORTANT
Do not connect the power cable to a power outlet until you have connected all the cables to the
projector and interactive whiteboard.
Installing SMART software
You must install SMARTsoftware, such as SMARTNoteboo collaborative learning software on
the computer connected to your interactive whiteboard system to access all of its features.
Download SMARTsoftware from smarttech.com/software. These web pages list the minimum
hardware requirements for each software version. If SMART software is already installed on your
computer, take this opportunity to upgrade your software to ensure compatibility.
Chapter 3
9 smarttech.com/kb/170549
Chapter 3: Using your interactive whiteboard
system
Using your projector 9
Using your remote control 9
Replacing the remote control battery 10
Using the remote control buttons 11
Adjusting projector settings 12
Focusing the image 18
Adjusting the image 19
Projector connection diagram 19
Using your interactive whiteboard 21
This chapter describes the basic operation of your interactive whiteboard system and explains
how to set up your remote control, retrieve system information, access the projector’s image
adjustment options and integrate your interactive whiteboard system with peripheral devices.
Using your projector
This section explains how to use your projector and its included remote control.
Using your remote control
The projector remote control enables you to access on-screen projector menus and change
projector settings.
CHAPTER 3
USING YOUR INTERACTIVE WHITEBOARD SYSTEM
10 smarttech.com/kb/170549
Replacing the remote control battery
Follow this procedure to replace the remote control battery.
WARNING
l Reduce the risk associated with a leaking battery in the projector’s remote control by
following these practices:
o
Use only the specified CR2025 coin-cell battery.
o
Remove the battery when the remote control is unused for an extended period.
o
Do not heat, disassemble, short or recharge the battery, or expose it to fire or high
temperatures.
o
Avoid eye and skin contact with the battery if it has a leak.
l Dispose of the exhausted battery and product components in accordance with applicable
regulations.
To replace the remote control battery
1. Hold down the side release on the leftside of the battery holder and pull the battery holder
completely out of the remote control.
2. Remove the old battery from the battery holder and replace it with a CR2025 coin-cell
battery.
IMPORTANT
Align the battery’s positive (+) and negative (–) terminals with the correct signs on the
battery holder.
3. Insert the battery holder into the remote control.
CHAPTER 3
USING YOUR INTERACTIVE WHITEBOARD SYSTEM
11 smarttech.com/kb/170549
Using the remote control buttons
The projector remote control enables you to access on-screen menus and change projector
settings. Use the Power button on the remote control to put the projector into Standby mode or
to turn it on. You can also use the Input button on the remote control to switch sources on the
projector.
Number Function Description
1 Input Select a video and audio input source on the
projector and the associated USB input source on
the ECP, if present.
2 Menu Show or hide the projector menus.
3 (Left), (Right),
(Up) and (Down) arrows
Change the menu selections and adjustments.
4 Hide Freeze, hide or display the image:
l
Press once to freeze the image.
For example, you can display a question on
the screen while you check your e-mail.
l
Press again to hide the image, that is, to
display a black screen.
l
Press again to return to the live image.
5 Mode Select a display mode.
6 Mute Mute audio amplification.
7
(Power)
Turn on the projector or put it into Standby mode.
8 (Enter) Accept the selected mode or option.
9 (Volume Up) Increase audio amplification volume.
10 (Volume Down) Decrease audio amplification volume.
CHAPTER 3
USING YOUR INTERACTIVE WHITEBOARD SYSTEM
12 smarttech.com/kb/170549
NOTE
The Mute, Volume Up and Volume Down buttons work only if there is an audio source
connected to the projector for the selected video input source.
For information on using the remote control’s Menu button to adjust the projector settings, see
Adjusting projector settings.
Adjusting projector settings
The remote control’s Menu button enables you to access the on-screen display to adjust the
projector settings.
IMPORTANT
Keep your remote control in a safe place because there is no other way to access menu options.
Setting Use Notes
Image Adjustment menu
Display Mode Indicates the projector’s
display output
(SMARTPresentation,
BrightRoom, DarkRoom,
sRGB and User).
The default is SMARTPresentation.
Brightness Adjusts projector brightness
from 0 to 100.
The default is 50.
Contrast Adjusts the difference
between the lightest and
darkest parts
of the image from 0 to 100.
The default is 50.
Frequency Adjusts the display data
frequency of the projected
image from -5 to 5 to match the
frequency of your computer’s
graphics card.
The default is 0.
This setting applies to VGA inputs only.
Tracking Synchronizes your projector’s
display timing with your
computer’s graphics card from
0 to 63.
This setting applies to VGA inputs only.
  • Page 1 1
  • Page 2 2
  • Page 3 3
  • Page 4 4
  • Page 5 5
  • Page 6 6
  • Page 7 7
  • Page 8 8
  • Page 9 9
  • Page 10 10
  • Page 11 11
  • Page 12 12
  • Page 13 13
  • Page 14 14
  • Page 15 15
  • Page 16 16
  • Page 17 17
  • Page 18 18
  • Page 19 19
  • Page 20 20
  • Page 21 21
  • Page 22 22
  • Page 23 23
  • Page 24 24
  • Page 25 25
  • Page 26 26
  • Page 27 27
  • Page 28 28
  • Page 29 29
  • Page 30 30
  • Page 31 31
  • Page 32 32
  • Page 33 33
  • Page 34 34
  • Page 35 35
  • Page 36 36
  • Page 37 37
  • Page 38 38
  • Page 39 39
  • Page 40 40
  • Page 41 41
  • Page 42 42
  • Page 43 43
  • Page 44 44
  • Page 45 45
  • Page 46 46
  • Page 47 47
  • Page 48 48
  • Page 49 49
  • Page 50 50
  • Page 51 51
  • Page 52 52
  • Page 53 53
  • Page 54 54
  • Page 55 55
  • Page 56 56
  • Page 57 57
  • Page 58 58
  • Page 59 59
  • Page 60 60
  • Page 61 61
  • Page 62 62
  • Page 63 63
  • Page 64 64
  • Page 65 65
  • Page 66 66
  • Page 67 67
  • Page 68 68
  • Page 69 69
  • Page 70 70
  • Page 71 71
  • Page 72 72
  • Page 73 73
  • Page 74 74
  • Page 75 75
  • Page 76 76
  • Page 77 77
  • Page 78 78
  • Page 79 79
  • Page 80 80
  • Page 81 81
  • Page 82 82
  • Page 83 83
  • Page 84 84
  • Page 85 85
  • Page 86 86
  • Page 87 87
  • Page 88 88
  • Page 89 89
  • Page 90 90
  • Page 91 91
  • Page 92 92
  • Page 93 93
  • Page 94 94
  • Page 95 95
  • Page 96 96
  • Page 97 97
  • Page 98 98
  • Page 99 99
  • Page 100 100
  • Page 101 101
  • Page 102 102

Smart UF70 (i6 systems) User guide

Category
PC/workstation barebones
Type
User guide
This manual is also suitable for

Ask a question and I''ll find the answer in the document

Finding information in a document is now easier with AI