Black & Decker GSL35 TYPE 1 Owner's manual

Category
Power tools
Type
Owner's manual

This manual is also suitable for

CORDLESS GARDEN SHEAR
INSTRUCTION MANUAL
Thankyoufor_ng Black&DeckedGo to
www.BlackandDecker.co m/NewOwne r
to register your new product.
PLEASE READ BEFORE RETURNING
THIS PRODUCT FOR ANY REASON:
Ifyouhaveaquestionorexperienceaproblemwithyour
Black&Deckerpurchase,forinstantanswers24hoursadaygoto
HTTP:/iWWW.BLACKANDDECKER.COM/INSTANTANSWERS
Ifyoucan'tfindtheanswerordonothaveaccesstotheinternet,
call1-800-544-6986from8a.m.to5p.m.ESTMon.-- Fri.tospeak
withanagent.Pleasehavethecatalognumberavailablewhenyoucall.
SAVETHISMANUALFORFUTUREREFERENCE.
VEAELESPA_IOLENLACONTRAPORTADA.
POUR LEFRANCAIS, VOIR LACOUVERTUREARRII:RE.
IN.STRUCTIVO DE OPERACION, CENTROS DE SERVIClO Y
POLIZA DE GARANTIA. ADVERTENCIA: LEASE ESTE
INSTRUCTIVO ANTES DE USAR EL PRODUCTO.
GSN3n f\"% &
GSN3
GSL35,
GSL75,
GSN35
Catalog Numbers GSL35, GSL75, GSN30,
GSN32, GSN35
±WARNING: Read and understand all instructions.
Failure to follow all instructionslisted below may result in electric
shock, fire and/or serious personal injury.
Important Safety Warnings and Instructions
TO REDUCE RISK OF INJURY:
Before any use, be sure everyone using this garden appliance
reads and understands all safety instructions and other information
contained in this manual.
Save these instructionsand review frequently prior to use and in
instructing others.
WAR NING: Whenusing gardening appliances, basic
safety precautions should always be followed to reduce risk of fire,
electric shock, and personal injury, including the following.
WAR NING: Somedustcreatedby this product
contains chemicals known to the State of California to cause cancer,
birth defects or other reproductive harm. Some examples of these
chemicals are:
• compounds in fertilizers
• compounds in insecticides, herbicides and pesticides
• arsenic and chromium from chemically treated lumber
To reduce your exposure to these chemicals, wear approved safety
equipment such as dust masks that are specially designed to filter
out microscopic particles.
SAFETY GUIDELINES - DEFINITIONS
It is important for you to read and understand this manual. The
information it contains relates to protecting YOUR SAFETY and
PREVENTING PROBLEMS. The symbols below are used to help
you recognize this information.
DANGER: _ndicatesan imminently hazardous
z_
situation which, if not avoided, will result in death or serious injury.
WARNING: _ndicatesapotentia,yhazardous
zL
situation which, if not avoided, could result in death or serious injury.
CAUTION: _ndicatesapotentia,yhazardoussituation
/k
which, if not avoided, may result in minor or moderate injury.
--L;AUTION: Used without the safety alert symbol indicates
a potentially hazardous situation which, if not avoided, may result in
property damage.
General Safety Warnings and Instructions for All
Snrubbers & Shears
AVOID DANGEROUS ENVIRONMENT. Don't use appliances in
damp or wet locations. Don't use appliances in the rain.
KEEP CHILDREN AWAY. All visitors should be kept at a distance
from work area.
STORE IDLE APPLIANCE INDOORS. When not in use, shrubber
should be stored indoors with the blade cover on, in a dry, and high
or locked-up place - out of reach of children.
DON'T FORCE APPLIANCE - It will do the job better and with
less likelihood of a risk of injury atthe rate for which it was designed.
USE APPLIANCE PROPERLY. Use only for trimming the type of
shrub, growth, etc., described in the operating instructions. Do not
abuse appliance.
USE RIGHT APPLIANCE. Do not use the appliance for any job
except that for which it is intended.
KEEP HANDS AND ALL PARTS OF BODY AWAY from blade, the
edges are sharp and can cause injury even when the appliance isOFF,
BEFORETRIMMING,inspectareasforwires,cords,glassor
otherforeignobjectswhichcouldcomeincontactwiththeblade.
DRESSPROPERLY.Donotwearlooseclothingorjewelry.They
canbecaughtinmovingparts.Glovesandsubstantial,non-skid
footweararerecommendedwhenworkingoutdoors.Wear
protectivehaircoveringtocontainlonghair.
DON'TOVERREACH.Keepproperfootingandbalanceatalltimes.
USESAFETYGLASSESANDOTHERSAFETYEQUIPMENT.
Usesafetygogglesorsafetyglasseswithsideshields,complying
withapplicablesafetystandardsand,whenneeded,afaceshield.
Alsousefaceordustmaskifoperationisdusty.Thisappliestoall
personsintheworkarea.Alsouseahardhat,hearingprotection,
gloves,safetyshoesanddustcollectionsystemswhenspecified
orrequired.Safetyglassesorthelikeareavailableatextracostat
yourlocaldealerorBlack&DeckerServiceCenter.
MAINTAINAPPLIANCEWITHCARE.Keepcuttingedgessharp
andcleanforbestperformanceandtoreducetheriskofinjury.
Followinstructionsforpropermaintenance.Keephandlesdry,
clean,andfreefromoilandgrease.
AVOIDUNINTENTIONALSTARTING.Don'tcarryappliancewith
fingeronswitch.
DONOTattempttoremovecutmaterialnorholdmaterialtobecut
whenbladesaremoving.Makesuretrimmerswitchisoffwhen
clearingjammedmaterialfromblades.
CHECKDAMAGEDPARTS.Beforefurtheruseoftheappliance,a
guardorotherpartthatisdamagedshouldbecarefullycheckedto
determinethatitwilloperateproperlyandperformitsintended
function.Checkforalignmentofmovingparts,bindingofmoving
parts,breakageofparts,mounting,andanyotherconditionthat
mayaffectitsoperation.
Aguardorotherpartthatisdamagedshouldbeproperlyrepaired
orreplacedbyanAuthorizedServiceCenterunlessotherwise
indicatedelsewhereinthismanual.
STAYALERT.Watchwhatyouaredoing.Usecommonsense.Do
notoperateappliancewhenyouaretired.
REPAIRSANDSERVICE.Repairs,maintenanceandany
adjustmentsnotspecifiedinthismanualshouldbeperformedby
Black&DeckerAuthorizedServiceCentersorotherqualified
serviceorganizations,alwaysusingidenticalreplacementparts.
USEOFACCESSORIESANDATTACHMENTS.Theuseofany
accessoryorattachmentnotrecommendedforusewiththis
appliancecouldbehazardous.
DON'TGRASPTHEEXPOSEDCUTTINGBLADESorcutting
edgeswhenpickinguporholdingtheappliance.
DONOTOPERATEgardeningappliancesingaseousorexplosive
atmospheres.Motorsintheseappliancesnormallyspark,andthe
sparksmightignitefumes.
IMPORTANTWARNINGSFORSHRUBBERS&SHEARS
1. Keephandsawayfromblades.
2. Donotchargetheapplianceinrain,orinwetlocations.
3. Donotusebatteryoperatedapplianceinrain.
SAVE THESE INSTRUCTIONS
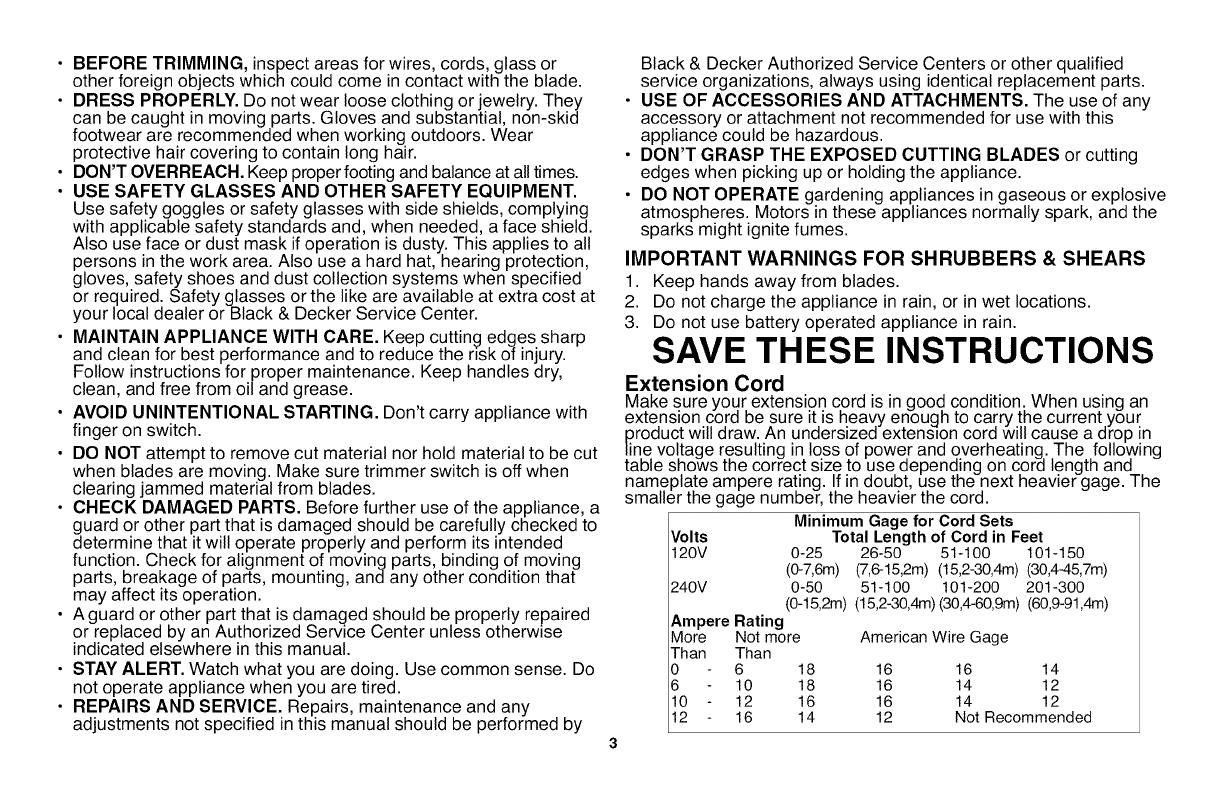
Extension Cord
Make sure your extension cord is in good condition. When using an
exte,nsion cord be sure it,is heavy enough to carry the current,your
proauct will draw. An unaersizea extension core will cause a arop in
line voltage resulting in loss of power and overheating. The following
table shows the correct size to use depending on corn length and
nameplate ampere rating. If in doubt, use the next heavier gage. The
smaller the gage number, the heavier the cord.
Minimum Gage for Cord Sets
Volts Total Length of Cord in Feet
120V 0-25 26-50 51-100 101-150
(0-7,6m) (7,6-15,2m)(15,2-30,4m)(30,4-45,7m)
240V 0-50 51-100 101-200 201-300
(0-15,2m)(15,2-30,4m)(30,4-60,gm)(60,9-91,4m)
Ampere Rating
More Not more American Wire Gage
Than Than
0 6 18 16 16 14
6 10 18 16 14 12
10 12 16 16 14 12
12 16 14 12 Not Recommended
Features
1. On/off switch
2. Lock-off button
3. Blade release button
4. Grass Shear blade (GSL35,
GSL75, GSN30, GSN35)
5. Shrub Trim blade (GSL35,
GSL75, GSN32, GSN35)
6. Blade cover (not shown)
Assembly
WARN ING:Avoidaccidentally switching thetoolon
during assembly,
Fitting and removing the
blade (fig. A, B, C)
The shear blade (4) has been
designed for trimming grass and
weeds. The trim blade (5) has been
designed for trimming hedges and
shrubs.
To remove the blade cover (6).
Push and hold the blade release
button (3) in the direction of the
arrow (fig. A)
Slide the blade cover (6)
backwards and lift it off (fig. A-l).
While holding the blade onto the
pins (Fig. B), locate the blade cover
(6) and slide it forward (fig. C).
O
Note: No alignmentof bladewith drive
pinisrequiredandoperation ofthe blade !,_ -2_
coverrelease buttonisnot requiredwhen (_6
re-fittingthe bladecover. ........
Charging Procedure
The bafferyneedsto becharged before
firstuseandwhenever itfails toproduce
suffident power onjobs thatwere easily
done before.When chargingthe battery
forthe firsttime, or afterprolonged
storage,itwill onlyacceptan 80%
charge.Afterseveral charge and dischargecycles,the batterywillattainfull
capacity.The batterymaybecome warm while charging;thisis normal and
doesnot indicateaproblem.
/t,
WARNING: Do not charge the battery at ambient
temperatures below 36° F (2°C) or above 104°F (40°C).
Recommended charging temperature: Approximately 75°F (24°C).
Note: Thecharger plugincorporateslock outs topreventthe use ofincorrect
chargers.The plugmust becorrectlyoriented when inserted.
Insert the charger plug into the charger connector at the rear of the
tool (fig. D).
Plug the charger into a 120V outlet. __ ...........................f--
Charge the tool for 16 hours before first use.
For catalog numbers GSL35, GSL75:
The charger indicator light will come on
indicating that the tool is charging. -............"-,
When the chargeiscompletethe lightwillgo out.
For catalog numbers GSN30,GSN32, GSN35: _i_
The charger indicatorlightwill comeon indicating _
thatthe tool ischarging.
The light will stay on as long as the charger is connected to the
tool and pluggedinto a working outlet.
ItWILL NOTflash, or go outwhen the chargingcycle iscomplete.To
maximizethe lifetimeofthe battery,itis recommended to keepthe battery
connectedto the chargerwhenever the toolis not inuse. When thebatteryis
full,the power consumptionofthe charger isnegligible.
Use CAUTION: Let the tool work at its own pace.
DO NOT OVERLOAD.
Switching on and off
± CAUTION.- Bladescoast after turn off.
Switching on "\
-N
Push and hold the lock button(2) (fig.E)
tothe rightorto the leftand thensqueeze
the on/offswitch (1).
Release the lock-off button.
Switching off
Release the on/off switch (1). i
WA RNING"Neverattempttolocktheswitchintheonposition.
Hints for optimum use (figs. F, G, H & I)
T....._.,,.... .C. 0r |ON: Blades coast after turn off.
In order to achieve optimum cutting results, only cut dry grass.
Hold the tool as shown in fig. F & G. Keep your other hand well
away from the blade. Maintain a
stable working position so that you
do not slip. Do not overreach.
When cutting long grass, work in
stages from the top. Take small cuts.
Keep the tool away from hard
objects and delicate plants.
Ifthe tool starts running slowly,
reduce the load.
Tomake acloser cut, slightlytilt thetool.
Spray thebladewith alightcoatingof
general purposeoil beforefirst useand
wheneverthe bladesbeginto lookdry.
Trimming hedges
± CAUTION: Blades coast after turn o.,
Slightly tilt the tool (up to 15° relative to the line of cut) sothat the blade
tips point slightly towards the hedge ,r=_ \f_-. _
(fig.H). This willcause the blades to
cut more effectively.
Start by trimming the top of the hedge. \
Hold the tool at the desired angle and "
move it steadily along the lineof cut.
The double-sided blade allows you to /'
cut in either direction.
Inorder to obtain a very straight cut,
stretch a piece of string along the
length of the hedge at the desired
hei(jht. Use the st-ringas a guide line,
cutting just above it.
Inorder to obtain flat sides, cut upwards with the growth (fig. I).
Younger stems move outwards when the blade cuts downwards,
causing shallow patches in the hedge. A
Take care to avoid any foreign objects. IMp
Especially avoid hard objecfs such as
metal wire and railings, asthese could
damage the blades.
Regularly oil the blades.
Maintenance
Your Black& Deckertool has been
designedto operate overalong periodof
time withaminimum ofmaintenance.
Continuoussatisfactoryoperation depends
uponproper toolcareand regularcleaning.
Yourcharger does notrequireany
maintenanceapartfrom regularcleaning.
±WARNING: Beforeperformingany maintenance onthe
tool, switchoffthe tool. Unplug thecharger beforecJeaningit.
Regularlyclean the ventilationslots inyour toolandcharger using asoft
brush ordry cloth.
Regularlyclean the motor housingusing adamp cloth.Do not use any
abrasive or solvent-basedcleaner.
Afteruse,carefullydeantheblades.Aftercleaning,applyafilmoflight
machineoiltopreventthebladesfromrusting.
Storage
When the tool will not be used for several months, ideally leave the
battery connected to the charger. Otherwise proceed as follows:
Fully charge the battery.
Store the tool in a secure and dry location. The storage temperature
must always remain in the range of 41°F (5°C) to 104°F (40°C).
Beforeusingthe toolafter prolongedstorage,fully charge the batteryagain.
Accessories
Recommended accessories for use with your tool are available from
your local dealer or authorized service center. Ifyou need
assistance regarding accessories, please call: 1-800-544-6986.
'4"WAR N IN G: Theuseofanyaccessorynot
recommended for use with this tool could be
hazardous. O
The RBRC TM Seal
The RBRCTM
Corporatbn) (or
batterypack)indicatesthatthecoststorecyclethebattery(orbatterypack)atthe
endofitsusefullifehavealreadybeenpaidby Black& Decker.Insomeareas,it
isillegaltoplacespent
nickel-cadmiumorlithium-bnbatteriesinthetrashormunicipalsolidwaste
streamandthe RBRCprogramprovidesanenvironmentallyconscious
alternative.RBRCincooperatbnwithBlack& Deckerandotherbatteryusers,
hasestablishedprogramsintheUnitedStatesand Canadatofadlitatethe
collectbnofspentnickel-cadmiumorlithium-bnbatteries.Helpprotectour
environmentandconservenaturalresourcesbyreturningthespentbatteriesto
an authorizedBlack& Deckerservicecenterortoyourbcalretailerforrecycling.
Youmay alsocontactyourlocalrecyclingcenterforinformationonwheretodrop
offthe spentbattery,orcall1-800-8-BATTERY.
Service Information
All Black& DeckerServiceCenters arestaffedwithtrainedpersonnelto
provide customers withefficientandreliablepowertoolservice.Whetheryou
need technicaladvice,repair,or genuinefactoryreplacement parts,contact
the Black & Decker locationnearestyou. Tofindyour localservice location,
refertothe yellowpage directoryunder"Tools-- Electric"or call: 1-800-544-
6986 or visit www.blackanddecker.com
Full Two -Year Home Use Warranty
Black& Decker(U.S.)Inc.warrantsthisproductfortwo yearsagainstanydefects
in materialor workmanship.Thedefectiveproductwillbereplacedor repairedat
no chargeineitheroftwoways:
Thefirst,whichwillresultinexchangesonly,istoreturntheproducttothe retailer
fromwhom itwas purchased(proddedthatthe storeisa .p_icipatingretailer).
Returnsshouldbemadewithinthetimeperiodoftheretailer'spolicyfor
exchanges(usually30to90daysafterthesale).Proofofpurchasemay be
required.Pleasecheckwiththe retailerfortheirspedficreturnpolicyregarding
returnsthatarebeyondthetimesetforexchanges.
Thesecondoptbn istotakeorsendtheproduct(prepaid)toaBlack& Decker
ownedorauthorizedServiceCenterfor repairorreplacementatouroption.Proof
ofpurchasemay berequired.Black&Deckerownedandauthorizedservice
centersarelistedunder'q'oois-Electric"inthe yellowpaqesofthe phone
directory.Thiswarrantydoesnotapplytoaccessories.Thiswarrantygivesyou
specificlegalrightsandyoumay haveotherrightswhichvaryfrornstatetostate.
Shouldyou haveanyquestbns,contactthemanagerofyournearestBlack&
DeckerServiceCenter.This productisnotintendedforcommercialuse.
FREEWARNING LABEL REPLACEMENT: Ifyour warning labelsbecome
illegibleorare missing,call 1-800-544-6986for a free replacement.
Problem
Battery won't charge.
Possible Cause
• Charger not plugged into a working outlet.
or not plugged into shear shrubber.
• Charger plug not fully inserted into tool socket.
• _Surroundlng a_rtemperature too not or too COld.
TROUBLESHOOTING
Possible Solution
Plug charger into a working outlet. Refer to
"Important Charging Notes" for more details.
• Check current at receptacle by plugging in a
lamp or other appliance.
• Check to see if receptacle is connected to a
light switch which turns power off when you turn
out the lights.
• Check to be sure charger plug is fully inserted
into tool charging socket.
• Move charger and tool to a surrounding a_r
temperature of above 40 degree F(4.5°C) or
below 105 degree F (+40.5°C).
For assistance, visit our website www.blackanddecker.com for the location of the service center nearest you or call the BLACK &
DECKER help line at 1-800-544-6986.
Imported by
Black & Decker(U.S.)lnc.,
701E. Joppa Rd.
Towson, MD 21286 U.S.A.
Powered by an
ENERGY STAR_
qualified battery
charger for a
better environment
See 'Tools-Electric' [-_
- Yellow Pages -
for Service & Sales
TIJERAS INALAMBRICAS PARA JARDiN
MANUAL DE INSTRUCCIONES
Gracias por elegir Black & Decker!
Visite
www.Blackand Decker.com/NewOwner
para registrar su nuevo producto.
LEA EL MANUAL ANTES DE DEVOLVER
ESTE PRODUCTO POR CUALQUIER MOTIVO:
SitieneunaconsultaoalgOninconvenienteconsuproductoBlack&
Decker,visite
HTTP:/iWWW.BLACKANDDECKER.COM/INSTANTANSWERS
paraobtenerrespuestasinstanta.neaslas24horasdeldia.
SinoencuentralarespuestaonotieneaccesoaInternet,Ilameal
1-800-544-6986delunesaviernesde8a.m.a5p.m.horadelEstepara
hablarconunagente.
CuandoIlame,tengaamanoelnQmerodecata.logo,
CONSERVE ESTE MANUAL PARA FUTURAS CONSULTAS.
GSN30 /"×"
GSN32 ii,_
GSL35,
GSL75,
GSN35
Cat&logo N° GSL35, GSL75, GSN30,
GSN32, GSN35
16
Cat. No. GSN30, GSN32, GSL35, GSL75, GSN35
Copyright @ 2012 Black & Decker
Form No. 90588154
28
May 2012
Printed in China
  • Page 1 1
  • Page 2 2
  • Page 3 3
  • Page 4 4
  • Page 5 5
  • Page 6 6
  • Page 7 7
  • Page 8 8
  • Page 9 9
  • Page 10 10
  • Page 11 11
  • Page 12 12
  • Page 13 13
  • Page 14 14
  • Page 15 15
  • Page 16 16
  • Page 17 17
  • Page 18 18
  • Page 19 19
  • Page 20 20
  • Page 21 21
  • Page 22 22
  • Page 23 23
  • Page 24 24
  • Page 25 25
  • Page 26 26
  • Page 27 27
  • Page 28 28

Black & Decker GSL35 TYPE 1 Owner's manual

Category
Power tools
Type
Owner's manual
This manual is also suitable for

Ask a question and I''ll find the answer in the document

Finding information in a document is now easier with AI