Page is loading ...


USE AND CARE GUIDE
BISCAYNE OUTDOOR FLOOR LAMP-#32248
Questions, problems, missing parts? Before returning to the store,
call Kenroy Home Customer Service
8 a.m.-6 p.m., EST, Monday-Friday
904-642-4340
THANK YOU
We appreciate the trust and confidence you have placed in Kenroy Home through the purchase of this lamp.
We strive to continually create quality products designed to enhance your home.
Thank you for choosing us!

Table of Contents
Safety Information ....................................................................................................................................... 2
Warranty ...................................................................................................................................................... 2
Pre-Installation ............................................................................................................................................ 3
Planning Installation ............................................................................................................................. 3
Package Contents .................................................................................................................................. 3
Assembly ..............................................................................................................................................4, 5, 6
Care and Cleaning ....................................................................................................................................... 7
Troubleshooting ........................................................................................................................................... 7
Safety Information
□ Consult a qualified electrician with any
electrical questions you may have.
Warranty
1-YEAR LIMITED WARRANTY
WHAT IS COVERED
The manufacturer warrants this lamp to be free from defects in the materials and workmanship for a period of
one (1) year from date of purchase. This warranty applies only to the original consumer purchaser and only to
products used in normal use. If this product is found to be defective, the manufacturer's only obligation, and
your exclusive remedy, is the repair or replacement of the product at the manufacturer's discretion, provided
that the product has not been damaged through misuse, abuse, accident, modifications, alterations, neglect or
mishandling. This warranty shall not apply to any product that is found to have been improperly installed,
assembled, or used in any way not in accordance with the instructions supplied with the product. This
warranty shall not apply to a failure of the product as a result of an accident, misuse, abuse, negligence,
alteration, faulty installation, or any other failure not relating to faulty material or workmanship.
WHAT IS NOT COVERED
This warranty shall not apply to the finish on any portion of the product due to weathering, as this is
considered normal wear. The manufacturer does not warrant and specifically disclaims any warranty, whether
expressed or implied, other than the warranty contained herein. The manufacturer specifically disclaims any
liability and shall not be liable for any consequential or incidental loss or damage, including but not limited
to, any labor or expense costs involved in the replacement or repair of the product.
Contact the Customer Service Team at 904-642-4340.
IMPORTANT: Inspect the wire insulation for
any cuts, abrasions, or exposed copper that may
have occurred during shipping. If there is a
defect in the wire, do not continue the assembly
process. Please call our Customer Service Team
at 904-642-4340.

Pre-Installation
PLANNING INSTALLATION
Read all instructions before assembly.
To avoid damaging this product, assemble it on a soft, non-abrasive surface such as carpet
or cardboard. Inspect each part for defects that may have occurred during shipping.
Keep your receipt and these instructions for proof of purchase.
NOTE: This lamp requires the use of two 120V, 60HZ,
100-Watt max, medium-base type A bulbs (not included).
Do not exceed the recommended wattage.
PACKAGE CONTENTS
A
B
1
D
Upper cage
Glass dome
Shorter shade
C
Ball screw
2
3
1
Part
Description Quantity
H
Lower cage
1
G
1
Metal washer
Part
Description Quantity
F 1
Lower socket assembly
A
B
C
D
E
B
F
G
H
I
J
E
Taller shade
1
J
Nut
1
I
1
Wrench

Assembly instructions
1. Unpack the lamp and assemble shorter shade
2. Install bulb into upper socket
□ Carefully organize and place all parts on a smooth,
flat surface. Take out of the shades from cages,
then remove the plastic bag from the shades. line
up all of the parts according to the assembly
diagram.
□ Place the lower socket assembly (F) into the
shorter shade (D), then place the shorter shade (D)
into upper cage (A), make sure the wire tube in the
upper cage (A) was inserted into the notch of
shorter shade (D) and the lower socket assembly
(F) exits from bottom of the shorter shade (D).
□ Prior to installing the bulb, inspect upper socket for silica packet. If packet is
present, then remove and throw away. Do not expose it to children or pets.
□ Install the 120V, 60HZ, 100-watt max. medium-base type A bulb (not
included) into the upper socket of the light lamp.
NOTE: If LED bulb is used, the LED bulb must be rated for damp locations
and enclosed luminaires.
□ Screw glass dome (B) to the glass dome holder.
A
D
F
B
Bulb (not included)
Upper socket
Glass dome holder

Assembly instructions (continued)
3. Assemble the taller shade
□ Place the taller shade (E) into lower cage (G),
make sure the wire tube in the lower cage (G) was
inserted into the notch of taller shade (E).
□ Insert the nipple of lower socket assembly (F) into
the hole in base and secure with metal washer (H)
and nut (I) from bottom of the base. (Wrench (J)
included)
4. Install bulb into lower socket
□ Prior to installing the bulb, inspect upper socket for
silica packet. If packet is present, then remove and
throw away. Do not expose it to children or pets.
□ Install the 120V, 60HZ, 100-watt max.
medium-base type A bulb (not included) into the
lower socket of the light lamp.
NOTE: If LED bulb is used, the LED bulb must be
rated for damp locations and enclosed luminaires.
□ Screw glass dome (B) to the glass dome holder.
B
E
F
G
H
I
J
Bulb (not included)
Lower socket
Glass dome holder

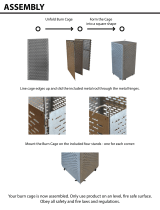
5. Assemble the upper cage to lower cage
□ Lay down the upper cage assembly (A) and lower cage assembly (G) on a
smooth, flat floor, pull the excess power cord through the base.
□ Stand the lower cage assembly (G) on flat floor, place the upper cage
assembly (A) with shorter shade (D) onto top of the lower cage (G), make
sure the shades are inserted into the inner metal ring of upper cage (A).
□ Line up the holes in upper cage (A) with the holes in lower cage (G) and
secure with three ball screws (C).
□ Plug cord into an outlet and push the switch to turn on the light.
Assembly instructions (continued)
G
A
C
Switch
D

Care and Cleaning
□ Clean the lamp with a soft, dry cloth. Do not use any cleaners with chemicals, solvents, or harsh abrasives.
□ Wash the shade with a soft brush and mild detergent (such as dishwashing soap) and then thoroughly
rinsed.
Troubleshooting
Possible Cause
□ The bulb is burned out.
□ The power is off.
□ The circuit breaker is off.
□ There is an exposed wire.
□ There are too many items on
one circuit.
□ Discontinue use of the lamp.
□ Contact a qualified electrician or
call the Customer Service Team at
904-642-4340.
□ Unplug other items on the circuit.
□ Ensure that the circuit breaker
is set in the on position.
□ Ensure that the power supply
is turned on.
□ Replace the light bulb.
Solution
The bulb will not light.
The fuse blows or a
circuit breaker trips when
the light is turned on.
Problem
□ Did not insert plug into power
outlet.
□ Ensure that the plug is fully and
properly inserted into the power
outlet.
Important safety instructions
□ Use only three-wire outdoor extension cords that have three-prong grounding plugs and grounding
receptacles that accept the appliance's plug.
□ Ground fault circuit interrupter (GFCI) protection is to be provided on the circuit or outlet to be used for
the wet location portable luminaire. receptacles are available having built-in gfci protection and are able to be
used for this measure for this measure or safety.
□ use only with an extension cord for outdoor use. such as an extension cord of cord type sw, sw-a. sow,
sow-a, stw, stw-a, stow, stow-a, sjw, sjw-a, sjow, sjow-a, sjtw, sjtw-a, or sjtow, sjtow-a.
NOTE: We recommend bringing in your lamp during winter.
Bulb Replacement
□ Before replacing the bulb, be sure that the glass dome and bulb are cool and lamp is unplugged.
□ Unscrew glass dome and existing bulb from socket, replace with a new bulb, then recover the glass dome,
plug power supply cord back into outlet.

/