Page is loading ...

SKU 817472
UPC 022011617909
Model #18123-000
USE AND CARE GUIDE
BELLEFONT SEMI FLUSH CEILING FIXTURE
Questions, problems, missing parts? Before returning to the store call
Hampton Bay Customer Service
8 a.m. - 6 p.m. EST, Monday-Friday
1-877-527-0313
HAMPTONBAY.COM
We appreciate the trust and confidence you have place in the Hampton Bay through the purchase of this ceiling fixture. We strive to
continually create qulaity products designed to enhance your home. Visit us online to see our full line of products avaialbe for your
home improvement needs. Thank you for choosing Hampton Bay.
Thank You

2
Table of Contents
Table of Contents
.....................................................
2
Safety Information
....................................................
. 2
Warranty
....................................................................
. 2
Pre-Assembly
............................................................
. 2
Planning for Successful
2
Package Contents 3
Assembly
4
Care and Cleaning
6
Troubleshooting
6
Safety Information
WARNING: Inspect the wire insulation for any cuts,
abrasions or exposed copper that may have resulted
during shipping. If there is a defect in the wire, do not
continue the assembly operation. Please call our
Customer Service Team at 1-877-527-0313.
CAUTION: Consult a qualified electrician if you have
any electrical questions.
Warranty
The manufacturer warrants this unit to be free from defects in materials and workmanship for a period of one (1) year from date of
purchase. This warranty applies only to the original consumer purchaser and only to products used in normal use and service. If this
product is found to be defective, the manufacturer’s only obligation, and your exclusive remedy, is the repair or replacement of
the
product at the manufacturer’s discretion, provided that the product has not been damaged through misuse, abuse, accident,
modifications, alterations, neglect or mishandling. This warranty shall not apply to any product that is found to have been improperly
installed, setup, or used in any way not in accordance with the instruction supplied with the product. This warranty shall not apply to a
failure of the product as a result of an accident, misuse, abuse, negligence, alteration, or faulty installation, or any other failure not
relating to faulty material or workmanship. This warranty shall not
apply to the finish on any portion of the product, such as surface
and/or weathering, as this is considered normal wear and tear.
The manufacturer does not warrant and specially disclaims any
warranty, whether express or implied, of fitness for a particular
purpose, other than the warranty contained herein. The manufacturer specifically disclaims any liability and shall not be liable for any
consequential or incidental loss or damage, including but not limited to any labor / expense costs involved in the replacement or repair
of said product.
Contact the Customer Service Team at 1-877-
527-0313 or visit www.hamptonbay.com.
Pre-Assembly
PLANNING FOR SUCCESSFUL
ASSEMBLY
Read all instructions before assembly.
To avoid damaging this product, assemble it on a soft, non-
abrasive surface such as carpet or cardboard.
Keep your receipt and these instructions for proof of purchase.
.................................................
................................................
.............................................................
....................................................
......................................................

HAMPTONBAY.COM
Please contact 1-877-527-0313 for further assistance.
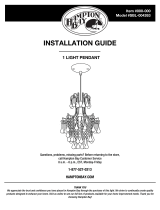
JUNCTION BOX
D1 WIRE
CONNEC
TORS
E
G LAMP BODY
E CANOPY
3
Pre-Assembly (continued)
3
F RETAINING
SCREWS
A MOUNTING
PLATE
CANOPY
A1 MOUNTING
PLATE HOLE
D MOUNTING
SCREWS
GROUND
SCREW
B
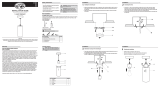
PACKAGE CONTENTS
H GLASS BEAD
DIFFUSER
G LAMP BODY
K THREADED
CAPS
J SCREWS
(not included)
G
H
K
MOUNTING PLATE
1
GROUND SCREW
MOUNTING SCREWS
WIRE CONNECTORS
CANOPY (preassembled)
1
2
3
1
RETAINING SCREWS
2
LAMP BODY
1
GLASS BEAD DIFFUSER
THREADED CAPS
2
1
A
B
D
D1
E
F
Part
Description
Quantity
1/2 INCH

Assembl y
1
2
4
D1 WIRE
CONNEC
TORS
E
G LAMP BODY
E CANOPY
3
F RETAINING
SCREWS
A MOUNTING
PLATE
CANOPY
A1 MOUNTING
PLATE HOLE
D MOUNTING
SCREWS
GROUND
SCREW
B
H GLASS BEAD
DIFFUSER
G LAMP BODY
K THREADED
CAPS
J SCREWS
Carefully unpack your new fixture and lay all parts
on a clean, level surface. Package should contain:
mounting hardware package and fixture assembly
with glass bead diffuser.
Before starting installation of the fixture or removal
of a previous fixture, disconnect
the power by turning off the circuit breaker or by
removing the fuse at the fuse box.
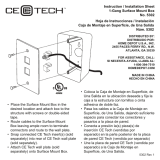
1. Place the Mounting Plate (A) with the Ground Screw (B)
against the Junction Box (C) and secure by threading the
Mounting Screws (D) through the Mounting Plate Holes (A1)
2. Pull the Supply Wires from the Junction Box ((not included) )
through the center hole of the Mounting Plate (A)
3. Make your connections to a 120V AC/60Hz circuit. Attach the
green wire or bare wire from the electrical suppy to the green
or bare wire from the fixture. Attach the black or hot
wire from the electrical supply to the black wire from the fixture
4. NOTE: If a ground wire does not exist in the Jucniton Box ,
connect the fixture ground wire directly to the Ground Screw (B),
located on the Mounting Plate (A). If you have electrical questions,
consult your local electrical code for approved grounding
methods.
5. Secure the wire connections using the Wire Connectors (D1).
Wrap the two wire connections with electrical tape for a more
secure connection.
6.
strands or connections should be present.
Tuck all wires back into the Junction Box (not included). No loose
7. Install the light bulb into the socket on the Canopy and Lamp Body
Assembly (E) and (G). DO NOT EXCEED RECOMMENDED WATTAGE.
Light Bulb not included.
8. Raise the Glass Bead Diffuser (H) into the Canopy and Lamp Body
Assembly (E) and (G) so the 2 screws (J) protrude through the 2 holes
on the Canopy and Lamp Body Assembly (E) and (G).
9. Secure the 2 Screws (J) with the Threaded Caps (K).
10 Raise the completed Canopy and Lamp Body Assembly (E) and (G)
and Glass Bead Diffuser (H) toward the ceiling.
11. Align the 2 holes on the sides of the Canopy and Lamp Body
Assembly (E) and (G) with the 2 holes on the located on the sides
of the Mounting Plate (A).
12. Secure with the two Retaining Screws (F).
13. Restore power at the source and turn light on.
JUNCTION BOX
(not included)

MOC.YABNOTPMAH5
Please contact 1-877-527-0313 for further ass istan ce.
Install a 60 Watt Maximum standard Type B bulb
(sold separately) into the socket

HAMPTONBAY.COM
Please contact 1-877-527-0313 for further assistance.
6

Questions, problems, missing parts? Before returning to the store call
Hampton Bay Customer Service
8 a.m. - 6 p.m., EST, Monday-Friday
1-877-527-0313
HAMPTONBAY.COM
Retain this manual for future use.

HAMPTONBAY.COM
Para obtener asistencia, llama al 1-877-527-0313.
DI CONECTORES DE
CABLE
E
G CUERPO DE LA
LÁMPARA
E CUBIERTA
3
Preensamblado (continuación)
3
F TORNILLOS DE
RETENCIÓN
A PLACA DE MONTAJE
CUBIERTA
A1 ORIFICIO DE LA
PLACA DE MONTAJE
D TORNILLOS
DE MONTAJE
B TORNILLO A TIERRA
CONTENIDO DEL PAQUETE
H DIFUSOR
CON CUENTAS
DE VIDRIO
G CUERPO DE
LA LÁMPARA
K TAPAS
ROSCADAS
J TORNILLOS
G
H
K
PLACA DE MONTAJE
1
TORNILLO A TIERRA
TORNILLOS DE MONTAJE
CONECTORES DE CABLE
CUBIERTA (preensamblado)
1
2
3
1
TORNILLOS DE RETENCIÓN
2
CUERPO DE LA LÁMPARA
1
DIFUSOR CON CUENTAS
DE VIDRIO
TAPAS ROSCADAS
2
1
A
B
D
D1
E
F
Pieza
Descripción
Cantidad
CAJA ELÉCTRICA
(no incluida)
1/2 INCH
/